1. Sarrera
This manual provides detailed instructions for the installation, operation, and maintenance of your GAMEON Midnight I Series Mid Tower Gaming PC Case. Please read this manual thoroughly before beginning installation to ensure proper setup and to maximize the performance and lifespan of your product. Keep this manual for future reference.
2. Segurtasun informazioa
- Always disconnect the power supply from the wall outlet before performing any installation or maintenance inside the PC case.
- Handle the tempered glass panels with care. Tempered glass, while durable, can shatter if dropped or subjected to sharp impacts.
- Avoid exposing the case to extreme temperatures or high humidity.
- Do not attempt to modify the case or its components. Unauthorized modifications may void your warranty and pose safety risks.
- Keep small parts and screws away from children.
3. Paketearen edukia
Mesedez, egiaztatu behean zerrendatutako elementu guztiak zure paketean daudela:
- GAMEON Midnight I Series Mid Tower Gaming PC Case
- 7 x 120mm ARGB PWM Cooling Fans (pre-installed)
- Accessory Box (containing screws, cable ties, and other mounting hardware)
- ARGB/PWM Fan Controller and Remote Control
- Erabiltzailearen eskuliburua (dokumentu hau)
4. Produktua amaitu daview
The GAMEON Midnight I Series PC case is designed for optimal cooling and aesthetic appeal, featuring tempered glass panels and pre-installed ARGB PWM fans.

Figure 4.1: Internal layout of the PC case, highlighting the spacious interior for component installation.

Figure 4.2: Rear and top internal view, illustrating fan placement and overall structure.
4.1 ARGB+PWM Case Fans
The case comes with 7 pre-installed 120mm ARGB PWM fans, providing efficient cooling and customizable lighting. The fans are controlled via an included ARGB/PWM controller and remote.

Figure 4.3: ARGB+PWM fan features and fan mounting support. The front supports 360mm water cooling. Fan mounts include 3x120mm for PSU cover, 3x120mm for bottom, 3x120mm for top, and 1x120mm for rear.
4.2 Aurreko S/I atakak
Aurrealdeko panelak konexiorako ezinbesteko portuetarako sarbide erosoa eskaintzen du.
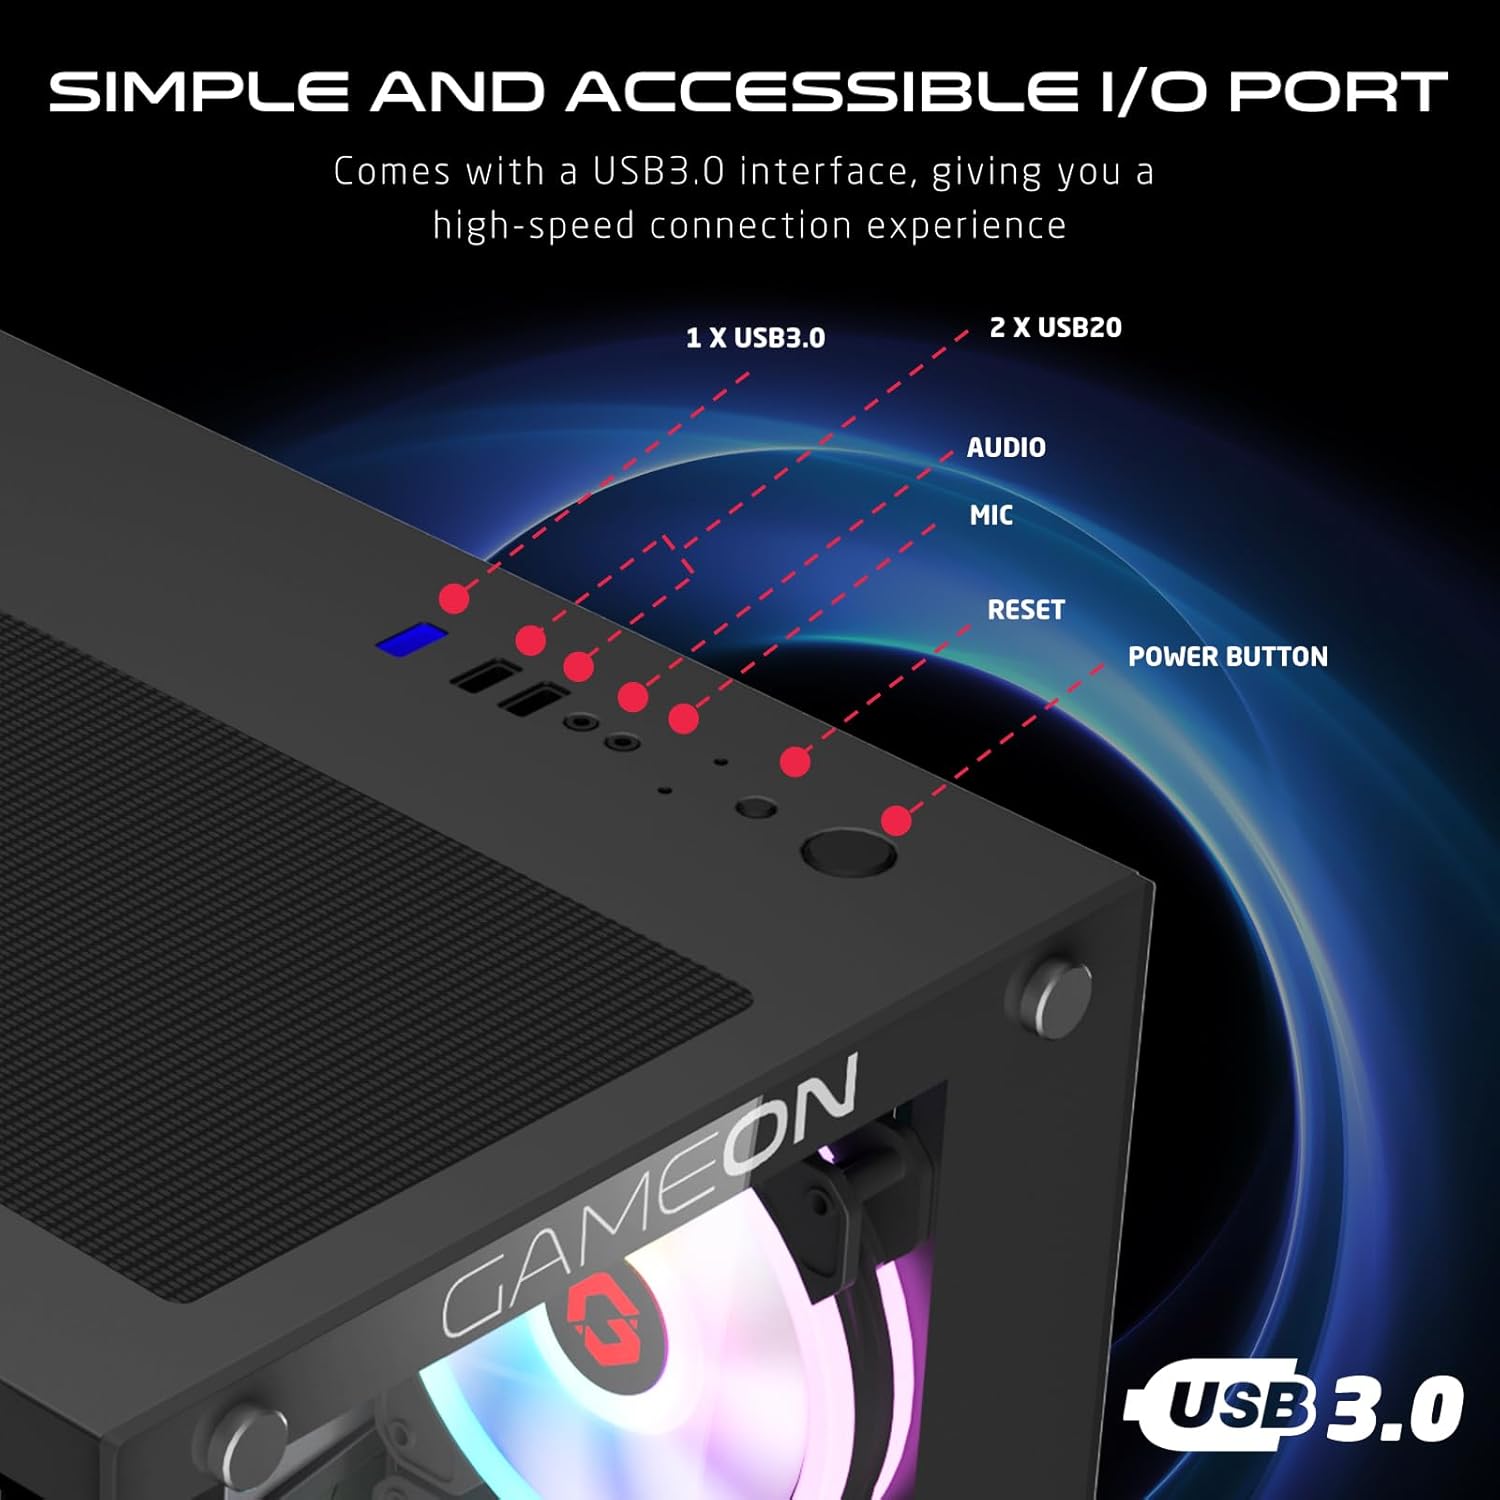
Figure 4.4: Front I/O ports, including 1x USB 3.0, 2x USB 2.0, Audio jack, Microphone jack, Reset button, and Power button.
4.3 Cooling and Construction
The case is designed with an optimized cooling solution, featuring multiple fan mounts and durable tempered glass panels.

Figure 4.5: Optimized cooling solution with massive air intake and exhaust. Features 7 pre-installed fans and durable tempered glass construction.
4.4 Compatibility and Drive Support
The case offers wide compatibility for various motherboard form factors and ample drive bay support.

Figure 4.6: Motherboard compatibility includes ATX, M-ATX, and ITX. Drive bay support for 2x HDD and 2x SSD. Also shown are the front panel header connections.
5. Konfiguratzeko argibideak
Follow these steps to install your components into the GAMEON Midnight I Series PC case.
5.1 Kasua prestatzea
- Jarri zorroa gainazal lau eta egonkor batean.
- Carefully remove the tempered glass side panel(s) by unscrewing the thumb screws and gently sliding the panel off. Set them aside in a safe place.
- Remove any internal packaging materials.
5.2 Plaka amaierako instalazioa
- Install the I/O shield (if not pre-installed on your motherboard) into the rear opening of the case.
- Align your motherboard with the standoffs inside the case. Ensure the standoffs match your motherboard's form factor (ATX, M-ATX, ITX).
- Lotu plaka nagusia emandako torlojuekin.
5.3 Energia hornitzeko unitatea (PSU) instalatzea
- Locate the PSU mounting area at the bottom rear of the case.
- Slide your PSU into position from the rear of the case.
- Secure the PSU with the provided screws.
5.4 Diskoaren instalazioa (HDD/SSD)
The case supports 2x 3.5" HDDs and 2x 2.5" SSDs.
- For 3.5" HDDs: Locate the drive cage, typically near the PSU shroud. Slide the HDD into the drive bay and secure it with screws.
- For 2.5" SSDs: Mount the SSDs to the designated mounting points, usually on the back of the motherboard tray or within the drive cage, using the provided screws.
5.5 Graphics Card and Expansion Card Installation
- Kendu beharrezko PCIe zirrikituen estalkiak kaxaren atzealdetik.
- Insert your graphics card or other expansion cards into the appropriate PCIe slots on your motherboard.
- Txartelak torlojuekin finkatu.
5.6 Kableen kudeaketa
Erabili plaka basearen atzean dauden kableen bideratze-ebakiak eta lotzeko puntuak kableak kudeatzeko. Horrek aire-fluxua eta estetika hobetzen ditu.
5.7 Connecting Front Panel I/O and Fans
- Connect the front panel cables (Power SW, Reset SW, HDD LED, Power LED, USB 3.0, USB 2.0, HD Audio) to their corresponding headers on your motherboard. Refer to your motherboard manual for header locations.
- Ensure the pre-installed ARGB fans are connected to the included ARGB/PWM controller. Connect the controller to a SATA power connector from your PSU and a 3-pin ARGB header (if available) and a 4-pin PWM header on your motherboard for software control, or use the remote for standalone control.
6. Funtzionamendu-argibideak
6.1 Piztu/Itzaltzea
- Osagai guztiak instalatu eta kableak konektatu ondoren, alboko panelak berriro jarri.
- Connect your monitor, keyboard, mouse, and power cable to the PSU.
- Press the Power button on the front panel to turn on your PC.
- To turn off, use the operating system's shutdown function or press and hold the Power button for several seconds.
6.2 ARGB haizagailuaren kontrola
The pre-installed ARGB fans can be controlled in two ways:
- Urruneko kontrola: Use the included remote to cycle through various lighting effects, adjust brightness, and change fan speed.
- Plaka basearen softwarea: If the ARGB controller is connected to a compatible 3-pin ARGB header on your motherboard, you can synchronize lighting effects with your motherboard's RGB software (e.g., ASUS Aura Sync, MSI Mystic Light Sync, ASRock Polychrome RGB, Gigabyte RGB Fusion).
7. Mantentzea
Mantentze-lan erregularrak zure ordenagailuaren kaxaren errendimendu optimoa eta iraupena bermatzen laguntzen du.
7.1 Hauts-iragazkiaren garbiketa
The case includes dust filters to prevent dust buildup. It is recommended to clean them every 1-3 months, depending on your environment.
- Locate the dust filters (e.g., top, bottom, front).
- Iragazkiak astiro-astiro kendu.
- Clean them using compressed air, a soft brush, or by rinsing with water (ensure they are completely dry before re-installing).
- Re-attach the dust filters.
7.2 Garbiketa orokorra
- Erabili biguna, damp cloth to wipe down the exterior surfaces of the case. Avoid abrasive cleaners.
- For tempered glass panels, use a glass cleaner and a microfiber cloth to avoid streaks.
7.3 Haizagailuaren garbiketa
Periodically inspect the fan blades for dust accumulation. Use compressed air to gently clear dust from the fan blades and grilles.
8. Arazoak
If you encounter issues with your PC case, refer to the following common problems and solutions.
8.1 Fans Not Spinning or ARGB Not Working
- Egiaztatu energia-konexioa: Ensure the ARGB/PWM controller is properly connected to a SATA power connector from your PSU.
- Egiaztatu haizagailuaren konexioak: Verify that all fans are securely connected to the ARGB/PWM controller.
- Urruneko kontrolaren bateria: If using the remote, check if its battery needs replacement.
- Plaka basearen softwarea: If using motherboard software for control, ensure the controller is connected to the correct ARGB header and the software is installed and configured correctly.
- Zaleen Zuzendaritza: Ensure fans are oriented correctly for optimal airflow (intake/exhaust).
8.2 Aurreko S/I atakak ez dira funtzionatzen
- Check Motherboard Connections: Ensure all front panel cables (USB 3.0, USB 2.0, HD Audio) are correctly and securely connected to their respective headers on the motherboard. Refer to your motherboard manual.
8.3 PC Not Powering On
- Power Button Connection: Verify the Power SW cable from the front panel is correctly connected to the motherboard's front panel header.
- PSU Connection: Ziurtatu elikadura-iturria behar bezala konektatuta dagoela hormako entxufean eta elikadura-iturriaren etengailua 'ON' posizioan dagoela.
- Internal Power Cables: Check that all necessary power cables (24-pin ATX, CPU, GPU) are securely connected to the motherboard and components.
9. Zehaztapenak
| Ezaugarri | Zehaztapena |
|---|---|
| Ereduaren izena | GO-EMPERORII-M (Midnight I Series) |
| Kasu mota | Mid dorrea |
| Materiala | Beira Tenplatua |
| Kolorea | Beltza |
| Produktuaren neurriak (L x W x H) | 44 x 28 x 42.7 cm |
| Elementuaren pisua | 6.45 kg |
| Plaka amaren euskarria | ATX, Micro ATX, ITX |
| Aurrez instalatutako zaleak | 7 x 120mm ARGB PWM Fans |
| Fan Tamaina | 120 mm |
| Hozteko metodoa | Air, Water (supports up to 360mm radiator in front) |
| Drive Bays | 2 x 3.5" HDD, 2 x 2.5" SSD |
| Aurreko I / O Portuak | 1 x USB 3.0, 2 x USB 2.0, Audio, Mic, Reset, Power |
| Ezaugarri gehigarriak | Dust Filters, ARGB Controller with Remote |
10. Bermea eta Laguntza
This product comes with a standard manufacturer's warranty. For specific warranty terms and conditions, please refer to the documentation provided with your purchase or contact GAMEON customer support. For technical assistance or further inquiries, please visit the official GAMEON webgunea edo jarri harremanetan haien laguntza-kanalekin.