1. Sarrera
Thank you for choosing the novorik 12-inch Double Bevel Compound Sliding Miter Saw. This manual provides essential information for the safe assembly, operation, maintenance, and troubleshooting of your new tool. Please read this manual thoroughly before initial use and keep it for future reference. This miter saw is designed for precise cutting of various materials, including wood, plastic, and soft metals, offering versatility for your woodworking projects.
2. Segurtasun-argibide garrantzitsuak
Always follow basic safety precautions to reduce the risk of fire, electric shock, and personal injury. Failure to follow these instructions may result in serious injury or death.
- Erabili begien babesa: Erabili beti ANSI onartutako segurtasun-betaurrekoak edo alboko babesak dituzten segurtasun-betaurrekoak.
- Entzumen-babesak erabili: Use earplugs or earmuffs during operation to prevent hearing damage.
- Mantendu lan eremua garbi: Gune nahasiek istripuak ekartzen dituzte. Ziurtatu zure lan-eremua ondo argiztatuta dagoela eta oztoporik gabe dagoela.
- Saihestu ingurune arriskutsuak: Ez erabili erreminta elektrikoa damp edo toki hezeak, edo euriaren eraginpean jartzea. Mantendu lan-eremua ondo argiztatuta.
- Utzi haurrak urrun: Bisitari guztiak lan-eremutik segurtasun-distantzia mantendu behar dira.
- Lan-pieza segurua: Beti clamp edo bestela lotu lan-pieza ebaketa-prozesuan mugimendua saihesteko.
- Deskonektatzeko tresna: Disconnect the saw from the power source before making any adjustments, changing accessories, or performing maintenance.
- Erabili pala zuzena: Ensure the saw blade is appropriate for the material being cut and is sharp and undamaged.
- Zaindariak mantendu: Keep all guards in place and in working order. Never operate the saw without guards.
- Avoid Forcing Tool: Allow the saw to cut at its own pace. Forcing it can lead to kickback or damage.
- Oin egokia: Mantendu oin eta oreka egokia uneoro. Ez ezazu gainditzen.
- Ikuskatu tresna: Before each use, check for damaged parts, misalignment, binding of moving parts, breakage of parts, and any other condition that may affect its operation.
3. Produktua amaitu daview eta Osagaiak
Familiarize yourself with the parts of your novorik miter saw before operation.
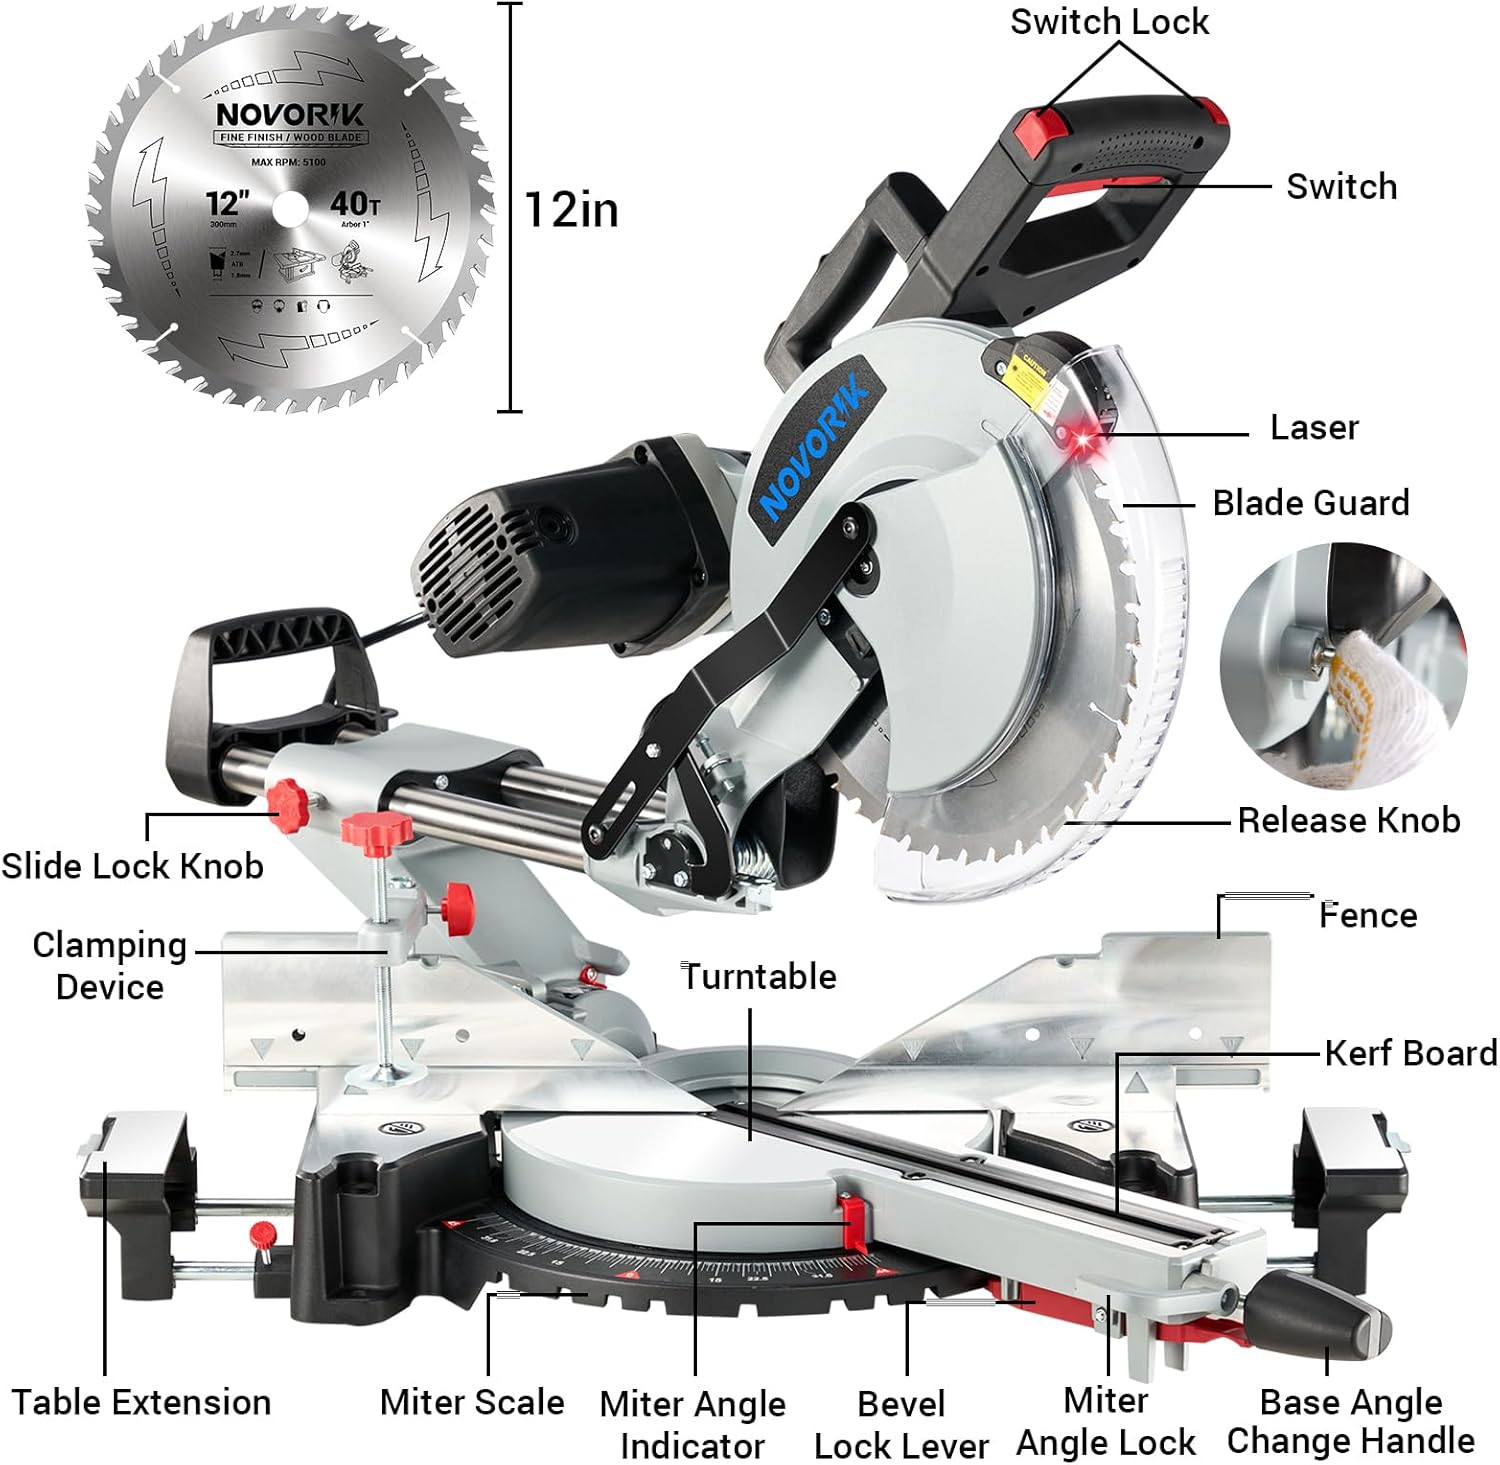
3.1. irudia: Labeled diagram showing key components of the miter saw, including the switch, laser, blade guard, release knob, fence, turntable, miter scale, bevel lock lever, and table extensions.
3.1 Paketearen edukia
Paketatzean, ziurtatu elementu guztiak bertan daudela eta kalterik gabe daudela:
- novorik 12-inch Double Bevel Compound Sliding Miter Saw
- 12-inch TCT Saw Blade (for woodworking)
- Blade Wrench (for blade changes)
- Hautsa poltsa
- Pieza Clamp
- Argibide eskuliburua

3.2. irudia: The novorik 12-inch Double Bevel Compound Sliding Miter Saw, shown with the included 12-inch TCT saw blade.
4. Muntaketa eta Konfigurazioa
4.1 Zerra-xafla instalatzea
Ensure the saw is unplugged from the power source before installing or replacing the blade.
- Raise the blade guard.
- Loosen the guard plate bolt and raise the guard plate.
- Loosen the arbor bolt by turning clockwise and remove the used saw blade (if applicable).
- Place the new saw blade onto the arbor, ensuring the teeth are oriented correctly for cutting.
- Tighten the arbor bolt by turning counter-clockwise.
- Lower the guard plate and tighten the guard plate bolt.
- Jaitsi pala babeslea.

4.1. irudia: Visual guide for replacing the saw blade, detailing the steps from raising the guard to securing the new blade.
4.2 Adjusting Miter Angle
The miter saw allows for precise angle adjustments for miter cuts.
- Askatu inguratze-blokeatzailearen heldulekua.
- Pull up the miter detent lever.
- Move the turntable to the desired angle on the miter scale.
- Push down the miter detent lever to lock into a preset stop, or tighten the miter lock knob for custom angles.

4.2. irudia: Visual instructions for adjusting the miter angle, showing the loosening of the knob, pulling the lever, moving the table, and locking the angle.
4.3 Bevel angelua doitzea
The saw head can be tilted for bevel cuts, with a free bevel range from -45° to 45°.
- Lift up the bevel lock lever.
- Adjust the saw head assembly to the desired angle on the bevel scale.
- Push down the bevel lock lever to secure the saw head in position.

4.3. irudia: Visual instructions for adjusting the bevel angle, illustrating lifting the lever, tilting the saw head, and pushing the lever to lock.

4.4. irudia: Illustration of the saw's dual bevel feature, allowing cuts from -45° to 45° with multiple stops for common angles.
5. Funtzionamendu-argibideak
5.1 Funtzionamendu Orokorra
Before starting, ensure the workpiece is securely clamped and the saw blade is clear of any obstructions. The 15-Amp / 1800W motor provides a no-load speed of 4,000 rpm for efficient cutting.

5.1. irudia: The powerful 15-Amp motor, delivering 4000 RPM for effective cutting.
5.2 Laser Guide for Precision
The integrated laser guide projects a line onto your workpiece, indicating the exact cutting path. This feature assists in making precise and accurate cuts.

5.2. irudia: The laser guide in action, providing a clear visual line for precise cuts on a workpiece.
5.3 Cutting Capacities and Types
The novorik miter saw is capable of various cuts with specific capacities:
- Straight Cuts (90°): 4-1/4" x 13-5/8"
- Max Bevel Cuts: 2-1/4" x 13-3/8"
- Max Miter Cuts: 4-1/4" x 9-3/4"
- Compound Cuts: 2-1/4" x 9-3/4"
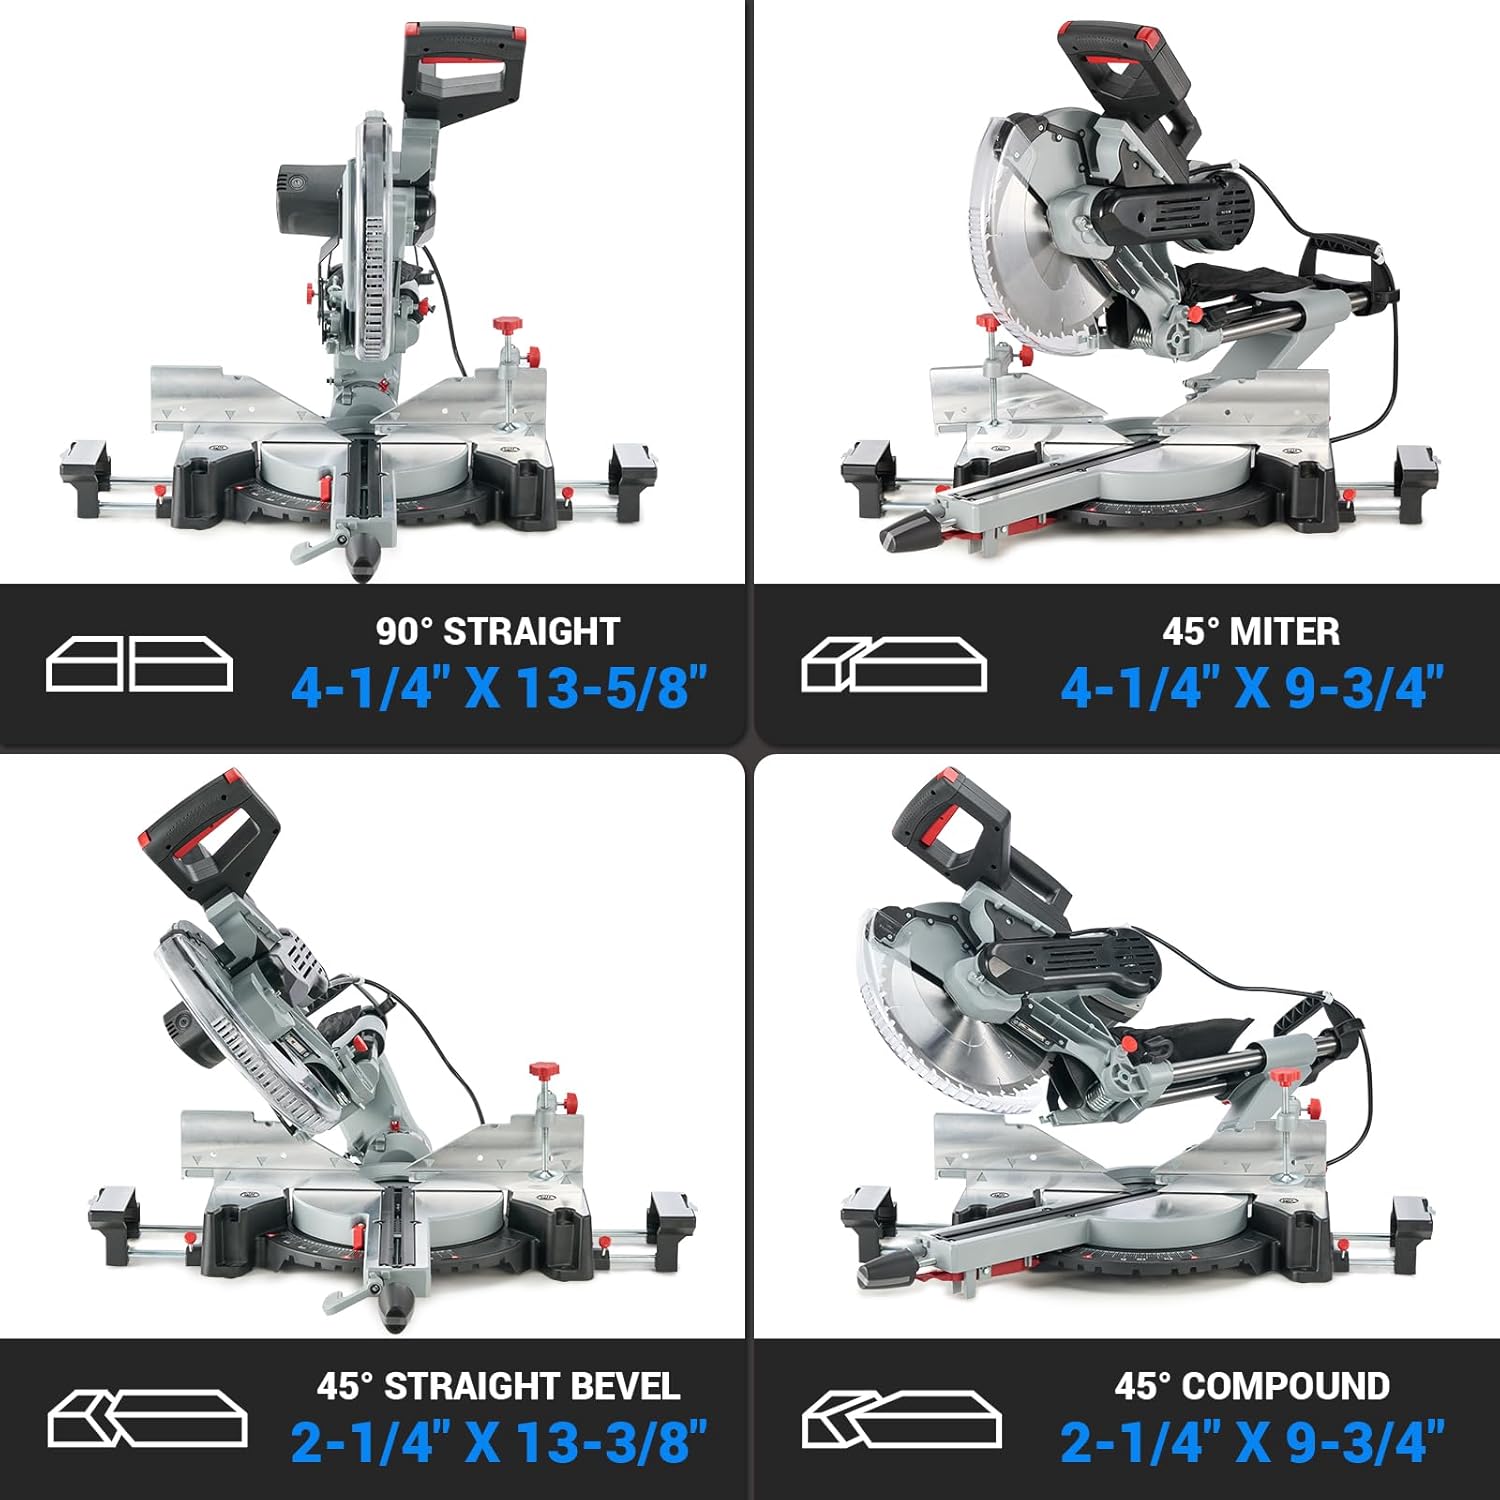
5.3. irudia: Visual representation of the saw's cutting capabilities for straight, miter, bevel, and compound cuts.
5.4 Material bateragarriak
This miter saw is suitable for cutting a variety of materials. The included TCT saw blade is optimized for woodworking.
- Egurra
- Plastikoa
- Soft Metal (with appropriate blade, not included)

5.4. irudia: Examples of materials that can be cut with the miter saw, such as wood, plastic, and soft metals. Note: A different blade may be required for materials other than wood.
6. Mantentzea
Mantentze-lan erregularrak zure inguratzaile-zerraren iraupena eta funtzionamendu segurua bermatzen ditu.
- Garbiketa: After each use, unplug the saw and clean off sawdust and debris from the motor housing, blade guard, and work surface. Use a soft brush or compressed air.
- Hautsa erauztea: Connect a vacuum hose to the dust extraction port to keep your workplace clean and reduce airborne dust. Regularly empty the dust bag if used.
- Palan ikuskatzea: Periodically inspect the saw blade for sharpness, cracks, or missing teeth. Replace dull or damaged blades immediately.
- Zati mugigarriak: Keep all moving parts clean and lightly lubricated as recommended in the full service manual (if applicable).
- Kableen ikuskapena: Egiaztatu korronte-kablea kalterik edo urraturik dagoen. Ordezkatu behar izanez gero.
7. Arazoak
Atal honek aurki ditzakezun arazo ohikoenak jorratzen ditu. Hemen zerrendatzen ez diren arazoetarako, jarri harremanetan bezeroarentzako arreta-zerbitzuarekin.
| Arazoa | Kausa posiblea | Irtenbidea |
|---|---|---|
| Zerra ez da hasten | Ez dago energia-iturririk; etengailu akastuna; motorraren gainkarga. | Check power connection; ensure switch is fully engaged; allow motor to cool down. |
| Ebaki zehaztugabeak | Blade dull or damaged; miter/bevel angle not locked; fence misalignment. | Replace blade; ensure angles are securely locked; check fence alignment. |
| Gehiegizko dardara edo zarata | Loose blade; damaged blade; motor issue. | Tighten blade arbor bolt; replace damaged blade; contact service if motor issue persists. |
| Laser guide not visible | Laser lens dirty; laser module faulty. | Clean laser lens; contact service for replacement if faulty. |
8. Zehaztapenak
| Ezaugarri | Xehetasuna |
|---|---|
| Modelo zenbakia | XQJ001000 |
| Pala Diametroa | 12 hazbete |
| Energia iturria | Kable elektrikoa |
| Motorra | 15 Amp / 1800W |
| Kargarik gabeko Abiadura | 4,000 bira/min |
| liburukiatage | 120 Volt |
| Mitra sorta | -45° to 45° (9 stops) |
| Alaka sorta | -45° to 45° (Dual Bevel) |
| Pala Materiala | Wolframio karburoa (TCT) |
| Produktuaren neurriak | 22"L x 20.4"Z x 38"A |
| Elementuaren pisua | 22 libra (gutxi gorabehera 10 kg) |
| UPC | 731052332879 |
9. Bermea eta Laguntza
This novorik product comes with a Limited Warranty. For specific details regarding warranty coverage, terms, and conditions, please refer to the warranty card included with your product or contact novorik customer support. For technical assistance or service inquiries, please visit the official novorik webwebgunean edo jarri harremanetan bere bezeroarentzako arreta zerbitzuarekin.