1. Sarrera
This manual provides detailed instructions for the setup, operation, maintenance, and troubleshooting of your VIVOSUN GrowCam C4. Please read this manual thoroughly before using the product to ensure proper functionality and safety.

Image 1.1: VIVOSUN GrowCam C4 Smart Camera. This image displays the compact, black VIVOSUN GrowCam C4 with its adjustable stand, designed for monitoring plant growth.
2. Paketearen edukia
Egiaztatu behean zerrendatutako elementu guztiak zure paketean daudela:
- VIVOSUN GrowCam C4 Camera
- Elikatze-kablea (USB-C)
- Korronte egokitzailea (5V 1A)
- Kamera Muntaia
- Torloju kit
- Kokapen eranskailua
- Erabiltzailearen eskuliburua (dokumentu hau)
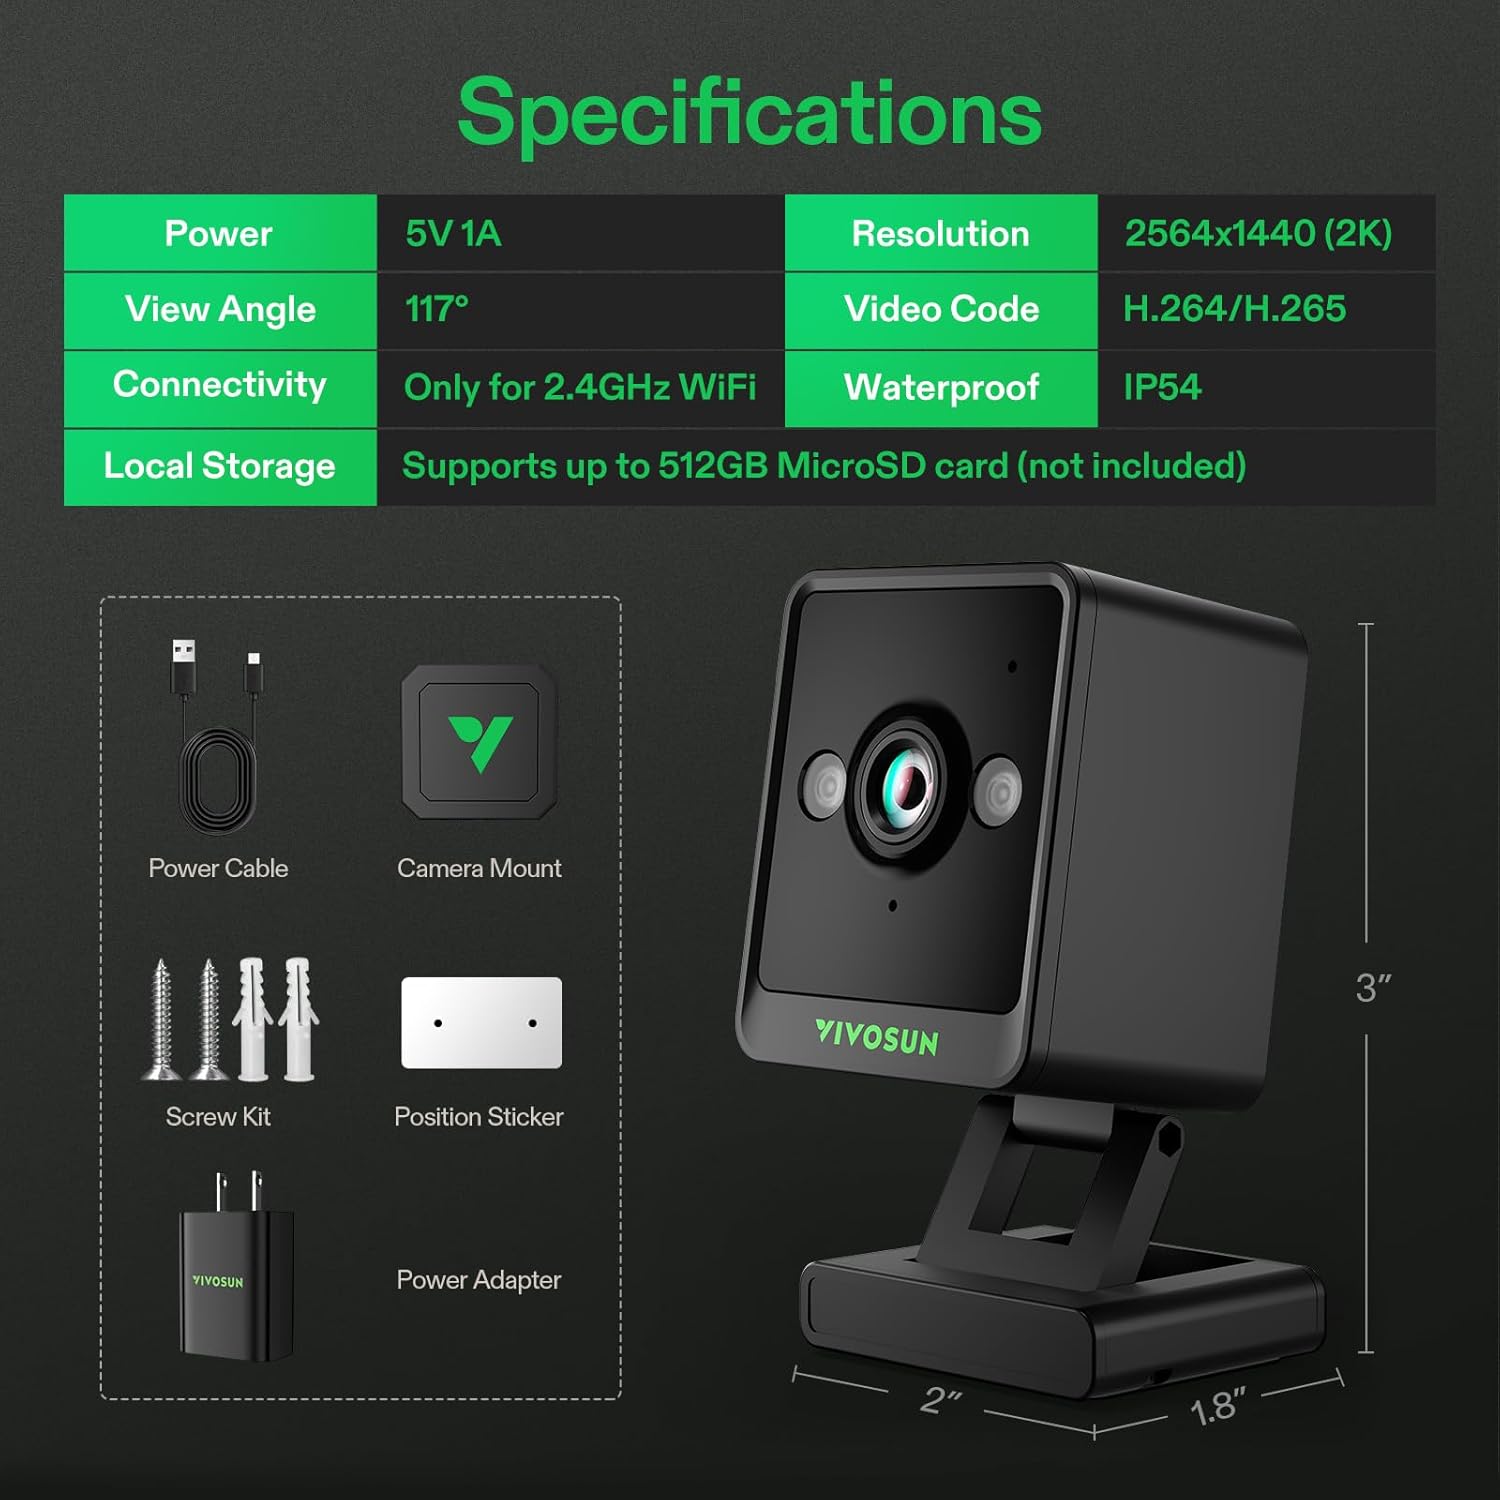
Image 2.1: Contents of the VIVOSUN GrowCam C4 package. This image illustrates the camera, power cable, power adapter, camera mount, screw kit, and position sticker included with the product.
3. Zehaztapenak
| Ezaugarri | Xehetasuna |
|---|---|
| Potentzia Sarrera | 5V 1A |
| Ebazpena | 2564x1440 (2K QHD) |
| View Angelua | 117° |
| Bideokliparen kodea | H.264/H.265 |
| Konektibitatea | 2.4GHz Wi-Fi (Not compatible with 5GHz/6GHz) |
| Iragazgaitzaren balorazioa | IP54 |
| Tokiko biltegiratzea | 512 GB arteko MicroSD txartela onartzen du (ez dago barne) |
| Kontrolagailu mota | Android, iOS (VIVOSUN App) |
| Muntatze Mota | Wall Mount, Magnetic, Pole Clamp, Flat Surface |
| Elementuaren pisua | 9.1 ontza (0.26 kilogramo) |
| Paketearen neurriak | 4.21 x 3.78 x 2.52 hazbete |
| Ezaugarri Berezia | 2-Way Audio, Night Vision, Timelapse |
| Barruko/Kanpoko erabilera | Indoor, Outdoor (protected from direct elements) |

Image 3.1: Detailed specifications for the VIVOSUN GrowCam C4. This graphic presents key technical data such as power, resolution, view angle, connectivity, and storage capabilities.
4. Konfigurazioa
4.1 Aplikazioaren instalazioa eta kontuaren sorrera
- Download the VIVOSUN App from your device's app store (iOS or Android).
- Ireki aplikazioa eta sortu kontu berri bat edo hasi saioa lehendik duzun batekin.
4.2 Gailuen parekatzea
Follow these steps to connect your GrowCam C4 to the VIVOSUN App:
- Open the VIVOSUN App and navigate to the 'My Garden' section.
- Sakatu '+' ikonoa gailu berri bat gehitzeko.
- Select 'GrowCam C4' from the list of available devices.
- Ensure your GrowCam C4 is powered on and in pairing mode. The indicator light should be flashing. If not, press and hold the reset button until it flashes.
- Connect your mobile device to a 2.4GHz Wi-Fi network. The GrowCam C4 only supports 2.4GHz Wi-Fi (not 5GHz or 6GHz networks).
- Enter your 2.4GHz Wi-Fi network password in the app.
- The app will generate a QR code. Position your GrowCam C4 to scan this QR code from your phone screen.
- Once the camera successfully scans the code, it will connect to your Wi-Fi network and pair with the app.

Image 4.1: Step-by-step guide for pairing the GrowCam C4 with the VIVOSUN App. This image illustrates the process from adding a device in the app to scanning the QR code for connection.
4.3 Muntatzeko aukerak
The GrowCam C4 offers versatile mounting options to suit various environments:
- Muntaketa magnetikoa: Utilize the magnetic base (included with VGrow systems) to attach the camera to metallic surfaces.
- Poloa Clamps: Erabili emandako clamps to secure the camera to tent poles or similar structures.
- Torlojuen muntaketa: For permanent installation, use the screw kit to mount the camera to walls or other surfaces.
- Azalera laua kokatzea: The camera can be placed directly on any flat surface using its integrated stand.

Image 4.2: Various mounting methods for the VIVOSUN GrowCam C4. This image demonstrates magnetic mounting, clamping to poles, securing with screws, and placement on flat surfaces.
5. Funtzionamendu-argibideak
5.1 Bizi View eta Jarraipena
Once connected, you can access the live feed of your GrowCam C4 through the VIVOSUN App from anywhere with an internet connection.
- Open the VIVOSUN App and select your GrowCam C4 from the device list.
- The app will display a real-time 2K QHD video feed, allowing for detailed observation of your plants.
- The camera features a specially adjusted lens for grow setups, providing accurate color representation.
- Day/Night mode ensures clear recording 24/7. The camera automatically switches to night vision in low-light conditions without using white LEDs, preventing disturbance to plants.

Image 5.1: The VIVOSUN App interface displaying a live feed from the GrowCam C4. This image shows how users can monitor their plants remotely, with options for sound, microphone, snapshot, and recording.
5.2 Bi norabideko audioa
The GrowCam C4 includes a two-way audio feature:
- Sakatu aplikazioko mikrofonoaren ikonoa kameraren bozgorailutik hitz egiteko.
- Listen to the environment around the camera through the app.

Image 5.2: Illustration of the two-way audio functionality of the GrowCam C4. This image depicts a user interacting with someone near the camera, demonstrating its communication capabilities.
5.3 Grabaketa eta erreprodukzioa
The camera supports continuous recording and event-triggered recording:
- MicroSD txartelaren biltegiratzea: Insert a MicroSD card (up to 512GB, not included) into the camera for local storage of footage. This enables continuous recording without a subscription.
- Erreprodukzioa: Sartu grabatutako footage directly through the VIVOSUN App.
- Aplikazioen alertak: Receive instant notifications on your app for detected events, ensuring timely monitoring.

Image 5.3: The 24/7 recording capability of the GrowCam C4. This image shows the camera monitoring plants within a grow tent, with a smartphone displaying the continuous recording interface.
5.4 Timelapse Function
Capture the growth journey of your plants with the timelapse feature (requires a MicroSD card):
- Configure timelapse settings (intervals, duration) within the VIVOSUN App.
- The camera will compile a video showing your plants' development over time.
- Timelapse videos can be downloaded and shared.

Image 5.4: The timelapse function of the VIVOSUN GrowCam C4. This image illustrates the camera capturing sequential images of plant growth, which are then compiled into a video.
6. Mantentzea
6.1 Kamera garbitzea
- Ziurtatu kamera itzalita eta deskonektatuta dagoela garbitu aurretik.
- Erabili zapi leun eta lehor bat kameraren gorputza garbitzeko.
- For the lens, use a specialized lens cleaning cloth to avoid scratches. Do not use harsh chemicals or abrasive materials.
6.2 MicroSD txartelaren kudeaketa
- Regularly check the storage status of your MicroSD card through the app.
- Format the MicroSD card periodically to maintain optimal performance and prevent data corruption. This can usually be done via the app settings.
- Replace the MicroSD card if it shows signs of degradation or error.
7. Arazoak
| Arazoa | Kausa posiblea | Irtenbidea |
|---|---|---|
| Kamerak ez du Wi-Fira konektatzen. | Incorrect Wi-Fi band, wrong password, weak signal. | Ensure your router is broadcasting a 2.4GHz Wi-Fi signal. The camera does not support 5GHz or 6GHz networks. Verify the Wi-Fi password. Move the camera closer to the router or use a Wi-Fi extender. |
| Ezin view camera feed remotely (outside home network). | Internet connectivity issues, app configuration. | Ensure both your camera and mobile device have stable internet access. Check app permissions and settings for remote access. Restart the camera and router. |
| Camera falls from mounting position. | Improper installation, adhesive failure. | Re-secure the camera using the appropriate mounting method. For magnetic mounts, ensure the surface is clean and the adhesive is strong. Consider using screws for more permanent installations. |
| Camera disappears from app or cannot be re-added. | Device malfunction, app glitch, network change. | Try restarting the camera and the VIVOSUN App. Reset the camera to factory settings (refer to setup section) and attempt to re-pair. Ensure your network settings haven't changed. |
| Timelapse function not working. | No MicroSD card, card full or corrupted. | Insert a compatible MicroSD card. Check if the card has sufficient free space. Format the MicroSD card if necessary. |
| Irudiaren kalitate eskasa. | Lente zikina, argiztapen eskasa, sareko banda-zabalera. | Clean the camera lens. Ensure adequate lighting in the monitored area. Check your internet connection speed. |
8. Bermea eta Laguntza
8.1 Bermearen informazioa
For specific warranty details regarding your VIVOSUN GrowCam C4, please refer to the warranty card included with your product or visit the official VIVOSUN webgunea. Bermearen baldintzak eskualdearen eta saltzailearen arabera alda daitezke.
8.2 Bezeroarentzako laguntza
If you encounter any issues not covered in this manual or require further assistance, please contact VIVOSUN customer support through their official website or the VIVOSUN App. Provide your product model (C4) and a detailed description of the issue for efficient support.