
1. Sarrera
The Drexma WiStat is a programmable WiFi touchscreen thermostat designed for radiant floor heating systems. It offers advanced control and monitoring capabilities through its intuitive interface and mobile application for iOS and Android devices. This thermostat is compatible with both 2.4G and 5G Wi-Fi networks and integrates with popular smart home ecosystems such as Amazon Alexa and Google Assistant. It supports dual-voltage (120V and 240V) floor heating cables and includes built-in Class A GFCI protection for enhanced safety. This manual provides detailed instructions for the proper installation, operation, and maintenance of your WiStat thermostat.
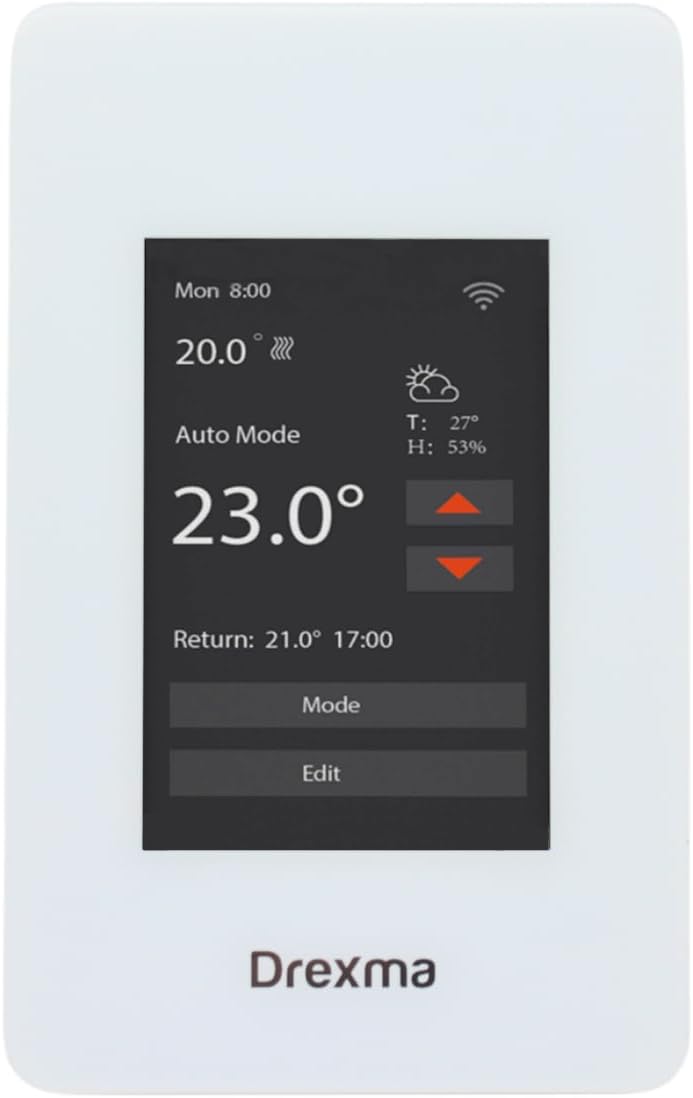
Figure 1: Drexma WiStat Thermostat and Packaging
2. Segurtasun informazioa
OHARRA: Deskarga elektrikoaren arriskua. Installation must be performed by a qualified electrician in accordance with local electrical codes. Disconnect power at the circuit breaker before installing or servicing the thermostat.
- Ensure the power supply is disconnected before any wiring.
- The thermostat is designed for 120V or 240V radiant floor heating systems. Verify your system's voltage instalatu aurretik.
- The built-in Class A GFCI (Ground Fault Circuit Interrupter) provides protection against electrical shock. Test the GFCI regularly as per local regulations.
- Ez jarri termostatoa uraren edo gehiegizko hezetasunaren eraginpean.
- Do not attempt to repair or modify the thermostat. Refer all servicing to qualified personnel.

2. Irudia: Atzealdea view with wiring caution
3. Paketearen edukia
Egiaztatu elementu guztiak paketean daudela:
- Drexma WiStat Thermostat Unit
- Zoruaren Tenperatura-sentsorea
- Muntatzeko torlojuak (normalean barne)
- Erabiltzailearen eskuliburua (dokumentu hau)
4. Konfigurazioa
4.1. Instalazioa
- Deskonektatu energia: Itzali berogailu zirkuituaren korrontea panel elektriko nagusian.
- Muntaketa: Install the thermostat into a standard electrical box. Ensure proper clearance for wiring.
- Kableatua: Connect the thermostat according to the wiring diagram provided in the installation guide (refer to Figure 2 for terminal layout). Ensure correct connections for LINE (power supply), LOAD (heating cables), and the floor sensor. The thermostat supports both 120V and 240V systems.
- Sentsoreen instalazioa: Route the floor temperature sensor cable to the desired location in the floor, ensuring it is properly embedded in the heating area.
- Termostato segurua: Fasten the thermostat to the electrical box using the provided screws.
- Berrezarri boterea: Turn on power at the circuit breaker. The thermostat display should illuminate.

3. irudia: Aldea view termostatoarena
4.2. Hasierako Konfigurazioa
- Upon first power-on, the thermostat will guide you through initial settings such as language (English/French) and temperature units (Celsius/Fahrenheit).
- Jarraitu pantailan agertzen diren argibideei data eta ordua ezartzeko.
4.3. Wi-Fi konexioa
- Deskargatu aplikazioa: Download the Drexma WiStat mobile application from the iOS App Store or Google Play Store.
- Sortu kontua: Ireki aplikazioa eta sortu erabiltzaile-kontu bat.
- Gehitu gailua: Follow the in-app instructions to add your WiStat thermostat. This typically involves putting the thermostat into pairing mode and connecting it to your home's 2.4G or 5G Wi-Fi network.
- Etxe adimendunaren integrazioa: Once connected to Wi-Fi, you can link your thermostat to smart home platforms like Amazon Alexa or Google Assistant through their respective apps.

4. irudia: Aurrealdea view of the thermostat display
5. Funtzionamendu-argibideak
5.1. Ukipen-pantailaren interfazea
The WiStat thermostat features a color touchscreen for easy navigation. Tap icons and menus to access various settings and functions.
5.2. Berokuntza moduak
Select from available heating modes (e.g., Auto, Manual, Away) to suit your comfort and energy-saving preferences. Refer to the on-screen menu for specific mode descriptions.
5.3. Programazioa
Utilize the 7-day programmability feature to create custom heating schedules. This allows you to set different temperatures for various times of the day and days of the week, optimizing comfort and energy consumption.
5.4. Tenperatura Doikuntza
Adjust the desired temperature directly on the touchscreen or through the mobile app. The thermostat can display temperatures in either Fahrenheit or Celsius.
5.5. Child Lock Functionality
Activate the child lock feature through the settings menu to prevent unauthorized changes to the thermostat settings.
5.6. Real-time Weather Reports
The thermostat can display real-time local weather reports, allowing you to anticipate heating needs and adjust settings proactively.

5. irudia: Goikoa view termostatoarena
6. Mantentzea
- Garbiketa: Gently wipe the touchscreen and thermostat body with a soft, damp oihal. Ez erabili garbitzaile edo disolbatzaile urratzailerik.
- GFCI proba: Regularly test the GFCI function as recommended by local electrical codes, typically monthly. Press the TEST button on the thermostat; the heating should turn off. Press the RESET button to restore normal operation.
- Firmware eguneraketak: Ensure your thermostat's firmware is up to date through the mobile application for optimal performance and new features.
7. Arazoak
| Arazoa | Kausa posiblea | Irtenbidea |
|---|---|---|
| Termostatoaren pantaila hutsik dago | No power supply; tripped circuit breaker; incorrect wiring. | Check circuit breaker. Verify wiring connections. Consult a qualified electrician if necessary. |
| Zorutik berorik ez | Thermostat in OFF mode; GFCI tripped; heating cables faulty; temperature set too low. | Ensure thermostat is in an active heating mode. Reset GFCI. Increase set temperature. Consult a professional for heating cable inspection. |
| Wi-Fi konexio arazoak | Incorrect Wi-Fi password; router too far; network interference; 2.4G/5G band conflict. | Re-enter Wi-Fi password. Move router closer or use a Wi-Fi extender. Ensure your router supports 2.4G or 5G and the thermostat is connecting to the correct band. Restart router and thermostat. |
| Tenperaturaren irakurketa okerrak | Zoruko sentsorea ez dago behar bezala instalatuta edo hondatuta. | Verify floor sensor placement. If damaged, replace the sensor. |
| Thermostat unresponsive | Softwarearen aldi baterako akatsa. | Perform a soft reset by turning off power at the circuit breaker for 30 seconds, then restoring power. |
8. Zehaztapenak
| Ezaugarri | Xehetasuna |
|---|---|
| Marka | Drexma |
| Ereduaren izena | DREXMA-WiStat |
| Kontrolagailu mota | WiFi programagarria |
| Ezaugarri Berezia | Ukipen-pantaila |
| Kolorea | Zuria |
| Produkturako erabilera espezifikoak | Solairuaren Berogailua |
| liburukiatage | 120 voltio, 240 voltio |
| Forma | Laukizuzena |
| Kontrol mota | Ukitu |
| Kontrol-metodoa | Aplikazioa |
| Produktuaren Ezaugarriak | Ukipen-pantaila |
| Konektibitate-protokoloa | Wi-Fi (2.4G and 5G compatible) |
| Atzeko argia | Bai |
| Produktu Estiloa | Modernoa |
| Modelo zenbakia | DREXMA-WiStat |
| UPC | 659460138640 |
| Fabrikatzailea | Drexma |
| Jatorrizko Herrialdea | AEB |
| ASIN | B0D9KPCW36 |
| GTIN | 659460138640 |
9. Bermea
As per the product information, this Drexma WiStat Thermostat is sold without a manufacturer's warranty. Please refer to your retailer's return policy for any issues.
10. Laguntza
For technical assistance or further inquiries regarding your Drexma WiStat Thermostat, please refer to the support section within the Drexma WiStat mobile application or visit the manufacturer's official webharremanetarako informazioa lortzeko gunea.