1. Sarrera
Eskerrik asko erosketagatik.asing the Sony DCR-DVD650 DVD Handycam Camcorder. This manual provides essential information for the safe and efficient operation of your device. Please read it thoroughly before use and retain it for future reference.
The DCR-DVD650 features a 1/6-inch Advanced HAD CCD imager, a Carl Zeiss Vario-Tessar lens with 40x optical zoom, a 2.5-inch touch-panel SwivelScreen LCD, and Super SteadyShot Image Stabilization for clear NTSC recording directly to DVD-R/-RW/+RW and +R DL (Dual Layer) discs.
2. Segurtasun informazioa
Beti jarraitu oinarrizko segurtasun neurriak produktu hau erabiltzean, sute, deskarga elektriko eta pertsonen lesio arriskua murrizteko.
- Energia iturria: Erabili zehaztutako korronte-egokitzailea eta bateria-paketea soilik.
- Ura eta hezetasuna: Ez jarri bideo-kamera euri edo hezetasunaren eraginpean.
- Beroa: Keep the camcorder away from heat sources such as radiators, heat registers, stoves, or other products that produce heat.
- Zerbitzua: Ez saiatu produktu hau zuk zeuk ematen. Bidali zerbitzu guztiak zerbitzu kualifikatuko langileengana.
- Bateriaren maneiua: Handle batteries with care. Improper use may result in fire, explosion, or other hazards.
3. Hasteko
3.1 Kutxa irekitzea eta edukia
Egiaztatu elementu guztiak paketean daudela:
- Sony DCR-DVD650 Camcorder
- AC egokigailua
- Bateria kargagarria
- A/V Connecting Cable
- USB kablea
- Application Software CD-ROM (if included)
3.2 Bateria kargatzea
Before first use, fully charge the supplied rechargeable battery pack. Connect the AC adaptor to the camcorder and a wall outlet. The CHARGE lamp kargatzen ari den bitartean piztuko da eta amaitutakoan itzali egingo da.
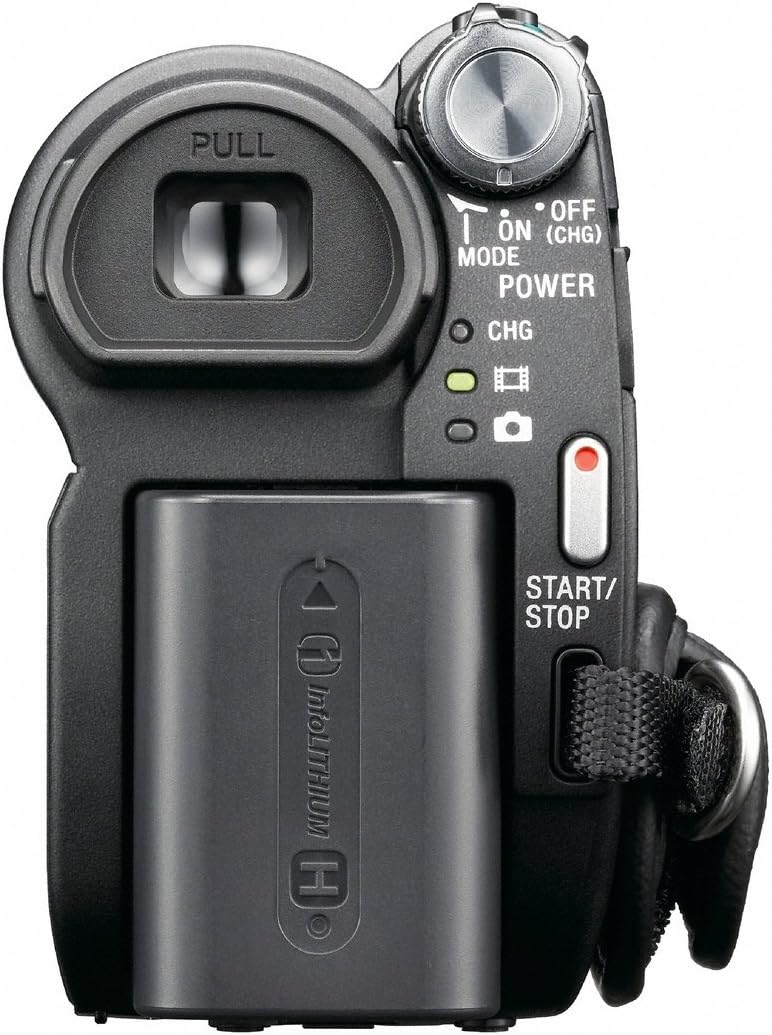
To attach/detach the battery: Slide the battery pack into the battery compartment until it clicks into place. To remove, press the BATT release lever and slide the battery out.
4. Hasierako konfigurazioa
4.1 Piztu/Itzaltzea
To power on the camcorder, open the LCD screen or pull out the viewfinder. To power off, close the LCD screen and push in the viewbilatzailea.

4.2 Data eta ordua ezartzea
Upon first power-on or after the battery has been fully depleted, you may need to set the date and time. Use the touch-panel LCD to navigate to the menu and adjust these settings.
4.3 Inserting a DVD
Open the DVD compartment cover. Insert a compatible DVD-R/-RW/+RW or +R DL disc with the recording side facing the lens. Close the cover firmly until it clicks.

4.4 Inserting a Memory Stick
The camcorder supports Memory Stick media for still image recording. Locate the Memory Stick slot, usually behind the LCD screen, and insert the card until it clicks.
5. Bideo-kameraren funtzionamendua
5.1 Bideoa grabatzea
With a formatted DVD inserted and the camcorder powered on, press the START/STOP button (usually located at the back or on the hand strap) to begin recording. Press it again to stop.
5.2 Zooma erabiltzea
Use the zoom lever (W/T) to zoom in (T) or zoom out (W). The DCR-DVD650 features a 40x optical zoom and up to 2000x digital zoom.
5.3 Image Stabilization (Super SteadyShot)
The Super SteadyShot Image Stabilization feature helps reduce blur caused by camera shake. This feature is typically active by default or can be toggled via the menu.
5.4 Erreprodukzioa
To play back recorded video, switch the camcorder to PLAY/EDIT mode (if available) or select the playback option from the menu. Use the touch-panel LCD to select and play your recordings.
Bideoa: A demonstration of the Sony DCR-DVD610 Camcorder, which shares many operational similarities with the DCR-DVD650. The video showcases the pop-out screen, battery compartment, and DVD loading mechanism.
6. Media Management
6.1 One Touch Disc Burn
The camcorder supports One Touch Disc Burn, allowing you to easily finalize and burn your recordings to a DVD for playback on compatible DVD players.
6.2 Transferentzia Files
Connect the camcorder to a computer using the supplied USB 2.0 interface cable to transfer videos and still images from the DVD or Memory Stick.
7. Beste gailu batzuetara konektatzea
- USBa: Use the USB cable to connect to a computer for data transfer.
- A/V kablea: Connect the A/V connecting cable to a television or monitor to view your recordings directly from the camcorder.
8. Mantentzea
- Garbiketa: Use a soft, dry cloth to clean the camcorder body. For the lens, use a lens cleaning cloth and specialized lens cleaning fluid.
- Biltegiratzea: Store the camcorder in a cool, dry place away from direct sunlight and extreme temperatures. Remove the battery pack if storing for extended periods.
9. Arazoak
| Arazoa | Balizko Kausa / Irtenbidea |
|---|---|
| Bideokamerak ez du pizten. | Bateria agortuta dago edo ez dago behar bezala sartuta. Ziurtatu bateria kargatuta eta behar bezala sartuta dagoela. |
| Ezin da bideoa grabatu. | No DVD inserted, DVD is full, or DVD is not finalized. Insert a new, formatted DVD. |
| Image is blurry or shaky. | Ensure Super SteadyShot is enabled. Check lens for smudges. |
| Ezin da transferitu files ordenagailura. | Ensure USB cable is connected correctly. Install necessary drivers/software (if applicable). |
10. Zehaztapenak
- Eredua: DCR-DVD650
- Irudigilea: 1/6-inch Advanced HAD CCD
- Lentea: Carl Zeiss Vario-Tessar
- Zoom optikoa: 40x
- Zoom digitala: 2000x
- LCD pantaila: 2.5-inch touch-panel SwivelScreen
- Irudiaren egonkortzea: Super SteadyShot
- Grabaketa euskarria: DVD-R/-RW/+RW, +R DL, Memory Stick
- Bideoa ateratzeko ebazpena: 480p
- Konektibitatea: USB 2.0
- Neurriak: 7.6 x 6.3 x 4.7 hazbete
- Pisua: 2.65 kilo
11. Bermea eta Laguntza
For warranty information and customer support, please refer to the documentation included with your purchase or visit the official Sony support website. As this is a renewed product, specific warranty terms may vary; please consult your retailer for details.