ERY-100
Machinist MR9A PRO MAX X99 Motherboard User Manual
Model: ERY-100
1. Sarrera
Welcome to the user manual for the Machinist MR9A PRO MAX X99 Motherboard. This guide provides detailed instructions for installing, operating, maintaining, and troubleshooting your motherboard. Please read this manual thoroughly before beginning installation to ensure proper setup and optimal performance.
The Machinist MR9A PRO MAX X99 is designed to support LGA 2011-3 Intel Xeon E5 V3&V4 CPU Processors and DDR4 RAM Memory, offering robust performance for various computing needs.
2. Produktua amaitu daview
2.1 Ezaugarri nagusiak
- LGA 2011-3 Socket for Intel Xeon E5 V3&V4 Processors
- DDR4 RAM Memory Support (Four Channel)
- NVME M.2 SSD Support
- USB 3.0 Connectivity
2.2 Motherboard Layout and Components
Ezagutu plaka baseko osagai eta konektore desberdinak.

Figure 2.2.1: Detailed layout of the Machinist MR9A PRO MAX X99 Motherboard, highlighting key connectors such as CPU fan headers, power connectors (24PIN DC, 8PIN DC), DDR4 RAM slots, SATA ports, M.2 slots (SATA M.2, NVME M.2, WIFI M.2), USB 2.0 and 3.0 headers, PCIe slots, audio headers, and diagnostic card display.
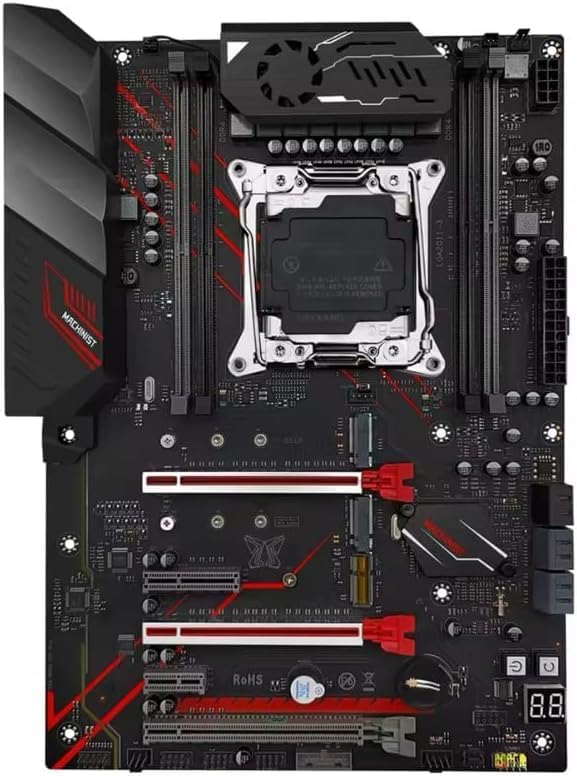
2.2.2. irudia: Goitik behera view of the Machinist MR9A PRO MAX X99 Motherboard, showcasing its overall design and component placement.
2.3 Neurriak

Figure 2.3.1: Dimensions of the Machinist MR9A PRO MAX X99 Motherboard, measuring approximately 300mm in length and 215mm in width.
2.4 Osagarriak

Figure 2.4.1: Standard accessories included with the motherboard, typically a CPU fan bracket with screws and a SATA data cable.
3. Zehaztapenak
| Ezaugarri | Zehaztapena |
|---|---|
| Fabrikatzailea | MAKINATZAILEA |
| Modelo zenbakia | ERY-100 |
| CPU Socketa | LGA 2011-3 (Note: Product page lists LGA 1700, but title/description confirm LGA 2011-3 for Xeon E5 V3&V4) |
| Prozesadore bateragarriak | Intel Xeon E5 V3&V4 Series |
| RAM Memoria Teknologia | DDR4 |
| RAM memoriaren gehienezko tamaina | 64 GB |
| Memoria zirrikituak eskuragarri | 4 (Four Channel) |
| Txip mota | X99 (Note: Product page lists Intel B760, but title/description confirm X99) |
| Biltegiratze Interfazea | SATA, NVME M.2 |
| USB atakak | USB 3.0, USB 2.0 |
4. Konfiguratzeko argibideak
4.1 Hasi aurretik
- Ensure you have all necessary components: CPU, CPU cooler, RAM, storage devices (SSD/HDD), power supply, and a compatible PC case.
- Work on a clean, flat, and static-free surface. Use an anti-static wrist strap or frequently touch a grounded metal object to discharge static electricity.
- Muntatzeko argibide zehatzak lortzeko, jo zure ordenagailuaren kaxaren eskuliburura.
4.2 Plaka amaierako instalazioa
- Prestatu kasua: Install the I/O shield into the rear opening of your PC case. Install standoffs in the case according to the motherboard's mounting holes.
- Instalatu CPUa: Open the CPU socket retention lever. Carefully align the CPU with the socket, ensuring the golden triangle on the CPU matches the triangle on the socket. Gently place the CPU into the socket without forcing it. Close the retention lever to secure the CPU.
- CPU hozkailua instalatu: Apply thermal paste to the CPU if not pre-applied on the cooler. Mount the CPU cooler according to its instructions, ensuring it is securely fastened and makes good contact with the CPU. Connect the CPU fan cable to the 'CPU_FAN' header on the motherboard.
- RAM memoria instalatu: Open the clips on the DDR4 memory slots. Align the RAM module with the slot, ensuring the notch on the module matches the key in the slot. Press down firmly on both ends of the module until the clips snap into place. For optimal performance, install RAM in the recommended dual-channel or quad-channel configuration as per the motherboard's silkscreen or manual.
- Biltegiratze gailuak instalatu:
- M.2 SSD: Insert the M.2 SSD into the appropriate M.2 slot (NVME M.2 or SATA M.2) at an angle, then gently push it down and secure it with the provided screw.
- SATA unitateak: Connect SATA data cables from your SSDs/HDDs to the SATA ports on the motherboard.
- Muntatu plaka basea: Carefully place the motherboard into the PC case, aligning the screw holes with the installed standoffs. Secure the motherboard with screws.
- Konektatu elikadura iturria: Connect the 24-pin ATX power cable from your power supply to the main 24-pin power connector on the motherboard. Connect the 8-pin (or 4+4-pin) CPU power cable to the 8-pin CPU power connector. Connect SATA power cables to your storage drives.
- Konektatu aurrealdeko paneleko kableak: Connect the power button, reset button, HDD LED, power LED, and USB/audio headers from your PC case to the corresponding pins on the motherboard's front panel header. Refer to the motherboard layout diagram (Figure 2.2.1) for pin locations.
- Hedapen-txartelak instalatu: Sartu grafiko-txartelak edo beste PCIe hedapen-txartelak dagokien PCIe zirrikituetan eta finkatu itzazu kaxaren atxikipen-mekanismoarekin.
5. Plaka basearen funtzionamendua
5.1 Lehenengo abiaraztea eta BIOS/UEFI konfigurazioa
After completing the hardware installation, connect your monitor, keyboard, and mouse. Power on your system.
- Abiarazteko prozesuan zehar, sakatu behin eta berriz tekla DEL or F2 key (or as indicated on screen) to enter the BIOS/UEFI setup utility.
- In the BIOS/UEFI, you can configure boot order, system time, fan speeds, and other hardware settings. Ensure your storage drive is recognized and set as the primary boot device for OS installation.
- Gorde aldaketak eta irten BIOS/UEFI-tik. Sistema berrabiaraziko da.
5.2 Sistema eragilearen eta kontrolatzaileen instalazioa
- Insert your operating system installation media (USB drive or DVD) and follow the on-screen prompts to install your preferred OS.
- After OS installation, install the necessary drivers for your motherboard's components (chipset, LAN, audio, USB, etc.). These drivers are typically available on the manufacturer's website or included on a driver CD/USB drive with the motherboard.
- Regularly check the Machinist official website for the latest driver updates and BIOS/UEFI versions to ensure system stability and performance.
6. Mantentzea
Proper maintenance can extend the lifespan of your motherboard and ensure stable operation.
- Hautsa kentzea: Aldian-aldian, garbitu hautsa plaka nagusitik eta osagaietatik aire konprimitua erabiliz. Ziurtatu sistema itzalita eta deskonektatuta dagoela garbitu aurretik.
- BIOS/UEFI eguneraketak: Update your BIOS/UEFI only when necessary, following the manufacturer's instructions carefully. Incorrect updates can damage the motherboard.
- Gidarien eguneraketak: Keep your drivers updated to ensure compatibility and optimal performance with new software and hardware.
- Kableen kudeaketa: Ensure cables inside the case are neatly routed to improve airflow and prevent obstruction.
7. Arazoak
Atal honek aurki ditzakezun arazo ohikoenei irtenbideak eskaintzen ditu.
| Arazoa | Kausa posiblea | Irtenbidea |
|---|---|---|
| Sistema ez da pizten. | Kable solteak, elikatze-iturri akastuna, aurrealdeko paneleko konexio okerrak. | Check 24-pin and 8-pin power connections. Ensure power supply switch is ON. Verify front panel power button connection. Test with a known good power supply if possible. |
| Ez da pantailarik ageri monitorearen gainean. | Graphics card not seated properly, monitor cable loose, faulty RAM. | Reseat graphics card. Check monitor cable connections. Try reseating RAM modules or testing with one module at a time. |
| System powers on but no POST (Power-On Self-Test). | CPU not seated correctly, RAM issues, short circuit. | Reseat CPU and check for bent pins. Reseat RAM. Remove all non-essential components and test. Check for any loose screws or components touching the motherboard. |
| Sistema eragilea ez da detektatu. | Incorrect boot order, faulty storage drive, loose SATA/M.2 cable. | Check BIOS/UEFI boot order. Ensure storage drive is properly connected. Test storage drive on another system if possible. |
| Sistemak huts egiten du edo izozten da. | Gehiegi berotzea, overclock ezegonkorra, RAM akastuna, kontrolatzaile zaharkituak. | Monitor temperatures. Reset BIOS/UEFI to default settings. Run memory diagnostic tests. Update drivers. |
8. Bermea eta Laguntza
For specific warranty information regarding your Machinist MR9A PRO MAX X99 Motherboard, please refer to the warranty card included with your product or visit the official Machinist webgunea. Bermearen baldintzak eta zehaztapenak eskualdearen eta saltzailearen arabera alda daitezke.
For technical support, driver downloads, and BIOS/UEFI updates, please visit the official Machinist support webgunea. Zure saltzailearekin ere harremanetan jar zaitezke laguntza eskatzeko.
Erlazionatutako dokumentuak - ERY-100
 |
Cooler Master NCORE 100 MAX Build Guide A comprehensive build guide for the Cooler Master NCORE 100 MAX computer case, detailing installation steps for components like the motherboard, CPU block, GPU, and SSDs, along with specifications and warranty information. |
 |
Thermalright SI-100 Serieko CPU Hozkailuaren Instalazio Gida Thermalright SI-100 serieko CPU hozkailuaren instalazio gida, piezen xehetasunak eta Intel LGA115X, 1200, 1700, 20XX eta AMD AM4 socket-etarako urratsez urrats argibideak. |
 |
Intel® Software Guard Extensions Platform Software for Windows* OS Release Notes Official release notes for Intel® Software Guard Extensions (SGX) Platform Software (PSW) for Windows* OS. This document details version updates, new features, bug fixes, system requirements, known issues, and legal information for Intel SGX PSW. |
 |
Kendall Howard Training Table CPU Holder Installation and Assembly Instructions Comprehensive installation and assembly guide for Kendall Howard Training Table CPU Holders (Part Numbers 5500-3-100-04, 5500-3-100, 5500-3-100-08), including tools needed, parts included, safety, support, and warranty information. |
 |
SOYO SY-D6IGA Motherboard User's Guide and Technical Reference Comprehensive user guide and technical reference for the SOYO SY-D6IGA Motherboard. Details hardware setup, BIOS configuration, driver installation, and features for Pentium II/III Xeon processors, Ultra2 SCSI, and 10/100 Mbps LAN. |
 |
MacBook Pro 16" 2019ko desmuntaketa: Barruko begirada zehatza Arakatu 2019ko MacBook Pro 16 hazbetekoaren barne osagaiak eta diseinua iFixit-en desmuntaketa gida oso honekin. Ikasi bere teklatu, bozgorailu eta sistema termiko berriari buruz. |