1. Sarrera
This user manual provides comprehensive instructions for the safe and efficient operation, installation, and maintenance of your XWJNE 4000W Pure Sine Wave Power Inverter. This device is designed to convert 48V DC power from batteries into 120V AC power, suitable for a wide range of applications including home, RV, truck, and off-grid solar power systems. Please read this manual thoroughly before using the inverter to ensure proper functionality and to prevent damage to the unit or connected appliances.

Image: The XWJNE 4000W Pure Sine Wave Power Inverter, showcasing its main unit, heavy-duty battery cables (red for positive, black for negative), and the remote control display unit.
2. Segurtasun-argibideak
Always observe the following safety precautions to prevent personal injury or damage to the inverter and connected equipment:
- Ensure the inverter is installed in a well-ventilated area, away from direct sunlight, heat sources, and flammable materials.
- Ez jarri inbertsoreari uraren, euriaren edo gehiegizko hezetasunaren eraginpean.
- Connect the inverter only to a 48V DC power source. Connecting to an incorrect voltage kalteak eragingo ditu.
- Ensure all connections are tight and secure to prevent loose connections that can cause overheating or sparks.
- Do not operate the inverter if it has been dropped or damaged.
- Mantendu haurrak inbertsoretik eta haren konexioetatik urrun.
- Always disconnect the battery before performing any maintenance or cleaning.
- The inverter generates high voltage AC power; treat it with extreme caution.
- Do not attempt to disassemble or modify the inverter. Refer all servicing to qualified personnel.
- Ensure the total power consumption of connected appliances does not exceed the inverter's rated output (4000W continuous, 8000W peak).

Irudia: Barneko bat view of the inverter highlighting its six safety protection functions: low-voltage protection, output short circuit protection, overvoltage protection, overpower protection, load shock protection, and overtemperature protection.
3. Paketearen edukia
Egiaztatu elementu guztiak paketean daudela:
- XWJNE 4000W Pure Sine Wave Power Inverter
- Car Battery Cables (2.62ft 7AWG positive and negative)
- Remote Controller (with 16.4ft cable)
- Argibide eskuliburua
- Giltza
- Ground Wire (1.64ft)
- Fuses (7 x 40A 32V)

Image: A visual representation of the XWJNE 4000W inverter and its complete set of accessories, including the remote control, battery cables, ground wire, fuses, and a wrench, along with product dimensions.
4. Produktuaren ezaugarriak
- Potentzia handiko irteera: Provides a stable 4000W continuous power output (8000W peak) from 48V DC to 120V AC.
- Uhin Sinusoidal Puruaren Teknologia: Delivers clean, stable power comparable to utility grid electricity, suitable for sensitive electronics like laptops, lights, TVs, refrigerators, and stereos, ensuring quiet operation without humming sounds.
- Babes integrala: Equipped with 6 types of protection: undervoltage, gainvoltage, overload, over-temperature, short circuit, and reverse connection protection for enhanced safety.
- LED Display & Remote Control: Features an LED screen for real-time status monitoring and a remote controller with a 16.4ft cable for convenient operation in various settings.
- Irteera hainbat ataka: Includes 2 x 120V AC output ports, 1 x USB port (5V 2.4A), and 1 x AC terminal board.
- Eraikuntza iraunkorra: Built with aluminum and plastic for a sturdy structure that protects against impacts and aids in heat dissipation.
- Hozte Sistema Adimenduna: Integrated smart fans automatically activate when the internal temperature is too high or load reaches half capacity, ensuring optimal operating conditions and low noise.

Image: A diagram illustrating the smooth, consistent waveform of a pure sine wave compared to a modified sine wave, emphasizing the inverter's >90% conversion efficiency and 40% power consumption reduction.
5. Osagaiak baino gehiagoview
Familiarize yourself with the different parts of your inverter:

Image: A detailed diagram pointing out key components of the inverter, including the Power Switch, Fault Indicator Lamp, Remote Controller port, LED Display, AC Output ports (2x 15A), Earth Wire terminal, AC Terminal Board (45A), USB port (5V 2.4A 12W), Positive and Negative DC Terminals, and Intelligent Cooling Fans.
- Switch potentziala: Turns the inverter ON/OFF.
- Akatsen adierazlea Lamp: Illuminates to indicate an error or protection mode.
- Remote Controller Port: Connects the wired remote control.
- LED pantaila: Bolumen erreala erakusten dutage, battery level, frequency, and load percentage.
- AC irteerako atakak: Standard 120V AC outlets for connecting appliances.
- Lurreko kablearen terminala: For grounding the inverter.
- AC Terminal Board: For hardwiring AC loads.
- USB ataka: 5V 2.4A output for charging USB devices.
- DC Input Terminals (Positive/Negative): Connect to the 48V DC battery bank.
- Intelligent Cooling Fans: Automatically activate to dissipate heat and maintain optimal operating temperature.
6. Konfigurazioa eta instalazioa
Instalazio egokia ezinbestekoa da inbertsorearen errendimendu eta segurtasunerako.
6.1 Bateriaren konexioa
The inverter requires a 48V deep cycle battery bank. Ensure the battery capacity is sufficient for your power needs. For a 4000W inverter, a minimum of 4 x 100Ah 12V batteries (wired in series for 48V) or equivalent 48V battery is recommended.

Image: Two diagrams illustrating connection methods: one for direct battery connection for independent use, and another for integration into an off-grid solar system with solar panels and an MPPT charge controller.
- Ziurtatu inbertsorearen etengailua OFF posizioan dagoela.
- Connect the positive (+) battery cable (red) to the positive (+) terminal of the battery bank and the positive (+) DC input terminal on the inverter.
- Connect the negative (-) battery cable (black) to the negative (-) terminal of the battery bank and the negative (-) DC input terminal on the inverter.
- Ziurtatu konexio guztiak estuak eta seguruak direla. Konexio solteek gehiegizko beroa eta kalteak eragin ditzakete.
- Connect the ground wire from the inverter's earth terminal to a proper ground point (e.g., vehicle chassis, earth rod).
6.2 Remote Controller Installation
The remote controller allows for convenient operation from a distance.
- Locate the remote control port on the inverter.
- Connect the remote controller cable to this port.
- The remote controller can be mounted in a suitable location using screws, as it is designed for embedding.
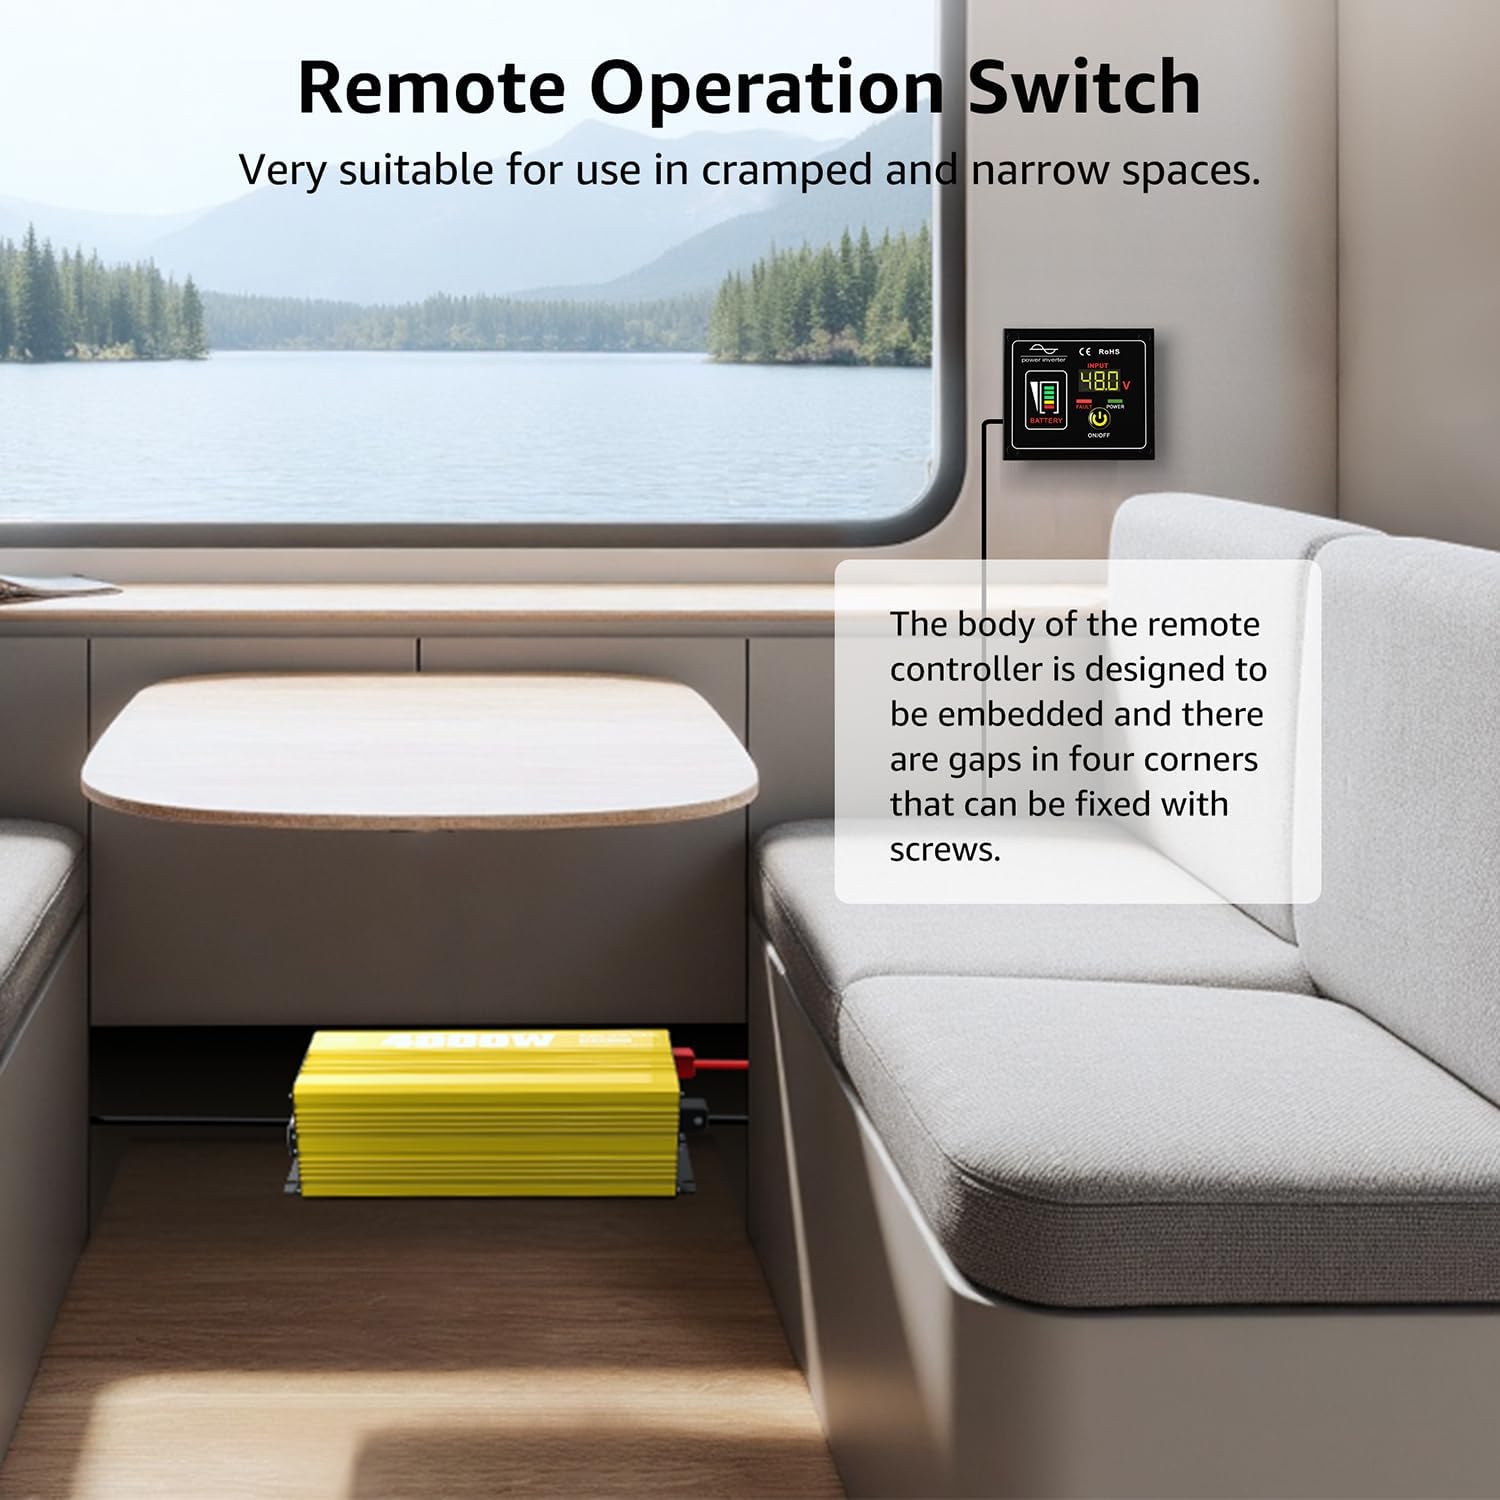
Image: The remote operation switch conveniently installed in a compact space, such as inside an RV, demonstrating its suitability for use in cramped or narrow environments.
7. Funtzionamendua
7.1 Piztu/Itzaltzea
- Ensure all connections are secure, then switch the inverter's power button to the ON position.
- The LED display will illuminate, showing battery voltage, irteera voltage, and other operational parameters.
- To turn off the inverter, switch the power button to the OFF position.
7.2 Gailuak konektatzea
Plug your 120V AC appliances into the inverter's AC output ports or connect them to the AC terminal board. Ensure the total wattagKonektatutako etxetresna elektriko guztien potentzia ez da 4000W-tik gorakoa.
7.3 LED pantaila ulertzea
The LED display provides critical information about the inverter's status:
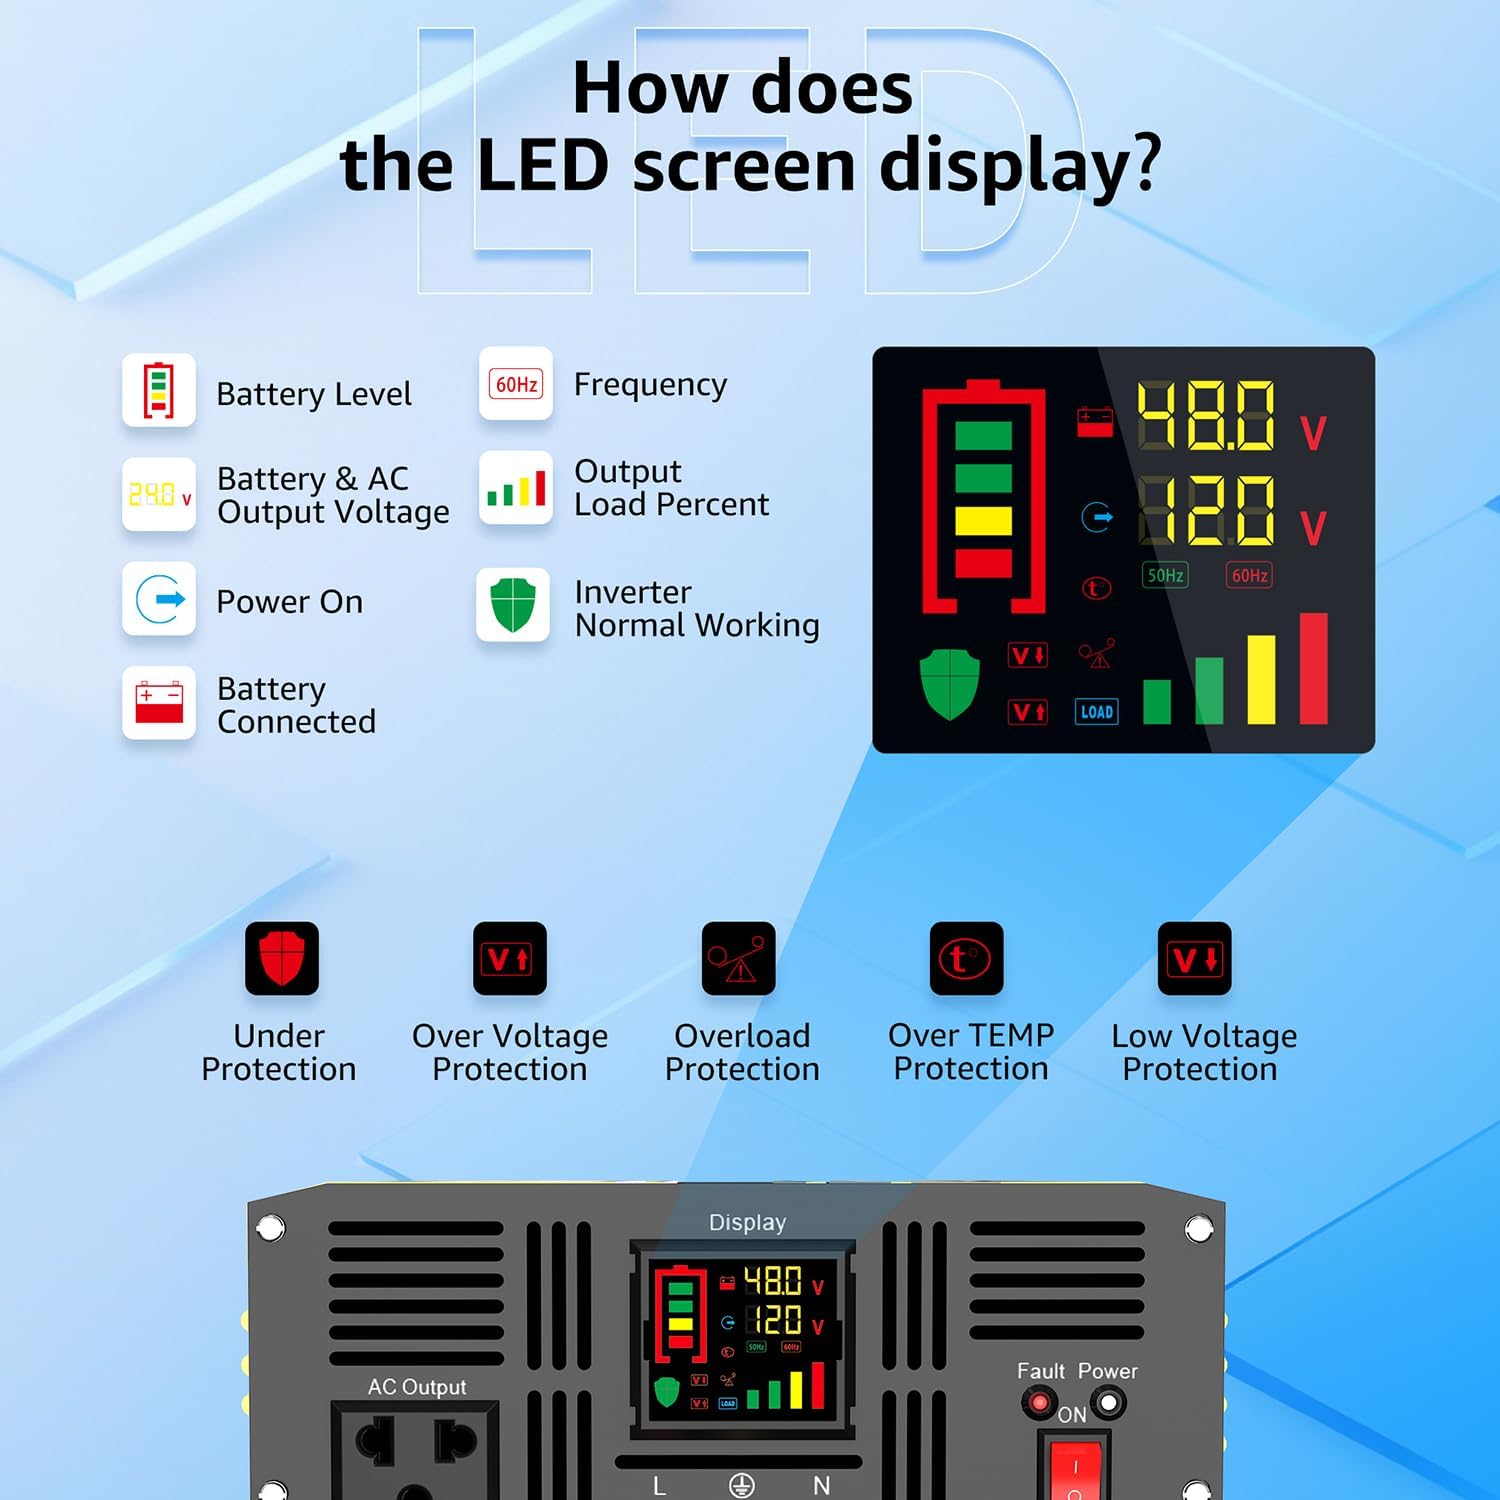
Image: A visual guide to the inverter's LED display, explaining indicators such as Battery Level, Frequency, Output Load Percent, Power On status, Battery Connected status, and Inverter Normal Working status. It also shows icons for Under Protection, Over Voltage Protection, Overload Protection, Over TEMP Protection, and Low Voltage Babesa.
- Bateria maila: Indicates the remaining charge in your battery bank.
- Maiztasuna: Displays the output frequency (e.g., 60Hz).
- Output Load Percent: ehunekoa erakusten dutage of the inverter's capacity currently being used.
- Sarrera/Irteera Voltage: DC sarrerako bolumena bistaratzen dutage from the battery and the AC output voltage.
- Protection Indicators: Icons will light up to indicate specific protection modes (e.g., Under Voltage, Overload, Over Temperature).
8. Mantentzea
Mantentze-lan erregularrak zure inbertsorearen iraupena eta errendimendu optimoa bermatzen ditu.
8.1 Garbiketa orokorra
- Keep the inverter clean and free from dust and debris. Use a dry cloth to wipe the exterior.
- Ensure the cooling fan vents are not obstructed to allow for proper airflow.

Image: A close-up of the inverter's two high-efficiency cooling fans, illustrating their automatic activation at 50 degrees Celsius or half load, and their low decibel operation (less than 60dB when on, less than 20dB when off).
8.2 Fusiblearen ordezkapena
If the inverter stops working due to an internal fuse issue, you may need to replace it. Always use fuses of the correct rating (40A 32V).
Video: This video demonstrates the step-by-step process of replacing the fuse in the XWJNE Pure Sine Wave Power Inverter. It shows how to safely open the unit, locate the fuses, remove the old fuse, and install a new one.
- Ensure the inverter is completely disconnected from the battery and all loads.
- Carefully remove the screws securing the upper cover of the inverter.
- Gently open the upper cover to expose the internal components.
- Locate the internal fuses (typically orange 40A fuses).
- Using a suitable tool (e.g., needle-nose pliers), carefully remove the blown fuse.
- Insert a new 40A 32V fuse into the slot.
- Replace the upper cover and secure it with the screws.
9. Arazoak
The LED display provides fault codes to help diagnose issues. Refer to the table below for common problems and their solutions.

Image: A visual guide to the inverter's fault display, listing various fault codes (F01-F13) and their corresponding meanings, such as Parameter Configuration Fault, Sampling Circuit Fault, DC Bus Voltage too Low, Output Overload, Over-temperature Protection, and Battery Overvoltage/Underboltage.
| Kodea | Deskribapena | Balizko Kausa / Irtenbidea |
|---|---|---|
| F01 | Parameter Configuration Fault | Internal error. Contact support. |
| F02 | Sampling Circuit Fault | Internal error. Contact support. |
| F03 | DC Bus Voltage baxuegia | Bateria boltage is too low. Recharge or replace battery. |
| F04 | Other power source connected with the output cables | Ensure no other AC source is connected to the inverter's output. |
| F05 | Irteera Zirkuitu Laburra | Check connected appliances and wiring for short circuits. Disconnect and restart. |
| F06 | Irteera gainkorrontea | Reduce load. Disconnect some appliances. |
| F07 | Irteera gainkarga | Reduce total connected load below 4000W. |
| F08 | Tenperatura gehiegizko babesa | Ensure proper ventilation. Allow inverter to cool down. Check fan operation. |
| F09 | Other power source connected with the output cables | Same as F04. |
| F10 | Bateria gainvoltage | Sarrera DC boltage is too high. Check battery charging system. |
| F11 | DC Bus Overvoltage | Barneko gainboltage. Contact support. |
| F12 | Bateria Undervoltage | Bateria boltage is too low. Recharge or replace battery. |
| F13 | Data Read Error | Internal communication error. Contact support. |
10. Zehaztapenak
| Ezaugarri | Xehetasuna |
|---|---|
| Modelo zenbakia | 24IVA-4KW-48V-110 |
| Potentzia nominala | 4000W |
| Potentzia gailurra | 8000W |
| DC sarrerako bolumenatage | 48V DC |
| CA irteera boltage | 120 V AC |
| Irteerako uhin forma | Sine Wave Pure |
| Eraginkortasuna | > %90 |
| Produktuaren neurriak | 12.01 x 19.21 x 25 hazbete |
| Elementuaren pisua | 19.2 kilo |
| USB irteera | 5V 2.4A |
| Gomendatutako Erabilerak | Home, Off-Grid, RV, Truck, Vehicle |
11. Bermea eta Laguntza
XWJNE products are designed for reliability and performance. For warranty information, technical support, or service inquiries, please refer to the contact information provided with your purchase or visit the official XWJNE webgunea. Gure bezeroarentzako arreta-taldea eskuragarri dago aurki ditzakezun galdera edo arazoekin laguntzeko.