1. Sarrera
This manual provides comprehensive instructions for the assembly, operation, and maintenance of your Outsunny Metal Arch Backdrop Stand Set. Please read carefully before use to ensure proper setup and safe handling of the product.
2. Segurtasun informazio garrantzitsua
- Always stake down the arch using the provided ground stakes when used outdoors to prevent it from tipping over due to wind or accidental bumps.
- Use weighted blocks (not included) if placing the arches on a hard, flat indoor or outdoor surface to ensure stability.
- Ziurtatu konexio guztiak ondo lotuta daudela muntaketa bitartean, kolapsoa saihesteko.
- Keep children and pets away from the arch during assembly and ensure it is stable before allowing them near it.
3. Paketearen edukia
Verify all components are present and undamaged before beginning assembly. If any parts are missing or damaged, please contact customer support.
- Metal Arch Tubes (various sizes for 7ft, 6.5ft, 6ft arches)
- Oinarrizko euskarriak
- Muntatzeko torlojuak
- 12 U-shaped ground stakes
- Argibide eskuliburua
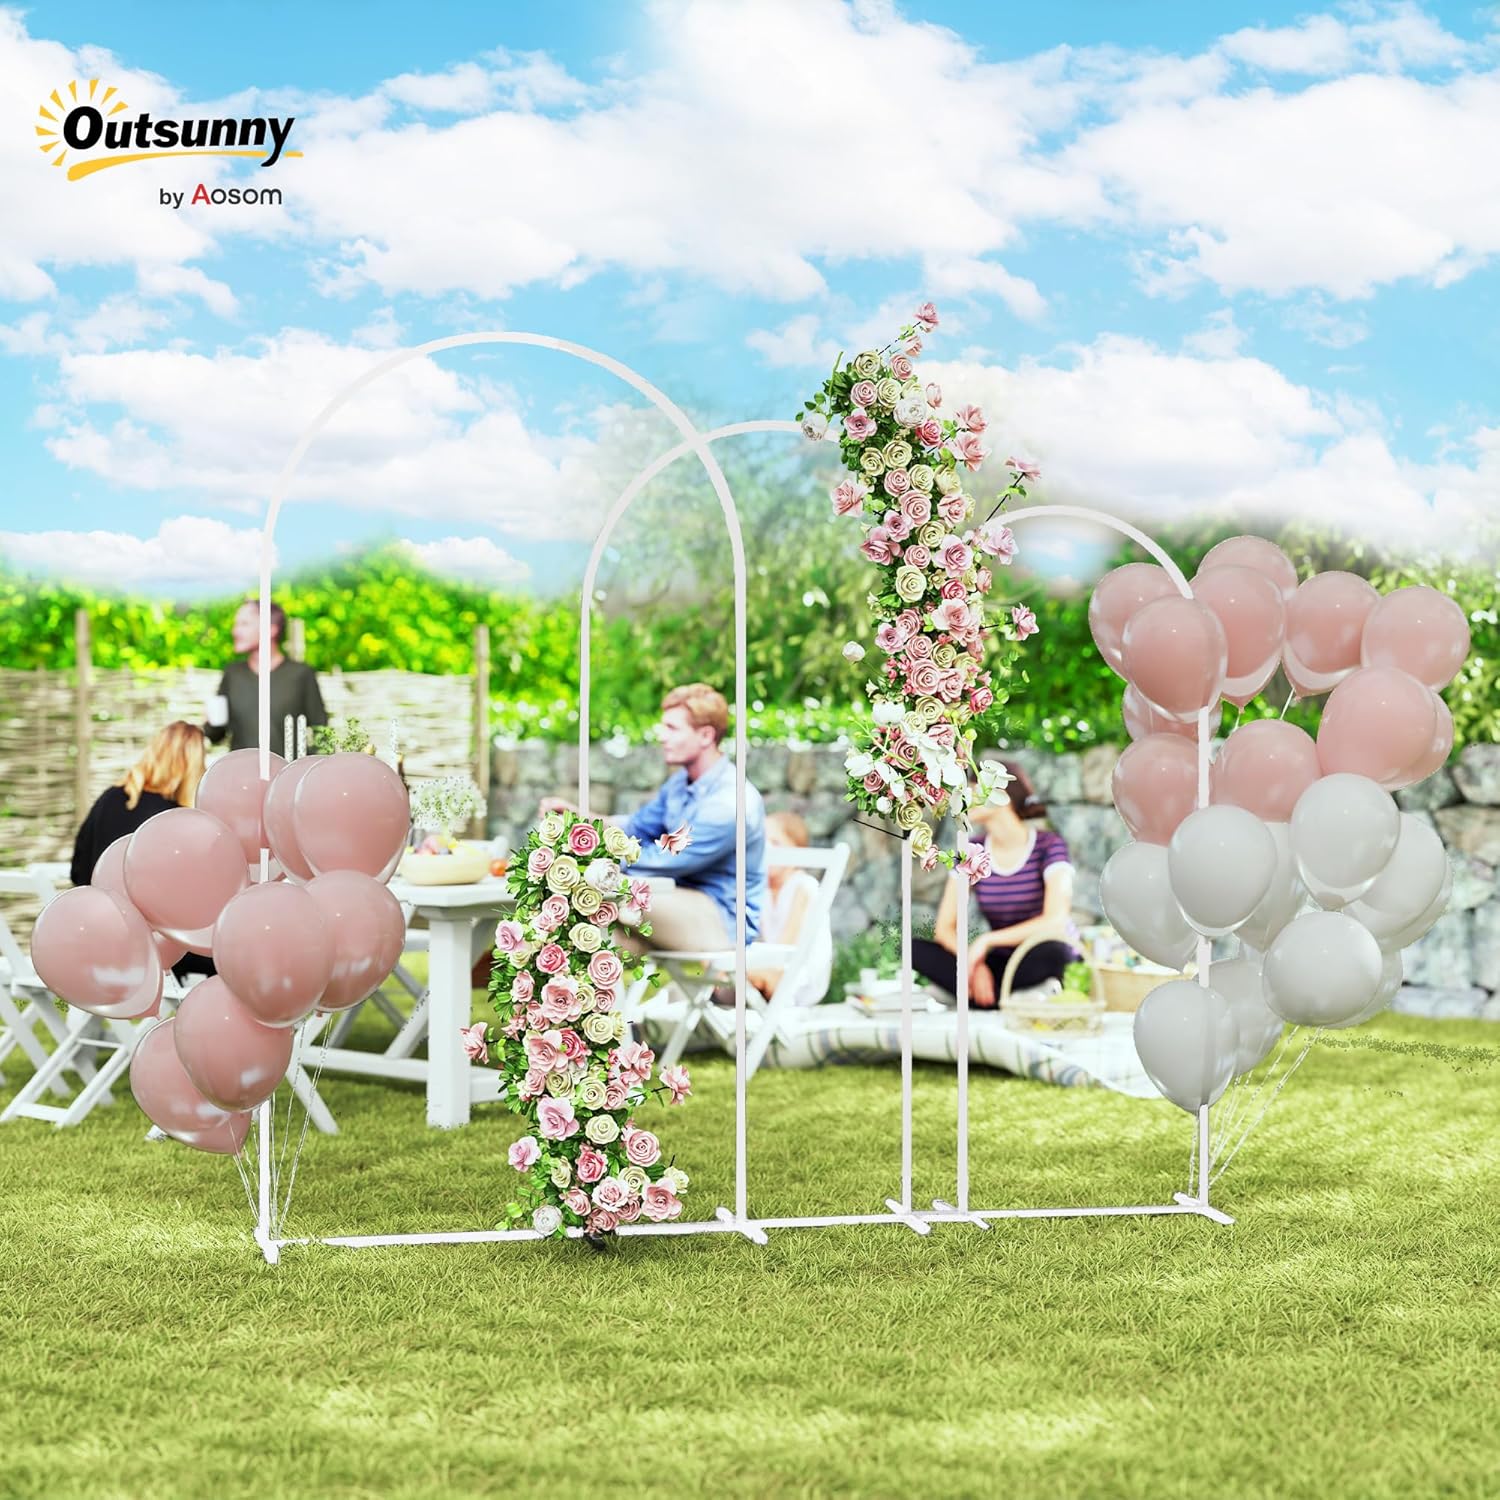
Figure 1: All individual metal tubes, base supports, and hardware included in the package, organized by size for clarity.
4. Konfiguratzeko argibideak
Follow these steps to assemble your metal arch backdrop stands:
- 1. urratsa: Osagaiak desontziratu eta identifikatu
Carefully remove all parts from the packaging. Separate the tubes by size (7ft, 6.5ft, 6ft) to avoid mixing. Each tube may have a label (e.g., A1, A2, etc.) to guide assembly.
Video 1: This video demonstrates how to unpack the arch components and separate them by size (sizes shown in video may vary slightly from product, but the principle applies) before assembly.
- 2. urratsa: Oinarria muntatu
For each arch, connect the horizontal base bars to the vertical base supports. Use the provided screws to securely fasten these connections. Ensure the base is flat and stable.
Video 2: This video illustrates the initial step of laying out and identifying the different sized metal tubes for the arch stands (sizes shown in video may vary slightly from product, but the principle applies).
- Step 3: Construct the Arch Frame
Following the numerical labels or visual guide, connect the straight and curved metal pieces to form the arch shape. Insert each piece firmly into the next until the full arch is formed. Ensure all connections are tight and secure.

Figure 2: The three fully assembled metal arch stands, illustrating their different heights and how they can be arranged.
- Step 4: Secure the Arches (Outdoor Use)
For outdoor placement, insert the 12 U-shaped ground stakes through the designated holes in the base supports and firmly into the ground to enhance stability. For indoor use on hard surfaces, weighted blocks (not included) are recommended to prevent movement.

3. irudia: Xehetasuna view of the arch's steel structure, emphasizing its powder-coated finish and the U-shaped ground stakes for securing it.
5. Funtzionamendu-argibideak
Dekorazioa
The arch backdrop stands are designed for versatile customization. You can adorn them with a variety of decorative elements to suit your event's theme:
- Flowers and greenery: Attach floral arrangements, garlands, or vines using floral wire or zip ties.
- LED lights: Wrap LED string lights around the frame for an illuminated effect.
- Balloons: Create balloon garlands and attach them to the arch structure.
- Tulle or fabric drapes: Drape fabrics over the arches to add softness and elegance.
Arrange decorations to create your desired aesthetic for weddings, parties, photoshoots, or other special events.
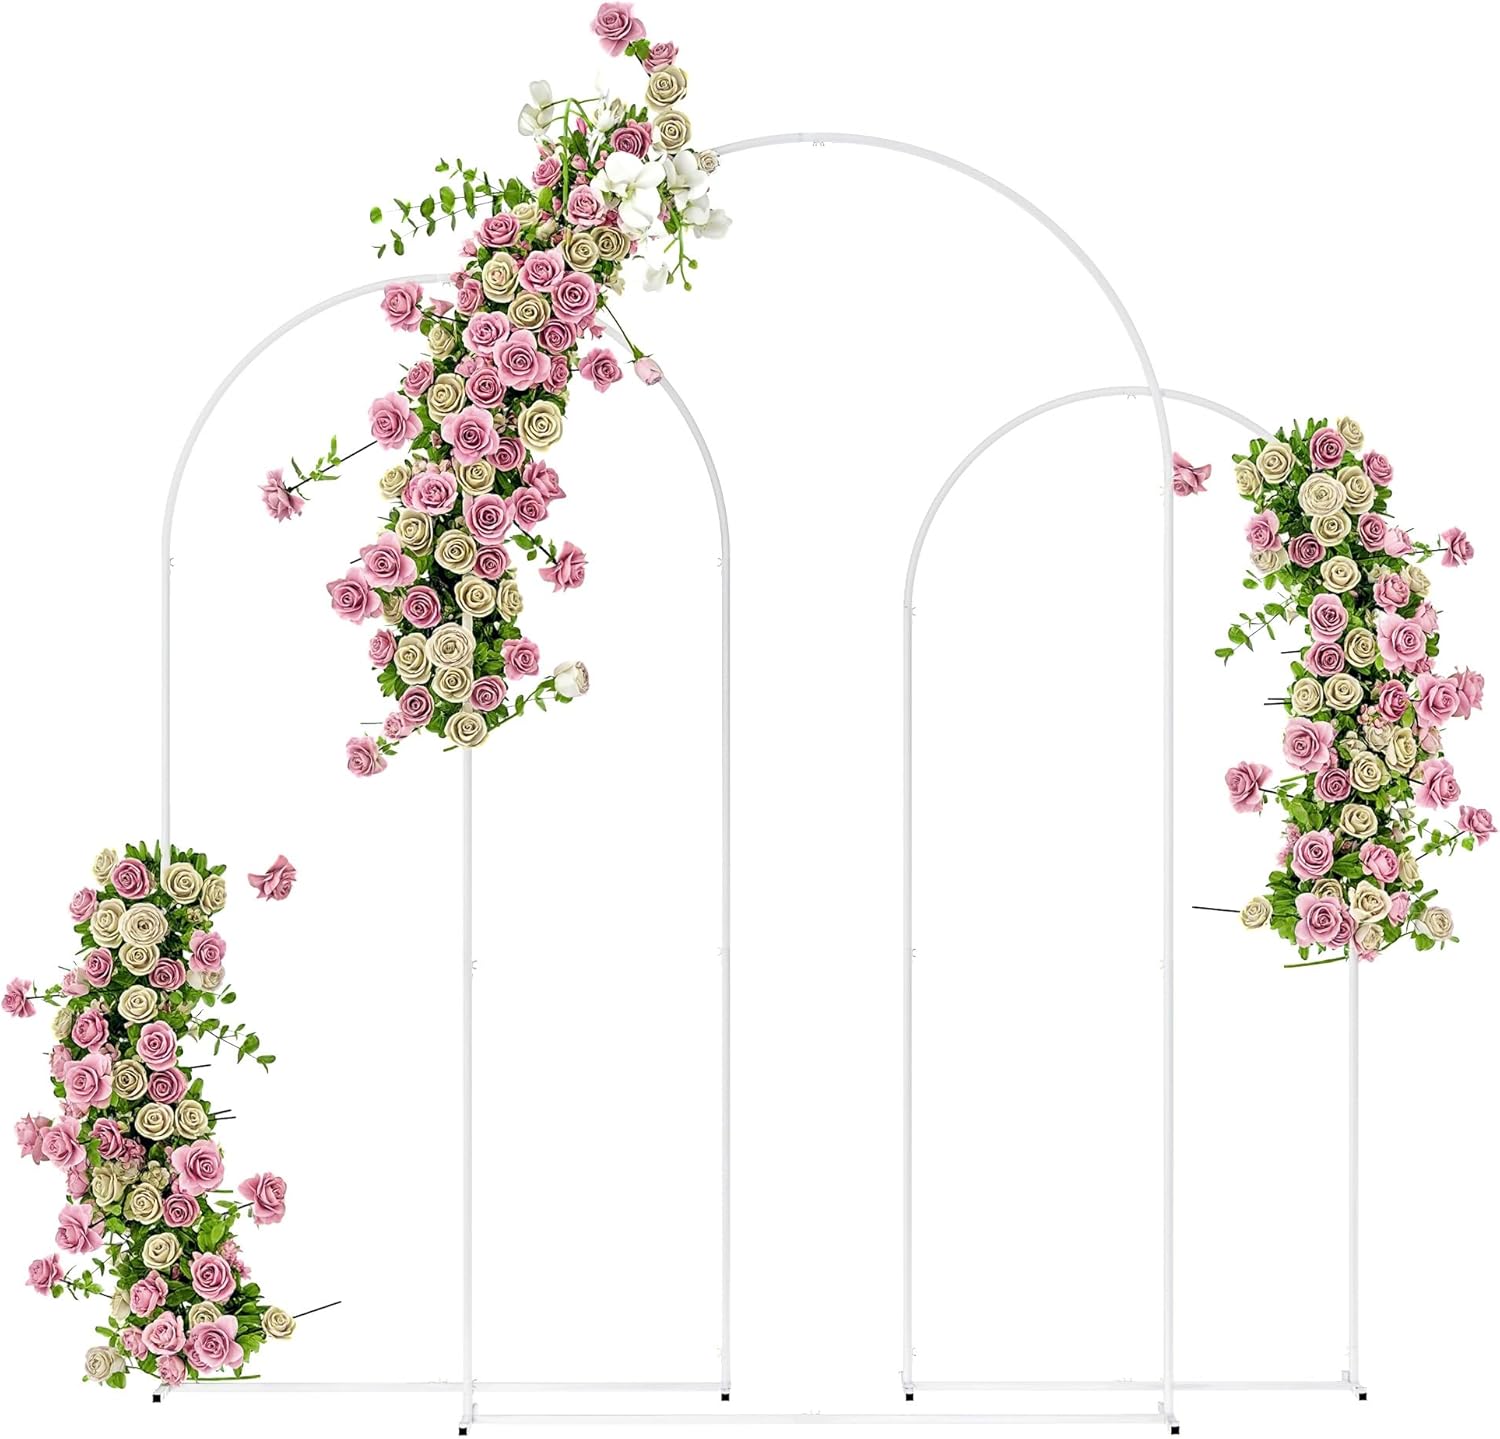
Figure 4: The three white metal arch stands beautifully adorned with pink and white flowers, demonstrating a potential decorative setup.

Figure 5: One of the metal arch stands decorated with colorful balloons and flowers, set up in an outdoor garden for a party.
6. Mantentzea
- Clean the metal frames with a soft, damp oihal. Saihestu hauts-estalduraren akabera kaltetu dezaketen garbitzaile urratzaileak edo produktu kimiko gogorrak.
- After each use, especially outdoors, wipe down the frames to remove any dirt, moisture, or debris.
- Store the disassembled arches in a dry, cool place to prevent rust and prolong their lifespan. Keep all components organized to facilitate future assembly.
7. Arazoak
Arch Instability
- Arazoa: Arch wobbles or tips easily.
- Irtenbidea: Ensure all screws connecting the base and frame pieces are tightly fastened. For outdoor use, verify ground stakes are fully inserted into firm ground. For indoor use on hard surfaces, place weighted blocks (e.g., sandbags, water bags) on the base supports to add stability.
Difficulty Assembling Tubes
- Arazoa: Metal tubes do not fit together smoothly or are difficult to connect.
- Irtenbidea: Double-check the numerical labels on the tubes to ensure correct pairing for each arch size. Apply gentle, consistent pressure and rotate the tubes slightly while pushing to align the internal spring buttons. Ensure no protective film or debris is obstructing the connection points.
8. Zehaztapenak
| Ezaugarri | Xehetasuna |
|---|---|
| Marka | Outtsunny |
| Modelo zenbakia | 84J-035V00WT |
| Materiala | Metala |
| Kolorea | Zuria |
| Akabera mota | Hauts estalita |
| Forma | ark |
| Large Arch Dimensions | 47.2" W x 15.7" D x 86.6" H (approx. 7.2 ft H) |
| Medium Arch Dimensions | 39.4" W x 15.7" D x 78.7" H (approx. 6.5 ft H) |
| Small Arch Dimensions | 31.5" W x 15.7" D x 70.9" H (approx. 6 ft H) |
| Elementuaren pisua | 15 kilo |
| Muntaia Beharrezkoa | Bai |
| Lurreko hesolak barne | 12 U-shaped stakes |
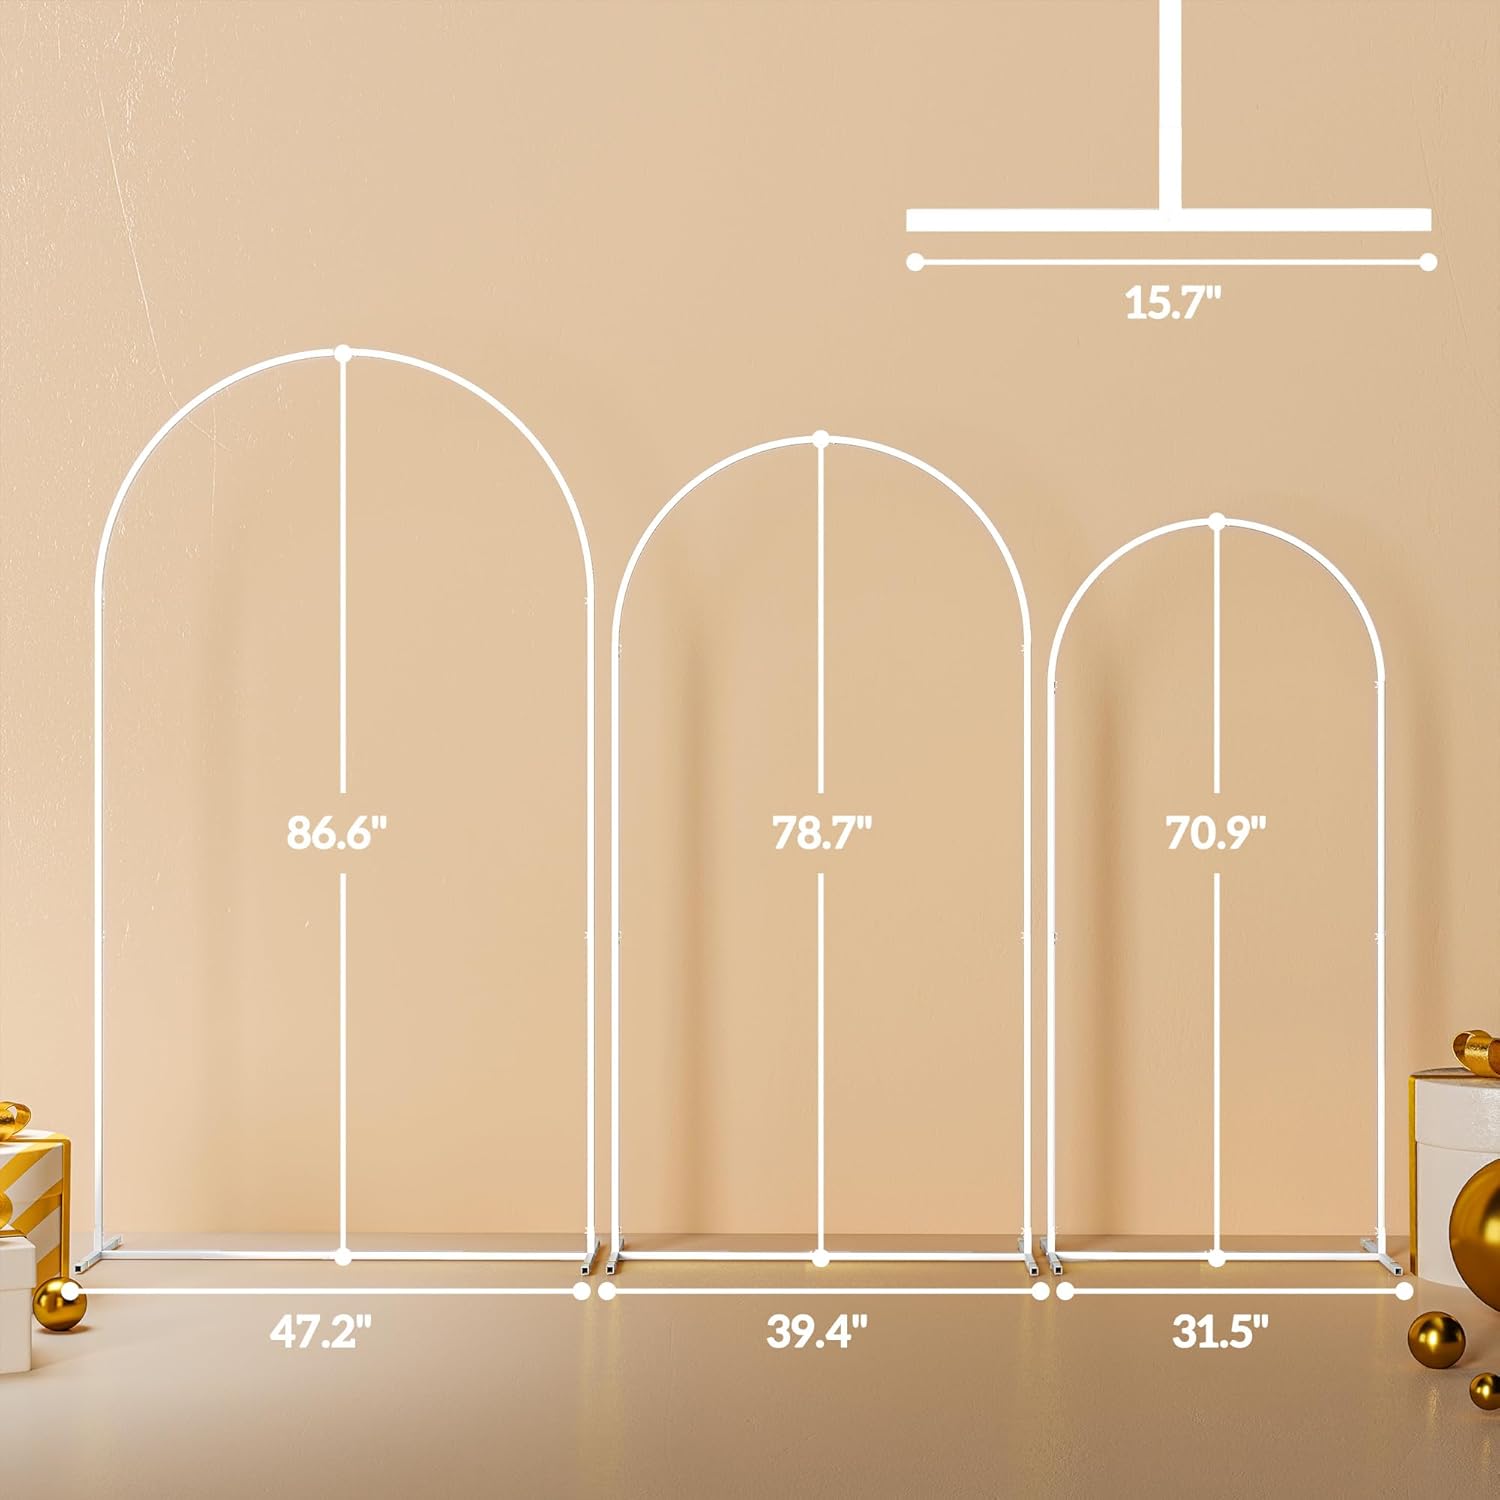
Figure 6: A diagram illustrating the dimensions (width and height) of the large, medium, and small arch stands in the set.
9. Bermea eta Laguntza
For warranty information or technical support regarding your Outsunny Metal Arch Backdrop Stand Set, please refer to the manufacturer's official website or contact their customer service directly. Keep your purchase receipt and model number (84J-035V00WT) for any warranty claims or inquiries.