
1. Sarrera
Thank you for choosing the hygger Intelligent Wave Maker. This device is designed to create natural water flow and circulation within your aquarium, promoting a healthier environment for fish and corals. It features multiple wave modes, a night mode, feeding mode, and wireless connectivity for multi-pump setups. Please read this manual thoroughly before installation and operation to ensure proper use and longevity of your product.

Image: The hygger Intelligent Wave Maker controller and pump in operation, demonstrating water movement.
2. Segurtasun-argibide garrantzitsuak
- Irakurri arretaz argibide guztiak aparatua erabili aurretik.
- Ez erabili tresnarik kablea edo entxufea hondatuta badu, gaizki funtzionatzen badu, erori edo edozein modutan kaltetu bada.
- Aparatuaren entxufea edo hargunea busti ez dadin, jarri akuarioaren euskarria eta depositua hormako hargune baten albo batera ura hargunera edo entxufean isuri ez dadin.
- A "drip loop" should be arranged by the user for each cord connecting an aquarium appliance to a receptacle. The drip loop is the part of the cord below the level of the receptacle, or the connector if an extension cord is used, to prevent water from traveling along the cord and coming into contact with the receptacle.
- Always unplug the appliance from the outlet when not in use, before putting on or taking off parts, and before cleaning. Never yank cord to pull plug from outlet. Grasp the plug and pull to disconnect.
- Ez erabili aparatua aurreikusitako erabilera ez den beste ezertarako.
- Ez instalatu edo gorde aparatua eguraldiaren eraginpean egongo den lekuetan edo izozte azpiko tenperaturetan.
- Ensure the wave maker is fully submerged in water during operation.
- Mantendu haurren eskura.
3. Paketearen edukia
Desontziratzean, egiaztatu osagai guztiak sartuta daudela:
- Hygger Intelligent Wave Maker Pump Unit
- External Controller with Digital Display
- Edukitzaile magnetikoa
- Elikatze-moldagailua
- Erabiltzailearen eskuliburua

Image: The main components of the hygger Intelligent Wave Maker: the pump unit and the external controller.
4. Produktua amaitu daview
4.1 Osagaiak
The hygger Intelligent Wave Maker consists of a submersible pump unit and an external controller. The pump unit features a rotatable wide wave outlet for multi-directional flow. The controller provides a digital display and intuitive buttons for mode selection and adjustments.
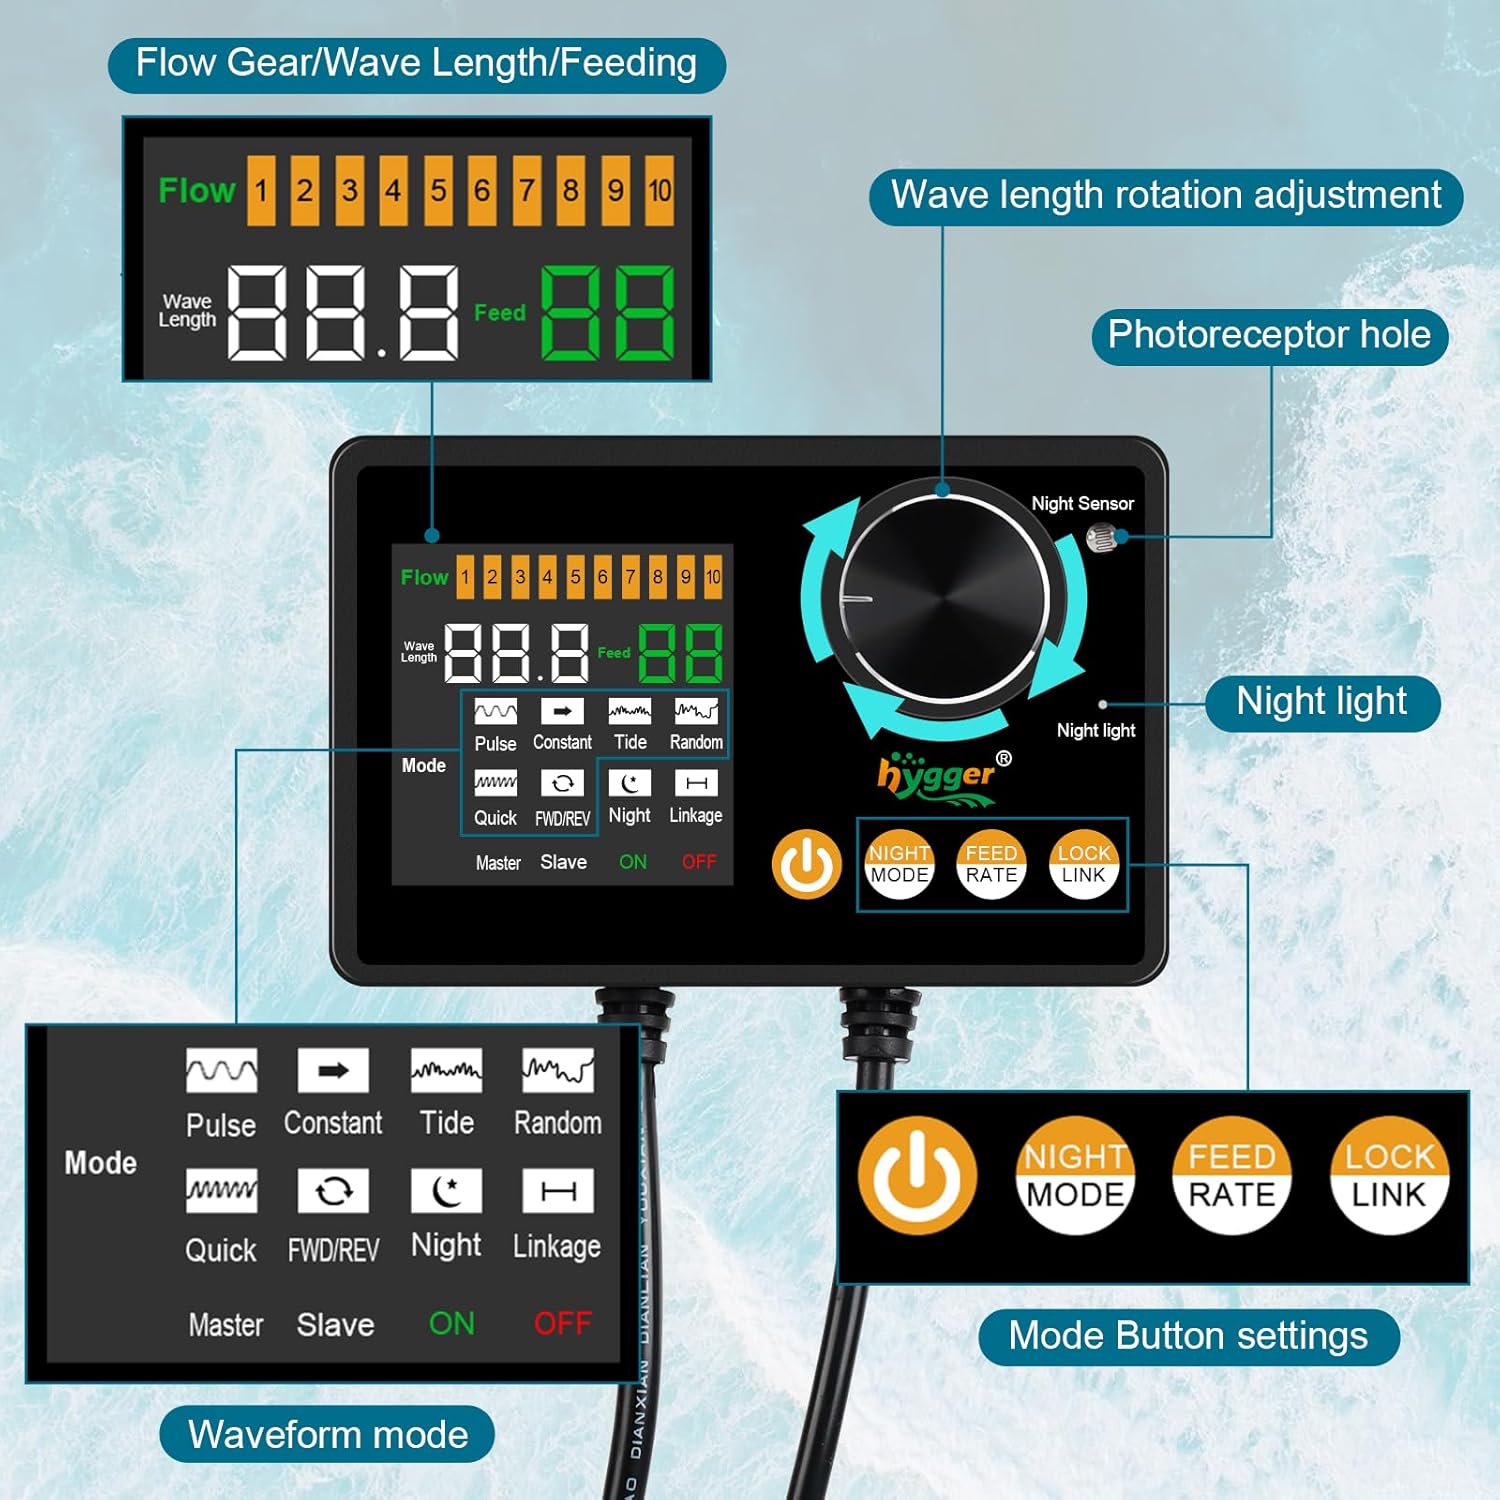
Irudia: Xehetasun handikoa view of the controller, highlighting the digital display, mode buttons, night sensor, and wave length adjustment knob.
4.2 Ezaugarri nagusiak
- 6 Wave Maker Modes: Constant, Pulse, Tide, Random, Quick, FWD/REV.
- Adjustable Wave Length and Flow Rate: Customize water movement for various aquarium needs.
- Rotatable Wide Wave Outlet: Directs water flow in multiple angles, reducing impact on fish and plants.
- Gaueko modua: Automatically switches to a lower flow rate when ambient light dims, promoting fish rest.
- Elikadura modua: Temporarily pauses the pump for 10 minutes during feeding.
- Haririk gabeko konexioa: Allows multiple pumps to operate alternately under a single master controller.
- Memoria Funtzioa: Retains settings after power loss.
- Low Water Level Protection: Automatically stops operation if water level is too low.
- Oinarri magnetiko sendoa: Secure and easy installation/removal, with silicone sleeve for noise reduction and tank protection.

Image: Visual representation of the Memory Function, Protection Reminder, and Feeding Mode features.
5. Instalazioa eta konfigurazioa
5.1 Osagaiak konektatzea
- Connect the wave maker pump unit cable to the controller.
- Konektatu korronte egokitzailea kontrolagailura.
- Plug the power adapter into a suitable electrical outlet, ensuring a drip loop is formed.

Image: Connection diagram illustrating how to link the wave pump, controller, and power adapter.
5.2 Mounting the Wave Maker
- Place the wave maker pump unit inside the aquarium, ensuring it is fully submerged.
- Attach the external magnetic holder to the outside of the aquarium glass, aligning it with the internal pump unit. The strong magnets will secure the pump in place.
- Ensure the silicone sleeve on the magnetic holder is properly positioned to prevent scratching the tank wall and reduce noise.
- Position the pump to direct water flow as desired. The outlet can be rotated to adjust direction.

Image: The wave maker pump unit securely mounted inside an aquarium using its strong magnetic base holder.
5.3 Initial Power-On and Low Water Protection
Once connected and mounted, the unit will power on. The controller will display current settings. The wave maker is equipped with low water level protection. If the water level in the aquarium is too low, the pump will automatically stop operating to prevent damage. Ensure the pump is always fully submerged during operation.

Image: The controller display indicating low water protection, along with visuals for feeding mode and wireless connection setup.
6. Funtzionamendua
6.1 Kontrolatzailearen funtzioak
The external controller allows for easy adjustment of all settings:
- Pizteko botoia: Turns the wave maker ON/OFF.
- Modu botoiak: Select from the 6 wave modes (Pulse, Constant, Tide, Random, Quick, FWD/REV).
- Night Mode Button: Activates or deactivates the automatic low flow night mode.
- Feed Rate Button: Initiates a 10-minute pause for feeding.
- Lock/Link Button: Locks current settings or initiates wireless linking for multiple pumps.
- Egokitzeko botoia: Used to adjust flow rate (Flow 1-10) and wave length.
- Night Sensor: Detects ambient light levels for automatic night mode activation.
6.2 Wave Maker Modes
The wave maker offers six distinct modes to simulate various natural water movements:
- Modu konstantea: Provides a continuous, fixed waveform output water flow.

Image: Visual representation of Constant, Pulse, and Tide wave patterns.
- Pultsu modua: The motor quickly pushes out a wave at maximum power, then drops to minimum power, repeating the cycle.
- Marea modua: The motor slowly increases to maximum speed and then slowly decreases, mimicking the rise and fall of tides.
- Ausazko modua: The flow rate has no standard rhythm, operating randomly to create turbulent water movement.

Image: Visual representation of Random, Quick, and FWD/REV wave patterns.
- Modu azkarra: The motor runs fast, providing a constant and strong flow of water.
- FWD/REV Mode: The waveform operates alternately in forward and reverse directions.
6.3 Gaueko modua
The external controller includes a light sensor. When the room light dims, the sensor activates, and the wave pump defaults to the lowest flow rate (1st speed) of the current mode. When the light brightens, it automatically returns to the previously set normal mode. This mode can be toggled ON/OFF using the Night Mode button.

Image: A graph illustrating the difference in flow rate between daytime (higher, fluctuating) and nighttime (lower, constant) operation.
6.4 Feeding Mode
During daily feeding, press the Feed Rate button on the controller. The wave pump will temporarily stop running for ten minutes, allowing fish to feed without strong water circulation. After ten minutes, the pump will automatically resume its previous operation.
6.5 Wireless Connection Mode (for multiple pumps)
For aquariums requiring multiple wave makers, this feature allows wireless synchronization. One controller acts as the master, and others as slaves. Each pump head operates alternately, sharing the master controller's settings. Refer to the controller's specific instructions for pairing multiple units.

Image: Illustrations demonstrating different water flow patterns achievable in an aquarium using wave makers, including multi-pump setups.
7. Mantentzea
Regular maintenance ensures optimal performance and extends the lifespan of your wave maker.
7.1 Cleaning the Pump Unit
- Unplug the power adapter before performing any maintenance.
- Carefully remove the wave maker pump unit from the aquarium.
- Disassemble the pump unit according to the diagrams (if provided in the physical manual) to access the impeller and internal components.
- Clean any algae, debris, or mineral deposits from the impeller, housing, and outlets using a soft brush and clean water. For stubborn deposits, a mild vinegar solution can be used, followed by thorough rinsing.
- Ensure all parts are clean and free of obstructions before reassembling and reinstalling.
7.2 Controller Care
- Mantendu kontrolatzailea lehor eta ur zipriztinetatik urrun.
- Wipe the controller surface with a soft, dry cloth. Do not use harsh chemicals or abrasive cleaners.
8. Arazoak
If you encounter issues with your hygger Intelligent Wave Maker, please refer to the following common problems and solutions:
| Arazoa | Kausa posiblea | Irtenbidea |
|---|---|---|
| Ponpa ez dabil / Argirik ez | Power adapter unplugged, power outage, faulty connection, low water level protection activated. | Check power connections. Ensure the power outlet is functional. Verify water level is sufficient. Check for damaged cables. |
| Weak or inconsistent flow | Impeller clogged with debris/algae, pump not fully submerged, incorrect mode/flow setting. | Unplug and clean the impeller. Ensure pump is fully submerged. Adjust flow rate settings on the controller. |
| Gehiegizko zarata | Impeller obstruction, improper mounting, air trapped in pump, worn components. | Clean the impeller. Ensure the magnetic holder is securely and correctly positioned. Gently shake the pump to release trapped air. If noise persists, contact customer support. |
| Kontrolatzailearen pantaila ez dabil | Power issue, damaged controller. | Check power connections. If power is confirmed and display remains off, the controller may be faulty; contact customer support. |
If the problem persists after attempting these solutions, please contact hygger customer support for further assistance.
9. Specifications (Model HG166-25W)
The following specifications apply to the hygger Intelligent Wave Maker Model HG166-25W:
| Ezaugarri | Xehetasuna |
|---|---|
| Eredua | HG166-25W |
| Sarrera boltage | 100-240V / 50/60Hz |
| Irteera boltage | DC 24V |
| Gehienezko Emaria | 2400 GPH (9085 L/H) |
| Suitable for Tank Wall Thickness | ≤12mm (0.47 inches) |
| Suitable Tank Length | ≤40 inches (100 cm) |
| Kablearen luzera | 6.2 + 8.2 inches |
| Elementuaren pisua | 2.66 kilo |
| Dimensions (Pump Unit) | Approx. 6.7in (length) x 1.81in (width) |
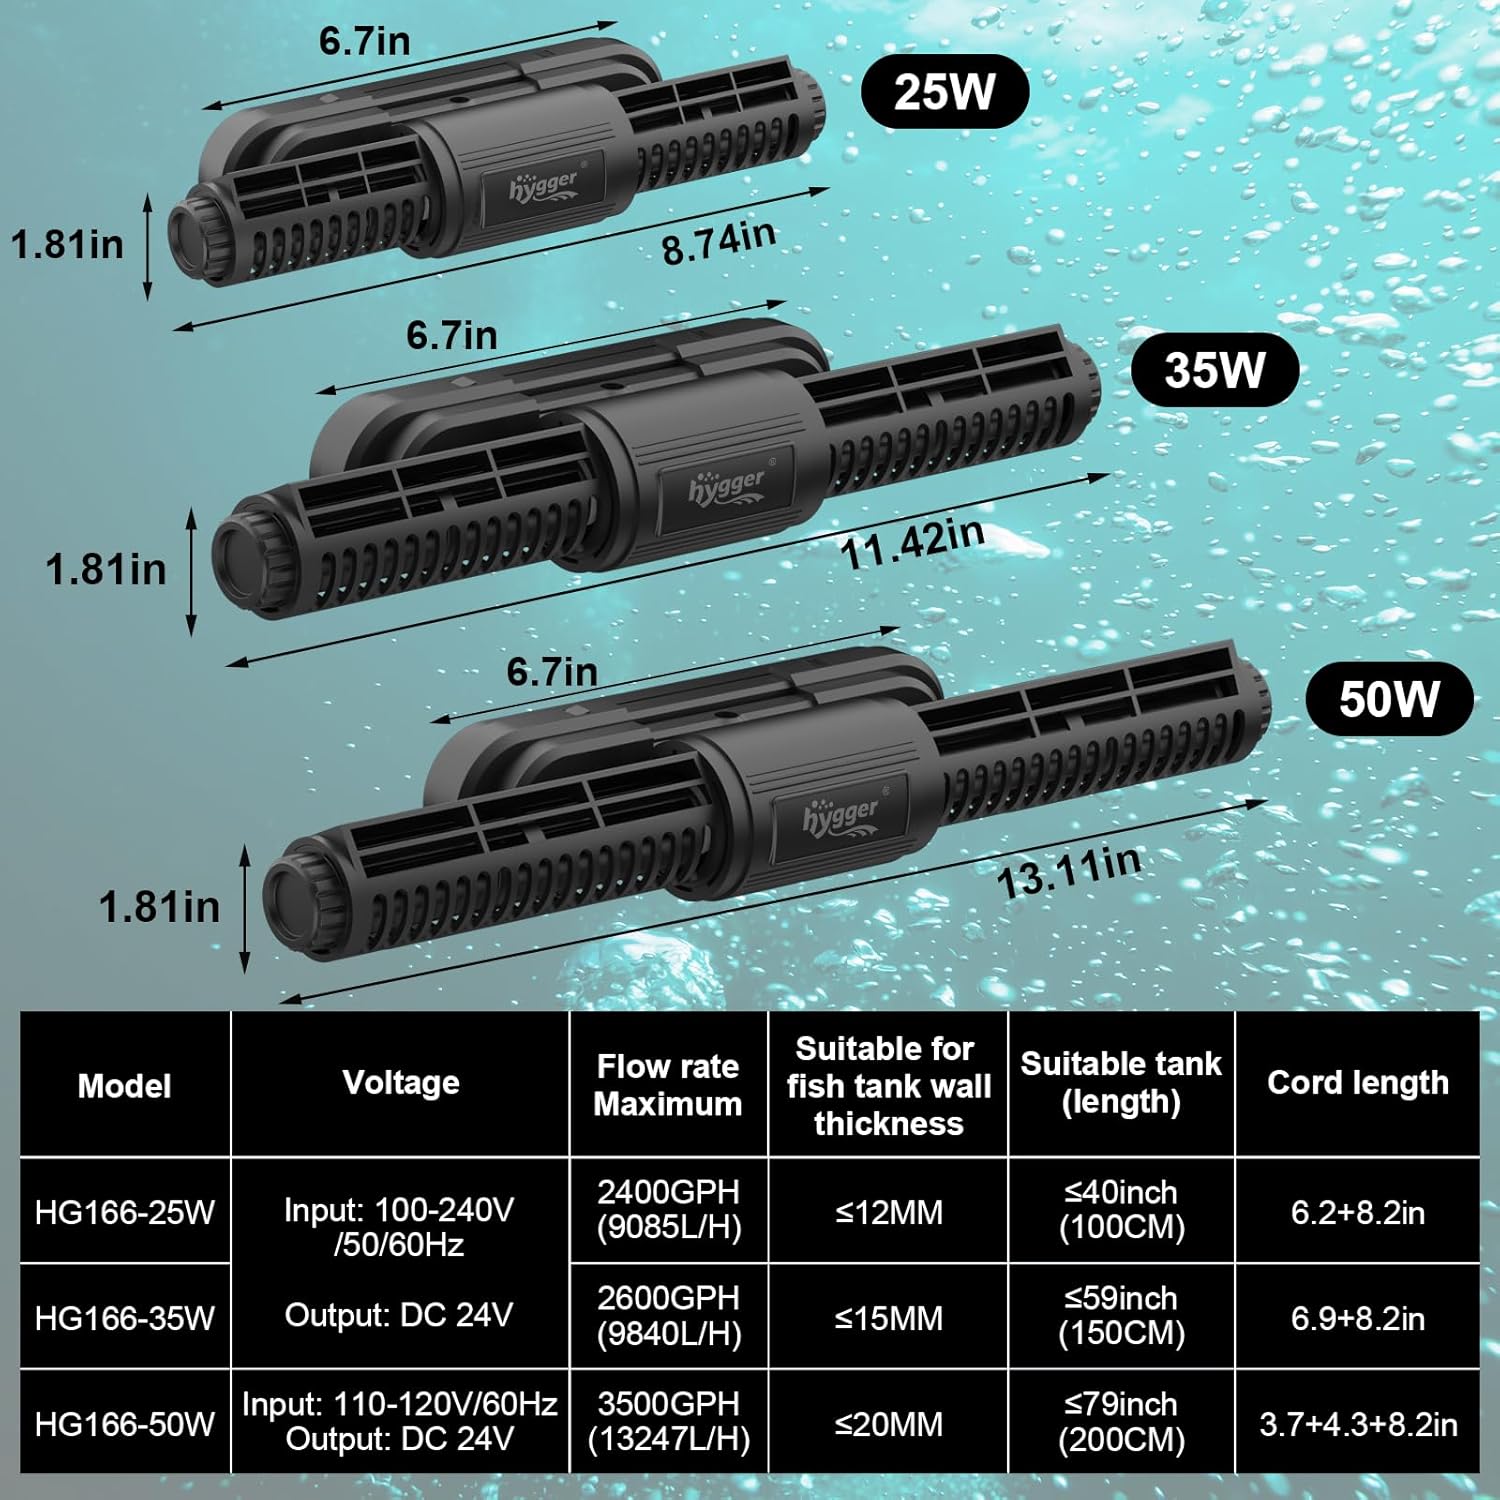
Image: A comparison table detailing specifications for different wattage models (25W, 35W, 50W) of the hygger wave maker.

Image: Visual guide for selecting the correct wave maker model based on aquarium wall thickness and length.
10. Bermea eta Laguntza
The hygger Intelligent Wave Maker (Model HG166) comes with a 1 urteko bermea erosketa-datatik aurrera. Berme honek ohiko erabileran materialen eta eskulanen akatsak estaltzen ditu.
For warranty claims, technical support, or any questions regarding your product, please contact hygger customer service. You can typically find contact information on the hygger official webgunea edo zure dendariaren bidez.
Gorde erosketaren egiaztagiria bermea balioztatzeko.