1. Sarrera
This manual provides essential information for the safe and efficient operation of your XWJNE 3000W Pure Sine Wave Power Inverter. This inverter converts 24V DC power to 120V AC power, suitable for various applications including off-grid systems, RVs, trucks, and home backup power. It features a pure sine wave output, ensuring compatibility with sensitive electronics, and includes an LCD display and remote control for convenient monitoring and operation.
Please read all instructions carefully before installation and use to prevent damage or injury. Always ensure proper grounding and adhere to all safety precautions.

Figure 1.1: XWJNE 3000W Pure Sine Wave Power Inverter with included cables, remote, and fuses.
2. Paketearen edukia
Egiaztatu elementu guztiak paketean daudela:
- 1 x XWJNE 3000W Pure Sine Wave Power Inverter
- 2 x 2.62ft 1AWG Positive Battery Cable (Red)
- 2 x 2.62ft 1AWG Negative Battery Cable (Black)
- 1 x Remote Controller with Cable
- 1 x 1.64ft Ground Wire
- 2 x 40A 32V Fuses (Spare)
- 1 x Argibide eskuliburua
- 1 x giltza

2.1 irudia: Produktuaren ontzian sartutako osagai guztiak.
3. Produktua amaitu daview
3.1 Aurrealdeko panelaren ezaugarriak
The front panel of the inverter provides various connection points and indicators:
- Switch potentziala: Toggles the inverter on/off.
- Fault/Power Indicators: LEDs indicating operational status or fault conditions.
- USB atakak: Includes 2 x QC 18W USB-A ports, 1 x QC 24W USB-A port, and 1 x PD 60W Type-C port for charging various devices.
- Urruneko kontrolaren entxufea: For connecting the wired remote control.
- CA irteera: 2 x 120V GFCI (Ground Fault Circuit Interrupter) AC outlets for connecting appliances.
- Korronte alternoko terminal-blokea: For hardwiring AC loads directly.

Figure 3.1: Front panel showing AC outlets, USB ports, and control switches.
3.2 Atzeko panelaren ezaugarriak
The rear panel is equipped with the DC input terminals and cooling fans:
- DC sarrera terminalak: Positive (Red) and Negative (Black) terminals for connecting to your 24V DC battery bank.
- Hozteko zaleak: Two high-efficiency cooling fans automatically activate when the internal temperature exceeds 45°C (113°F) or the load is over half, ensuring optimal performance and durability.

Figure 3.2: Rear panel showing DC input terminals and cooling fans.
3.3 LCD pantaila
The integrated LCD screen provides real-time operational data:
- Sarrera boltage: Displays the DC voltage bateriatik.
- CA irteera boltage: Shows the 120V AC output.
- Loads Power: Indicates the current wattagkonektatutako gailuek marrazten ari dira.
- Bateria Potentzia: Visual representation of the battery charge level.
- Lan-tenperatura: Displays the internal temperature of the inverter.
- Maiztasuna: Shows the output frequency (60Hz).
- Pure Sine Wave Indicator: Confirms pure sine wave output.
- Normal Working/Fault Indicators: Icons to quickly identify operational status or abnormal problems.

Figure 3.3: LCD display showing input/output voltage, zertage, battery level, and temperature.
3.4 Urruneko kontrola
The wired remote control allows you to monitor the inverter's status and control its power from a convenient location, especially when the inverter is installed in a less accessible area. The remote displays the same information as the inverter's main LCD screen.

Figure 3.4: Remote control unit for convenient operation and monitoring.
4. Konfigurazioa
4.1 Bateriaren konexioa
Connect the inverter to a 24V deep-cycle battery bank. Ensure the battery has a discharge level of 80% or more for optimal performance. Use the provided 2.62ft 1AWG positive (red) and negative (black) battery cables. Connect the red cable to the positive (+) terminal of the inverter and the battery, and the black cable to the negative (-) terminal of the inverter and the battery. Always ensure correct polarity.

Figure 4.1: Proper connection of the inverter to a 24V battery bank.
The inverter can be integrated into various systems, including off-grid solar setups. The diagram below illustrates a typical connection for basic power supply.

Figure 4.2: Typical inverter connection for standalone and off-grid solar systems.
4.2 Lurreratzea
Connect the provided 1.64ft ground wire to the inverter's grounding screw and to a reliable earth ground point. This is crucial for safety, especially with GFCI outlets.
4.3 Urrutiko agintearen konexioa
Plug the remote control cable into the designated remote socket on the inverter's front panel. The remote will then display the inverter's status and allow for remote power control.
5. Funtzionamendu-argibideak
5.1 Piztu/Itzaltzea
To power on the inverter, press the main power switch on the front panel to the 'ON' position. The LCD display will illuminate, and the cooling fans will briefly activate. To power off, switch the main power switch to the 'OFF' position.
5.2 Korronte alternoko kargak konektatzea
Plug your 120V AC appliances into the GFCI outlets on the front panel. For higher power or permanent installations, use the AC terminal block for hardwiring. The pure sine wave output ensures compatibility with sensitive electronic devices like laptops, TVs, refrigerators, and stereos.

Figure 5.1: Inverter providing power to electronic devices, demonstrating pure sine wave output.
5.3 USB atakak erabiltzea
Connect your USB-compatible devices to the available USB-A (QC 18W, QC 24W) or Type-C (PD 60W) ports for fast charging.
6. Protection Mechanisms
The inverter is equipped with six comprehensive protection mechanisms to ensure safe operation and protect connected devices:
- Beheko voltage Babesa: Safeguards against battery over-discharge.
- Gehiegizko bolumenatage Babesa: Protects the inverter and devices from excessive input voltage.
- Gainkarga babesa: Prevents damage from excessive power draw.
- Tenperatura gaindiko babesa: Activates cooling fans and shuts down if internal temperature becomes too high.
- Zirkuitu laburren babesa: Guards against short circuits in the output.
- Alderantzizko polaritatearen babesa: Prevents damage from incorrect battery connections.
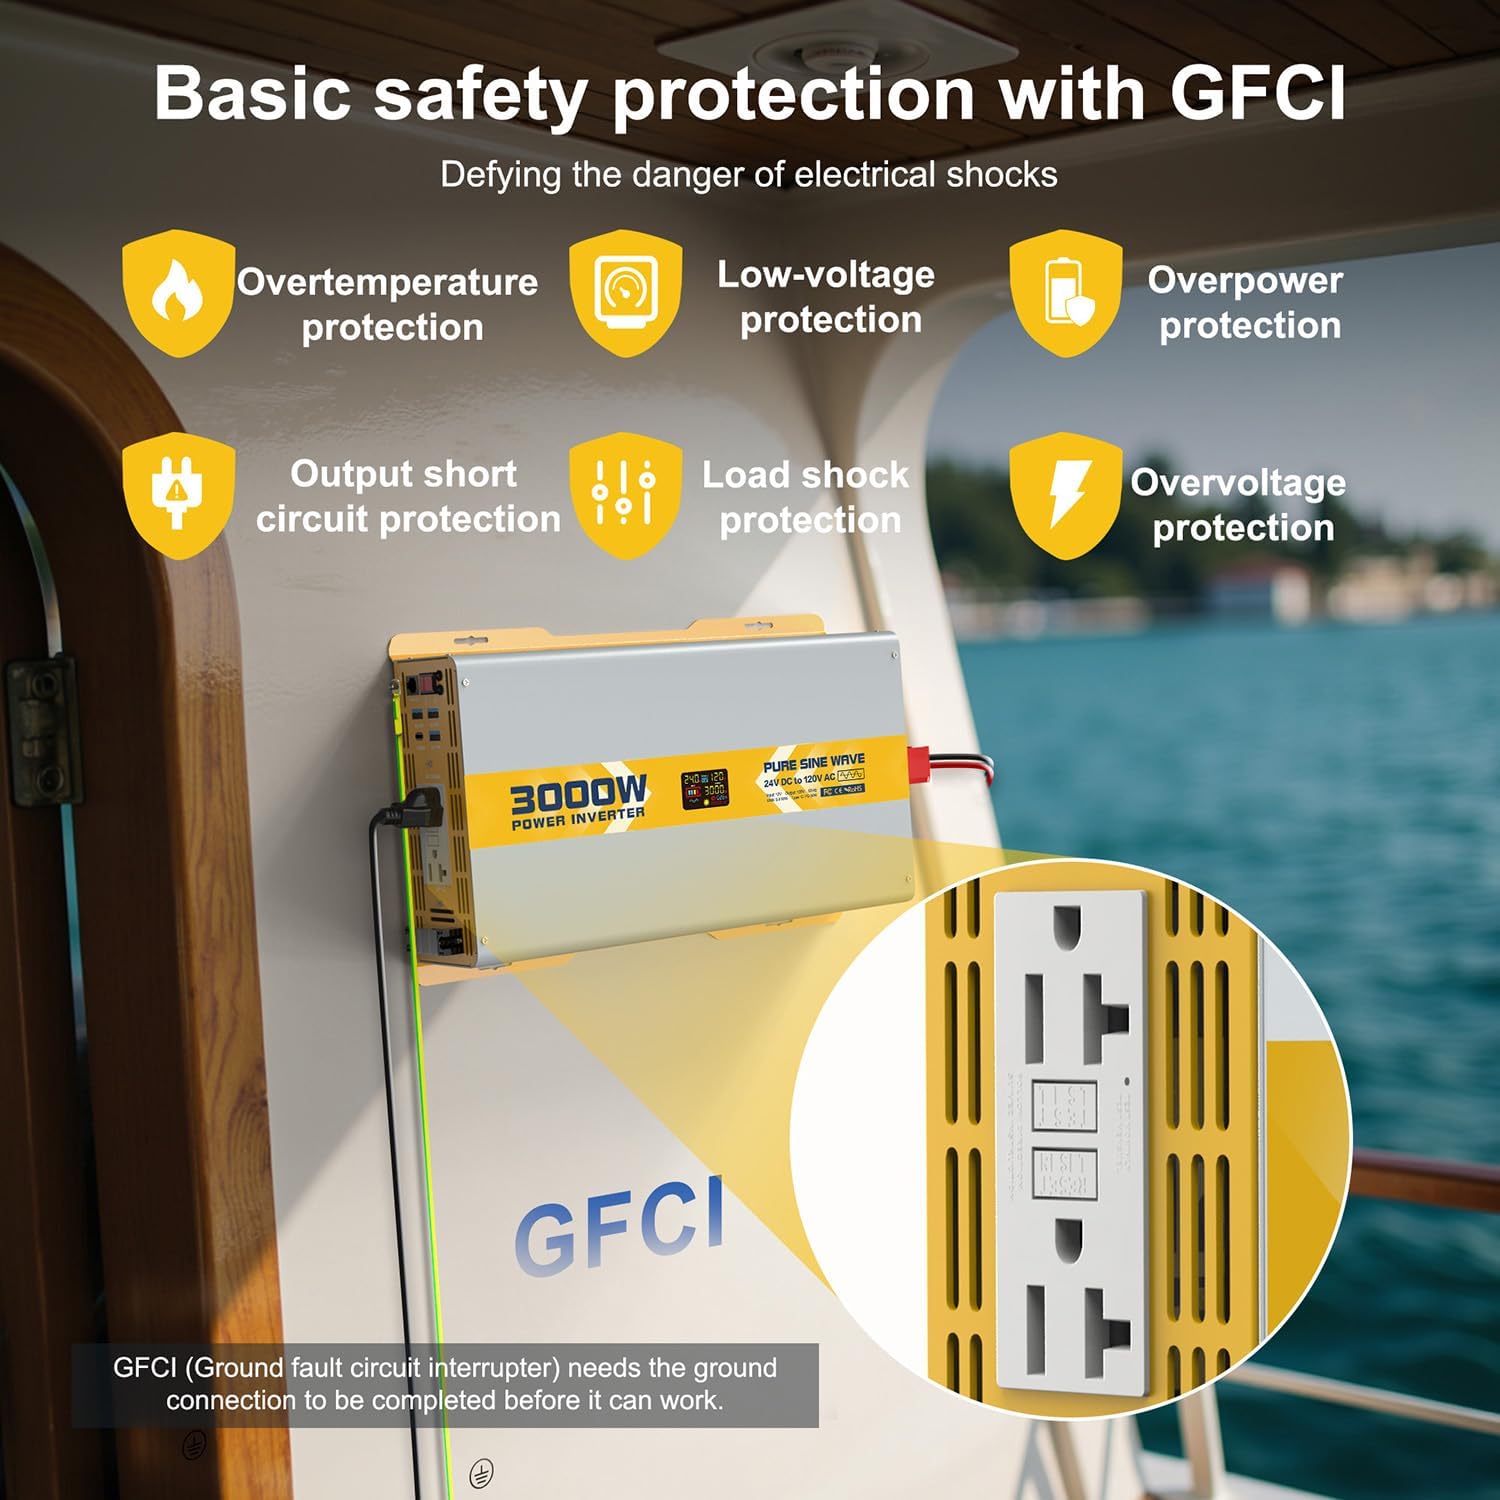
Figure 6.1: GFCI outlets and visual indicators for safety protections.
7. Zehaztapenak
| Ezaugarri | Zehaztapena |
|---|---|
| Modelo zenbakia | 25IVBTK-3KW-24V-120 |
| Etengabeko boterea | 3000W |
| Potentzia gailurra | 6000W |
| Sarrera boltage | 24V DC |
| Irteera boltage | 120 V AC |
| Irteerako maiztasuna | 60Hz |
| Irteerako uhin forma | Sine Wave Pure |
| THD | <3% |
| Eraginkortasuna | > %90 |
| Kargarik Gabeko Korrontea | <1A |
| USB-A irteera | 2 x QC 18W, 1 x QC 24W |
| USB-C irteera | 1 x PD 60W |
| Produktuaren neurriak | 10.24 x 12.99 x 23.62 hazbete |
| Elementuaren pisua | 16 kilo |
7.1 Load Compatibility
The inverter is compatible with a wide range of loads. Refer to the table below for general guidance on wattage compatibility with different inverter sizes. This 3000W model can power most common household and outdoor appliances.

Figure 7.1: General load compatibility for various inverter wattages.
7.2 Battery Capacity Requirements
For optimal performance and to prevent battery damage, ensure your battery bank meets the recommended capacity for the inverter's wattage. For the 3000W inverter, it is recommended to use at least 3 x 100Ah, 2 x 150Ah, or 2 x 200Ah deep-cycle batteries.

Figure 7.2: Recommended battery configurations for different inverter sizes.
8. Arazoak
The LCD display provides detailed fault codes and indicators to help diagnose and resolve common issues. Refer to the display and the table below for guidance:

Figure 8.1: Common fault displays and their corresponding protection states.

Figure 8.2: Detailed fault codes and their explanations for troubleshooting.
9. Mantentzea
The inverter is designed for durability with a sturdy metal structure that also aids in heat dissipation. The smart cooling fans will automatically activate when the internal temperature exceeds 45°C (113°F) or the load is over half, ensuring the inverter operates within appropriate temperature ranges. Keep the inverter in a well-ventilated, cool, and dry environment. Regularly check battery connections for tightness and corrosion.
10. Laguntza
For any questions or assistance, 24-hour customer service is available to help you with your XWJNE Power Inverter.
11. Produktuen bideoak
Hurrengo bideoak ikuspegi orokorra eskaintzen duview of the XWJNE Pure Sine Wave Inverter, demonstrating its features and basic operation. Please note that this video features a 2000W model, but the general functionality and accessories are similar to the 3000W model.
11.1. bideoa: Amaitu daview of the XWJNE 2000W Pure Sine Wave Inverter, including unboxing and basic connections. (Note: This video features a 2000W model, but general features apply to the 3000W model.)