Aqualin YL21177
Aqualin Water Timer Garden Irrigation Hose Timer User Manual
Eredua: YL21177
Produktua amaituview
The Aqualin Water Timer is an advanced irrigation system designed for efficient and automated watering of lawns, gardens, and pools. It features three independent irrigation programs, rain delay functionality, and a manual watering mode, providing flexible control over your watering schedule. Its durable and waterproof design ensures reliable performance in various outdoor conditions.

1. irudia: Aurrealdea view of the Aqualin Water Timer, showing the large LCD display, rotary dial, and control buttons.
Ezaugarri nagusiak:
- 3 Independent Irrigation Programs: Customize watering schedules with distinct start times, durations (1 to 360 minutes), and frequencies (1 hour to 15 days).
- Waterproof and Durable Design: Constructed with waterproof materials and a sealed battery cover to prevent internal leakage. Features a sturdy metal thread connection.
- Interfazea erabiltzeko erraza: Large LCD screen for clear display of watering information and intuitive controls for programming.
- Euri-atzerapen modua: Pause scheduled watering for 6, 12 hours, or 1-7 days to conserve water during rainfall.
- Eskuzko modua: Allows for on-demand watering without affecting programmed schedules.
- Intelligent Timing System: Built-in solenoid valve for precise and stable program execution.
Konfigurazioa
1. Kutxatik ateratzea eta osagaiak
Carefully remove the Aqualin Water Timer from its packaging. Ensure all components are present. The main unit includes the timer body, an integrated metal filter, and a connection nut.

Figure 2: The Aqualin Water Timer highlighting the built-in metal filter for durability and the easy-to-operate rotary dial.
2. Bateriaren instalazioa
- Aurkitu bateriaren konpartimentua tenporizadorearen atzealdean.
- Open the sealed battery cover.
- Insert two (2) AA 1.5V batteries (not included) into the compartment, ensuring correct polarity (+/-).
- Securely close the battery cover to maintain its waterproof seal.
3. Installation to Faucet
- Ensure your outdoor faucet is turned off.
- Thread the Aqualin Water Timer onto your standard outdoor faucet. The top connection features a durable metal thread for a secure fit.
- Tighten the connection by hand until snug. Avoid over-tightening.
- Connect your garden hose to the bottom outlet of the water timer.
- Slowly turn on your outdoor faucet. Check for any leaks at the connections.
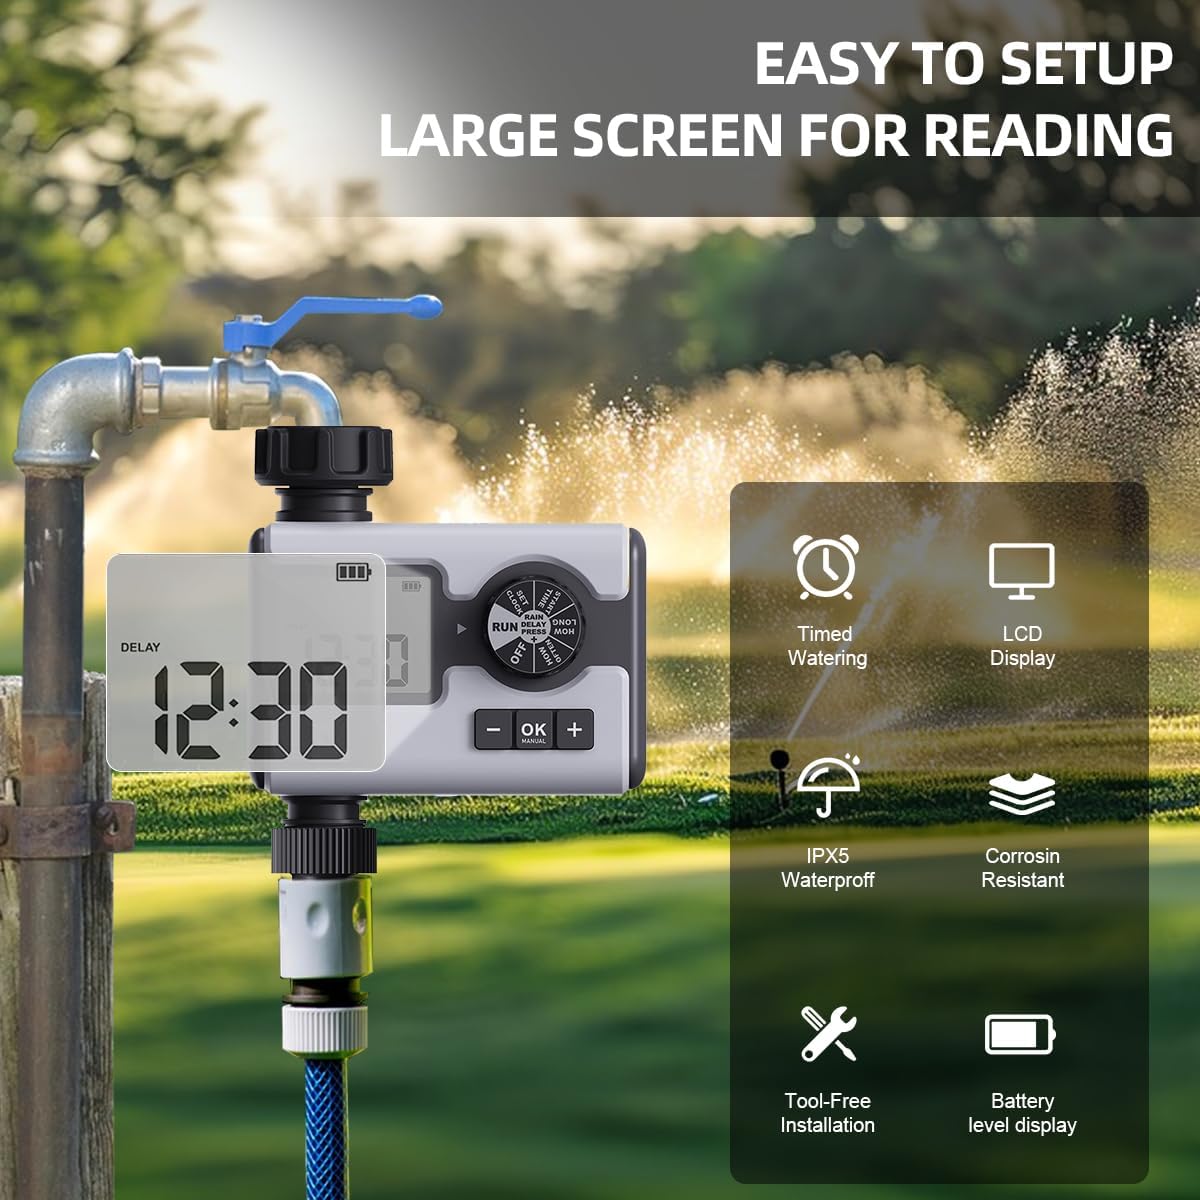
Figure 3: The Aqualin Water Timer connected to a faucet, illustrating its large LCD display for easy reading, IPX5 waterproof rating, corrosion resistance, and tool-free installation.
4. Erlojua ezartzea
- Rotate the dial to the "SET CLOCK" position.
- Use the "+" and "-" buttons to adjust the current time.
- Press "OK" to confirm the setting and move to the next digit or exit the setting mode.
Funtzionamendu-argibideak
1. Understanding the Control Dial
The central rotary dial allows you to navigate through different settings and modes. The available positions are:
- DESaktibatuta: Turns off all watering programs.
- KORRIKA EGIN: Activates the programmed watering schedules.
- EZARRI ERLOUA: Uneko ordua ezartzeko erabiltzen da.
- HASIERA ORDUA: Sets the beginning time for a watering program.
- ZENBAT: Sets the duration of watering.
- ZENBATERO: Sets the frequency of watering.
- EURIAREN ATZERAPENA: Activates the rain delay function.
2. Programming Irrigation Schedules (P1, P2, P3)
The Aqualin Water Timer supports three independent programs (P1, P2, P3). Each program can be configured with its own start time, duration, and frequency.
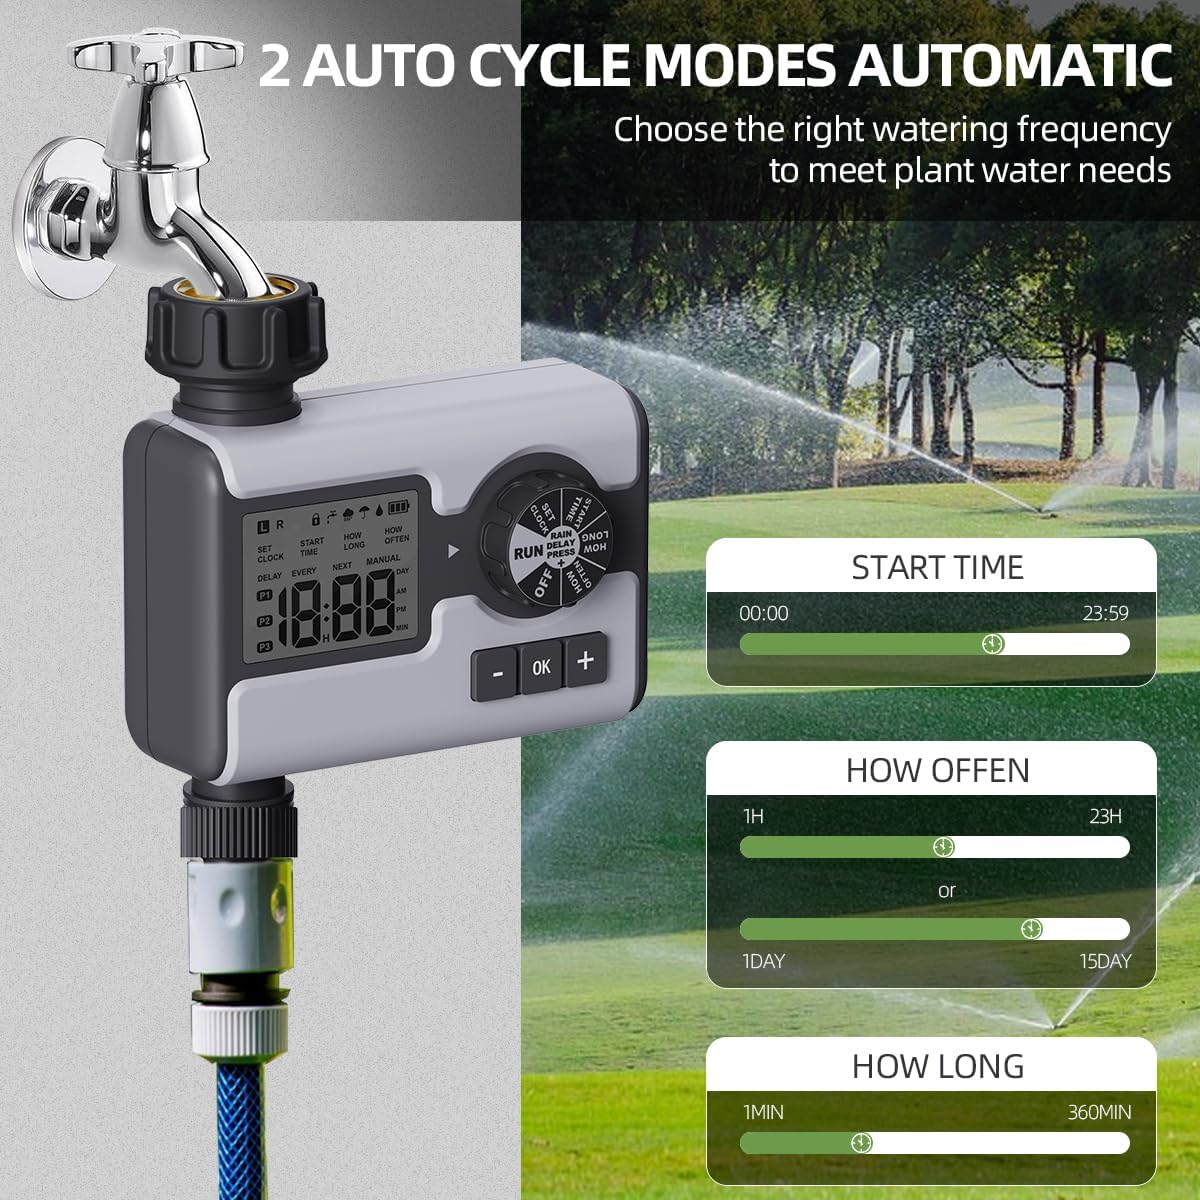
Figure 4: Display illustrating the settings for Start Time (00:00-23:59), How Often (1 hour-23 hours or 1 day-15 days), and How Long (1 minute-360 minutes) for the automatic watering cycles.
- Hautatu programa: While in "RUN" mode, press the "OK" button repeatedly to cycle through P1, P2, P3. The active program will be displayed on the LCD.
- Ezarri hasiera-ordua:
- Rotate the dial to "START TIME".
- Use "+" and "-" buttons to set the desired start time for the selected program.
- Sakatu "Ados" berresteko.
- Ezarri ureztatze iraupena ("ZENBAT DENBORA"):
- Rotate the dial to "HOW LONG".
- Use "+" and "-" buttons to set the watering duration from 1 minute to 360 minutes.
- Sakatu "Ados" berresteko.
- Ureztatze-maiztasuna ezarri ("ZENBAT MAIZ"):
- Rotate the dial to "HOW OFTEN".
- Use "+" and "-" buttons to set the frequency: from 1 hour to 23 hours, or from 1 day to 15 days.
- Sakatu "Ados" berresteko.
- After setting all parameters for a program, rotate the dial back to "RUN" to activate the schedule.
3. Rain Delay Mode
The rain delay feature allows you to temporarily pause your watering schedule to avoid overwatering during or after rainfall.

Figure 5: The Aqualin Water Timer displaying the rain delay function, which can be set for 6/12 hours or 1-7 days.
- While the timer is in "RUN" mode, press the "+" button.
- The display will show "DELAY". Use the "+" or "-" buttons to select the desired delay duration: 6 hours, 12 hours, or 1 to 7 days.
- Press "OK" to confirm the rain delay. The timer will resume its schedule automatically after the delay period ends.
4. Manual Watering Mode
The manual mode allows for immediate, on-demand watering without interrupting your pre-programmed schedules.

Figure 6: A person using the manual watering feature with the Aqualin Water Timer, indicating that temporary water use does not alter automatic watering schedules. The watering duration can be set from 1 minute to 360 minutes.
- While the timer is in "RUN" mode, press the "MANUAL" (OK) button.
- The display will show the manual watering duration. Use the "+" and "-" buttons to adjust the desired manual watering time.
- Sakatu "Ados" eskuzko ureztatzea hasteko.
- To stop manual watering prematurely, press the "MANUAL" (OK) button again.
Mantentzea
- Garbiketa: Periodically wipe the exterior of the timer with a damp zapi bat erabili zikinkeria eta hondakinak kentzeko. Ez erabili garbitzaile urratzailerik.
- Iragazkien garbiketa: The timer has a built-in metal filter. If water flow is reduced, unscrew the timer from the faucet, remove and clean the filter screen under running water. Reinstall the filter before reattaching the timer.
- Bateria ordezkatzea: Replace batteries when the low battery indicator appears on the LCD screen. Always use fresh AA 1.5V alkaline batteries.
- Neguko biltegiratzea: Before freezing temperatures, disconnect the timer from the faucet and hose. Remove the batteries. Store the timer indoors in a dry, frost-free location to prevent damage.
Arazoak konpontzea
| Arazoa | Kausa posiblea | Irtenbidea |
|---|---|---|
| Timer not turning on/LCD blank. | Bateriak hilda edo gaizki instalatuta. | Replace with new AA 1.5V batteries, ensuring correct polarity. |
| Ur-fluxurik ez edo ur-presio baxua. |
|
|
| Timer not watering at scheduled times. |
|
|
| Ura konexioetatik isurtzen. | Loose connection or missing/damaged washer. | Ensure connections are hand-tight. Check and replace rubber washers if damaged. |
Zehaztapenak
| Ezaugarri | Xehetasuna |
|---|---|
| Marka | Aqualin |
| Modelo zenbakia | YL21177 |
| Materiala | Plastic (with metal thread connection) |
| Kolorea | Grisa |
| Produktuaren neurriak (L x W x H) | 2.56" L x 5.24" W x 5.91" H |
| Elementuaren pisua | 357 gramo (12.6 ontza) |
| Uraren presioaren barrutia | 14.5 psi eta 116 psi |
| Energia iturria | 2 x AA 1.5V pila (ez daude barne) |
| Ureztatzeko Iraupena | Minutu 1 eta 360 minutu |
| Ureztatze Maiztasuna | 1 hour to 15 days |
| Euri-atzerapen aukerak | 6 hours, 12 hours, 1-7 days |
| Iragazgaitzaren balorazioa | IPX5 (implied from "IPX5 Waterproff" image) |
Bermea eta Laguntza
For warranty information and customer support, please refer to the documentation provided with your purchase or contact the retailer where the product was acquired. You may also visit the official Aqualin weblaguntza gehiago jasotzeko gunea.
Oharra: Ez da saltzailearen produktuen bideo ofizialik aurkitu emandako datuetan.
Ask a question about this manual
Ask about setup, troubleshooting, compatibility, parts, safety, or missing instructions. Manuals+ will review the question and use this page’s manual context to help answer it.