
1. Sarrera
This manual provides essential information for setting up, operating, maintaining, and troubleshooting your NIMO 15.6-inch FHD Business Laptop. Please read this guide thoroughly to ensure optimal performance and longevity of your device. Keep this manual for future reference.
2. Zer dago kutxan
Egiaztatu elementu guztiak ontzian daudela:
- 1 x Nimo N154 Laptop
- 1 x Type-C 65W PD Fast Charger
- 1 x Erabiltzailearen eskuliburua (dokumentu hau)
- Windows 11 Home (pre-installed)
3. Produktua amaitu daview
Familiarize yourself with the components and ports of your NIMO laptop.
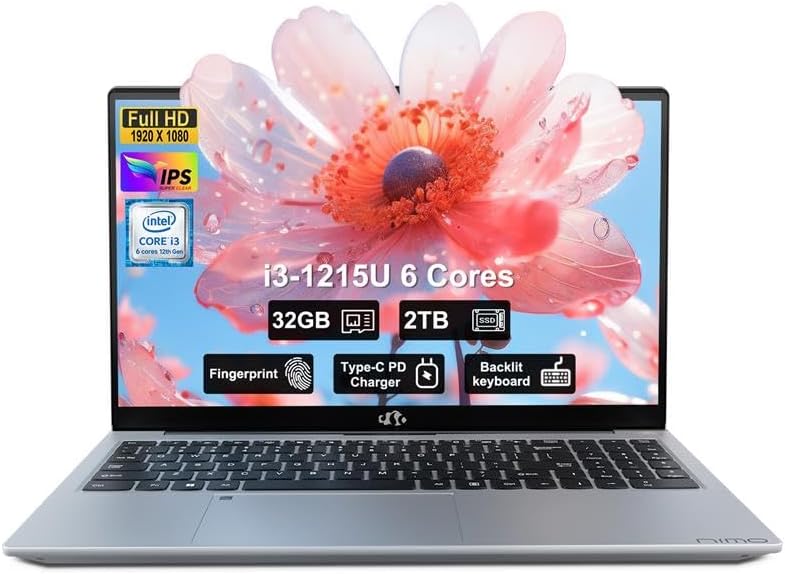
Irudia: Aurrealdea view of the NIMO 15.6-inch FHD Business Laptop, showcasinpantaila eta teklatua g.
3.1. Ataka eta konektoreak
The NIMO N154 laptop features a variety of ports for connecting peripherals and external devices.

Image: Diagram illustrating the various ports on the left and right sides of the NIMO laptop, including USB, HDMI, Type-C, and audio jack.
- Ezkerreko aldea:
- Kensington Lock: For securing your laptop.
- Headphone Combo Jack: For audio output and microphone input.
- USB 3.0 Port (x2): For high-speed data transfer.
- USB 2.0 Port (x1): For connecting standard USB devices.
- Micro SD Card Reader: For expanding storage or transferring files memoria-txarteletatik.
- Eskuineko aldea:
- Type-C Port (Charge Only): For connecting the 65W PD charger.
- USB 3.0 Port (x1): For high-speed data transfer.
- HDMI Port: For connecting to external displays.
- Type-C Port (Multifunction): Supports data transfer and display output.
- Charge LED Indicator: Shows charging status.
4. Konfigurazioa
4.1. Hasierako piztea eta kargatzea
- Desegin: Kontu handiz atera ordenagailu eramangarria eta osagarri guztiak paketetik.
- Konektatu energia: Plug the 65W Type-C PD Fast Charger into a power outlet and then connect the Type-C connector to the designated "Charge Only" Type-C port on the laptop.
- Kargatu bateria: Allow the laptop to charge for at least 30 minutes before initial use, or until the charge LED indicates a full charge.
- Piztu: Open the laptop lid and press the power button, typically located on the top right of the keyboard or side.

Image: The 65W Type-C PD Fast Charger, illustrating its compact design and universal compatibility.
4.2. Windows 11 konfigurazioa
Follow the on-screen instructions to complete the Windows 11 initial setup:
- Hautatu zure eskualdea eta teklatuaren diseinua.
- Konektatu Wi-Fi sare batera.
- Hasi saioa zure Microsoft kontuarekin edo sortu berri bat.
- Konfiguratu PIN bat saioa hasteko azkar.
- Review eta pribatutasun ezarpenak onartu.
5. Funtzionamendu-argibideak
5.1. Hatz-marken irakurgailua
The integrated fingerprint sensor allows for secure and quick login without passwords.
- Konfigurazioa: Navigate to Windows Settings > Accounts > Sign-in options > Fingerprint recognition (Windows Hello).
- Erregistratu hatz-marka: Follow the on-screen prompts to register your fingerprint. You may need to scan your finger multiple times from different angles.
- Erabilera: To log in, simply place your registered finger on the fingerprint sensor when prompted.

Image: Close-up of the laptop's touchpad area showing the fingerprint reader, and a separate image of the webcam with a privacy shield.
5.2. Backlit Keyboard
Atzeko argiztapendun teklatuak ikusgarritasuna hobetzen du argi gutxiko baldintzetan.
- Toggle Backlight: Use the dedicated function key (often Fn + Fx, where Fx is a key with a keyboard backlight icon) to cycle through backlight brightness levels or turn it off. Refer to your keyboard for the specific key combination.
5.3. Webcam Privacy Shield
The laptop includes a physical webcam privacy shield for enhanced security.
- Aktibatu/Desaktibatu: Slide the physical switch located next to the webcam to cover or uncover the camera lens.
5.4. Kanpoko pantailak konektatzea
You can extend your workspace by connecting an external monitor or projector.
- Konektatu kablea: Use an HDMI cable to connect your external display to the laptop's HDMI port, or a compatible Type-C to DisplayPort/HDMI adapter for the multifunction Type-C port.
- Configure Display: Sakatu Windows tekla + P to open the Project menu. Select your preferred display mode (e.g., Duplicate, Extend, Second screen only).
6. Mantentzea
6.1. Ordenagailu eramangarria garbitzea
- Pantaila: Erabili lipurrik gabeko zapi leun bat dampUrarekin edo pantaila-garbitzaile batekin garbitu. Ez ihinztatu likidoa zuzenean pantailan.
- Teklatua eta txasisa: Erabili zapi leun eta lehor bat. Zikinkeria egoskorra bada, ukitu apur batamp xaboi leunarekin bustitako oihal bat erabil daiteke, likidorik irekiduretan sartzen ez dela ziurtatuz.
- Portuak: Erabili aire konprimatua portuetako hautsa astiro-astiro kentzeko.
6.2. Bateria zaintzea
- Saihestu bateria maiz erabat deskargatzea.
- Denbora luzez erabiltzen ez baduzu, gorde ordenagailu eramangarria leku fresko eta lehor batean.
- Ez jarri ordenagailu eramangarria tenperatura altuetan.
6.3. Software eguneraketak
- Egiaztatu eta instalatu aldizka Windows eguneraketak sistemaren egonkortasuna eta segurtasuna bermatzeko. Joan Ezarpenak > Windows Eguneratzea atalera.
- Keep device drivers updated for optimal performance.
7. Arazoak
Atal honek aurki ditzakezun arazo ohikoenei heltzen die.
7.1. Ordenagailu eramangarria ez da pizten
- Ziurtatu kargagailua ordenagailu eramangarrira eta funtzionatzen duen entxufe batera ondo konektatuta dagoela.
- Egiaztatu entxufea funtzionatzen duela beste gailu bat konektatuz.
- Allow the laptop to charge for at least 30 minutes if the battery is completely drained.
- Saiatu berrezarpen gogorra egiten pizteko botoia 15-20 segundoz sakatuta edukiz.
7.2. Display Issues (No Image, Flickering)
- If an external monitor is connected, disconnect it to see if the laptop's screen works.
- Doitu pantailaren distira funtzio-teklak erabiliz (adibidez, Fn + F5/F6).
- Berrabiarazi ordenagailu eramangarria.
- If connected to an external display, ensure the cable is properly seated and try a different cable or port.
7.3. Wi-Fi konexio arazoak
- Ensure Wi-Fi is enabled in Windows Settings > Network & Internet > Wi-Fi.
- Berrabiarazi zure bideratzailea eta modema.
- Ahaztu sarea eta konektatu berriro.
- Eguneratu zure Wi-Fi kontrolatzaileak.
7.4. Errendimendu motela
- Itxi atzeko planoan exekutatzen ari diren beharrezkoak ez diren aplikazioak.
- Check Task Manager (Ctrl+Shift+Esc) for processes consuming high CPU, RAM, or disk usage.
- Ziurtatu nahikoa leku libre duzula zure SSDan.
- Run a disk cleanup and defragmentation (for HDD, though this is SSD).
- Eskaneatu malwarea edo birusak bilatzeko.
8. Zehaztapenak
Detailed technical specifications for the NIMO N154 Laptop.

Image: Diagram illustrating the Intel Core i3-1215U processor with details on cores, threads, power consumption, and Turbo Boost frequency.

Image: Visual representation of 32GB DDR4 RAM and 2TB PCIe 4.0 SSD, highlighting dual RAM channel capability.
| Ezaugarri | Zehaztapena |
|---|---|
| Ereduaren izena | NIMO N154 |
| Pantailaren tamaina | 15.6 hazbete |
| Pantailaren bereizmena | 1920 x 1080 pixel (FHD IPS) |
| Prozesadorea | Intel Core i3-1215U (6-core, 8-thread, up to 4.4GHz) |
| RAM | 32 GB DDR4 (3200 MHz) |
| Biltegiratzea | 2 TB PCIe SSD |
| Koprozesadore grafikoa | Intel Graphics integratua |
| Sistema eragilea | Windows 11 Home |
| Haririk gabeko mota | 802.11a/b/g/n/ac (Wi-Fi 6) |
| USB atakak | 2x USB 3.0, 1x USB 2.0, 2x Type-C (1x Charge Only, 1x Multifunction) |
| HDMI ataka | 1 x HDMI 2.1 |
| Ezaugarri bereziak | Backlit Keyboard, Fingerprint Reader, HD Audio, Memory Card Slot, Numeric Keypad, Webcam Privacy Shield |
| Bateriaren iraupena (batez bestekoa) | 5 ordu |
| Elementuaren pisua | 3.8 kilo |
| Produktuaren neurriak (LxWxH) | 14.07 x 8.98 x 0.76 hazbete |
| Kolorea | Zilarrezkoa |
9. Bermea eta Laguntza
Nimo Direct Inc. is committed to customer satisfaction.
- Fabrikatzailearen bermea: Your NIMO laptop is covered by a comprehensive 2-Year Manufacturer's Warranty. This warranty covers defects in materials and workmanship under normal use.
- Itzulketen politika: We offer 90-Day Hassle-Free Returns. If you are not satisfied with your purchase, you may return it within 90 days of receipt.
- Bezeroarentzako laguntza: Our dedicated US support team is available to provide swift issue resolution or immediate replacements. For assistance, please refer to the contact information provided on the NIMO official webgunea edo zure erosketa-dokumentazioa.

Image: Illustration of NIMO's after-sales support, including partial US assembly, 90-day free returns, 2-year after-sales support, and 24/7 customer service.