
1. Sarrera
Thank you for choosing the HANMATEK SF4 5-in-1 Multifunction Stud Finder. This device is designed to assist you in safely and accurately locating studs, metal objects, pipes, and live AC wires behind walls, floors, and ceilings. Please read this manual thoroughly before use to ensure proper operation and to maximize the tool's performance and longevity.
2. Segurtasun informazioa
Caution: This product can detect live AC wires. Always exercise extreme caution when working near electrical components to avoid electrical shock or damage to the product. Disconnect power to the area if possible before drilling or cutting.
- Always wear appropriate personal protective equipment (PPE) when performing tasks that involve drilling or cutting into walls.
- Do not rely solely on the stud finder for safety. Use other methods, such as consulting building plans, to confirm the presence of electrical wiring or plumbing.
- Mantendu gailua uretatik eta muturreko tenperaturatik urrun.
- Ez saiatu gailua irekitzen edo aldatzen. Mantendu konponketa guztiak langile kualifikatuen esku.
3. Produktua amaitu daview
The HANMATEK SF4 is an advanced wall scanner featuring a microprocessor chip for precise detection. It offers multiple scanning modes and a high-visibility LCD display with audio alerts for clear indications.
3.1 Ezaugarri nagusiak
- 5-in-1 Detection: Locates wood studs, metal studs, metal pipes, and live AC wires.
- Multiple Scan Depths: Includes three stud scan depths (12.5mm, 25mm, 38mm), metal scan (38mm), and AC scan (120mm).
- HD LCD pantaila: Backlit screen shows center, edge, and location of detected objects, along with battery status.
- Audio Alarma: Provides audible alerts to pinpoint object locations.
3.2 Osagaiak eta kontrolak
Familiarize yourself with the different parts of your HANMATEK SF4 stud finder:
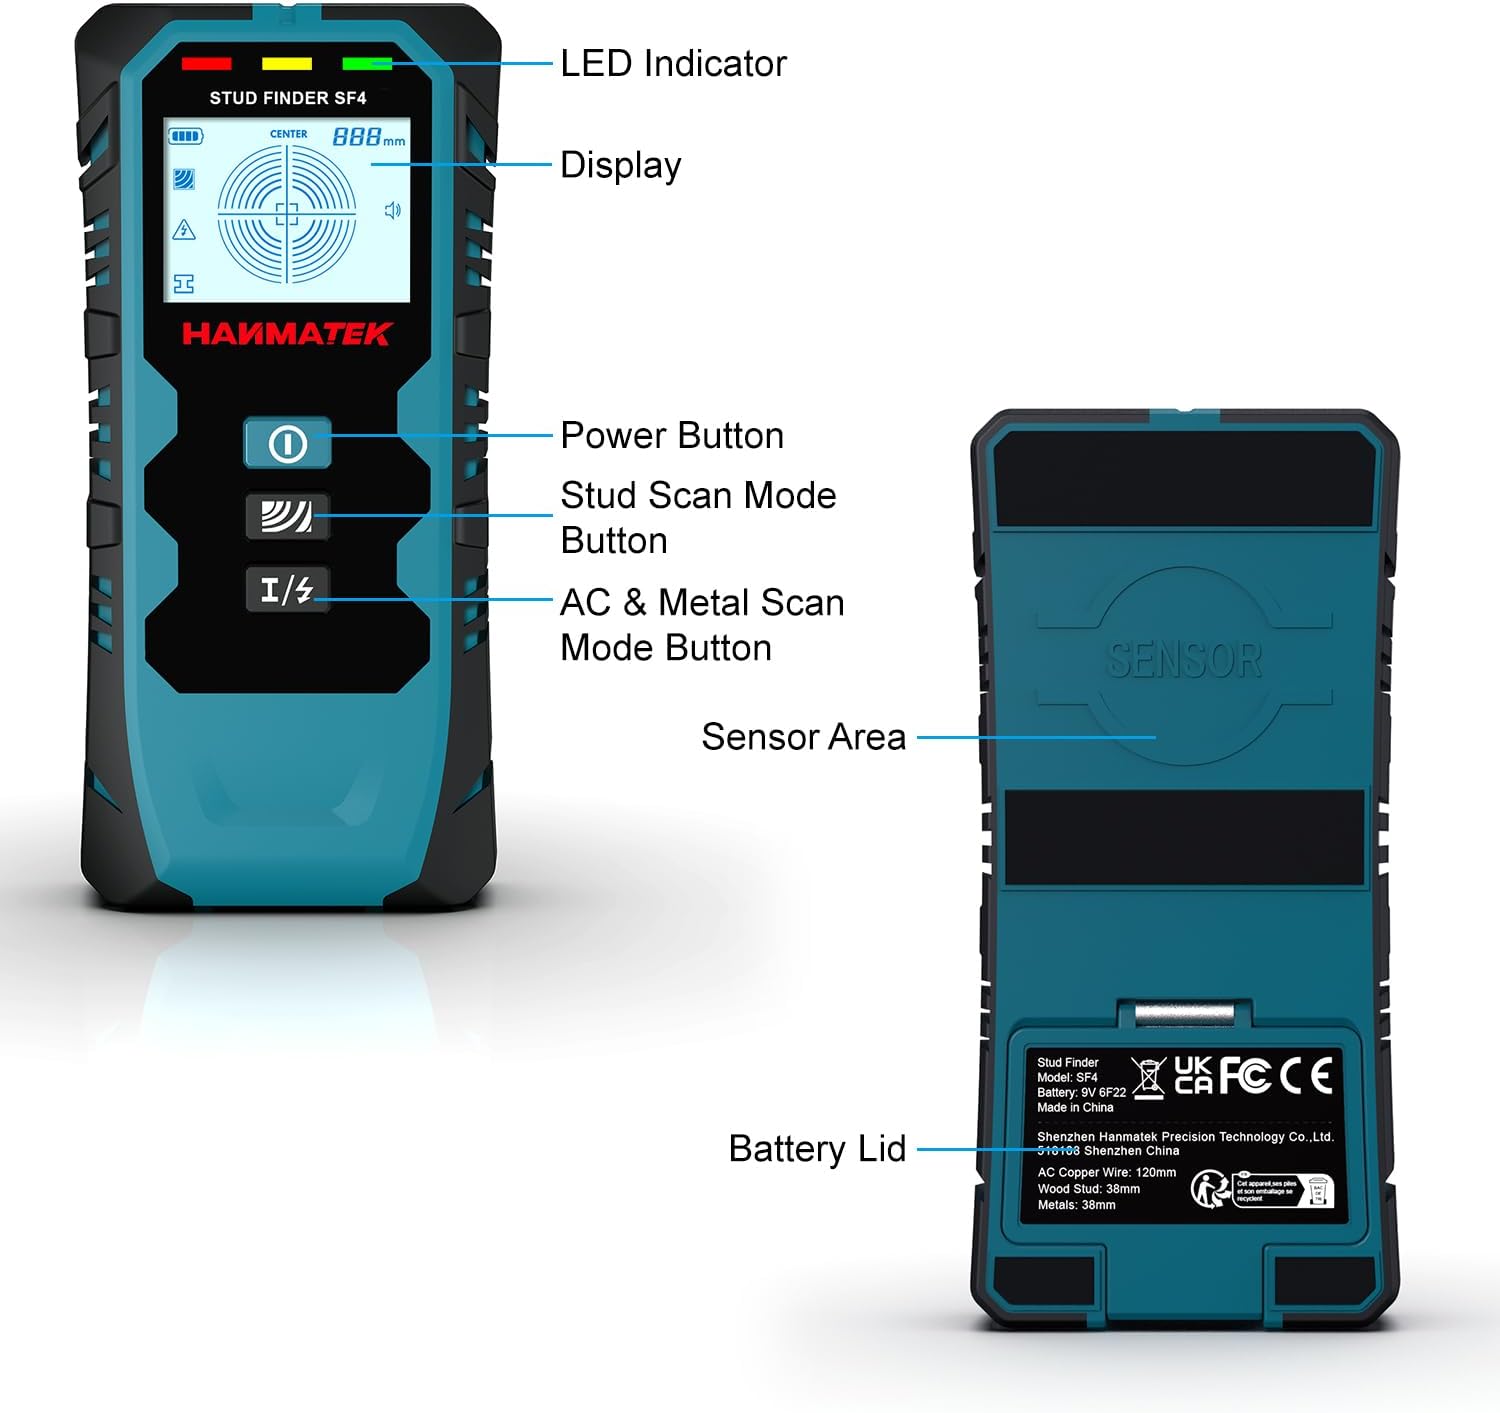
3.2.1. irudia: Labeled diagram of the HANMATEK SF4 stud finder, indicating the LED indicator, display screen, power button, stud scan mode button, AC & metal scan mode button, sensor area, and battery lid.
- LED adierazlea: Detekzio-egoerari buruzko iritzi bisuala ematen du.
- Pantaila: LCD screen showing detection information, mode, and battery level.
- Pizteko botoia: Gailua pizten eta itzaltzen du.
- Stud Scan Mode Button: Cycles through different stud detection depths.
- AC & Metal Scan Mode Button: Cycles between AC wire and metal detection modes.
- Sentsorearen eremua: The part of the device that must be in contact with the wall for scanning.
- Bateriaren estalkia: Bateriaren konpartimenturako estalkia.
4. Hasteko urratsak (konfigurazioa)
4.1 Bateriaren instalazioa
The HANMATEK SF4 requires one 9V battery (included). To install:
- Open the battery lid located on the back of the device.
- Connect the 9V battery to the battery clip, ensuring correct polarity (+/-).
- Place the battery into the compartment and close the lid securely.
4.2 Hasierako Kalibrazioa
Proper calibration is essential for accurate detection. The device must be calibrated against the wall surface before each scan.

4.2.1. irudia: Step 1: Press the Power Button to turn on the tool.

4.2.2. irudia: Step 2: Press the Mode Button to switch to the mode you need and wait for the signal bars to disappear and a "Beep" sound.
- Sakatu pizteko botoia gailua pizteko.
- Select the desired scan mode (Stud, Metal, or AC) by pressing the respective mode button.
- Place the device flat against the wall in an area where you are certain there are no studs, metal, or wires. This is typically an empty section of the wall.
- Hold the device steady and wait for the calibration process to complete. The display will show a calibration icon, and you may hear a beep sound. The signal bars should disappear, and the green LED indicator will light up, indicating it's ready to scan.
- If you lift the device or change the mode, you must recalibrate.
5. Funtzionamendu-argibideak
5.1 Eskaneatze Prozedura Orokorra

5.1.1. irudia: Step 3: Move the scanner slowly along the wall. Do not lift the instrument or apply additional pressure.

5.1.2. irudia: Step 4: The progress bar on the screen changes with the distance of the object. When the signal is full, the indicator light flashes and a ticking sound is emitted, meaning that the center of the object has been found.
- After calibration, slowly slide the scanner horizontally across the wall surface. Keep the device flat against the wall without lifting or tilting it.
- Observe the LCD display and listen for audio alerts.
- As the device approaches an object, the signal strength bars on the display will increase.
- When the device detects the edge of an object, the display will indicate the edge, and an audio alert may sound.
- When the device is directly over the center of an object, the display will show the "CENTER" indicator, the signal bars will be full, the LED indicator will flash, and a continuous beep will sound. Mark this spot.
- To confirm, scan the area from the opposite direction and mark the center again. The true center is usually between the two marks.
5.2 Stud Scan Modes (1st, 2nd, 3rd)

5.2.1. irudia: Stud Mode Detection (1st, 2nd, 3rd) illustrating different detection depths.
The SF4 offers three stud scan modes for varying wall thicknesses:
- Stud Scan Mode 1 (12.5mm / 0-½ inch): For detecting studs in thinner walls.
- Stud Scan Mode 2 (25mm / 0-1 inch): For standard wall thicknesses.
- Stud Scan Mode 3 (38mm / 0-1½ inches): For deeper detection of studs.
Erabiltzeko:
- Press the Stud Scan Mode Button to cycle through the three modes. The selected mode will be displayed on the LCD.
- Calibrate the device as described in Section 4.2.
- Slowly scan the wall horizontally. The device will indicate the edges and center of wood or metal studs.
- If no stud is found in a shallower mode, switch to a deeper mode and recalibrate before scanning again.
5.3 Metal Scan Mode

5.3.1. irudia: Metal Mode Detection, showing detection of metal objects up to 1.50 inches (38mm) deep.
This mode detects ferrous and non-ferrous metals, such as pipes, rebar, and metal studs, up to a depth of 38mm (1.50 inches).
- Press the AC & Metal Scan Mode Button until the Metal Scan icon appears on the display.
- Kalibratu gailua.
- Scan the wall slowly. The device will indicate the presence and approximate location of metal objects.
5.4 AC Wire Detection Mode

5.4.1. irudia: AC Wire Detection, showing the device indicating live, unshielded electrical wiring up to 4.72 inches (120mm) deep.
This mode detects live, unshielded AC electrical wiring up to a depth of 120mm (4.72 inches). For safety, the wire warning detection icon will flash in all modes if live, unshielded wires are detected.
- Press the AC & Metal Scan Mode Button until the AC Scan icon appears on the display.
- Kalibratu gailua.
- Scan the wall slowly. The device will indicate the presence of live AC wires.
- Always be aware of the AC wire warning icon, even when using other modes.
5.5 Interpreting the Display and Audio Alerts

5.5.1. irudia: Easy to Read Digital LCD Display & Audio Alarm, illustrating how the display indicates stud edges and center.
The LCD display provides visual cues, while the audio alarm offers audible feedback:
- Signal Strength Bars: Increase as the device approaches an object.
- Edge Indicator: Shows when the device is over the edge of a stud or object.
- CENTER Indicator: Appears when the device is directly over the center of a detected object.
- AC Wire Warning Icon: Flashes when live, unshielded AC wires are detected in any mode.
- Bateria adierazlea: Uneko bateria-maila erakusten du.
- Audio alertak: Beeps indicate detection of objects, with a continuous beep for the center.
6. Mantentzea
- Garbiketa: Garbitu gailua leun batekin, damp oihal. Ez erabili garbitzaile edo disolbatzaile urratzailerik.
- Biltegiratzea: Store the stud finder in its protective pouch in a dry, dust-free environment when not in use. Remove the battery if storing for extended periods to prevent leakage.
- Bateria ordezkatzea: Ordeztu 9V-ko bateria bateria baxuaren adierazlea pantailan agertzen denean.
7. Arazoak
If you encounter issues with your HANMATEK SF4, refer to the following common problems and solutions:
- Inaccurate Readings or No Detection:
- Ensure the device is properly calibrated against an empty section of the wall before each scan.
- Slide the scanner slowly and steadily. Rapid movement can lead to inaccurate results.
- Ensure the device is held flat against the wall and not tilted.
- Check the battery level and replace if low.
- Try a different scan mode, especially a deeper stud scan mode if you suspect objects are further behind the surface.
- Wall materials can affect performance. Very thick or unevenly textured walls may reduce accuracy.
- Gailua ez da pizten:
- Check if the 9V battery is correctly installed with proper polarity.
- Ordeztu bateria berri batekin.
- Constant AC Wire Warning:
- This indicates the presence of live, unshielded AC wires. Exercise extreme caution.
- If you suspect a false positive, try scanning in a different area or recalibrate. However, always prioritize safety.
8. Zehaztapenak
| Ezaugarri | Xehetasuna |
|---|---|
| Marka | HANMATEK |
| Modelo zenbakia | SF4 |
| Stud Scan Depth (1st) | 12.5 mm (0-½ hazbete) |
| Stud Scan Depth (2nd) | 25 mm (0-1 hazbete) |
| Stud Scan Depth (3rd) | 38 mm (0-1½ hazbete) |
| Metal Scan Depth | 38 mm (1.50 hazbete) |
| AC Wire Scan Depth | 120 mm (4.72 hazbete) |
| Energia iturria | Bateriaz elikatua (1 x 9V bateria barne) |
| Materiala | Plastikoa |
| Elementuaren pisua | 280 gramo (9.9 ontza) |
| Produktuaren neurriak | 8.82 x 3.74 x 1.95 hazbete |
| Fabrikatzailea | Shenzhen Hanmatek Precision Technology Co.,Ltd. |
9. Bermea eta Laguntza
For warranty information and technical support, please refer to the documentation included with your product packaging or visit the official HANMATEK webgunea. Gorde erosketa-agiria erosketaren frogagiri gisa.


