Segurtasun-argibide garrantzitsuak
Mesedez, irakurri arretaz argibide guztiak tresna hau erabili aurretik. Gorde eskuliburu hau etorkizunean erreferentzia gisa.
- Ziurtatu liburukiatagGailuaren balorazioak zure tokiko energia-hornidurarekin bat dator konektatu aurretik.
- Ez murgildu gailua, kablea edo entxufea uretan edo beste likido batzuetan.
- Always unplug the machine from the power outlet when not in use and before cleaning.
- Ez erabili aparatua kablea edo entxufea hondatuta dagoenean, edo aparatuak gaizki funtzionatzen duenean edo nolabait hondatu ondoren.
- Mantendu eskuak eta kableak tresnaren atal beroetatik urrun funtzionatzen ari den bitartean.
- Erabili fabrikatzaileak gomendatutako osagarriak soilik.
- Etxetresna hau etxeko erabilerarako soilik da.
- Exercise extreme caution when handling hot steam and hot water.
Produktua amaituview
Ezagutu zure espresso makinaren osagaiak.
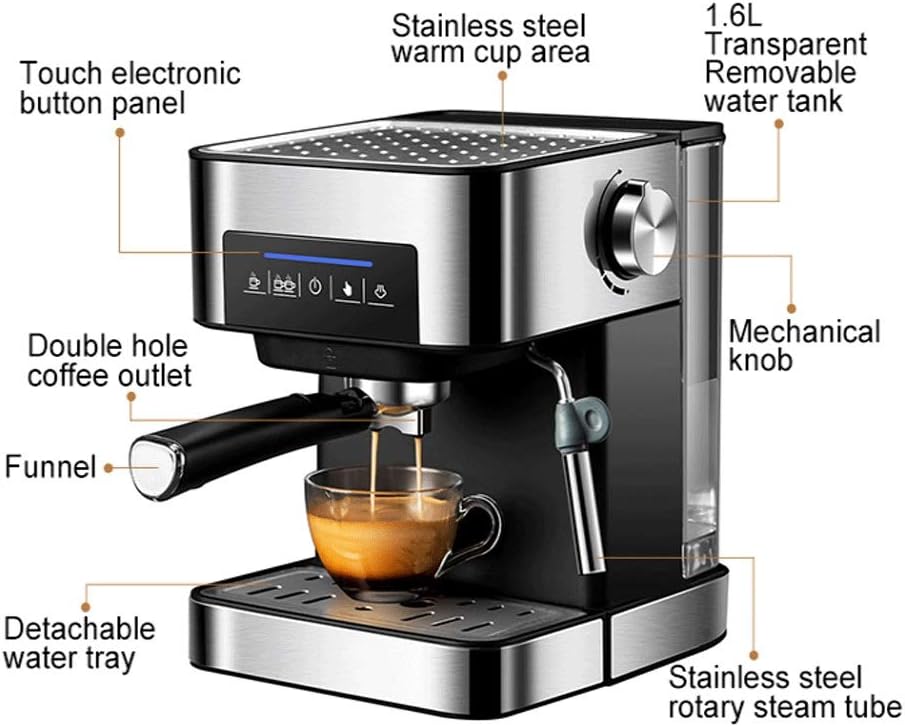
Irudia: Labeled diagram showing the various parts of the espresso machine.
- Touch electronic button panel: For controlling brewing functions.
- Stainless steel warm cup area: Top surface for pre-warming espresso cups.
- 1.6L Transparent Removable water tank: Located at the back, holds water for brewing.
- Mechanical knob: Controls steam function and power on/off.
- Double hole coffee outlet: Dispenses espresso into two cups simultaneously.
- Funnel (Portafilter): Kafea prestatzeko ehoa gordetzen du.
- Detachable water tray (Drip tray): Gehiegizko likidoa biltzen du eta erraz garbitzen da.
- Stainless steel rotary steam tube (Frother Wand): For steaming milk.
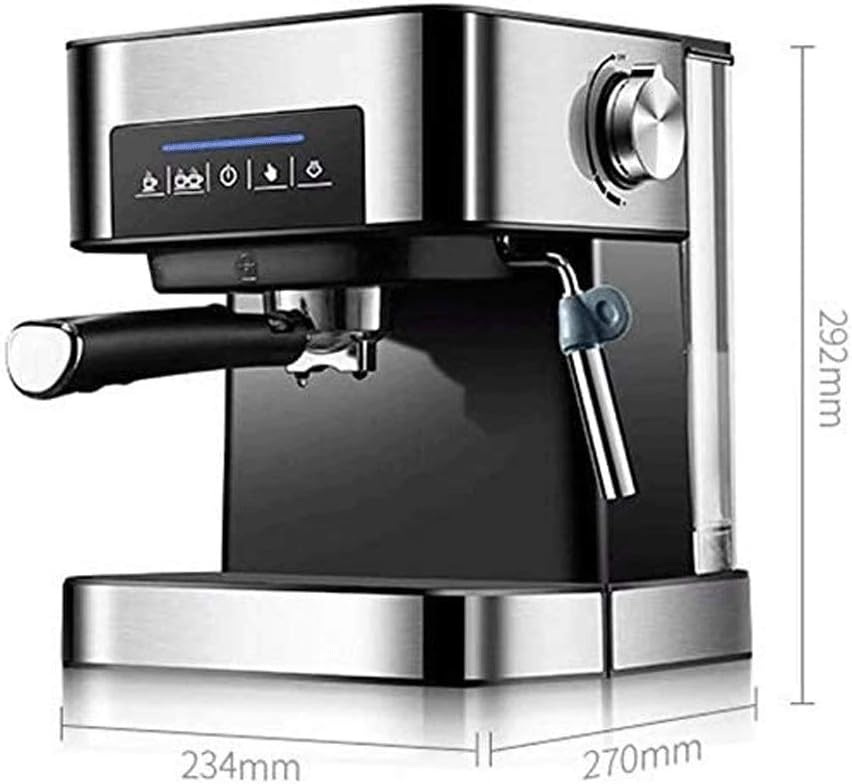
Irudia: Product dimensions: 234mm (width) x 270mm (depth) x 292mm (height).
Konfigurazioa
Before first use, follow these steps to prepare your espresso machine.
- Despaketatzea: Kontu handiz kendu ontziratzeko material guztiak eta ziurtatu pieza guztiak daudela.
- Hasierako garbiketa: Wash the water tank, portafilter, filter basket, and drip tray with warm, soapy water. Rinse thoroughly and dry. Wipe the exterior of the machine with a damp oihal.
- Ur depositua instalatzea:Fill the removable water tank with fresh, cold water up to the MAX line. Place the water tank securely into its position at the back of the machine. Ensure it is properly seated to prevent leaks.

Irudia: A hand placing the removable 1.5L water tank into the back of the espresso machine.
- Potentzia-konexioa: Entxufatu korronte-kablea lurreko hartune elektriko batean.
- Makina inprimatzea: Before brewing coffee, it is recommended to run a cycle with just water to prime the pump and clean the internal system. Fill the water tank, place a cup under the coffee outlet, and run a brewing cycle without coffee grounds.
Funtzionamendu-argibideak
Espressoa egitea
- Aurrez berotu: Turn on the machine using the mechanical knob. Allow the machine to pre-heat for a few minutes until the indicator light signals it's ready for brewing.
- Prestatu Portafiltroa: Add desired amount of finely ground espresso coffee into the filter basket. Tamp the coffee evenly and firmly. Wipe any excess grounds from the rim of the portafilter.
- Erantsi iragazki-portagailua: Insert the portafilter into the brewing head and twist it firmly to the right until it is securely locked in place.
- Jarri edalontziak: Place one or two espresso cups on the drip tray directly under the coffee outlets. You can pre-warm your cups on the stainless steel warm cup area.
- Espressoa prestatu:Press the one-button start on the touch electronic panel. The machine will begin extracting espresso. You can adjust coffee strength and set the number of brewing cups using the respective buttons. If you do not stop it manually, it will stop automatically in 2 minutes. If you add coffee halfway, you need to stop it manually.
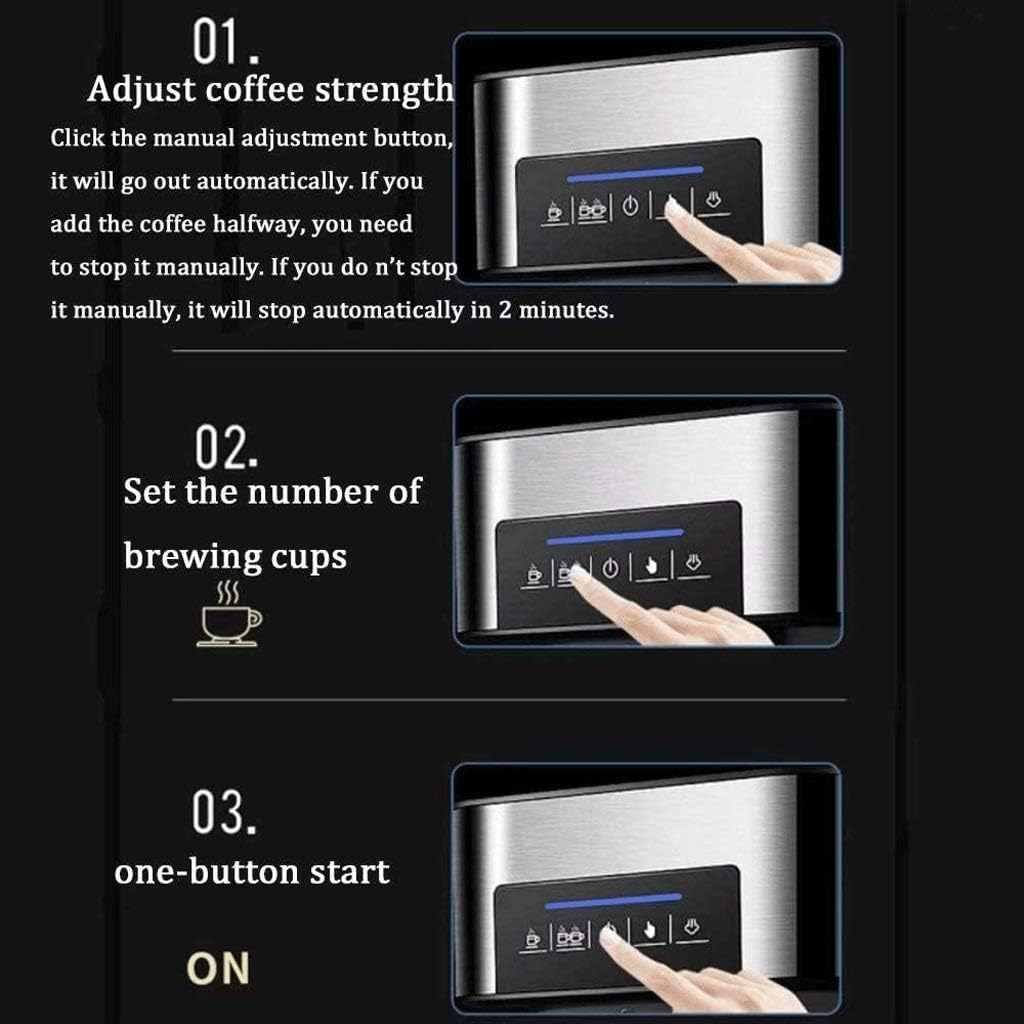
Irudia: Diagram illustrating the touch electronic button panel for adjusting coffee strength, setting the number of brewing cups, and one-button start.

Irudia: Close-up of espresso being extracted from the portafilter into a glass cup, demonstrating 20BAR high-pressure extraction.
- Zerbitzatu: Once brewing is complete, remove the cups and enjoy your espresso.
Esnea Esnea
Use the steam wand to create frothed milk for cappuccinos and lattes.
- Esnea prestatu: Bete altzairu herdoilgaitzezko apar-pitxer bat esne hotzarekin (esnekikoa edo esnekirik gabekoa) tutuaren azpiraino.
- Aktibatu Steam: Turn the mechanical knob to the steam setting. Wait for the steam indicator light to illuminate, indicating the machine has reached the correct temperature for steaming.
- Lurrun-haga garbitzeko: Briefly open the steam valve to release any condensed water from the wand into the drip tray. Close the valve.
- Esne apartsua: Immerse the tip of the steam wand just below the surface of the milk. Open the steam valve slowly. Move the pitcher up and down to incorporate air and create foam. Once desired foam consistency and temperature are reached, close the steam valve.

Irudia: Close-up of the mechanical knob with steam control markings. The text indicates that steam size can be adjusted, noting that too small steam results in poor milk foam, and too strong steam can cause splashing.
- Lurrun-haga garbia: Aparra egin ondoren, garbitu lurrun-hagatxoa sprayarekin.amp zapi bat esne-hondakinak kentzeko. Ireki berriro lurrun-balbula laburki makilaren barruko esnea husteko.
Mantentzea eta Garbiketa
Aldian-aldian garbitzeak zure espresso makinaren errendimendu optimoa eta iraupena bermatzen ditu.
- Eguneko garbiketa:
- Tantaketarako erretilua: Empty and clean the detachable drip tray after each use. It is removable and washable.

Irudia: Close-up showing the removable and washable drip tray, along with the 0.5mm stainless steel filter and scald-proof handle.
- Iragazkia eta iragazkia saskia: Kendu kafe-hondar gastatuak eta garbitu iragazki-eramakina eta iragazki-saskia ur korrontearen azpian.
- Lurrun-makila: As mentioned in the operating instructions, clean the steam wand immediately after each use.
- Kanpoaldea: Garbitu makinaren kanpoaldea leun batekin, damp oihal. Ez erabili garbitzaile urratzaileak edo zurgatzaileak.
- Tantaketarako erretilua: Empty and clean the detachable drip tray after each use. It is removable and washable.
- Ur depositua: Garbitu ur-depositua aldian-aldian detergente leun batekin eta ondo garbitu.
- Deskalifikazioa: Depending on water hardness and frequency of use, descale the machine every 2-3 months. Use a commercial descaling solution designed for espresso machines and follow the product's instructions.
Arazoak konpontzea
Atal honetan ohiko arazoei eta haien irtenbideei buruzko informazioa aurkituko duzu.
| Arazoa | Kausa posiblea | Irtenbidea |
|---|---|---|
| Ez dago kafe-banaketarik | No water in tank; Clogged filter; Machine not primed. | Fill water tank; Clean filter; Prime the machine by running a water-only cycle. |
| Espressoa polikiegi prestatzen da edo batere ez da prestatzen | Kafearen hondarrak oso finak edo txarrak diraampGogorregi garbitu da; Iragazkia buxatuta dago. | Erabili ehotze lodiagoa; Tamp less firmly; Clean filter. |
| Espresso brews too quickly | Kafearen hondarrak lodiegiak edo kafe nahikorik ez; Ez daampnahikoa ed. | Use finer grind; Add more coffee; Tamp sendoago. |
| Esne-apargailua ez da lurruna sortzen | Steam wand clogged; Not enough water in tank; Machine not heated to steam temperature. | Clean steam wand; Fill water tank; Wait for steam indicator light. |
| Makinatik ura isurtzen | Water tank not seated correctly; Drip tray full; Loose portafilter. | Re-seat water tank; Empty drip tray; Ensure portafilter is locked firmly. |
Zehaztapenak
- Eredua: B0F99RQV43
- liburukiatage: 110-240V 50Hz
- Potentzia: 850 W
- Edukiera: 1.5L (Water Tank)
- Presioa: 0-20 barra
- Pisu garbia: 3.6 kg inguru
- Produktuaren neurriak: 234 mm (W) x 270 mm (D) x 292 mm (H)
Bermea eta Laguntza
Produktu hau a 3 hilabeteko bermea erosketa-datatik aurrera.
For technical support, troubleshooting assistance, or warranty claims, please contact your retailer or the manufacturer directly. Please have your model number (B0F99RQV43) and proof of purchase ready when contacting support.


