1. Sarrera
This manual provides comprehensive instructions for the installation, operation, and maintenance of your GIGABYTE B550M DS3H AC R2 AMD AM4 Motherboard. The B550M DS3H AC R2 is designed to support AMD Ryzen 5000, 4000, and 3000 Series Processors, offering a robust platform for personal computing. It features an upgraded power design, high-grade storage standards, and extensive connectivity options to optimize system performance.

Figure 1.1: GIGABYTE B550M DS3H AC R2 Motherboard and its retail packaging.
2. Konfigurazioa eta instalazioa
Zure plaka basearen funtzionamendu egonkorrerako instalazio egokia ezinbestekoa da. Jarraitu urrats hauek arretaz.
2.1 Desontziratzea eta ikuskatzea
- Carefully remove the motherboard from its packaging.
- Inspect the board for any visible damage or missing components.
- Ensure all accessories listed in the product packaging are present.
2.2 Osagaien instalazioa
Install the following components onto the motherboard before placing it into the PC case.

2.1 Irudia: Gainetikview of the GIGABYTE B550M DS3H AC R2 Motherboard layout.
- CPU instalazioa:
Open the CPU socket lever, align the triangular mark on the CPU with the mark on the socket, gently place the CPU into the socket, and close the lever to secure it. Ensure the CPU is seated correctly before applying pressure.
- CPU hozkailuaren instalazioa:
Instalatu CPU hozkailua fabrikatzailearen argibideen arabera. Ziurtatu pasta termikoa behar bezala aplikatzen dela eta muntaketa segurua egiten dela.
- RAM (Memory) Installation:
The motherboard supports Dual Channel DDR4 memory across 4 DIMM slots. Open the clips on the DIMM slots, align the memory module's notch with the slot's key, and press down firmly on both ends until the clips snap into place. For optimal performance, refer to your CPU and RAM manufacturer's guidelines for dual-channel configuration (typically slots 2 and 4).
- M.2 SSD instalazioa:
The motherboard features two M.2 slots, including one supporting PCIe 4.0 x1. Remove the plastic standoffs from the M.2 slots. Insert the M.2 SSD at an angle into the slot, then gently push it down and secure it with the provided screw or standoff mechanism. Ensure the SSD is fully seated.
- PCIe txartelaren instalazioa:
The motherboard includes PCIe 4.0 x16 slots with an EZ-Latch Quick Release Design for graphics cards and other expansion cards. Align the card with the PCIe slot and press down firmly until it clicks into place. Ensure the retention clip is engaged.
2.3 Motherboard Installation into PC Case
- Install the I/O shield into the PC case's rear opening.
- Carefully align the motherboard with the standoffs in your PC case. This is a Micro-ATX form factor board, so ensure your case supports mATX.
- Lotu plaka torlojuekin.
2.4 Kableen konexioak
Connect all necessary power and data cables.
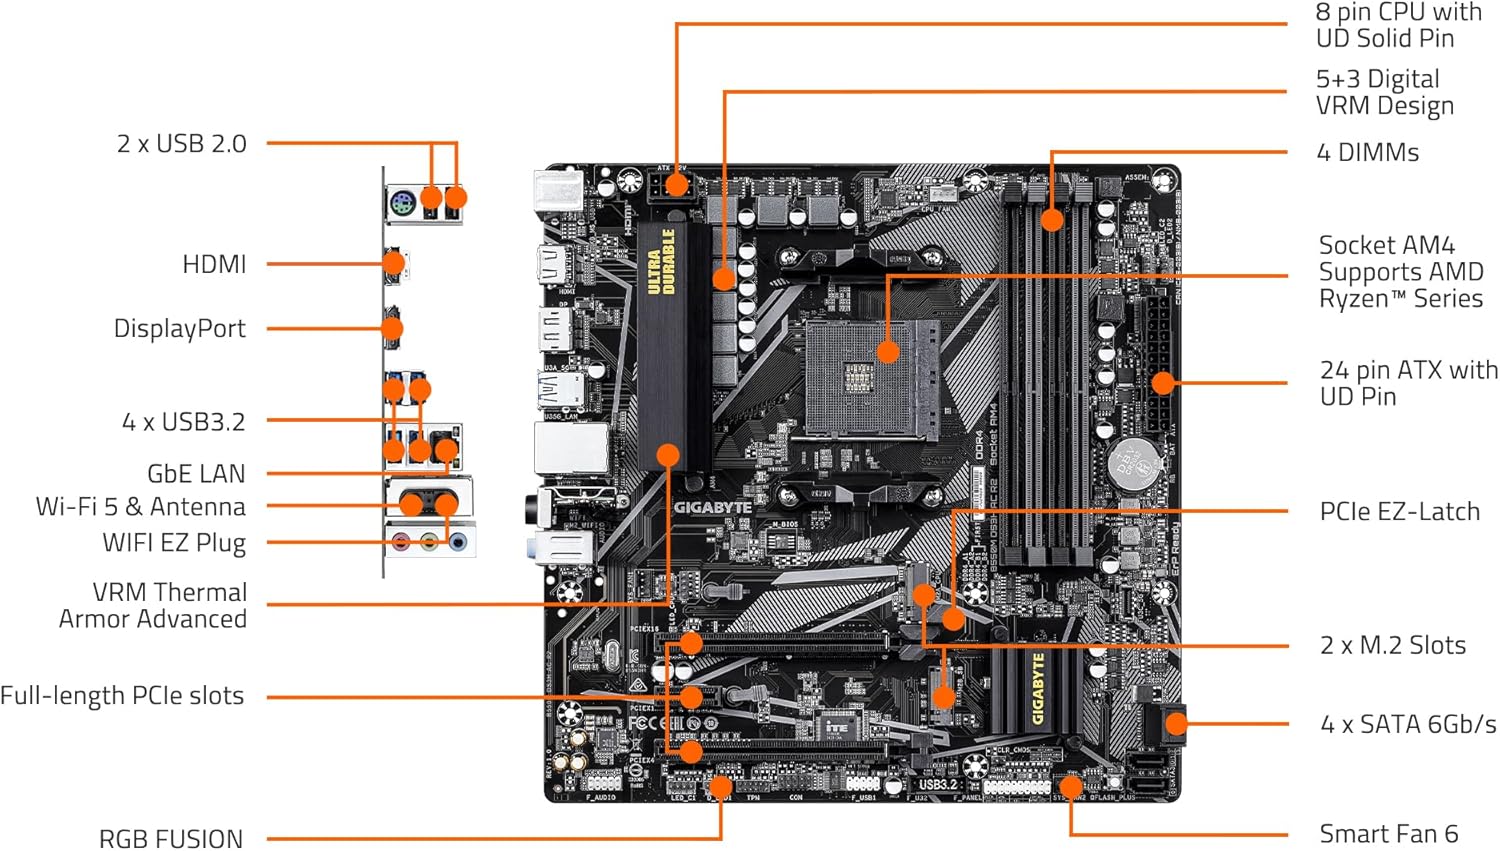
Figure 2.2: Detailed diagram of motherboard connectors and features.
- Main Power Connector (24-Pin ATX): Connect the large 24-pin power cable from your power supply unit (PSU) to the motherboard.
- CPU Power Connector (8-Pin CPU): Connect the 8-pin CPU power cable from your PSU to the motherboard.
- SATA Data Cables: Connect your SATA storage devices (HDDs, SSDs) to the 4 SATA 6Gb/s ports on the motherboard.
- Aurreko paneleko konektoreak: Connect the power button, reset button, HDD LED, power LED, and front panel audio/USB headers from your PC case to the corresponding pins on the motherboard. Refer to the motherboard's detailed manual for exact pin layouts.
- USB atakak: Connect internal USB headers for front panel USB ports. The board supports USB 2.0 and USB 3.2.
- Antena konexioa: For WIFI5 functionality, connect the included Wi-Fi antenna to the rear I/O panel.

Figure 2.3: Rear Input/Output (I/O) panel with various ports.
The rear I/O panel includes ports for USB, HDMI, DisplayPort, GbE LAN, Wi-Fi antenna connectors, and audio jacks.
3. Funtzionamendu-argibideak
Once all components are installed and connected, you can proceed with initial system setup.
3.1 Hasierako abiarazpena eta BIOS konfigurazioa
- Piztu sistema. Sakatu botoia DEL key repeatedly during startup to enter the BIOS (Basic Input/Output System) setup.
- The BIOS interface is designed to be user-friendly. Navigate using your keyboard or mouse.
- XMP Profile for RAM: By default, your RAM may run at a lower speed. Navigate to the memory settings in BIOS and enable the XMP (Extreme Memory Profile) to utilize your RAM's advertised speed (e.g., 3200 MHz).
- Abiarazteko ordena: Configure the boot order to prioritize your operating system installation media (USB drive or DVD drive).
- Q-Flash BIOS: This motherboard supports Q-Flash, allowing you to update the BIOS without a CPU, memory, or graphics card installed. This is useful for ensuring compatibility with newer CPUs. Refer to the GIGABYTE website for detailed Q-Flash instructions and the latest BIOS versions.
- Save changes and exit BIOS.
3.2 Sistema eragilearen instalazioa
Insert your Windows 11 (or preferred OS) installation media and follow the on-screen prompts to install the operating system on your storage drive.
3.3 Gidariaren instalazioa
After OS installation, install the necessary drivers for your motherboard components. These typically include chipset drivers, LAN drivers, Wi-Fi drivers, audio drivers, and any other peripheral drivers. Drivers can be found on the official GIGABYTE webzure plaka basearen modelo espezifikorako gunea.
4. Mantentzea
Mantentze-lan erregularrak zure plaka basearen iraupena eta errendimendu optimoa bermatzen laguntzen du.
- Hautsa kentzea: Aldian-aldian, garbitu hautsa plaka nagusitik eta osagaietatik aire konprimitua erabiliz. Ziurtatu sistema itzalita eta deskonektatuta dagoela garbitu aurretik.
- BIOS eguneraketak: Egiaztatu GIGABYTEak website regularly for BIOS updates. Updates can improve system stability, add support for new hardware, and fix bugs. Follow the instructions provided by GIGABYTE for safe BIOS updating.
- Gidarien eguneraketak: Keep your drivers updated to ensure compatibility and optimal performance with new software and hardware.
- Kudeaketa Termikoa: Ensure proper airflow within your PC case. The motherboard features VRM Thermal Armor Advanced for efficient heat dissipation, but good case ventilation is still essential.
5. Arazoak
Atal honek aurki ditzakezun arazo ohikoenei heltzen die.
- No Power / Board Not Booting:
- Verify all power cables (24-pin ATX, 8-pin CPU) are securely connected from the PSU to the motherboard.
- Ensure the PSU is switched on and functioning correctly.
- Check front panel connections (power button) are correctly seated.
- Remove all components except CPU, one RAM stick, and the CPU cooler. Try booting. If it boots, add components one by one to identify the faulty part.
- Ez dago pantailarik:
- Ensure your monitor is connected to the correct display output (either integrated graphics on the motherboard if your CPU supports it, or your dedicated graphics card).
- Berriro jarri grafiko-txartela eta RAM moduluak.
- Ahal bada, probatu beste pantaila-kable edo monitore batekin.
- Bluetooth konexio-arazoak:
- Ensure Wi-Fi/Bluetooth drivers are correctly installed and updated.
- Check that the Wi-Fi antenna is securely connected.
- Interference from other wireless devices can affect Bluetooth performance. Try moving the system or devices.
- Consider using an external Bluetooth adapter if issues persist.
- Sistemaren ezegonkortasuna / Matxura:
- Ziurtatu gidari guztiak eguneratuta daudela.
- Check RAM stability (run memory diagnostic tools).
- Kontrolatu CPU eta GPU tenperaturak gehiegi berotzea saihesteko.
- Verify that your PSU provides sufficient and stable power to all components.
For more detailed troubleshooting or specific error codes, consult the official GIGABYTE support webgunera edo jarri harremanetan haien laguntza teknikoarekin.
6. Zehaztapenak
Key technical specifications for the GIGABYTE B550M DS3H AC R2 Motherboard:
| Ezaugarri | Xehetasuna |
|---|---|
| Ereduaren izena | B550M DS3H AC R2 |
| CPU Socketa | Socket AM4 (Supports AMD Ryzen 5000 / 4000 / 3000 Series Processors) |
| Txip mota | AMD B550 |
| RAM Memoria Teknologia | DDR4 (4 DIMM slots, Dual Channel) |
| Memoria Erlojuaren Abiadura | 3200 MHz (and higher via OC/XMP) |
| Biltegiratzea | 2 x M.2 slots (including PCIe 4.0 x1), 4 x SATA 6Gb/s ports |
| PCIe zirrikituak | PCIe 4.0 x16 slots with EZ-Latch Quick Release Design |
| Saregintza | GbE LAN, WIFI5 |
| Konektibitatea | HDMI, DisplayPort, USB 2.0, USB 3.2 |
| Power Diseinua | Digital 5+3 phases VRM solution |
| Disoluzio termikoa | VRM Thermal Armor Advanced |
| Forma-faktorea | Mikro-ATX |
| Neurriak (LxWxH) | 8.82 x 8.82 x 1 hazbete |
| Elementuaren pisua | 1.1 kilo |
| OS bateragarria | Windows 11 |
7. Bermea eta Laguntza
For warranty information, technical support, and additional resources, please refer to the official GIGABYTE website. GIGABYTE provides support for their products, including driver downloads, BIOS updates, and troubleshooting guides.
- GIGABYTE ofiziala Webgunea: www.gigabyte.com
- Produktuaren laguntza orria: Navigate to the support section on the GIGABYTE website and search for your specific model (B550M DS3H AC R2) to find drivers, manuals, and FAQs.
- Jarri harremanetan laguntzarekin: Contact information for technical assistance can be found on the GIGABYTE support page.
Additional protection plans may be available from your retailer at the time of purchase. Please consult your purchase documentation for details on any extended warranties or service plans.


