VEVOR Electric Fence Charger, 10kV 1J
VEVOR Electric Fence Charger 10kV 1J User Manual
Model: Electric Fence Charger, 10kV 1J
1. Sarrera
This manual provides essential instructions for the safe and effective use of your VEVOR Electric Fence Charger 10kV 1J. Please read this manual thoroughly before installation and operation to ensure proper function and safety.
1.1 Segurtasun informazioa
- Always disconnect power before servicing the unit or fence.
- Do not install the energizer in wet locations or near flammable materials.
- Ensure proper grounding for safe and effective operation.
- Mantendu haurren eskura.
- Post warning signs on electric fences as required by local regulations.
2. Produktua amaitu daview
The VEVOR Electric Fence Charger is designed to provide a powerful electrical pulse to deter livestock and wildlife. It features multiple power supply options and a durable, weather-resistant design.
2.1 Paketearen edukia
- 1 x VEVOR Electric Fence Charger (10kV 1J)
- 1 x Power Adapter (Standard Version)
- Connection Cables (e.g., for battery connection)
- Abisu seinalea
2.2 Ezaugarri nagusiak
- Irteerako energia: 1 Joule
- Irteera boltage: 10kV
- Alta-tartea: segundo 1 pultsu bakoitzeko
- Pultsuaren zabalera: <1 ms
- Elikatze-aukerak: AC, DC (external lithium battery), Solar
- Iraunkortasuna: IP65 waterproof rating, -4°F to 122°F (-20°C to 50°C) operating temperature range
- Jarraipena: LED indicators for Power and Run status
- Eraginkortasun gama: 1-3 kilometro
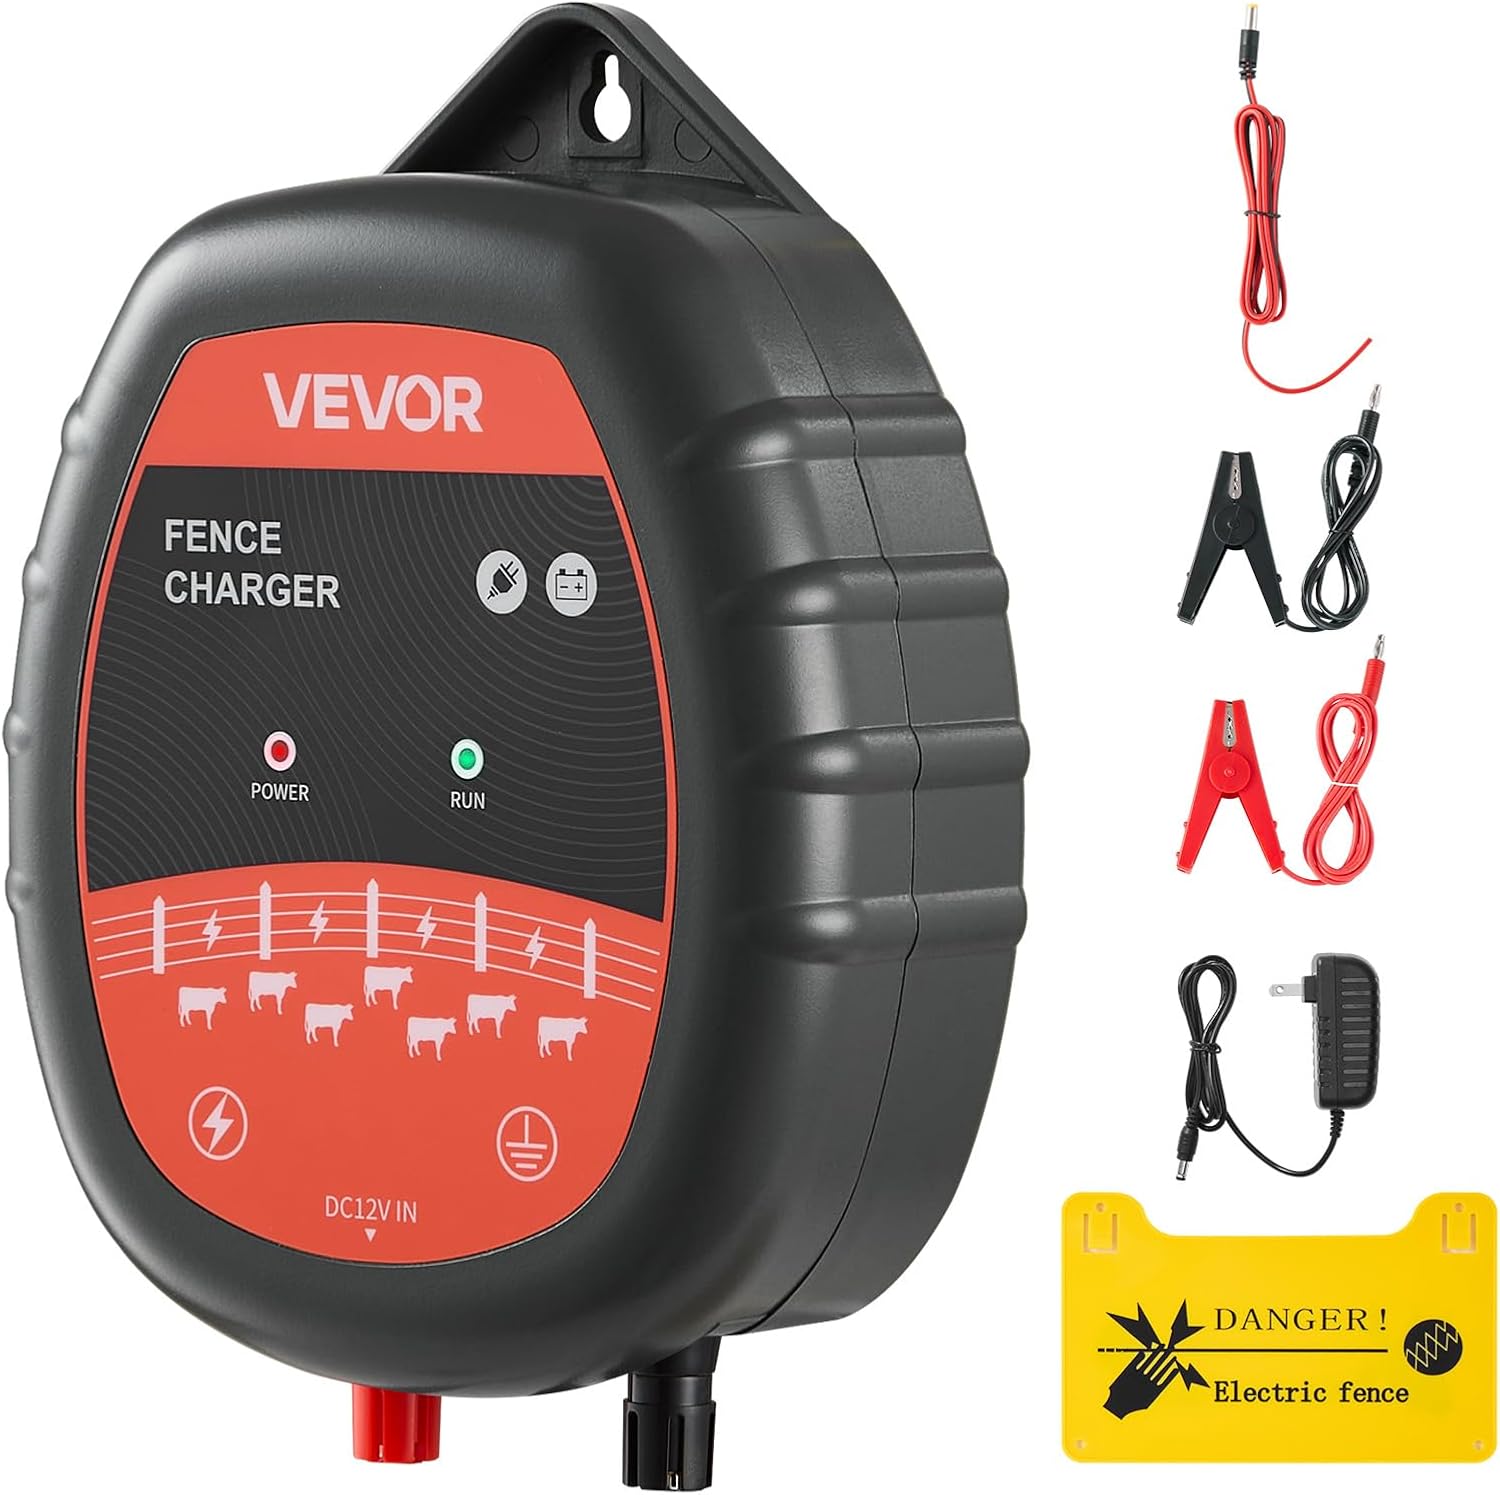
Figure 2.1: VEVOR Electric Fence Charger with included accessories, including power adapter, connection cables, and a warning sign.

Figure 2.2: Illustration detailing the charger's output energy (1.0 J), pulse amplitude (10 KV), discharge interval (1 sec/pulse), and pulse width (<1ms).

2.3. irudia: Zehaztutako irudia view of the VEVOR Electric Fence Charger's front panel, showing the Power and Run LED indicators and connection points.
3. Konfigurazioa eta instalazioa
Proper installation is crucial for the safety and effectiveness of your electric fence system.
3.1 Kokapena aukeratzea
- Install the charger in a dry, sheltered location, away from direct sunlight and heavy rain, unless using an outdoor waterproof enclosure.
- Ensure the location is easily accessible for monitoring and maintenance.
- Keep the charger away from children and animals.
3.2 Kargagailua muntatzea
The charger can be mounted indoors or outdoors. For outdoor installation, it is recommended to place the unit inside a waterproof box to enhance protection, despite its IP65 rating.
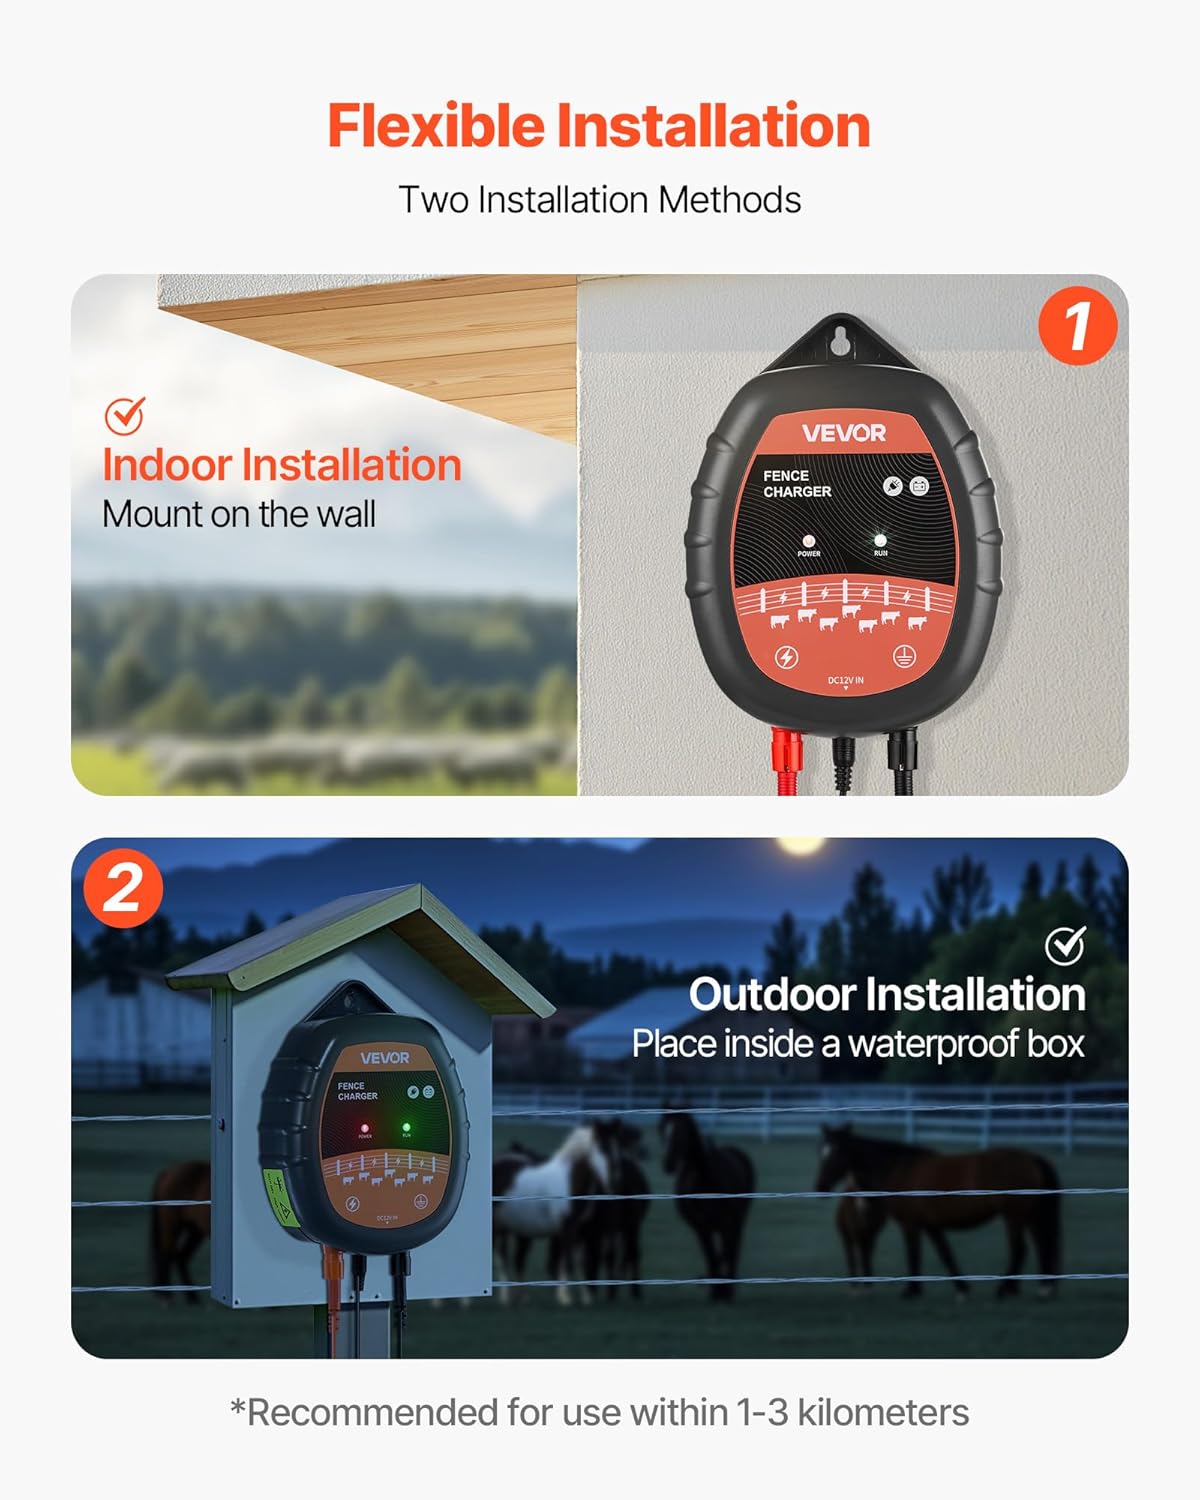
Figure 3.1: Depicts two installation methods: indoor wall mounting and outdoor installation within a protective waterproof box.
3.3 Sistema lurreratzea
A good ground system is essential for optimal fence performance. Use a galvanized steel or copper ground rod at least 3 feet (90 cm) long, driven into moist soil.
- Connect the ground terminal of the charger to the ground rod using appropriate insulated wire.
- For best conductivity, ensure the grounding stake is placed on moist ground. Recommended depth for copper/iron stakes is 31.5-39.37 inches (80-100 cm).
3.4 Connecting to the Fence
- Connect the fence output terminal of the charger to the electric fence line using high-voltage insulated wire.
- Ziurtatu konexio guztiak seguru daudela eta korrosiorik gabe.
3.5 Elikatze-iturrien aukerak
The VEVOR Electric Fence Charger offers versatile power options:
- AC potentzia: Connect the provided power adapter to the charger's DC12V IN port and plug it into a standard AC outlet.
- DC Battery Power: Connect the charger to an external 12V lithium battery using the appropriate connection cables (e.g., alligator clips). Ensure correct polarity.
- Eguzki energia: Integrate the charger with a solar panel and a solar charge controller for continuous operation in off-grid areas.

Figure 3.2: Illustrates the three power supply methods: AC (Alternating Current) using an adapter, DC (Direct Current) using an external battery, and Solar Power with a solar panel and charge controller.
4. Funtzionamendua
Once installed and connected, operating the fence charger is straightforward.
4.1 Piztea
Connect the chosen power source (AC adapter, DC battery, or solar setup) to the charger's DC12V IN port. The charger will automatically begin operation.
4.2 LED adierazleak
The charger is equipped with two LED indicators for real-time monitoring:
- Power Indicator (Red): Illuminates when the unit is receiving power.
- Run Indicator (Green): Flashes with each pulse, indicating the fence is actively energizing.
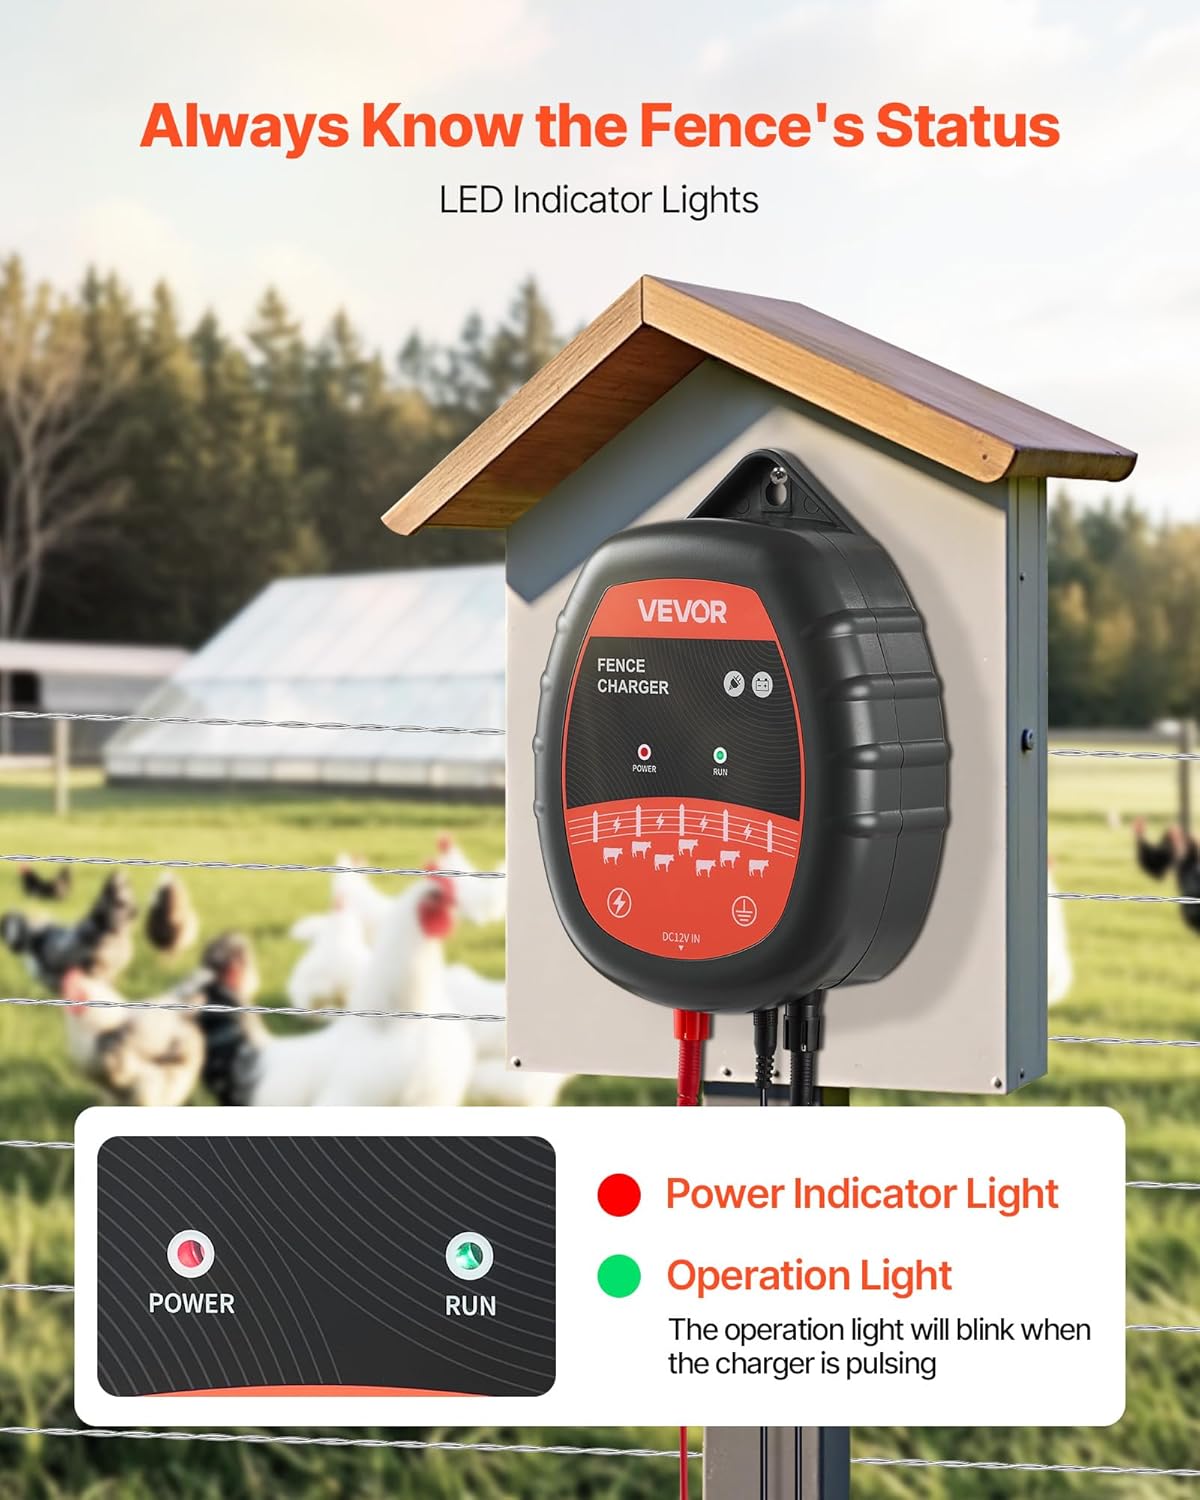
Figure 4.1: Close-up of the charger's LED indicators, showing the red Power light and the green Run light, which flashes with each pulse.
4.3 Checking Fence Performance
Regularly check the fence voltage using a fence tester to ensure it is operating effectively (typically between 4000V and 8000V for optimal deterrence).
5. Mantentzea
Minimal maintenance is required to keep your fence charger in optimal condition.
- Ohiko ikuskapena: Periodically check the charger, fence lines, and connections for damage, corrosion, or vegetation growth.
- Garbitasuna: Keep the charger free from dust and debris. Use a dry cloth for cleaning. Do not use abrasive cleaners or solvents.
- Vegetation Control: Trim vegetation around the fence line to prevent short circuits and maintain effective voltage.
- Lurreratze sistema: Ensure the ground rod remains firmly in moist soil. If the soil is dry, consider watering the area around the ground rod.
6. Arazoak
Ikusi beheko taula arazo ohikoenak eta haien irtenbideak ikusteko.
| Arazoa | Kausa posiblea | Irtenbidea |
|---|---|---|
| Argi-adierazlerik ez | No power supply; faulty adapter/battery; loose connection. | Check power source, adapter, battery charge, and all connections. |
| Run Indicator Not Flashing | No output pulse; internal fault. | Ensure power is on. If power light is on but run light is off, contact support. |
| Low Fence Voltage | Poor grounding; fence short circuit (vegetation, broken insulators); faulty charger. | Check ground system. Inspect fence for shorts. Use a fence tester. |
| Intermittent Pulsing | Loose connections; power supply issues. | Verify all connections are secure. Check power source stability. |
7. Zehaztapenak
Technical details for the VEVOR Electric Fence Charger 10kV 1J.
- Modelo zenbakia: Electric Fence Charger, 10kV 1J
- Irteera boltage: 10 kilovolt
- Irteerako energia: 1 Joule
- Alta-tartea: segundo 1 pultsu bakoitzeko
- Pultsuaren zabalera: <1 ms
- Recommended Effective Range: 1-3 kilometers (0.62 - 1.86 miles)
- Elikatze-iturria: AC, DC 12V (external battery), Solar
- Iragazgaitzaren balorazioa: IP65
- Funtzionamendu-tenperatura: -4°F eta 122°F (-20°C eta 50°C)
- Produktuaren neurriak: 7.87 x 5.31 x 2.17 hazbete (200 x 135 x 55 mm)
- Elementuaren pisua: 1.57 libra (0.71 kg)
- Material nagusia: ABS
- UPC: 197988145677
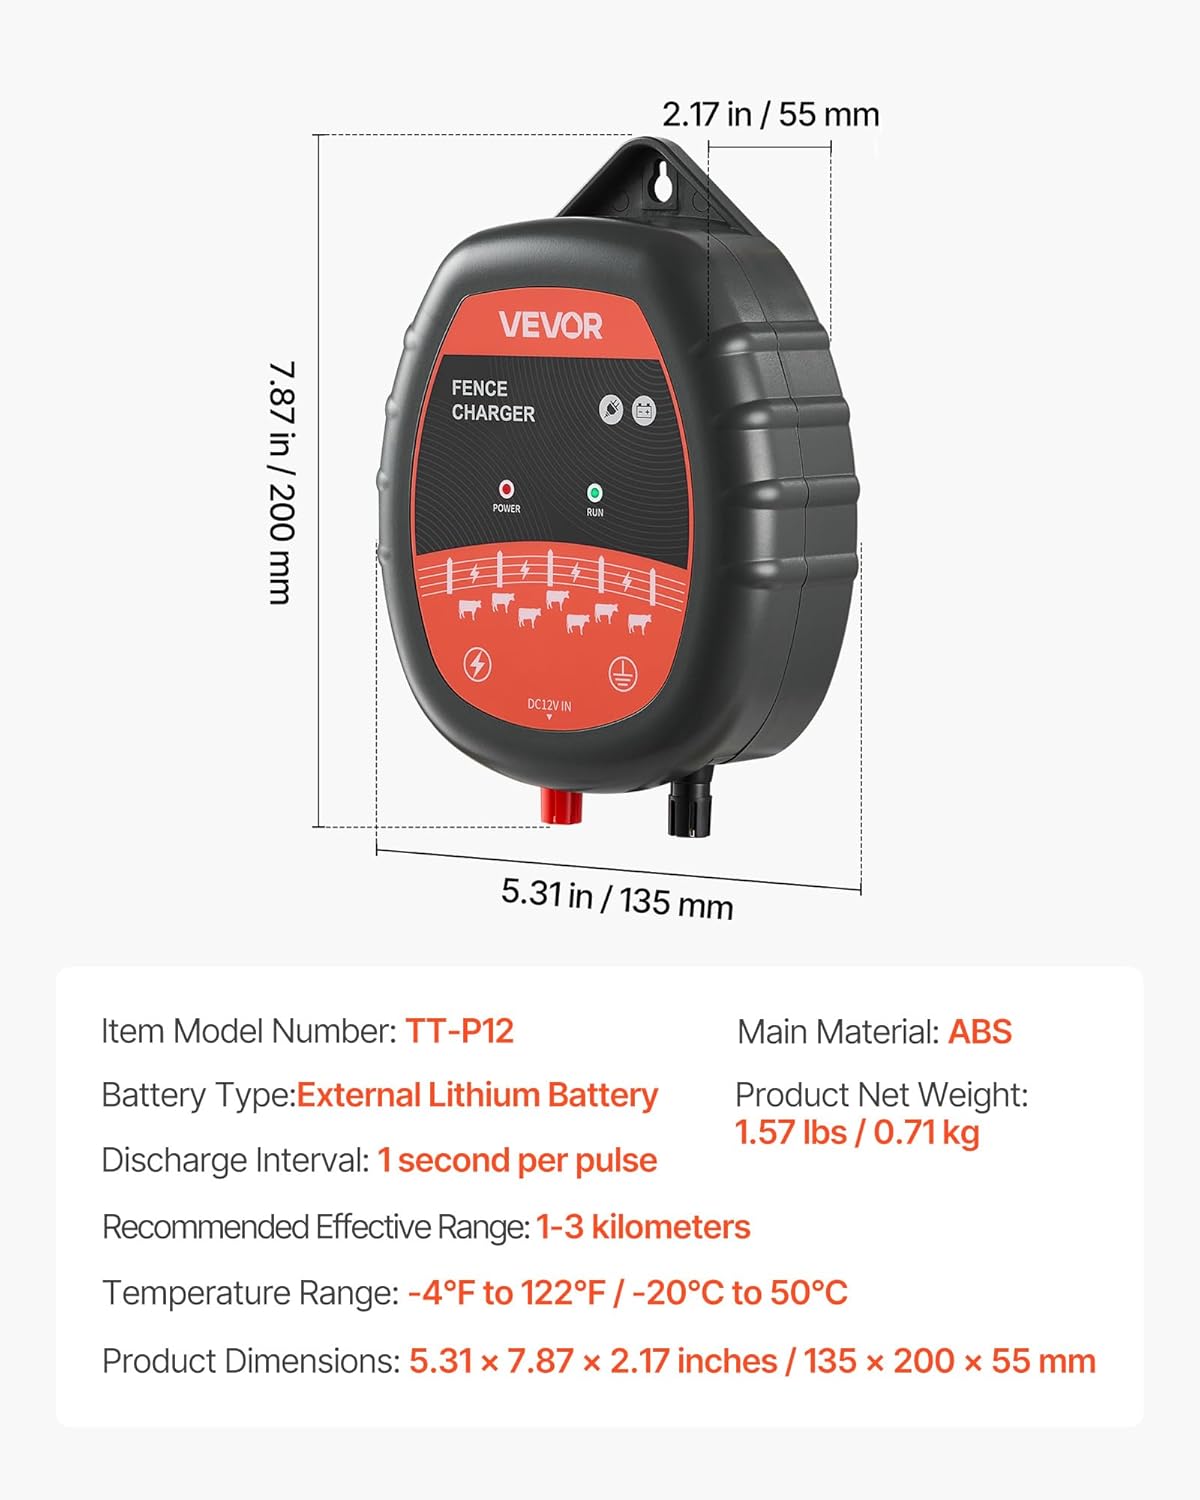
Figure 7.1: Diagram showing the physical dimensions of the VEVOR Electric Fence Charger and a summary of its key specifications.
8. Bermea eta Laguntza
Bermeari buruzko informazioa edo laguntza teknikoa lortzeko, jo VEVOR ofizialera. webwebgunera edo jarri harremanetan zuzenean bezeroarentzako arreta-zerbitzura. Gorde erosketa-agiria berme-erreklamazioetarako.
Fabrikatzailea: ZABALTZA
Lehen eskuragarri dagoen data: 13ko ekainaren 2025a
Ask a question about this manual
Ask about setup, troubleshooting, compatibility, parts, safety, or missing instructions. Manuals+ will review the question and use this page’s manual context to help answer it.