1. Sarrera
This manual provides detailed instructions for the installation, operation, maintenance, and troubleshooting of your GIGABYTE B850M Eagle WIFI6E ICE AMD AM5 Motherboard. Please read this manual thoroughly before beginning installation to ensure proper setup and optimal performance. Keep this manual for future reference.
The GIGABYTE B850M Eagle WIFI6E ICE motherboard is designed to support AMD Ryzen 9000, 8000, and 7000 Series Processors with an AM5 socket. It features DDR5 memory compatibility, PCIe 5.0 support, multiple M.2 slots, USB-C connectivity, and 2.5GbE LAN. Key user-friendly features include M.2 EZ-Latch, PCIe EZ-Latch, and Wi-Fi EZ-Plug for simplified installation.
2. Produktua amaitu daview
Familiarize yourself with the components and layout of your motherboard.
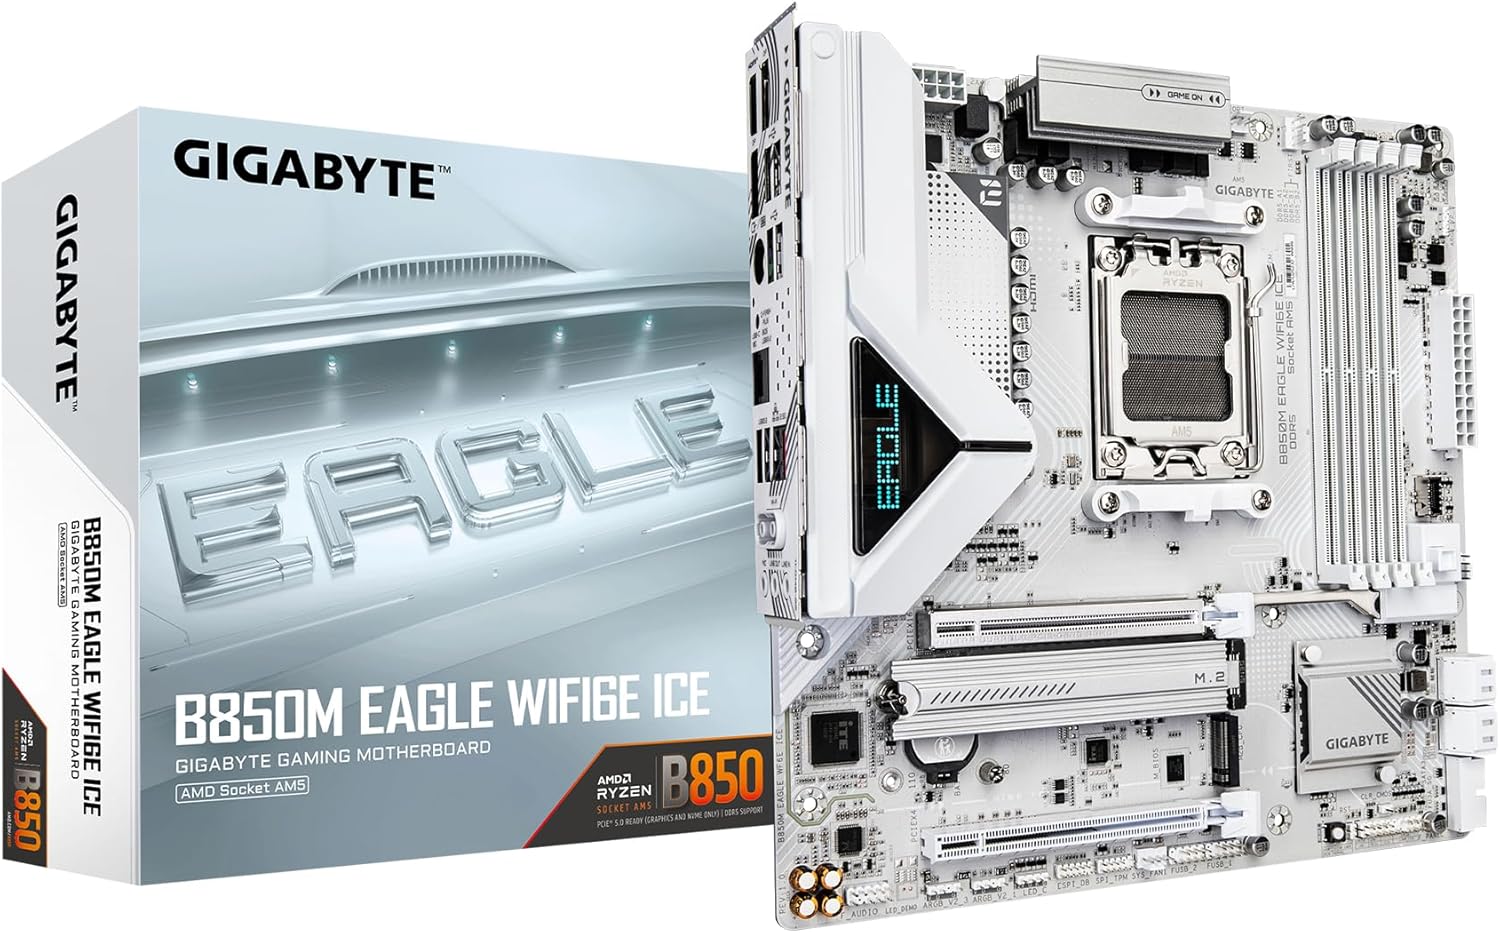
Image 2.1: GIGABYTE B850M Eagle WIFI6E ICE Motherboard and retail packaging.

2.2 irudia: Goitik behera view plakaren plaka, CPUaren socket-a, DIMM zirrikituak eta M.2 zirrikituak nabarmenduz.

2.3. irudia: Angelua view plaka nagusia, erakustaldiaasing heatsinks and PCIe slots.
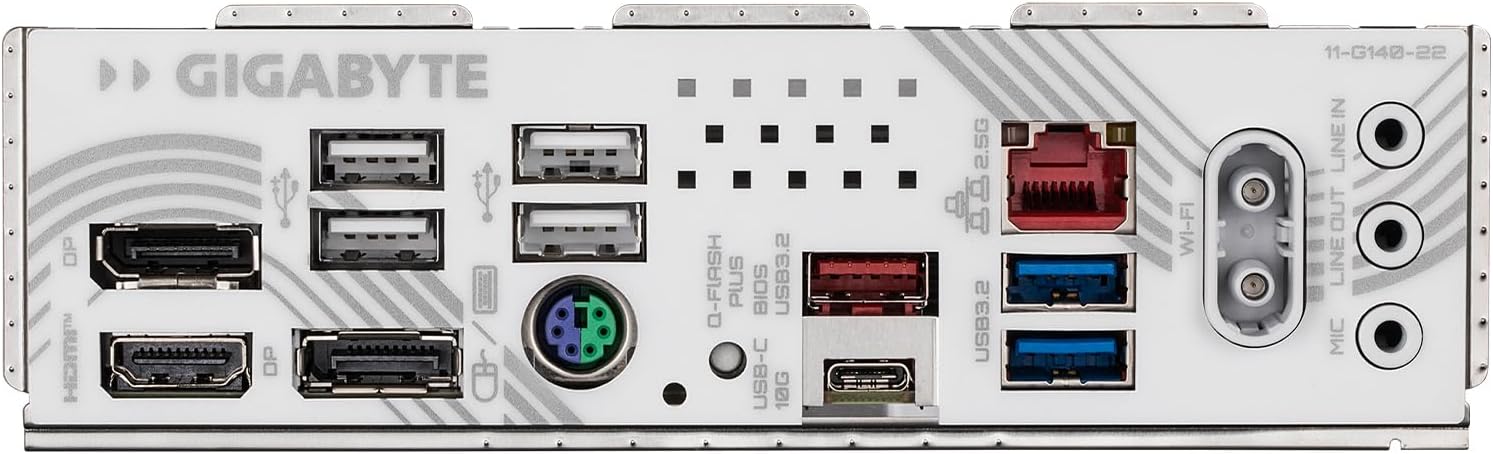
Image 2.4: Close-up of the rear I/O panel, showing various ports.

Image 2.5: Labeled diagram of the rear I/O panel and key internal headers, including HDMI, DisplayPorts, USB ports, Q-Flash Plus button, 2.5GbE LAN, Wi-Fi EZ-Plug, and audio jacks.
3. Konfigurazioa eta instalazioa
Jarraitu urrats hauek zure plaka basea eta osagaiak behar bezala instalatzeko.
- Prestatu kasua: Ensure your computer case is compatible with M-ATX motherboards. Install the I/O shield (if not pre-attached) and standoffs in the correct positions.
- Instalatu CPUa: Open the CPU socket lever. Carefully align the AMD AM5 processor with the socket, ensuring the triangular markers match. Gently place the CPU into the socket without forcing it. Close the lever to secure the CPU.
- CPU hozkailua instalatu: Attach your chosen CPU cooler according to its manufacturer's instructions. Ensure proper thermal paste application and secure mounting.
- Instalatu memoria (RAM): Open the clips on the DDR5 DIMM slots. Align your DDR5 memory modules with the slots, ensuring the notch on the module matches the notch in the slot. Press firmly on both ends of the module until the clips snap into place. Refer to your motherboard manual for recommended dual-channel configurations.
- Instalatu M.2 SSDak: Locate the M.2 slots. This motherboard features M.2 EZ-Latch for tool-less installation. Insert the M.2 SSD into the slot at an angle, then gently push it down and secure it with the EZ-Latch mechanism.
- Muntatu plaka basea: Kontu handiz jarri plaka basea kaxan, torloju-zuloak euskarriekin lerrokatuz. Lotu plaka basea torlojuekin.
- Txartel grafikoa (GPU) instalatu: Open the PCIe EZ-Latch on the primary PCIe 5.0 x16 slot. Insert your graphics card firmly into the slot until it clicks. Secure the card to the case with a screw. Close the EZ-Latch.
- Konektatu elikatze-kableak: Connect the 24-pin ATX main power connector and the 8-pin (or 4+4-pin) CPU power connector from your power supply to the motherboard. Connect any necessary PCIe power cables to your graphics card.
- Konektatu aurrealdeko paneleko kableak: Connect the power button, reset button, USB ports, audio jacks, and LED indicators from your case to the corresponding headers on the motherboard.
- Connect Storage Drives: Connect SATA data and power cables to your SATA SSDs/HDDs and the motherboard's SATA ports.
- Wi-Fi antena instalatu: Connect the included Wi-Fi antenna to the Wi-Fi EZ-Plug connectors on the rear I/O panel.
4. Funtzionamendu-argibideak
After completing the hardware installation, proceed with the initial boot-up and software setup.
- Lehenengo abioa: Connect your monitor, keyboard, and mouse. Power on your system. The system should display the GIGABYTE splash screen and enter the BIOS/UEFI setup utility.
- BIOS/UEFI konfigurazioa: Navigate the BIOS using your keyboard or mouse. Configure settings such as boot order, date/time, and enable/disable specific features as needed. Save changes and exit.
- Sistema eragilearen instalazioa: Insert your operating system installation media (USB drive or DVD). Follow the on-screen prompts to install your preferred operating system.
- Gidariaren instalazioa: After OS installation, install the necessary drivers for your motherboard components (chipset, LAN, audio, Wi-Fi, etc.). These can typically be found on the GIGABYTE support webzure plaka basearen modelo espezifikorako gunea.
- Software utilitateak: Install any optional GIGABYTE utilities for system monitoring, RGB control, or performance tuning.
5. Mantentzea
Mantentze-lan erregularrak zure plaka basearen iraupena eta errendimendu egonkorra bermatzen laguntzen du.
- Hautsa kentzea: Periodically clean dust from inside your computer case, especially from fans, heatsinks, and motherboard surfaces. Use compressed air or a soft brush. Ensure the system is powered off and unplugged before cleaning.
- BIOS eguneraketak: Egiaztatu GIGABYTEak website for the latest BIOS updates. BIOS updates can improve compatibility, stability, and performance. Follow the update instructions carefully to avoid system damage.
- Gidarien eguneraketak: Mantendu zure gidariak eguneratuta errendimendu optimoa eta software eta hardware berriekin bateragarritasuna bermatzeko.
- Kudeaketa Termikoa: Ensure adequate airflow within your case. This motherboard can run warm under heavy loads, especially with PCIe 5.0 and multiple M.2 drives. Good case ventilation and fan configuration are crucial.
6. Arazoak
Atal honek aurki ditzakezun arazo ohikoenei heltzen die.
- Argindarrik ez/Abiorik ez:
- Verify all power cables (24-pin ATX, 8-pin CPU, GPU PCIe) are securely connected.
- Check that the power supply is switched on and functioning.
- Ensure the front panel power button cable is correctly connected to the motherboard header.
- Ez dago pantailarik:
- Confirm the monitor cable is connected to the graphics card (or motherboard if using integrated graphics).
- Berriro jarri grafiko-txartela eta memoria-moduluak.
- If your CPU has integrated graphics, try removing the discrete GPU and connecting the monitor to the motherboard's video output.
- Sistemaren ezegonkortasuna/matxurak:
- Ziurtatu kontrolatzaile guztiak instalatuta eta eguneratuta daudela.
- Egiaztatu CPU eta GPU tenperaturak. Gehiegi berotzeak ezegonkortasuna eragin dezake.
- Exekutatu memoriaren diagnostiko tresnak RAM akastuna egiaztatzeko.
- Wi-Fi konexio-arazoak:
- Ziurtatu Wi-Fi antena ondo lotuta dagoela.
- Install the latest Wi-Fi drivers from the GIGABYTE webgunea.
- Check router settings and signal strength.
- BIOS Recovery (Q-Flash Plus):
If a BIOS update fails or the system becomes unbootable due to BIOS issues, the Q-Flash Plus feature can restore the BIOS without a CPU or RAM installed.
- Download the correct BIOS version for your motherboard from the GIGABYTE webgunea.
- Deskargatutako BIOSaren izena aldatu file to GIGABYTE.bin (or as specified in the GIGABYTE Q-Flash Plus guide).
- Kopiatu izena aldatutakoa file to the root directory of a FAT32 formatted USB flash drive (32GB or larger recommended). Ensure it is the only file diskoan.
- With the system powered off (but power supply connected and switched on), insert the USB drive into the designated Q-Flash Plus USB port on the rear I/O panel (refer to Image 2.5).
- Press and hold the Q-Flash Plus button for approximately 3 seconds. The Q-Flash Plus LED will begin to flash.
- Wait for the LED to stop flashing, indicating the process is complete. This may take several minutes.
- Power on the system. The BIOS should now be restored to the updated version.
7. Zehaztapenak
Key technical specifications for the GIGABYTE B850M Eagle WIFI6E ICE Motherboard:
| Ezaugarri | Zehaztapena |
|---|---|
| CPU Socketa | AM5 entxufea |
| Prozesadore bateragarriak | AMD Ryzen 9000 / Ryzen 8000 / Ryzen 7000 Series |
| Chipset | AMD B850 |
| RAM Memoria Teknologia | DDR5 |
| Memoria zirrikituak | 4 DIMM |
| Memoria Abiadura | Up to 5200 MHz (and higher via OC) |
| PCIe zirrikituak | PCIe 5.0 x16 (primary), additional PCIe slots |
| M.2 zirrikituak | 2 x M.2 Slots |
| USB atakak | USB-C, USB 3.2 Gen 2, USB 3.2 Gen 1, USB 2.0 |
| LAN | 2.5 GbE LAN |
| Haririk gabeko konexioa | WIFI6E |
| Forma-faktorea | M-ATX |
| Neurriak (LxWxH) | 8.82 x 8.82 x 1 hazbete |
| Pisua | 1.2 kilo |
8. Bermea eta Laguntza
GIGABYTE produktuak berme mugatu batek estaltzen ditu. Bermearen baldintza zehatzak ikusteko, kontsultatu zure produktuarekin batera datorren berme-txartela edo bisitatu GIGABYTE-ren webgune ofiziala. webgunea.
For technical support, driver downloads, BIOS updates, and further product information, please visit the official GIGABYTE support webgunea. Baliabide gehigarriak eta harremanetarako informazioa ere aurki ditzakezu hemen: GIGABYTE denda Amazonen.