
1. Sarrera
This manual provides detailed instructions for setting up, operating, maintaining, and troubleshooting your Beelink SER5 MAX Mini PC. Please read this manual thoroughly before using the device to ensure proper functionality and to prevent damage.
2. Paketearen edukia
Egiaztatu behean zerrendatutako elementu guztiak zure paketean sartuta daudela:
- Beelink SER5 Mini PC ×1
- Potentzia egokitzailea × 1
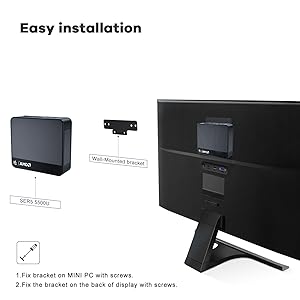
- Wall-Mounted bracket ×1
- Erabiltzailearen eskuliburua ×1
- HDMI Cable (100CM) ×1
3. Produktua amaitu daview
3.1 Front and Rear Ports
The Beelink SER5 MAX Mini PC features a variety of ports for connectivity. The front panel provides easily accessible ports for common peripherals, while the rear panel offers ports for display outputs, network, and power.

Aurrealdeko panelak honako hauek ditu:
- 2x USB 3.2 Gen2 ports (10Gbps)
- 1x USB 2.0 ataka
- 1x Type-C port (Data & Video output)
- 1x Headphone Jack
- 1x Pizteko botoia
Atzeko panelak honako hauek ditu:
- 1x DC Jack
- 1x HDMI port (max 4K 60Hz)
- 1x DisplayPort (DP 1.4, max 4K 144Hz)
- 2x USB 3.2 Gen2 ports (10Gbps)
- 1x USB 2.0 ataka
- 1x RJ45 LAN port (1000Mbps)
4. Konfigurazio gida
4.1 Hasierako konexioa
- Connect your monitor(s) to the HDMI, DisplayPort, or Type-C video outputs on the Mini PC.
- Konektatu teklatua eta sagua eskuragarri dauden USB ataketara.
- Connect the power adapter to the DC Jack on the Mini PC and then plug it into a power outlet.
- Press the power button on the front panel to turn on the Mini PC.
4.2 VESA Mount Installation
The Beelink SER5 MAX Mini PC can be mounted to the back of a compatible monitor using the included VESA mount bracket. This saves desk space and provides a cleaner setup.
- Secure the VESA bracket to the Mini PC using the provided screws.
- Attach the Mini PC with the bracket to the VESA mounting holes on the back of your display using the appropriate screws.

5. Funtzionamendu-argibideak
5.1 Piztu/Itzali
- Pizteko: Sakatu Mini PCaren aurrealdean dagoen pizteko botoia.
- Itzaltzeko: Use the operating system's shutdown function. Alternatively, press and hold the power button for 5-7 seconds for a forced shutdown (use only when necessary).
5.2 BIOS Access
To access the BIOS settings or boot options:
- Sartu BIOS ezarpenak: Press the "Delete" key repeatedly at the Beelink logo during boot-up.
- Enter Boot Options Menu: Press the "F7" key repeatedly at the Beelink logo during boot-up.
5.3 Triple Display Setup
The Beelink SER5 MAX supports connecting up to three displays simultaneously, enhancing productivity for various tasks. Utilize the HDMI, DisplayPort, and Type-C video outputs for this configuration.
5.4 Sarearen konexioa
The Mini PC offers robust network connectivity options:
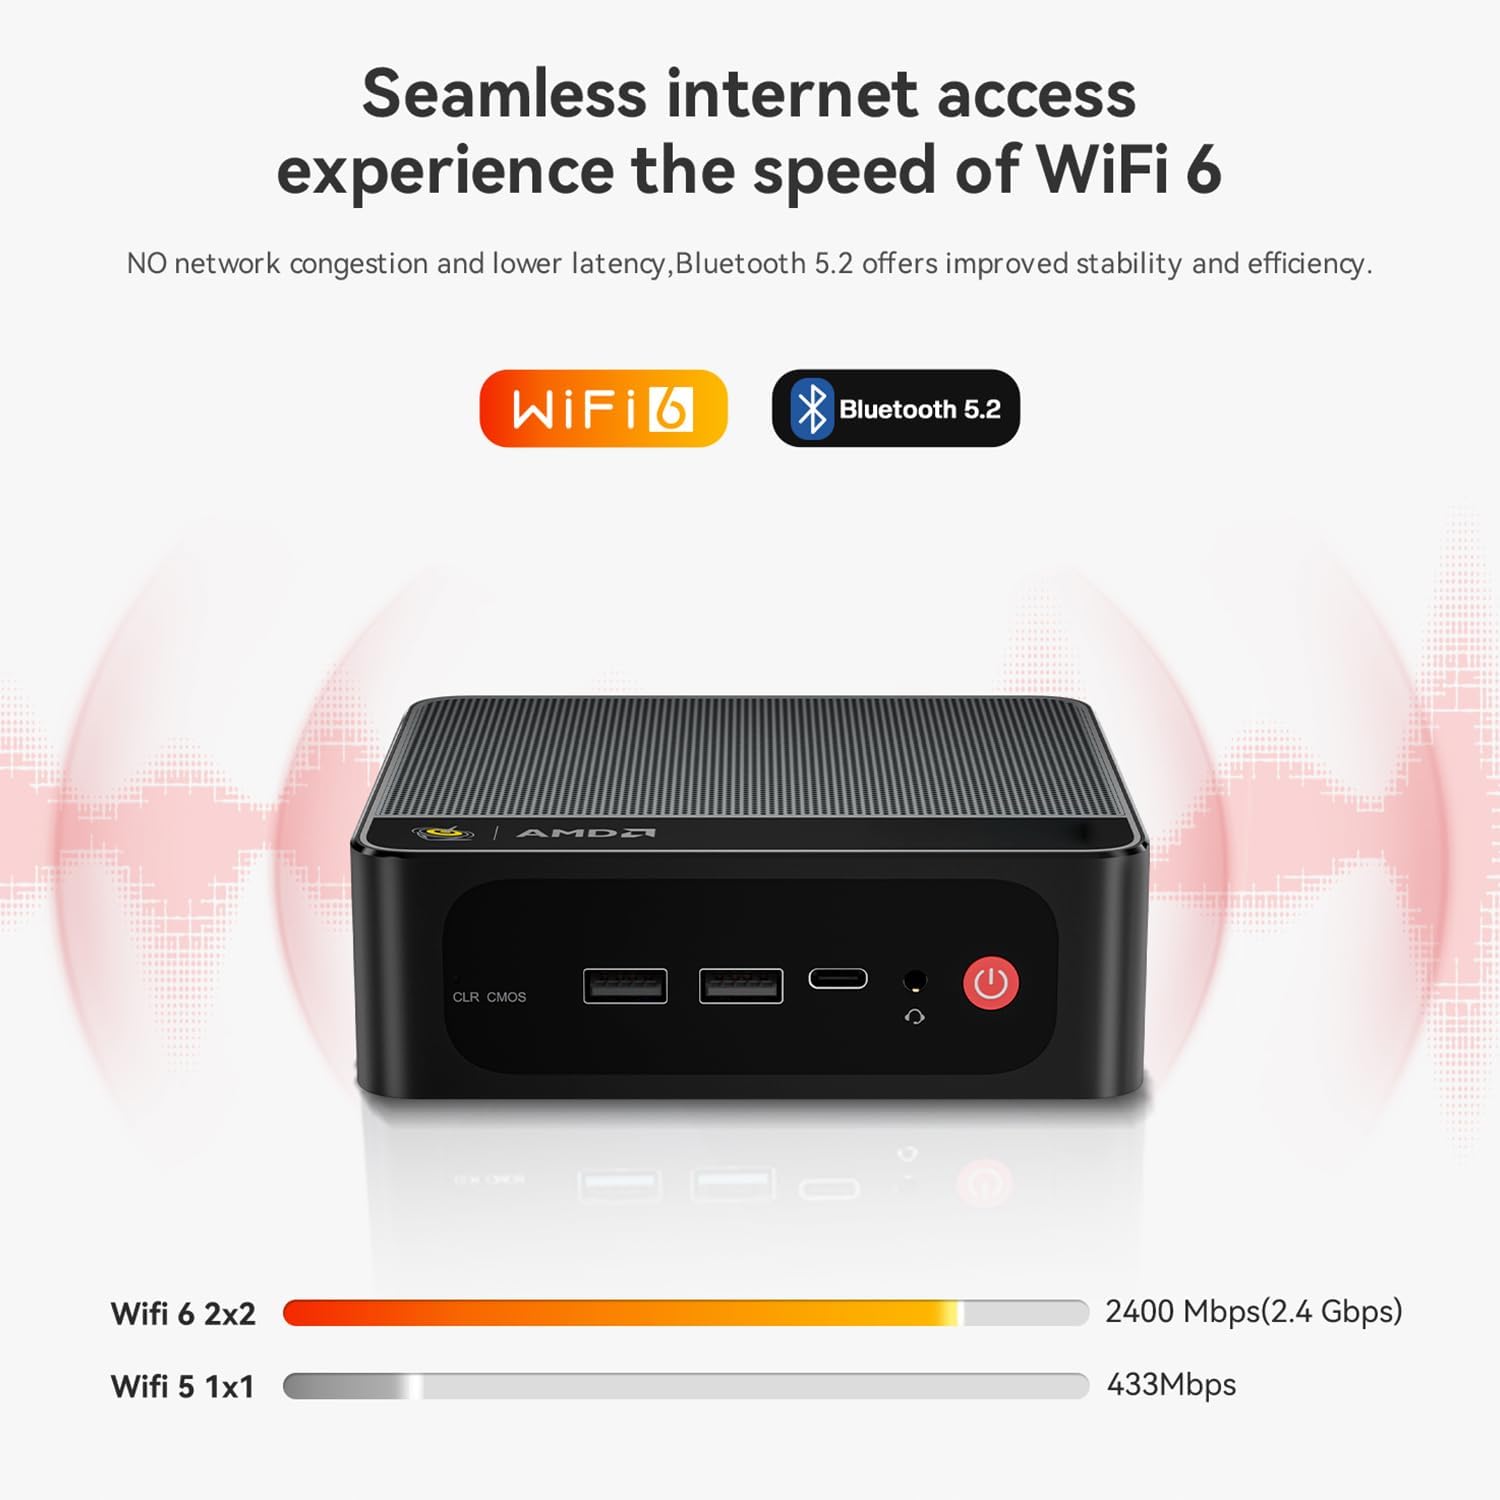
- Wi-Fi 6: Provides faster wireless speeds and lower latency compared to previous Wi-Fi standards.
- Bluetooth 5.2: For stable and efficient connection to various wireless devices such as keyboards, mice, and audio peripherals.
- RJ45 LAN: A Gigabit Ethernet port for a stable wired network connection.

6. Biltegiratzea eta memoriaren hedapena
6.1 Biltegiratze-hedapena
The Beelink SER5 MAX Mini PC comes with a 500GB M.2 NVMe 2280 SSD. It supports dual M.2 2280 PCIe 4.0 SSD slots, each supporting up to 4TB of storage. Additionally, there is space for a 2.5-inch SSD/HDD inside the bottom lid for further storage expansion.

7. Hozte Sistema
The SER5 MAX Mini PC is equipped with an efficient MSC2.0 cooling system, featuring a cooling fan, dual heat conduction tubes, and a heat sink to maintain optimal operating temperatures and ensure stable performance.

7.1 CPU Temperature & Noise Test Data
The following table presents typical CPU temperature and noise levels under various workloads. Note that actual performance may vary due to environmental conditions and specific configurations.
| Jolasa | Tenperatura | FPS on AVG | Zarata |
|---|---|---|---|
| Overwatch | 81°C | 47 FPS | 34.6-35.2 dB |
| Forza Horizon 5 | 65°C | 53 FPS | 35-37.1 dB |
| CS:GO | 73°C | 44 FPS | 35.3-37 dB |
| DOTA2 | 73°C | 65 FPS | 34.6-37.2 dB |
| League of Legends | 72°C | 64 FPS | 34-36.5 dB |
| PUBG | 79°C | 41 FPS | 33.7-37.8 dB |
Test Configurations: AMD Ryzen™ 7 6800H Processor, Radeon™ 680M Graphics, 32GB(16GB*2) LPDDR5 RAM, PCIe 1TB SSD, 1080p low quality, 27°C ambient temperature. Test data from Beelink lab, and the actual performance may fluctuate due to environmental and configuration changes.
8. Arazoak
This section addresses common issues you might encounter with your Beelink SER5 MAX Mini PC.
- Q: What should I do if I find the Mini PC defective?
A: Please contact customer support immediately. They will provide assistance and a satisfactory solution. - Q: What should I do if I need to update the Mini PC?
A: Please contact customer support, and they will provide the necessary tutorial files and guidance for updates. - Q: How do I set up Auto Power On?
A: To enable the Auto Power On feature, please send the barcode located at the bottom of your machine to customer support. They will provide the corresponding tutorial file.
9. Zehaztapenak
Detailed technical specifications for the Beelink SER5 MAX Mini PC:
| Ezaugarri | Deskribapena |
|---|---|
| Marka | Beelink |
| Ereduaren izena | SER5 |
| Sistema eragilea | OS (Pre-installed) |
| CPU eredua | AMD Ryzen 7 6800U (8 Cores, 16 Threads) |
| CPU Abiadura | Up to 4.7 GHz (Max Boost Clock) |
| Koprozesadore grafikoa | AMD Radeon Graphics 12core 2200 MHz |
| RAM memoria instalatuta | 32 GB LPDDR5 |
| Memoria Abiadura | 5200 MHz |
| Memoria zirrikituak eskuragarri | 2 (LPDDR5 is typically soldered, this might refer to M.2 slots for storage) |
| Memoria Biltegiratzeko Ahalmena | 500 GB M.2 NVMe SSD |
| Disko gogorraren deskribapena | SSD (M.2 NVMe 2280, expandable up to 8TB; supports 2.5-inch SSD/HDD) |
| Bideo Irteera | HDMI, DisplayPort, Type-C (Supports 4K Triple Display) |
| Bistaratzeko Gehienezko bereizmena | 3840x2160 (4K) |
| Konektibitate Teknologia | Bluetooth 5.2, Ethernet (RJ45), HDMI, USB, Wi-Fi 6 |
| USB portuak guztira | 4 (2x USB 3.2 Gen2, 2x USB 2.0) + 1x Type-C |
| Elementuaren pisua | 0.89 kg |
| Fabrikatzailea | Shenzhen AZW Technology Co., Ltd. |
10. Bermea eta Laguntza
10.1 Bermearen informazioa
The Beelink SER5 MAX Mini PC comes with a 1 urteko bermea from the date of purchase. This warranty covers manufacturing defects and hardware malfunctions under normal use. Please retain your proof of purchase for warranty claims.
10.2 Laguntza Teknikoa
For technical assistance, troubleshooting, or any questions regarding your Beelink SER5 MAX Mini PC, please contact Beelink customer support. You can typically find contact information on the official Beelink webgunea edo zure erosketa plataformaren bidez.
Beelink provides professional after-sales service and lifetime technical support. If a replacement is needed during the warranty period, it will be provided.