WLIVE ACHJ005-1
WLIVE Floating Full Bed Frame Instruction Manual
Model: ACHJ005-1
Sarrera
This manual provides detailed instructions for the assembly, operation, and maintenance of your WLIVE Floating Full Bed Frame. Please read this manual thoroughly before assembly and use to ensure safe and proper operation.
Segurtasun Informazioa
Segurtasun-abisu garrantzitsuak:
- Ez gainditu 1500 kiloko pisu-gaitasuna.
- Kontuz ibili ertz zorrotzekin eta puntu koskagarriekin muntatzean eta erabiltzean.
- Jarraitu beti muntaketa-argibideak arretaz ezegonkortasuna edo kolapsoa saihesteko.
- Erabili aurretik, ziurtatu konexio guztiak ondo estututa daudela.
- Mantendu haurrak eta maskotak muntaketa gunetik urrun.
Paketearen edukia
Verify that all components are present before beginning assembly. Refer to the assembly diagram for part identification.
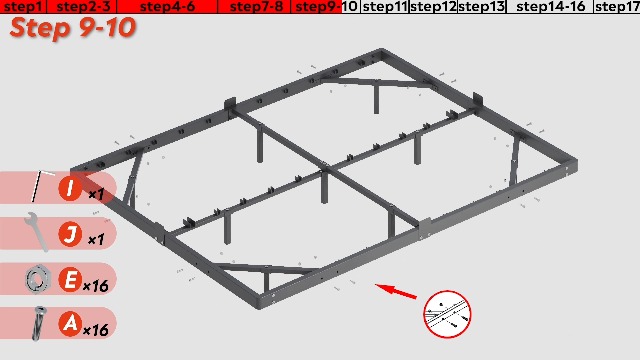
Figure 1: Assembly Instructions Diagram (from video "ACHJ005 006 007 bed frame")
The package should include all necessary frame components, hardware, tools, LED light strip, and power adapter with charging station.
Muntatzeko jarraibideak
Follow these steps carefully for proper assembly. It is recommended to assemble the bed frame with two people.
Video 1: WLIVE Bed Frame Assembly Guide. This video demonstrates the step-by-step process for assembling the bed frame, including attaching the support legs, side rails, and slats.
- Step 1: Assemble the Center Support Structure. Connect the main center beams (Part 1) using the provided bolts (Part A) and Allen key (Part I). Attach the vertical support legs (Part 2, Part 3) to the center beams.
- Step 2-3: Extend the Center Structure. Attach additional center beams (Part 4) and vertical support legs (Part 5, Part 6) to complete the central support. Secure with bolts (Part B) and washers (Part D).
- Step 4-6: Assemble the Outer Frame. Connect the four outer frame sections (Part 7, Part 8, Part 9, Part 10) using bolts (Part E) and the wrench (Part J). Ensure corners are tightly secured.
- Step 7-8: Attach Center Support to Outer Frame. Secure the assembled center support structure to the outer frame using bolts (Part E) and the wrench (Part J).
- Step 9-10: Install Corner Brackets. Attach the triangular corner support brackets (Part 11, Part 12) to the outer frame and center structure using bolts (Part E) and the wrench (Part J).
- Step 11: Add Additional Crossbars. Install the remaining crossbars (Part 13) to enhance stability.
- Step 12: Install Charging Station. Mount the charging station (Part 17) to the designated slot on the side rail using bolts (Part F) and the wrench (Part K).
- Step 13: Secure Mattress Stoppers. Attach the mattress stopper components (Part 16) to the frame using thumb screws (Part G).
- Step 14-16: Install LED Lights. Attach the LED light strip (Part M) to the underside of the bed frame. Use the provided adhesive and Velcro straps (Part H) to ensure secure placement. Connect the LED light strip to the power cable (Part L).
- Step 17: Install Slats. Place all metal slats (Part 14) across the frame. Ensure they are evenly spaced and secured. If some slats are difficult to place, slightly loosen the frame screws, insert the slats, then re-tighten all screws.
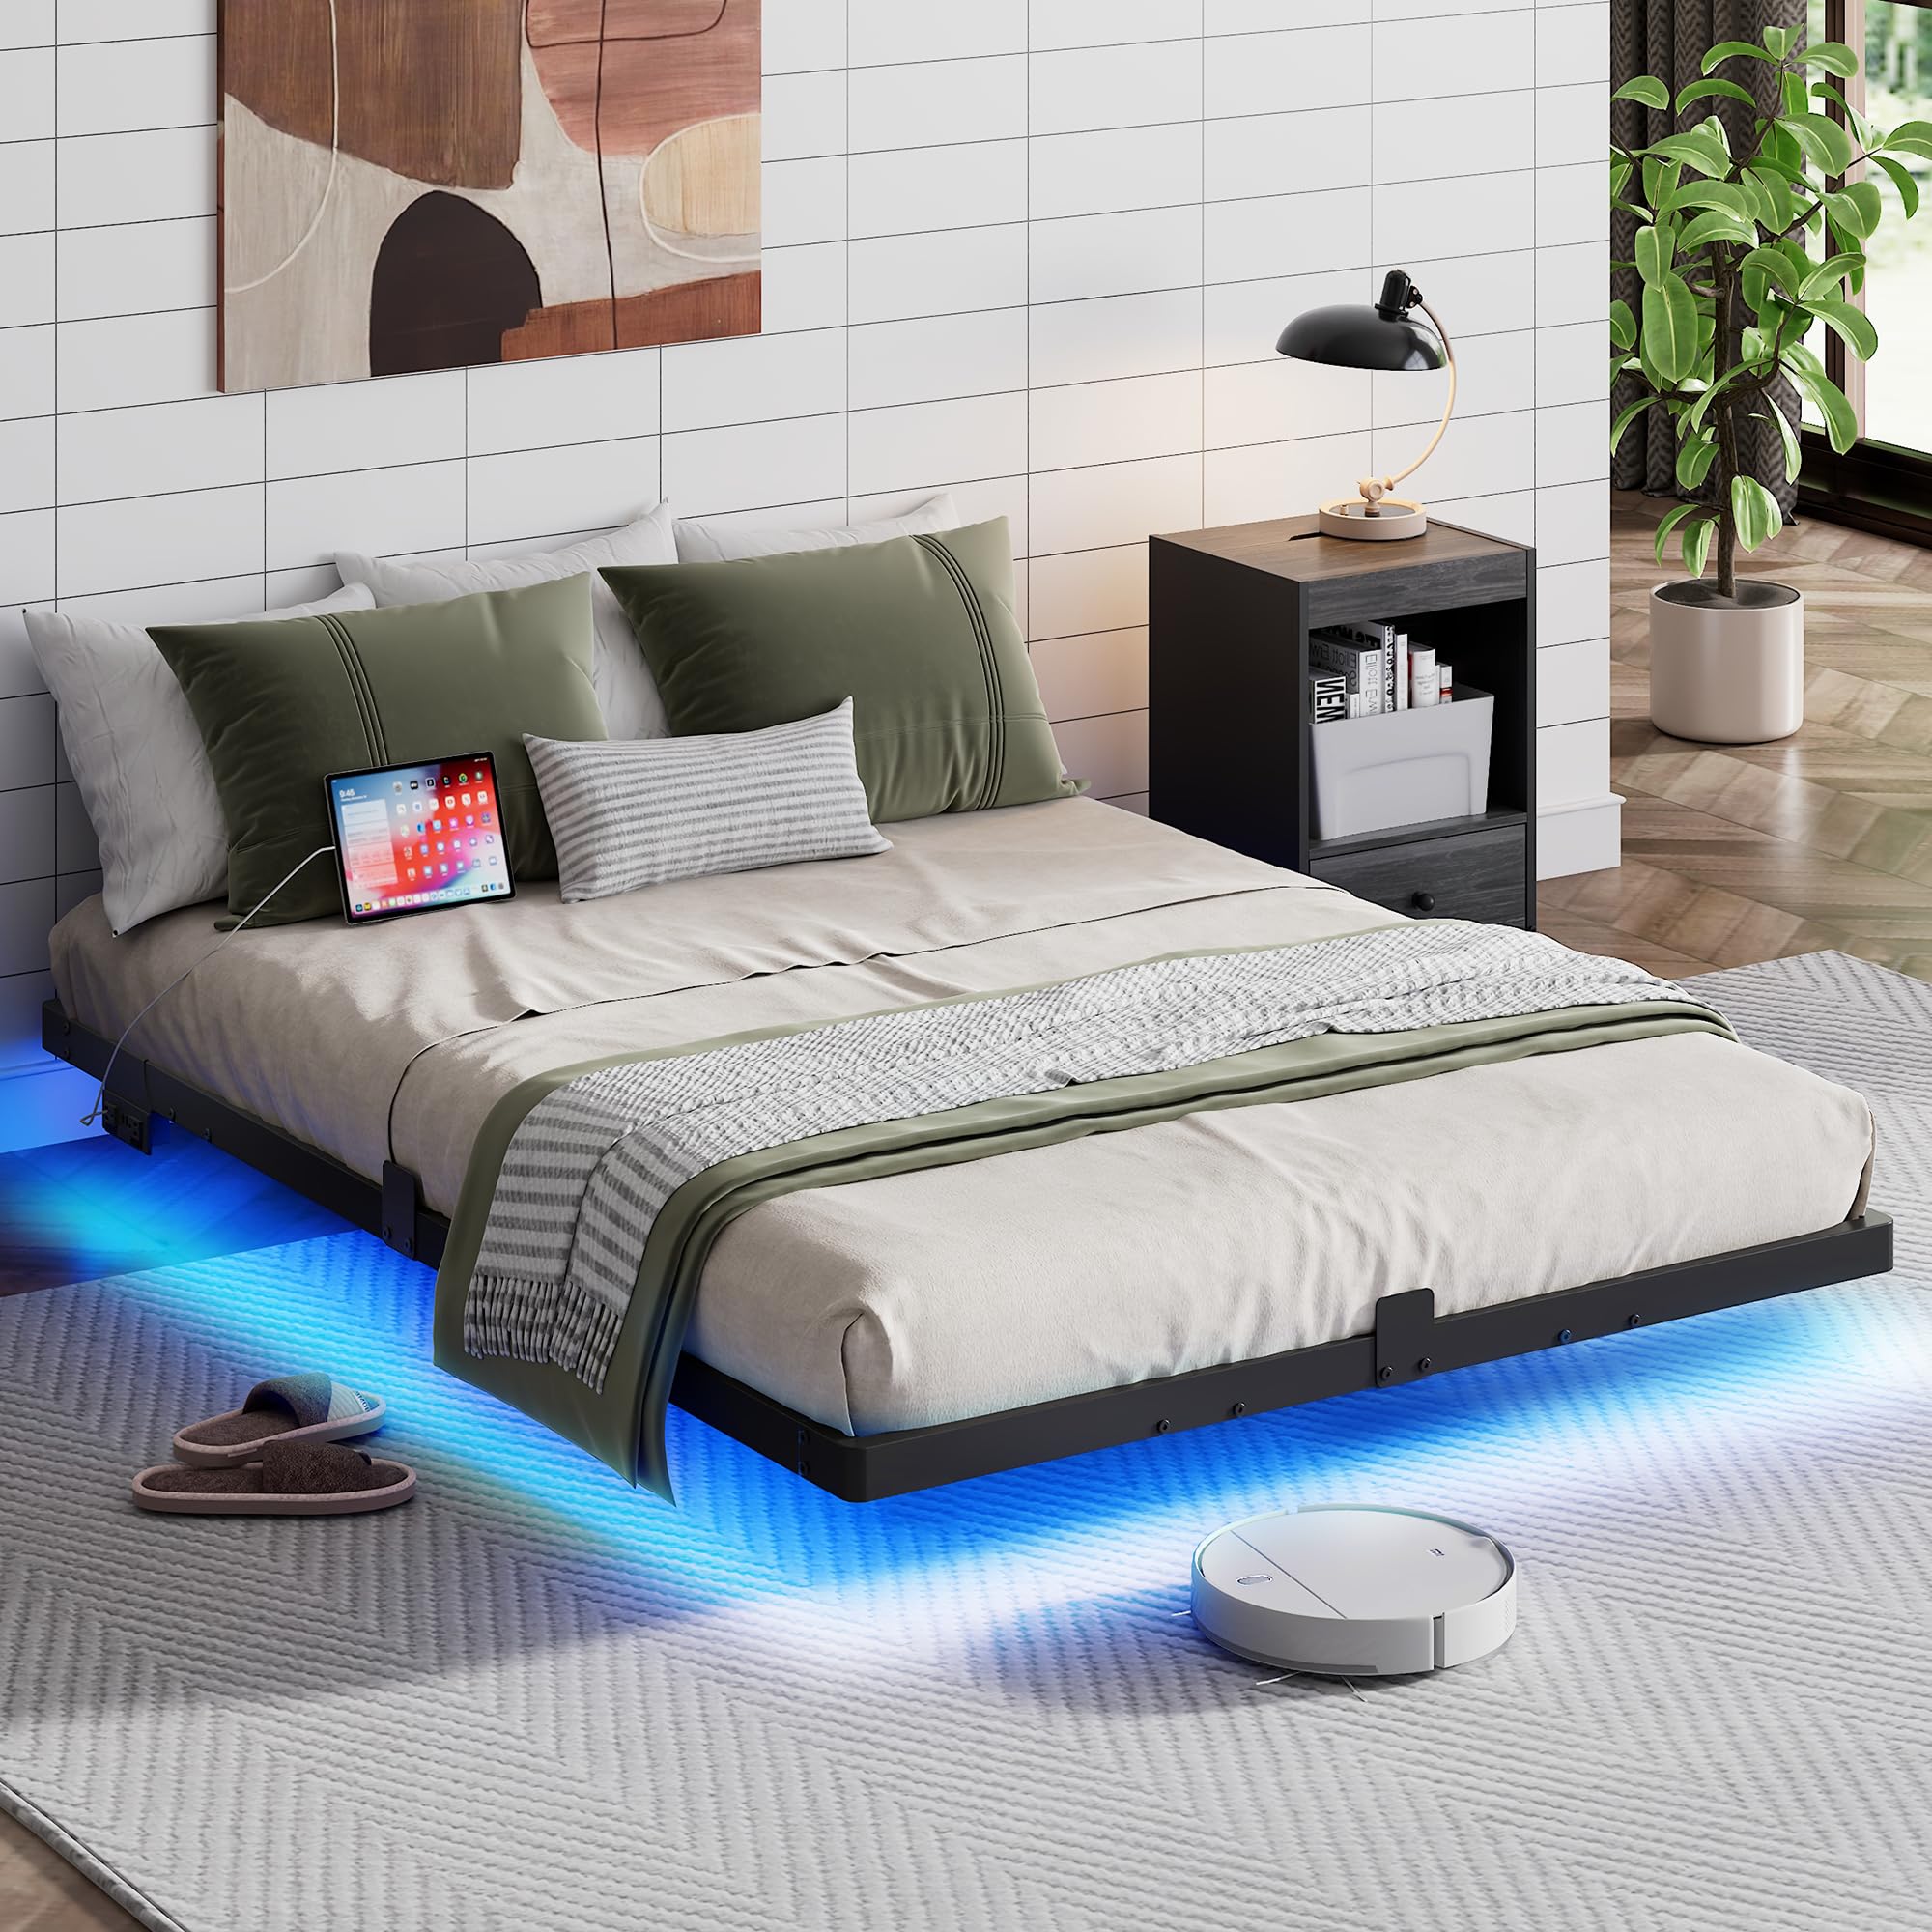
Figure 2: Fully assembled WLIVE Floating Full Bed Frame.
Funtzionamendu-argibideak
LED Argiztapen Sistema
The integrated LED light strips offer customizable ambiance for your bedroom.
- Kontrola: Use the included remote control or a compatible mobile application to manage the LED lights.
- Moduak: Choose from 12 scene modes to suit your preference.
- Koloreak: Aukeratu 20 kolore ezberdinetatik.
- Doikuntzak: Adjust the speed and brightness of the lighting effects.

Figure 3: LED Light Features and Control Options.
Kargatzeko estazio integratua
The bed frame includes a convenient charging station to power your devices.
- AC irteerak: Two 125V/12A AC outlets for standard electronics.
- USB atakak: Bi 5V/2A-ko USB ataka gailu mugikorrak kargatzeko.
- Elikatze kablea: Features a 1.5m flexible power cable.
- Segurtasuna: UL/ETL certified for electrical safety.

Figure 4: Built-in Charging Station.
Mantentzea
Regular maintenance will extend the life and appearance of your bed frame.
- Garbiketa: Garbitu metalezko markoa oihal leun batekin,amp oihal. Saihestu produktu kimiko gogorrak edo garbitzaile urratzaileak.
- Estutzea: Periodically check and re-tighten all bolts and screws to ensure stability.
- LED argiak: Ensure the LED strips are securely attached. If adhesive weakens, re-secure with additional Velcro or appropriate adhesive.
- Korronte-hartuneak: Keep the charging station free from dust and debris. Do not overload the outlets.
Arazoak konpontzea
| Arazoa | Kausa posiblea | Irtenbidea |
|---|---|---|
| Ohe-egiturak zarata egiten du/kirrinka egiten du. | Torloju edo konexio solteak. | Egiaztatu eta estutu markoko torloju eta torloju guztiak. Ziurtatu listoiak behar bezala finkatuta daudela. |
| Koltxoia egituran irristatzen da. | Mattress stoppers not installed or improperly positioned. | Ensure all four mattress slide stoppers are correctly installed and secured. |
| LED argiak ez dira funtzionatzen. | Power connection issue, remote battery dead, or light strip damage. | Check if the power adapter is securely plugged in. Replace remote control batteries. Inspect the LED strip for visible damage. |
| Kargatzeko estazioak ez du energiarik ematen. | Power cord not plugged in, device cable faulty, or overloaded circuit. | Ensure the bed frame's power cord is fully plugged into a working wall outlet. Try a different device or charging cable. Avoid overloading the outlets. |
Zehaztapenak
| Ezaugarri | Xehetasuna |
|---|---|
| Modelo zenbakia | ACHJ005-1 |
| Tamaina | Osoa |
| Produktuaren neurriak | 74.8"L x 53.94"Z x 9.13"A |
| Materiala | Metala |
| Pisu Edukiera | Gehienez 1500 lbs |
| Ezaugarri bereziak | LED Lighting, Built-in Charging Station (2 AC, 2 USB), 4 Mattress Slide Stoppers, Noise-free design |
| Muntaia Beharrezkoa | Bai |

Figure 5: Product Dimensions for Full Size.
Bermea eta Laguntza
For any questions, concerns, or assistance with your WLIVE Floating Full Bed Frame, please contact WLIVE customer support. Refer to your purchase documentation for specific warranty details.
WLIVE is committed to providing professional after-sales service to ensure your satisfaction.
Ask a question about this manual
Ask about setup, troubleshooting, compatibility, parts, safety, or missing instructions. Manuals+ will review the question and use this page’s manual context to help answer it.