
1. Sarrera
This manual provides detailed instructions for the installation, operation, and maintenance of your plplaaoo 100A MPPT Solar Charge Controller. This advanced controller is designed to optimize energy harvest from your solar panels and manage battery charging efficiently for 12V, 24V, 36V, and 48V solar power systems. Please read this manual thoroughly before installation and use to ensure proper function and safety.
2. Segurtasun-argibideak
Mesedez, jarraitu segurtasun neurri hauek instalazioan eta funtzionamenduan zehar:
- Ensure all wiring is correctly connected and securely fastened to prevent loose connections and overheating.
- Deskonektatu beti eguzki-panela eta bateria kontrolatzailea instalatu edo doitu aurretik.
- Use appropriate tools and wear protective gear, including eye protection, during installation.
- Install the controller in a well-ventilated area, away from flammable gases and liquids.
- Ez desmuntatu edo konpontzen saiatu kontrolatzailea zeuk. Jarri harremanetan langile kualifikatuekin zerbitzua jasotzeko.
- Ensure the battery bank is properly sized and compatible with the controller's voltage eta egungo balorazioak.
- Avoid short-circuiting the solar panel, battery, or load terminals.
3. Produktuaren ezaugarriak
- Maximum Power Point Tracking (MPPT): Achieves up to 98% conversion efficiency by intelligently tracking the maximum power point of solar panels under varying conditions.
- Bolumen automatikoatage Adaptation: Automatically detects and adapts to 12V, 24V, 36V, or 48V battery systems.
- Multifunctional Control: Supports various operating modes including PWM charging, constant current output, and voltage araudia.
- Integrated USB and DC Outputs: Features dual 5V 1A USB ports and a 2A DC output for charging external devices.
- Babes integrala: Includes safeguards against overvoltage, overcurrent, overtemperature, overload, short circuits, and reverse polarity.
- Erabiltzaileentzako interfazea: Equipped with a backlit LCD display for real-time monitoring and intuitive buttons for configuration.
- Eraikuntza iraunkorra: Features an aluminum heatsink for efficient cooling and robust design for harsh environments (0°C to 60°C).
- Bateriaren bateragarritasuna: Compatible with gel, sealed lead-acid, and lithium batteries.
4. Paketearen edukia
- 1 x plplaaoo 100A MPPT Solar Charge Controller
- 1 x Erabiltzailearen eskuliburua
5. Produktua amaitu daview eta Osagaiak
Familiarize yourself with the main components and interface of the solar charge controller.

5.1. irudia: Aurrealdea view of the solar charge controller, highlighting the LCD screen and various connection terminals.
The controller features an intuitive LCD display and clearly labeled ports for easy connection. The display provides real-time information about the system's status.
5.2. irudia: Xehetasuna view of the controller's connection ports.

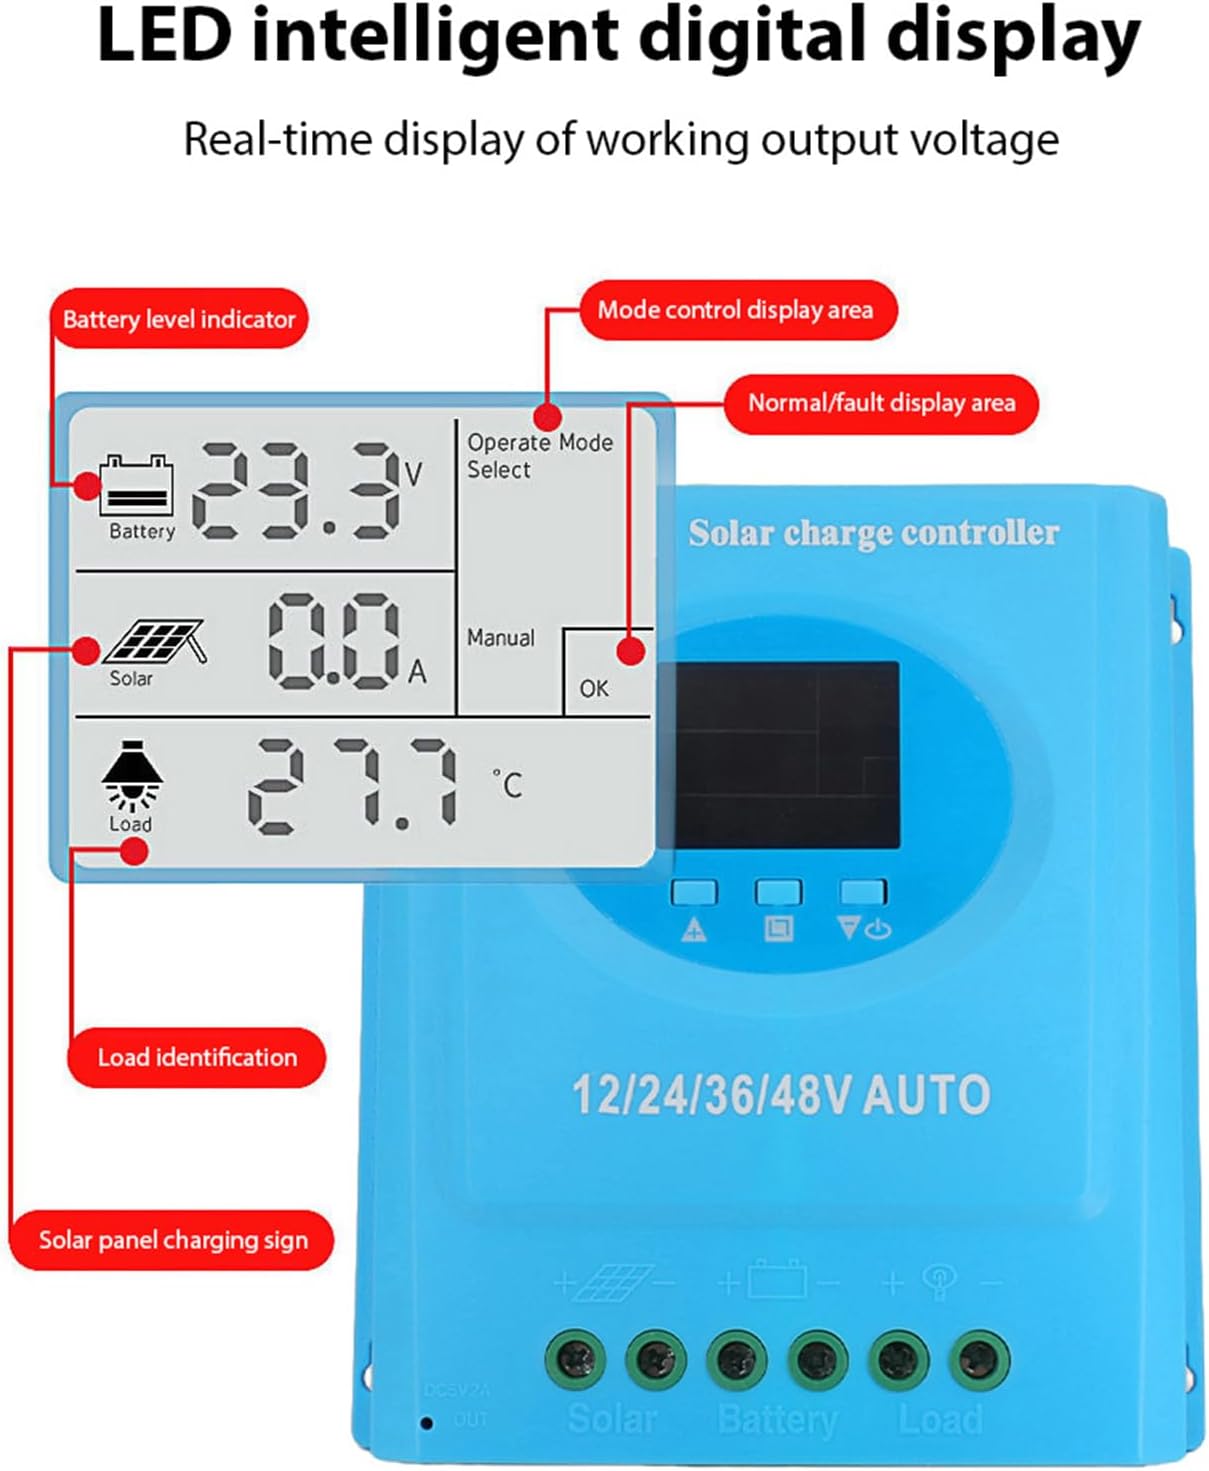
5.3. irudia: Xehetasuna view of the LCD display, indicating battery level, solar panel charging sign, load identification, operating mode, and real-time voltage.
5.1. Konexio Portuak
- Dual USB Interface: Two 5V 1A USB ports for charging mobile devices.
- Solar Panel Port: Connects to your solar panels (positive and negative).
- Bateria ataka: Connects to your battery bank (positive and negative).
- DC Load Port: Connects to your DC loads (positive and negative).
- DC irteerako ataka: Additional DC output.
6. Konfigurazioa eta instalazioa
Follow these steps for proper installation of the solar charge controller. Ensure all power sources are disconnected before beginning.
6.1. Kableatzeko metodoa
Connect the components in the following order to prevent damage:
- Konektatu bateria: Connect the battery to the controller's battery terminals (positive to positive, negative to negative). The controller will automatically detect the battery voltage.
- Konektatu eguzki-panela: Connect the solar panel to the controller's solar panel terminals (positive to positive, negative to negative).
- Konektatu korronte zuzeneko karga: Connect the DC load to the controller's load terminals (positive to positive, negative to negative).
Garrantzitsua: Konektatu beti bateria lehenik, gero eguzki-panela eta azkenik karga. Deskonektatu alderantzizko ordenan.

6.1. irudia: Solar energy system wiring diagram. Note the correct polarity for all connections.
6.2. Muntaketa
Mount the controller vertically on a flat surface in a well-ventilated area, ensuring adequate clearance for air circulation around the heatsink. Avoid direct sunlight, high temperatures, and humid environments.
7. Funtzionamendu-argibideak
Once installed, the controller will automatically begin operating. The LCD display provides real-time system status.
7.1. LCD pantailaren informazioa
The LCD screen displays various parameters:
- Bateria mailaren adierazlea: Shows the current charge status of the battery.
- Solar Panel Charging Sign: Indicates when the solar panels are actively charging the battery.
- Kargaren identifikazioa: Shows the status of the connected DC load.
- Operating Mode Display Area: Displays the current operating mode (e.g., manual, automatic).
- Normal/Fault Display Area: Indicates normal operation or displays error codes if a fault occurs.
- Real-time Working Output Voltage: Uneko bolumena erakusten dutagsistemaren e.
7.2. Botoiaren funtzioak
The controller typically features multiple buttons for navigation and setting adjustments:
- Menuko botoia: Used to enter and exit the menu settings.
- Gora / Behera botoiak: Used to navigate through menu options and adjust parameter values.
- Ados botoia: Used to confirm selections and save settings.
Refer to the on-screen menu for specific parameter adjustments such as battery type, load control mode, and charging thresholds.
8. Mantentzea
Mantentze-lan erregularrak zure eguzki-karga kontrolatzailearen errendimendu optimoa eta iraupena bermatzen ditu.
- Garbiketa: Aldian-aldian garbitu kontrolatzailearen kanpoaldea oihal lehor batekin hautsa eta hondakinak kentzeko. Ziurtatu aireztapen-irekidurak garbi daudela.
- Konexioaren egiaztapena: Annually inspect all wiring connections for tightness and corrosion. Re-tighten if necessary.
- Ingurumen-kontrola: Ensure the installation environment remains within the specified operating temperature range and is free from excessive moisture or dust.
- Bateriaren ikuskapena: Regularly check the battery terminals for corrosion and ensure the battery is in good condition.
9. Arazoak
Eguzki-karga kontrolagailuarekin arazoak badituzu, jo ezazu honako arazo eta irtenbide ohikoenei:
| Arazoa | Kausa posiblea | Irtenbidea |
|---|---|---|
| Kontrolatzailea ez da pizten / LCDa hutsik |
|
|
| Bateria ez da kargatzen |
|
|
| Karga ez dabil |
|
|
| Errore kodea bistaratzen da | Sistemaren akats espezifikoa. | Refer to the controller's display for the specific error code and consult the full product documentation or contact support for detailed interpretation and resolution. |
10. Zehaztapenak
| Parametroa | Balioa |
|---|---|
| Eredua | plplaaoozi6egog4wm-0A |
| Marka | plplaaoo |
| Korronte nominatua | 100A |
| Sistema Boltage | 12V / 24V / 36V / 48V Automatic Adaptation |
| Kargatzeko mota | MPPT (Potentzia Puntu Maximoaren Jarraipena) |
| Bihurketa-eraginkortasuna | Gehienez %98 |
| USB irteera | Dual 5V 1A ports |
| DC irteera | 2A |
| Funtzionamendu-tenperatura | 0°C eta 60°C artean |
| Neurriak (gutxi gorabehera) | 19.5 cm x 18.3 cm x 6.8 cm (7.7 x 7.2 x 2.7 cm) |

10.1. irudia: Approximate dimensions of the solar charge controller.
11. Bermea eta Laguntza
Bermeari buruzko informazioa, laguntza teknikoa edo zerbitzu-kontsultak egiteko, jarri harremanetan zure saltzailearekin edo fabrikatzailearekin zuzenean. Gorde erosketa-agiria erosketaren frogagiri gisa.