1. Segurtasun informazio garrantzitsua
Read all instructions carefully before assembling or using this equipment. Keep this manual for future reference.
- Kontsultatu medikuari edozein ariketa-programa hasi aurretik.
- Mantendu haurrak eta maskotak ekipotik urrun erabiltzen diren bitartean.
- Place the equipment on a flat, stable surface. Ensure adequate space around the bench for safe operation.
- Inspect the equipment for loose or damaged parts before each use. Do not use if any components are compromised.
- Do not exceed the maximum weight capacity of 550 lbs for the bench and 810 lbs total (including user weight and weights).
- Jantzi ariketa fisikorako arropa eta oinetako egokiak.
- Always use spotters when lifting heavy weights.
- Barbells and dumbbells are not included with this product.
2. Paketearen edukia
Verify all components are present before assembly. Refer to the assembly video for visual guidance.
- 1 x Main Bench Press Frame
- 1 x Assembly Kit (screws, wrenches, etc.)
- Bizkarraldeko kuxina
- Eserlekuko Pad
- Elbow Pad
- Foam Rollers (for leg extension/preacher curl)
- Various support frames and rods
Video: Assembly overview eta erabilera erakustaldia.
3. Muntatzeko jarraibideak
Follow these steps carefully. It is recommended to have two people for assembly.
Step 1: Install the Side Frames
Attach the side legs to the left and right side frames using the provided carriage bolts (M10x65mm) and open wrench (13-17). Ensure all bolts are securely tightened.

Image: Attaching side legs to the main frame components.
Step 2: Install the Shelf (Connecting Rod)
Connect the angle control rod (J) and square support (K) between the two assembled side frames using hex bolts (M10x65mm) and the Allen wrench (#6). This forms the base of the squat rack.

Image: Securing the horizontal connecting rod between the side frames.
Step 3: Install the Upper Side Frame
Attach the upper side frames (H) to the top of the main side frames using the knob bolts (M10x55mm). These are the adjustable uprights for the barbell.

Image: Attaching the adjustable uprights to the main frame.
Step 4: Install the Seat Pad
Secure the seat pad (C) to the main frame (D) using screws (M6x16mm) and the Allen wrench (#5).

Image: Attaching the padded seat to the bench frame.
Step 5: Install the Front Support
Attach the front support (N) to the side leg (E) using carriage bolts (M10x65mm) and the open wrench (13-17).

Image: Connecting the front support to the leg base.
Step 6: Connect the Rack to the Dumbbell Bench
Connect the main rack assembly to the dumbbell bench using hex bolts (M8x55mm), screws with nuts (M8x16mm), and the pin (Ø8x50mm). Use the Allen wrench (#5) and open wrench (13-17) for final tightening.

Image: Attaching the squat rack portion to the adjustable bench.
Step 7: Install the Foam Rollers
Insert the foam rollers (E) onto the φ19 round support (N) and secure the fixed support (M) using screws (M8x16mm) and the Allen wrench (#5). These are for the leg extension/preacher curl eranskina.

Image: Assembling the foam rollers for leg exercises.
Step 8: Install the Leg Frame
Assemble the leg frame (Q) by inserting the φ22 round support (N) and foam rollers (E), securing with the clamp (φ25).

Image: Assembling the leg frame component.
Step 9: Connect the Leg Frame to the Weight Bench
Attach the assembled leg frame to the main weight bench using hex bolts (M10x55mm) and the open wrench (13-17) or Allen wrench (#6).

Image: Attaching the leg exercise attachment to the bench.
Step 10: Install the Backrest Pad
Secure the backrest pad (A) to the backrest frame (L) using hex bolts (M6x40mm) and the Allen wrench (#5).

Image: Attaching the padded backrest to its support frame.
Step 11: Install the Elbow Pad
Attach the elbow pad (B) to the elbow support (P) using screws (M6x16mm) and the Allen wrench (#5). This forms the preacher curl pad.

Image: Attaching the preacher curl pad to its support.
Step 12: Install the Backrest Pad and Elbow Pad to the Bench
Connect the backrest pad assembly and the elbow pad assembly to the main bench frame using hex bolts (M10x160mm) and knob bolts (M10x55mm). Use the open wrench (13-17) and Allen wrench (#6) for final tightening.

Image: Final assembly of the backrest and elbow pads to the bench.
4. Funtzionamendu-argibideak
The YOLEO 6-in-1 Weight Bench offers multiple exercise configurations. Always ensure all adjustment pins and knobs are securely fastened before starting any exercise.
4.1. Bench Press and Squat Rack
The main frame serves as both a bench press station and a squat rack. The barbell height can be adjusted to 9 different positions. The back pad of the bench can be adjusted to 4 positions (-10°, 0°, 20°, 30°) for flat, incline, and decline presses.

Image: Diagram showing adjustable barbell height and bench backrest angles.
Video: Demonstration of bench press and squat rack adjustments and usage.
4.2. Leg Extension/Curl
Attach weight plates (not included) to the leg extension bar. Adjust the height of the leg press attachment for comfort and proper form. Perform leg extensions or curls by moving your legs against the resistance.

Image: Close-up of the leg extension attachment with foam rollers.
4.3. Preacher Curl
The preacher curl attachment allows for isolated bicep workouts. Adjust the height of the preacher curl rack to suit your arm length and ensure your elbows are comfortably positioned on the pad.

Image: Close-up of the preacher curl pad.
4.4. Sit-ups and Other Exercises
The adjustable bench can be used for various bodyweight exercises, including sit-ups (in decline position) and dumbbell exercises (with dumbbells not included).
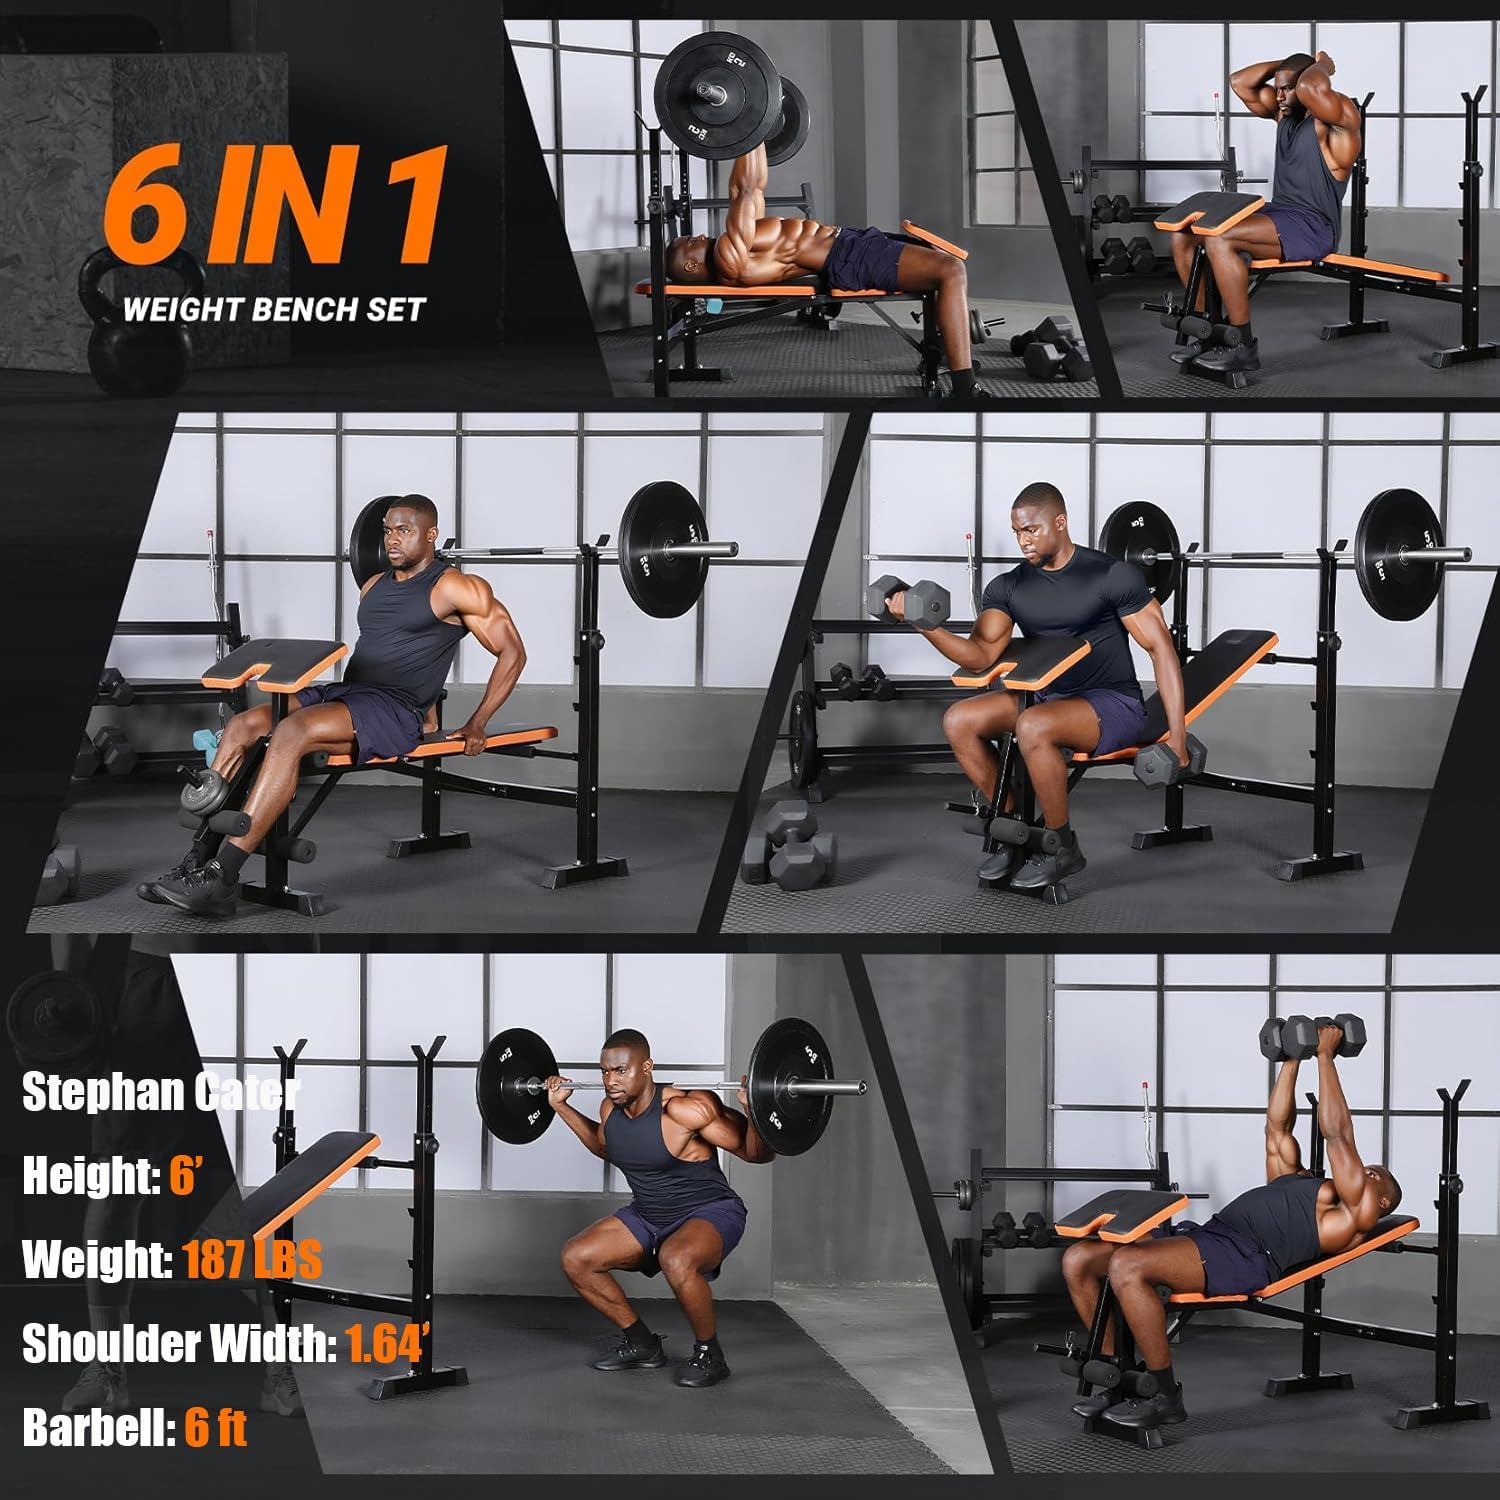
Irudia: Visual examples of various exercises possible with the bench.
5. Egokitzapenak
- Bench Backrest: Adjust the backrest to -10°, 0°, 20°, or 30° using the adjustment pin located beneath the backrest.
- Barbell Rack Height: The barbell rack has 9 adjustable height positions. Loosen the knob, slide the rack to the desired height, and re-tighten the knob securely.
- Predikala Curl Rack-en altuera: The preacher curl rack has 5 adjustable height positions. Loosen the knob, adjust to the desired height, and re-tighten.
- Leg Press Height: The leg press attachment has 2 adjustable height positions. Loosen the knob, adjust to the desired height, and re-tighten.
Image: Visual guide to the various adjustment points on the bench.
6. Tolestura eta biltegiratzea
This weight bench is designed for quick and easy folding to save space.
- Remove any barbells or weights from the rack and attachments.
- Adjust the bench backrest to the flat position.
- Locate the folding pin (often a pull-pin or knob) on the main frame.
- Pull the pin and carefully fold the bench upwards. The design allows for a 1-step folding process.
- Once folded, ensure it is stable before storing.

Image: Visual representation of the bench in its folded, space-saving configuration.
Video: Short demonstration of the 1-step folding mechanism.
7. Mantentzea
- Garbiketa: Wipe down the pads and frame with a damp Erabili ondoren, zapi bat garbitu izerdia eta zikinkeria kentzeko. Saihestu garbitzaile urratzaileak.
- Ikuskapena: Regularly check all bolts, nuts, and pins for tightness. Tighten as necessary. Inspect the frame for any signs of damage or wear.
- Lubrifikazioa: Periodically apply a small amount of lubricant to moving parts (e.g., adjustment mechanisms) to ensure smooth operation.
8. Arazoak
- Dardarka/Ezegonkortasuna: Ensure all assembly bolts are securely tightened. Verify the equipment is on a flat, even surface.
- Difficulty Adjusting: Check for any obstructions in the adjustment holes. Apply a small amount of lubricant to the sliding mechanisms if they are stiff.
- Noise During Use: Tighten any loose bolts. Ensure foam pads are correctly positioned.
9. Zehaztapenak
| Marka | YOLEO |
| Modelo zenbakia | YOLEO430 |
| Materiala | Altzairu aleazioa |
| Produktuaren neurriak (L x W x H) | 63" x 50" x 32" |
| Elementuaren pisua | 44 kilo |
| Pisu Muga | 550 Pounds (Bench), 810 Pounds (Total) |
| Kolorea | Vitality Orange |
| UPC | 199967005309 |
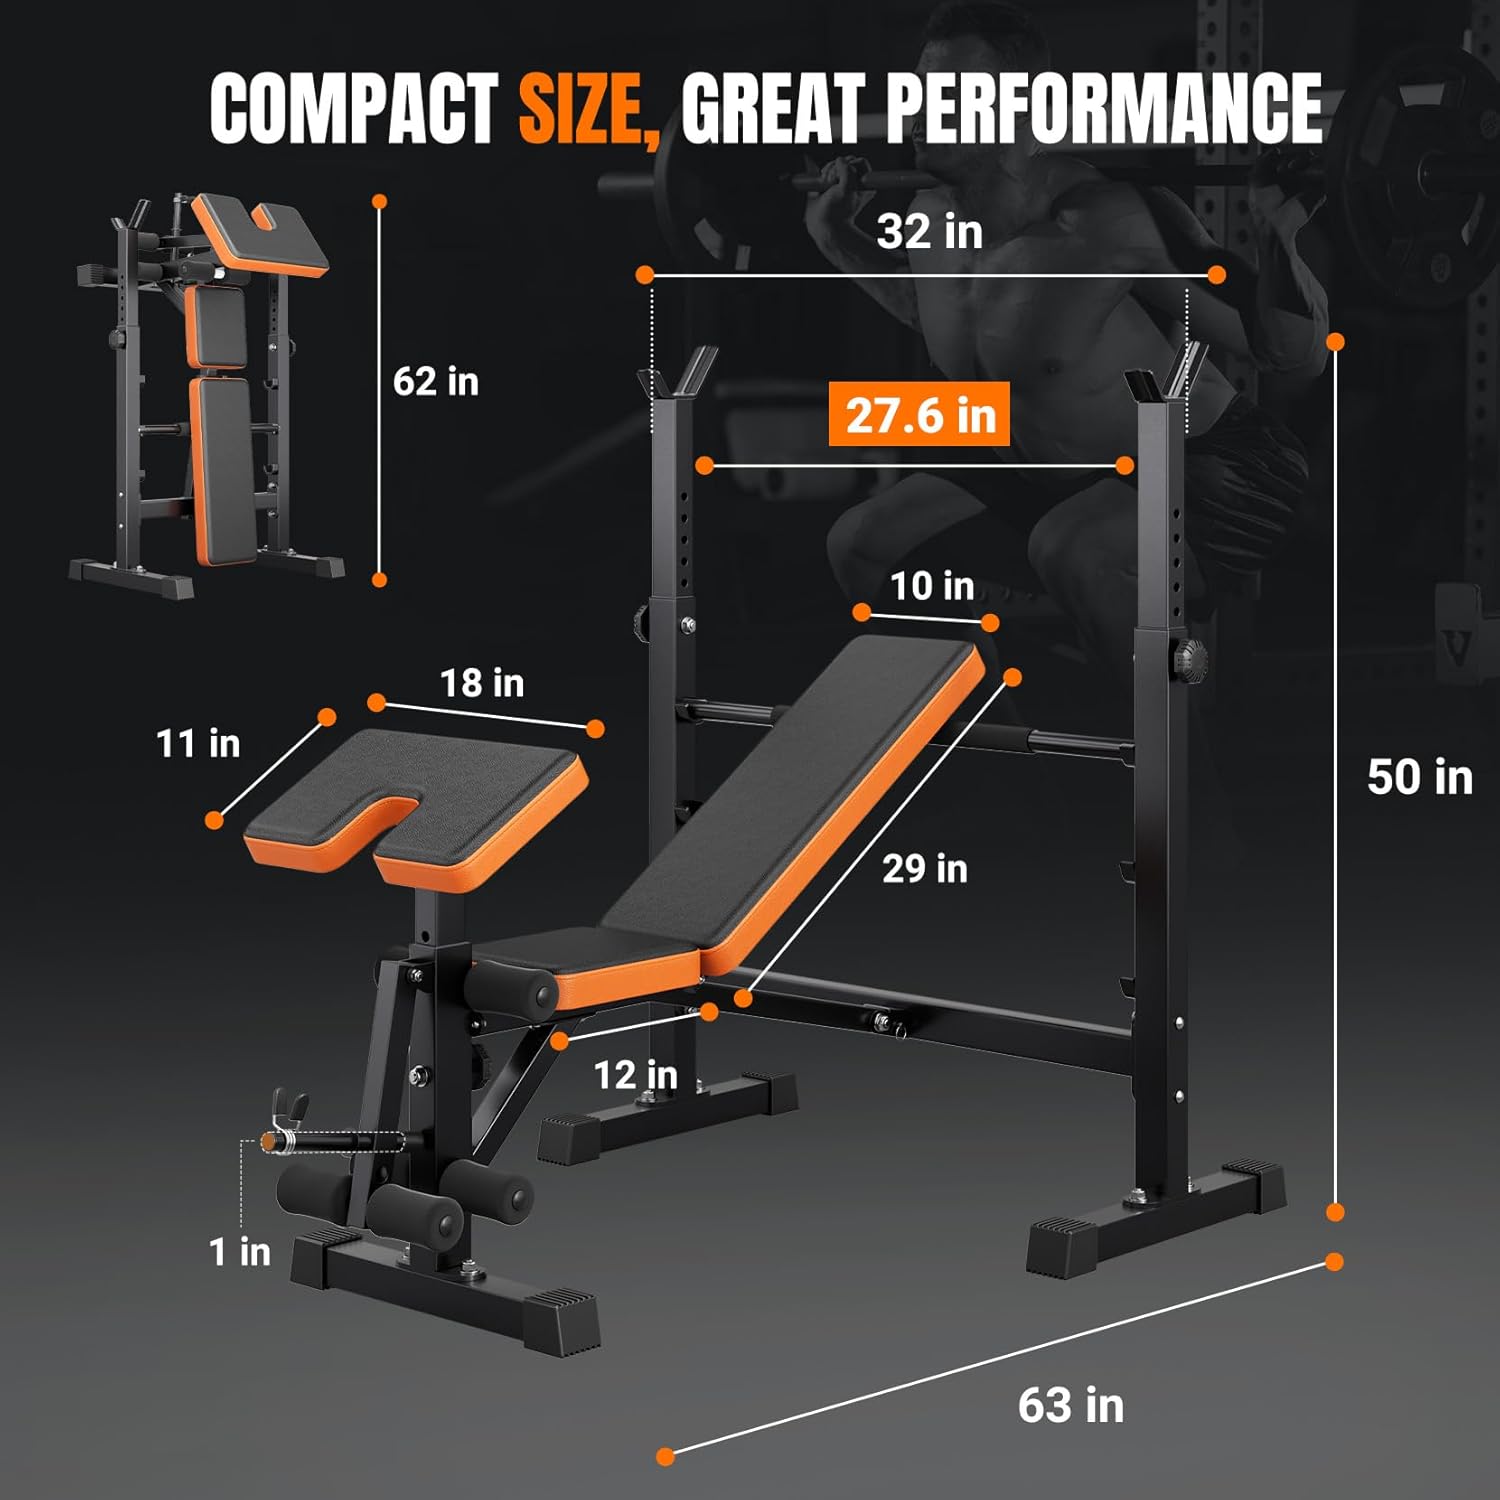
Image: Detailed dimensions of the YOLEO 6-in-1 Weight Bench.
10. Bermea eta Laguntza
YOLEO provides comprehensive support for its products:
- Ordezko piezak: If any part is damaged or lost, YOLEO will reissue spare parts for life.
- Bezeroarentzako arreta: 24/7 customer service is available for setup assistance and troubleshooting.
- For support, please refer to the contact information provided with your purchase or visit the official YOLEO webgunea.