
1. Sarrera
This manual provides detailed instructions for the installation, configuration, and operation of the SOYO X99 BSF motherboard. It is designed to assist users in setting up their system correctly and efficiently. Please read this manual thoroughly before beginning the installation process.

Figure 1: SOYO X99 BSF Motherboard and included accessories, including the I/O shield, SATA cable, and CPU cooler mounting bracket.
2. Konfigurazioa eta instalazioa
Follow these steps for proper installation of your SOYO X99 BSF motherboard and its components.
2.1 Plaka amaierako diseinua

Figure 2: Detailed layout of the SOYO X99 BSF motherboard, highlighting key components and connectors such as the LGA2011-V3 CPU socket, DDR4 DIMM slots, M.2 NVMe slots, PCIe slots, and various headers.
2.2 PUZaren instalazioa
- Ensure the motherboard is placed on a non-conductive surface.
- Locate the LGA2011-V3 CPU socket. Open the CPU retention mechanism by releasing the two levers.
- Carefully align the CPU (Intel Xeon E5 LGA2011-V3 series) with the socket, ensuring the gold triangle on the CPU matches the triangle on the socket. Do not force the CPU into the socket.
- Close the retention mechanism by pressing down the levers until they lock into place.
- Apply thermal paste to the CPU and install the CPU cooler.
2.3 Memoriaren (RAM) instalazioa
- Aurkitu lau DDR4 DIMM zirrikituak.
- Ireki DIMM zirrikituaren bi muturretan dauden klipak.
- Lerrokatu memoria-modulua zirrikituarekin, moduluko koska zirrikituan dagoen giltzarekin bat datorrela ziurtatuz.
- Press down firmly on both ends of the memory module until the clips snap into place. For optimal performance, install memory modules in the gray primary channels first.
2.4 Biltegiratze-gailuaren instalazioa
2.4.1 M.2 NVMe/SATA SSD Installation
- Locate the two M.2 slots on the motherboard. The upper slot supports NVMe (PCIe 3.0 x4) and SATA 3.0 protocols, while the lower slot supports NVMe (PCIe 3.0 x4) only.
- Sartu M.2 SSDa zirrikituan 30 graduko angeluan.
- Gently push down the SSD and secure it with the provided screw.
2.4.2 SATA 3.0 Device Installation
- Connect one end of the SATA data cable to one of the four SATA 3.0 interfaces on the motherboard.
- Konektatu SATA datu-kablearen beste muturra zure SATA disko gogorrera edo SSDra.
- Konektatu SATA kable bat elikatze-iturritik (PSU) biltegiratze-gailura.
2.5 Potentzia-konexioak
- Connect the 24-pin ATX power connector from your PSU to the 24-pin ATX power socket on the motherboard.
- Connect the 8-pin EPS power connector from your PSU to the 8-pin EPS power socket near the CPU.
2.6 Front Panel and Internal Headers
Refer to Figure 2 for the location of these headers.
- FPANEL (Front Panel Header): Connect the power switch, reset switch, power LED, and HDD activity LED from your PC case.
- USB 2.0 Header: Connects to front panel USB 2.0 ports (expandable to 2 ports).
- USB 3.0 Header: Connects to front panel USB 3.0 ports (expandable to 2 ports).
- Front Audio Header: Connects to the front panel audio jacks.
- CPU Fan Header (4-pin): Connect your CPU cooler fan.
- System Fan Header (3-pin): Connect a case fan.
- JBAT (CMOS Clear): Used to clear CMOS settings.
- JLPC (LPC Debug): Arazte helburuetarako.
- SPEAK (System Speaker): Connects to a system speaker for POST codes.
- TPM Header (14-pin): For connecting a compatible TPM 2.0 module.
2.7 Atzeko S/I panelaren konexioak
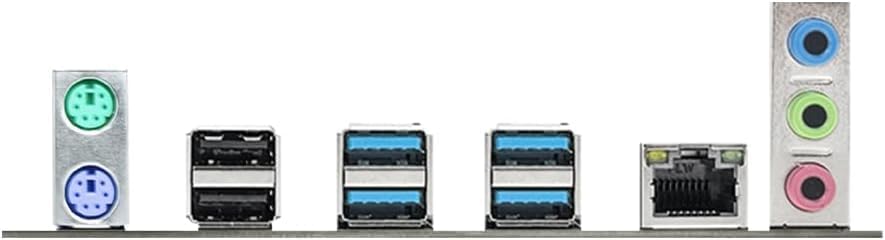
3. irudia: hurbileko planoa view of the rear input/output panel, showing PS/2 ports, USB 2.0 ports, USB 3.0 ports, RJ45 LAN port, and audio jacks.
- PS/2 atakak: 1 x PS/2 Keyboard port (green), 1 x PS/2 Mouse port (purple).
- USB 2.0 portuak: 2 x USB 2.0 ports (black).
- USB 3.0 portuak: 4 x USB 3.0 ports (blue).
- RJ45 LAN Port: 1 x Gigabit Ethernet port for network connection.
- Audio-konektoreak: 1 x Line Out (green), 1 x MIC In (pink), 1 x Line In (blue) for audio devices.
2.8 PCIe txartelaren instalazioa
- Locate the PCIe x16 3.0 slot (PCIe1, from CPU) for graphics cards and the PCIe x1 2.0 slot (PCIe2, from PCH) for other expansion cards.
- Kendu dagokion zirrikituaren estalkia zure ordenagailuaren kaxatik.
- Align the expansion card with the PCIe slot and press down firmly until it is seated correctly.
- Txartela torloju batekin ordenagailuaren karkasari lotu.
3. Funtzionamendu-argibideak
3.1 Hasierako abiaraztea
- After all components are installed and connected, ensure the power supply is switched on.
- Sakatu zure ordenagailuaren kaxan dagoen pizteko botoia.
- The system should power on, and you should see the BIOS/UEFI splash screen.
3.2 BIOS/UEFI konfigurazioa
To enter the BIOS/UEFI setup utility, press the designated key (commonly DEL or F2) during the initial boot-up sequence. Here you can configure system settings, boot order, and monitor hardware status.
3.3 Gidariaren instalazioa
After installing your operating system, install the necessary drivers for the motherboard components. These typically include chipset drivers, LAN drivers, and audio drivers. Drivers are usually provided on a support CD or can be downloaded from the SOYO official webgunea.
4. Mantentzea
- Mantendu garbi: Regularly clean dust from inside your PC case, especially around fans and heatsinks, to ensure optimal airflow and prevent overheating. Use compressed air for best results.
- BIOS eguneraketak: Periodically check the SOYO website for BIOS/UEFI updates. Updates can improve system stability, compatibility, and performance. Follow the update instructions carefully to avoid system damage.
- Kableen kudeaketa: Ensure cables are neatly routed to prevent obstruction of airflow and to facilitate future maintenance.
5. Arazoak
Arazoak badituzu, jarraitu arazoak konpontzeko ohiko urrats hauek:
- Potentziarik gabe: Check all power connections (24-pin ATX, 8-pin EPS) from the PSU to the motherboard. Ensure the PSU is switched on.
- Ez dago pantailarik: Verify that the graphics card is properly seated in the PCIe slot and that the monitor cable is securely connected to the graphics card. If using integrated graphics (not applicable for this motherboard as it requires a dedicated GPU), ensure the monitor is connected to the motherboard's video output.
- Sistemaren ezegonkortasuna/matxurak: Check memory modules for proper seating. Test memory with diagnostic tools. Ensure CPU cooler is properly installed and making good contact. Check for overheating.
- Osagaia ez da detektatu: Re-seat the component (e.g., RAM, M.2 SSD, SATA drive, PCIe card). Check power and data cables. Ensure drivers are installed.
- Garbitu CMOS: If the system fails to boot after making BIOS changes, clear the CMOS by shorting the JBAT header pins or removing the CMOS battery for a few minutes.
6. Zehaztapenak
| Ezaugarri | Zehaztapena |
|---|---|
| Fabrikatzailea | SOYO |
| Modelo zenbakia | X99 BSF |
| CPU Socketa | LGA 2011-3 |
| Prozesadore bateragarriak | Intel Xeon E5 LGA2011-V3 series (e.g., E5-2603V3, 2666V3, 2673V3, 2680V3, 2678V3, 2696V3, 2684V4, 2696V4) |
| Txip mota | Intel X99 |
| Memoriaren Teknologia | DDR4 |
| Memoria zirrikituak | 4 x DDR4 DIMM zirrikitua |
| Gehienezko memoria-ahalmena | Up to 128GB (32GB x 4) |
| Supported Memory Speed | 2133/2400MHz (Max) |
| Biltegiratze interfazeak | 2 x M.2 slots (Upper: NVMe PCIe 3.0 x4/SATA3.0; Lower: NVMe PCIe 3.0 x4) 4 x SATA3.0 interfaces |
| PCIe zirrikituak | 1 x PCIe x16 3.0 slot (from CPU) 1 x PCIe x1 2.0 slot (from PCH) |
| Audio Txipa | Realtek ALC897 HD Audioa |
| LAN Chip | Realtek RTL8111H Gigabit Ethernet |
| Atzeko I/O atakak | 2 x USB 2.0, 4 x USB 3.0, 1 x RJ45, 1 x Line Out, 1 x MIC In, 1 x Line In, 1 x PS/2 Keyboard, 1 x PS/2 Mouse |
| Barne goiburuak | 1 x FPANEL, 1 x 4-pin CPU fan, 1 x 3-pin system fan, 1 x JBAT, 1 x JLPC, 1 x SPEAK, 1 x USB 2.0 (exp. 2 ports), 1 x USB 3.0 (exp. 2 ports), 1 x Front Audio, 1 x 14-pin TPM |
| Potentzia Sarrera | 24-pin ATX + 8-pin EPS connectors |
| Neurriak | 220 x 190mm (4-layer PCB) |
| Plataforma bateragarritasuna | Windows 11 |
7. Bermea eta Laguntza
For warranty information, please refer to the documentation included with your purchase or contact your retailer. For technical support, driver downloads, and further assistance, please visit the official SOYO website or contact SOYO customer service.
You can find more information about SOYO products at their official store: SOYO Store on Amazon.