Sarrera
This manual provides detailed instructions for the proper setup, operation, maintenance, and troubleshooting of your KONUSPRO M-30 1x-4x24mm Riflescope (Model 7184). Please read this manual thoroughly before using the riflescope to ensure safe and effective operation. This riflescope is designed for close-to-medium range shooting, offering reliable performance with its illuminated reticle and durable construction.
Segurtasun Informazioa
- Always treat firearms as if they are loaded.
- Always point the muzzle in a safe direction.
- Keep your finger off the trigger until ready to shoot.
- Be sure of your target and what is beyond it.
- Tiro egitean, erabili begi eta belarrietarako babes egokiak.
- Ensure the riflescope is securely mounted before use to prevent injury or damage.
- Never look directly at the sun through the riflescope, as this can cause permanent eye damage.
Paketearen edukia
Egiaztatu elementu guztiak zure paketean daudela:
- KONUSPRO M-30 1x-4x24mm Riflescope
- Flip-up Lens Covers
- Battery (for reticle illumination)
- Garbiketa Oihala
Konfigurazioa
1. Fusil-mira muntatzea
The KONUSPRO M-30 riflescope is designed for rifles with Dovetail/Weaver mounting rails. Proper mounting is crucial for accuracy and consistent performance.
- Select appropriate mounting rings (not included) that match the riflescope's 30mm tube diameter and your rifle's rail type.
- Position the riflescope on the mounting rings, ensuring proper eye relief. Eye relief is the distance between your eye and the ocular lens when you have a full field of view.
- Rotate the riflescope so the reticle is level. Use a reticle leveling tool or a plumb line for precision.
- Tighten the mounting rings evenly and securely according to the ring manufacturer's specifications. Do not overtighten, as this can damage the scope tube.

Image: The KONUSPRO M-30 1x-4x24mm Riflescope, showing its overall design and how it would appear when mounted on a rifle.
2. Battery Installation for Reticle Illumination
The riflescope features an illuminated reticle, powered by a battery.
- Locate the illumination control knob on the left side of the riflescope's main tube.
- Unscrew the battery cap from the illumination control knob.
- Insert the provided battery (typically a CR2032) with the positive (+) side facing outwards.
- Kontu handiz itxi bateriaren tapoia berriro, iragazgaitza den zigilua mantentzeko eskuz estututa dagoela ziurtatuz.
Funtzionamendua
1. Handitze doikuntza
The riflescope offers variable magnification from 1x to 4x.
- To adjust the magnification, rotate the power ring located near the ocular (eyepiece) end of the riflescope.
- Turn clockwise to increase magnification and counter-clockwise to decrease it.
2. Fast Focus Ocular Adjustment
The fast focus ocular allows you to quickly bring the reticle into sharp focus for your eye.
- Look through the riflescope at a plain, bright background (e.g., a clear sky).
- Rotate the ocular lens (the part closest to your eye) until the reticle appears crisp and sharp.
- Once set, this adjustment typically does not need to be changed unless a different user operates the scope.
3. Reticle Illumination
The riflescope features a dual-illuminated circle-dot reticle (red and blue) for enhanced visibility in various lighting conditions.
- The illumination control knob, located on the left side, controls both the color and brightness.
- Rotate the knob to select either red or blue illumination.
- Continue rotating to increase or decrease the brightness level. There are multiple brightness settings for each color.
- Turn the knob to the 'OFF' position when illumination is not needed to conserve battery life.
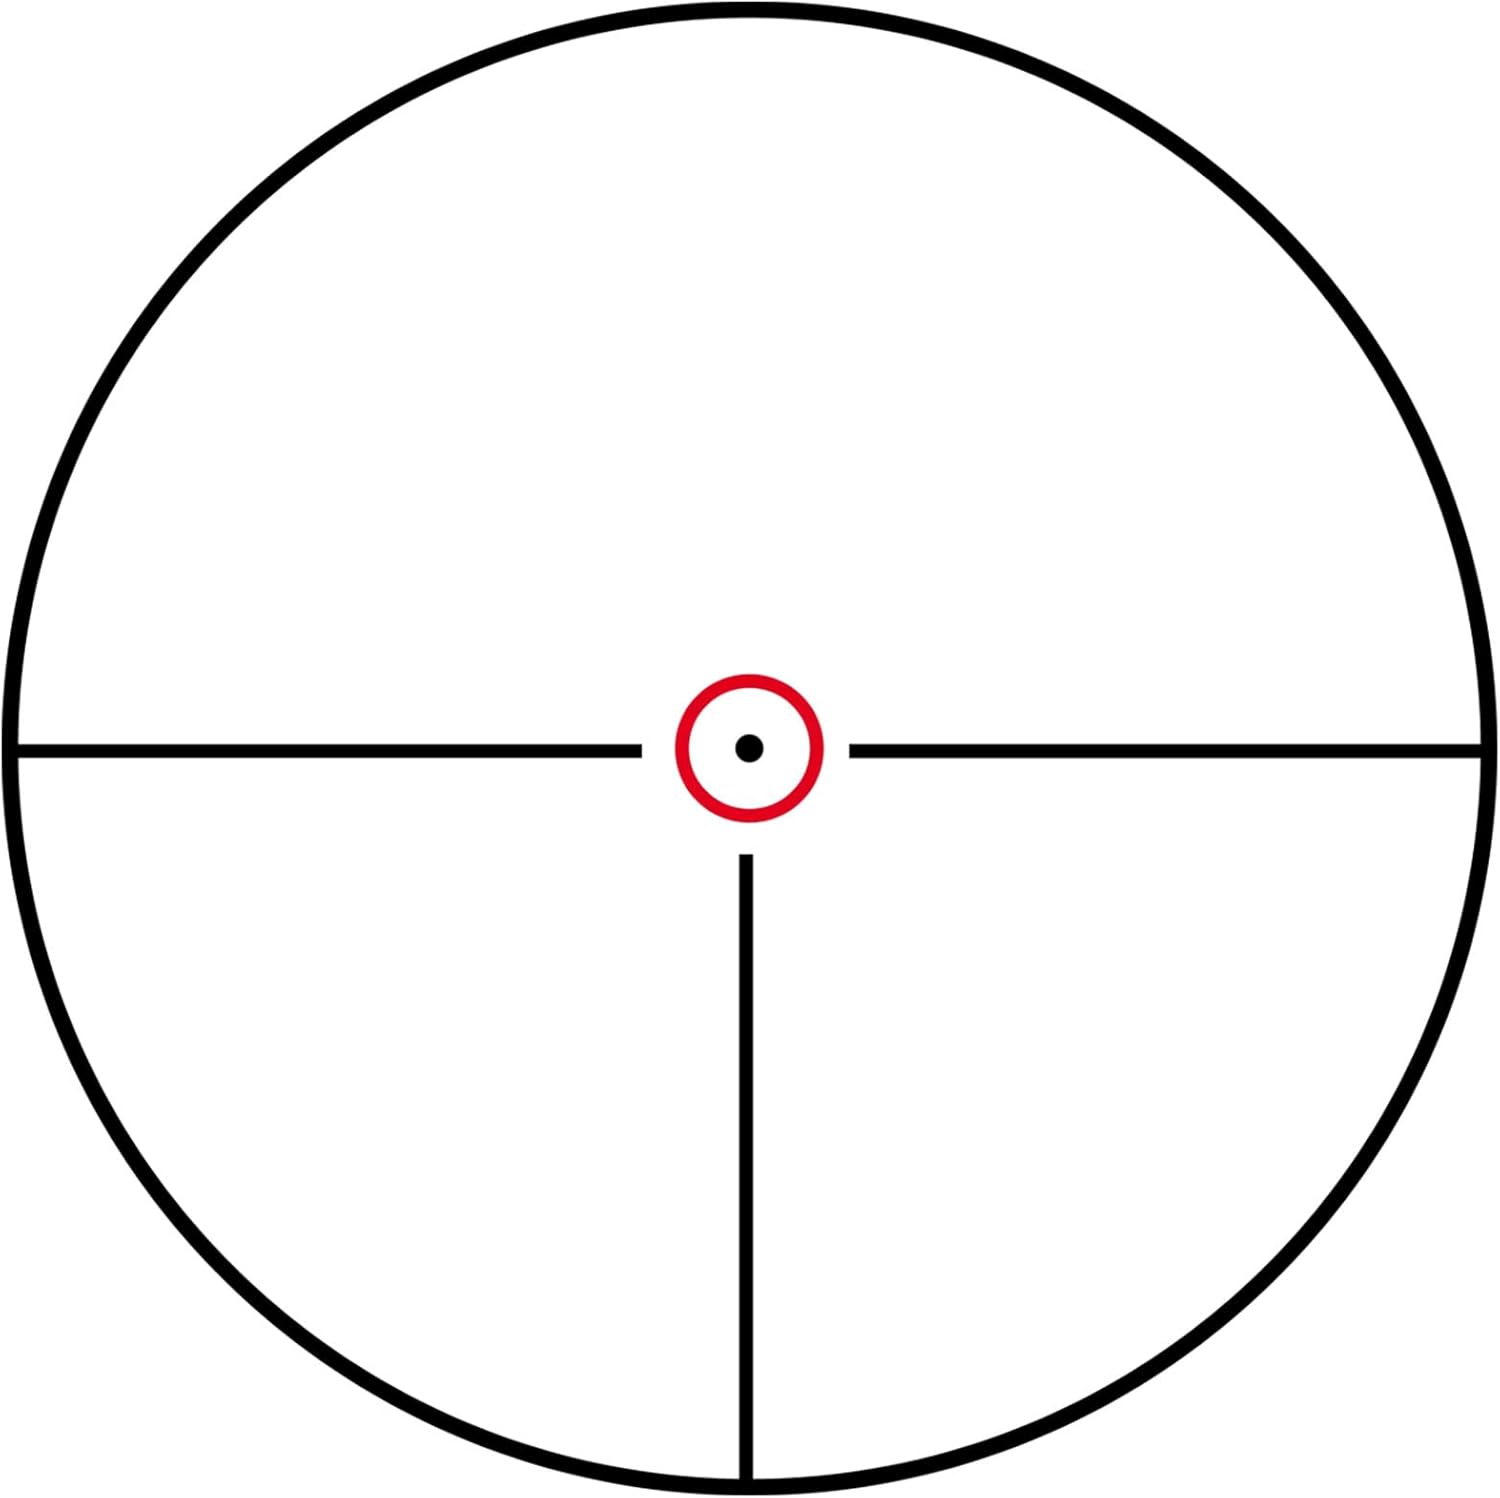
Image: A visual representation of the illuminated circle-dot reticle as seen through the riflescope.
4. Haize- eta kota-doikuntzak
The riflescope features tactical turrets for precise 1/2 M.O.A. adjustments for windage (horizontal) and elevation (vertical).
- The elevation turret is located on top of the riflescope.
- The windage turret is located on the right side of the riflescope.
- To make adjustments, remove the protective caps (if present) and turn the turrets. Each click represents 1/2 Minute of Angle (M.O.A.) adjustment.
- Refer to your firearm's zeroing procedure for specific instructions on how to adjust for point of impact. Generally, to move the point of impact up, turn the elevation turret counter-clockwise. To move the point of impact right, turn the windage turret counter-clockwise.
- After zeroing, you can reset the turrets to '0' by loosening the set screws on the turret and rotating the numbered dial to '0', then retightening the screws.

Irudia: Gertutik view of the riflescope's windage and elevation adjustment turrets, showing their textured design for easy grip.
Mantentzea
1. Lenteak garbitzea
To maintain optical clarity, keep the lenses clean.
- Use the provided cleaning cloth or a soft, lint-free optical cloth.
- Gently brush away any loose dust or debris.
- If necessary, use a small amount of lens cleaning fluid specifically designed for optics. Apply to the cloth, not directly to the lens.
- Saihestu lenteen gainazalak hatzekin ukitzea.
2. Fusil-miraren gorputza garbitzea
The riflescope's exterior can be cleaned with a soft, damp oihal.
- Wipe down the body to remove dirt, dust, or fingerprints.
- Saihestu produktu kimiko gogorrak edo material urratzaileak erabiltzea, hauek akabera kaltetu baitezakete.
3. Biltegiratzea
When not in use, store the riflescope in a cool, dry place.
- Ensure the flip-up lens covers are in place to protect the lenses.
- Remove the battery if storing for extended periods to prevent corrosion.
Arazoak konpontzea
| Arazoa | Kausa posiblea | Irtenbidea |
|---|---|---|
| Reticle illumination not working | Dead battery; Incorrect battery orientation; Loose battery cap | Replace battery; Reinsert battery with correct polarity; Tighten battery cap |
| Irudi lausoa | Ocular not focused; Lenses dirty | Adjust fast focus ocular; Clean lenses |
| Inaccurate shots / Cannot hold zero | Loose mounting rings; Damaged scope; Incorrect zeroing procedure | Check and tighten mounting rings; Contact Konus support if scope is damaged; Re-zero the riflescope carefully |
| Fogging inside scope | Extreme temperature changes; Seal compromise | Allow scope to acclimate; If persistent, contact Konus support (scope is fogproof) |
Zehaztapenak
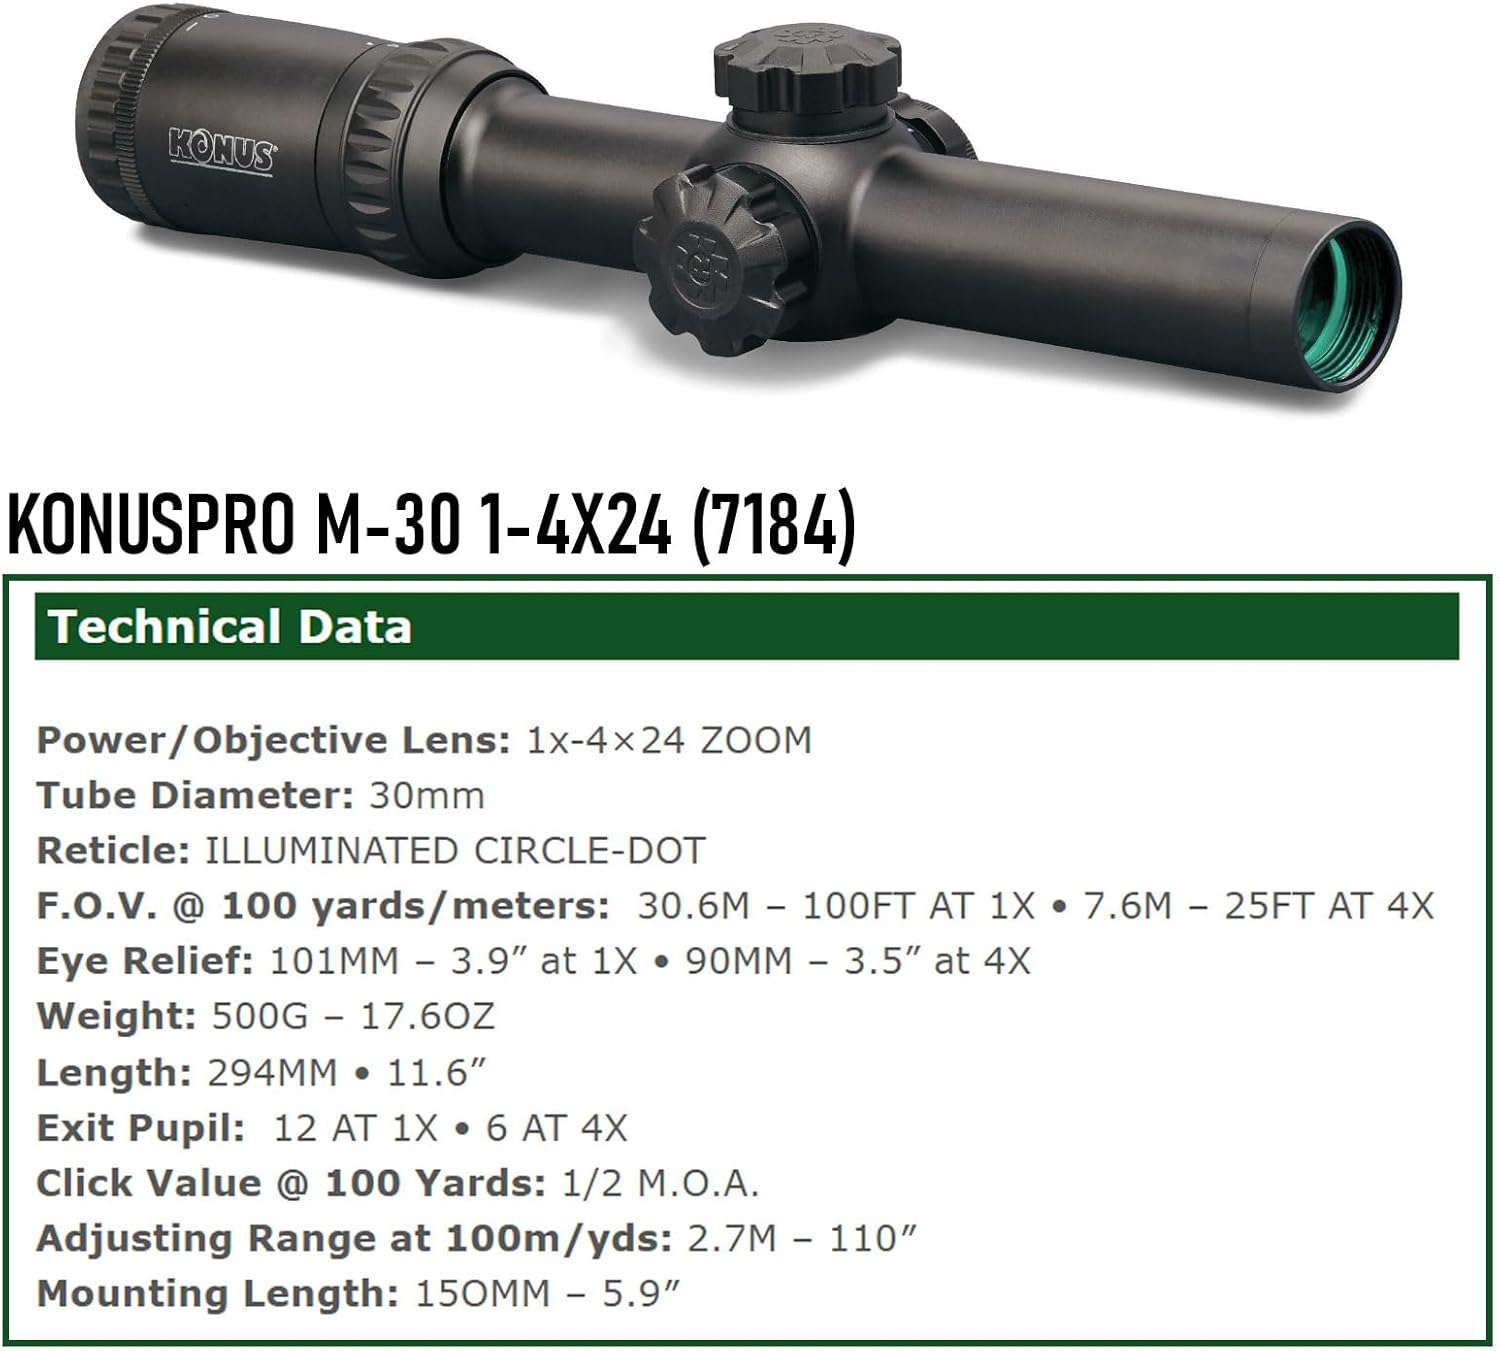
Image: Technical data sheet for the KONUSPRO M-30 1x-4x24mm Riflescope, detailing its optical and physical specifications.
| Ezaugarri | Xehetasuna |
|---|---|
| Ereduaren izena | KONUSPRO M-30 1x-4x24mm Riflescope (7184) |
| Handitzea | 1x - 4x |
| Lente objektiboaren diametroa | 24 mm |
| Hodiaren Diametroa | 30 mm |
| Erretikulua | Illuminated Circle-Dot |
| ren eremua View (100 metrotan) | 30.6 ft (1x) - 7.6 ft (4x) |
| Eye Relief | 101mm (3.9") at 1x - 90mm (3.5") at 4x |
| Irten Pupil | 12 mm at 1x - 6 mm at 4x |
| Sakatu Balioa | 1/2 M.O.A. |
| Adjusting Range (at 100m/yds) | 2.7m - 110" |
| Muntatzeko Luzera | 150 mm (5.9") |
| Elementuaren pisua | 17.6 ontza (500 g) |
| Iragazgaitza | Bai |
| Lainoaren aurkakoa | Bai |
| shockproof | Bai |
| Gailu bateragarriak | Rifles with Dovetail/Weaver mounting rails |
Bermea eta Laguntza
Konus products are manufactured to high-quality standards. For specific warranty information, please refer to the warranty card included with your product or visit the official Konus website. For technical support or service inquiries, please contact Konus customer service through their official channels.