
Sarrera
Thank you for choosing the Prechen 21.5 Inch Portable Touchscreen Monitor. This monitor is designed to provide a responsive multi-touch experience with a Full HD 1080p display, 75Hz refresh rate, and versatile connectivity options. This manual provides essential information for setting up, operating, and maintaining your monitor. Please read it thoroughly before use.
Paketearen edukia
Mesedez, egiaztatu paketea elementu hauek dituen:
- Prechen 21.5 Inch Portable Touchscreen Monitor
- Elikatze-moldagailua
- HDMI kablea
- USB-C USB-C kablea
- USB-A USB-C kablea
- Erabiltzailearen eskuliburua
Produktua amaituview
Familiarize yourself with the ports and buttons on your monitor.
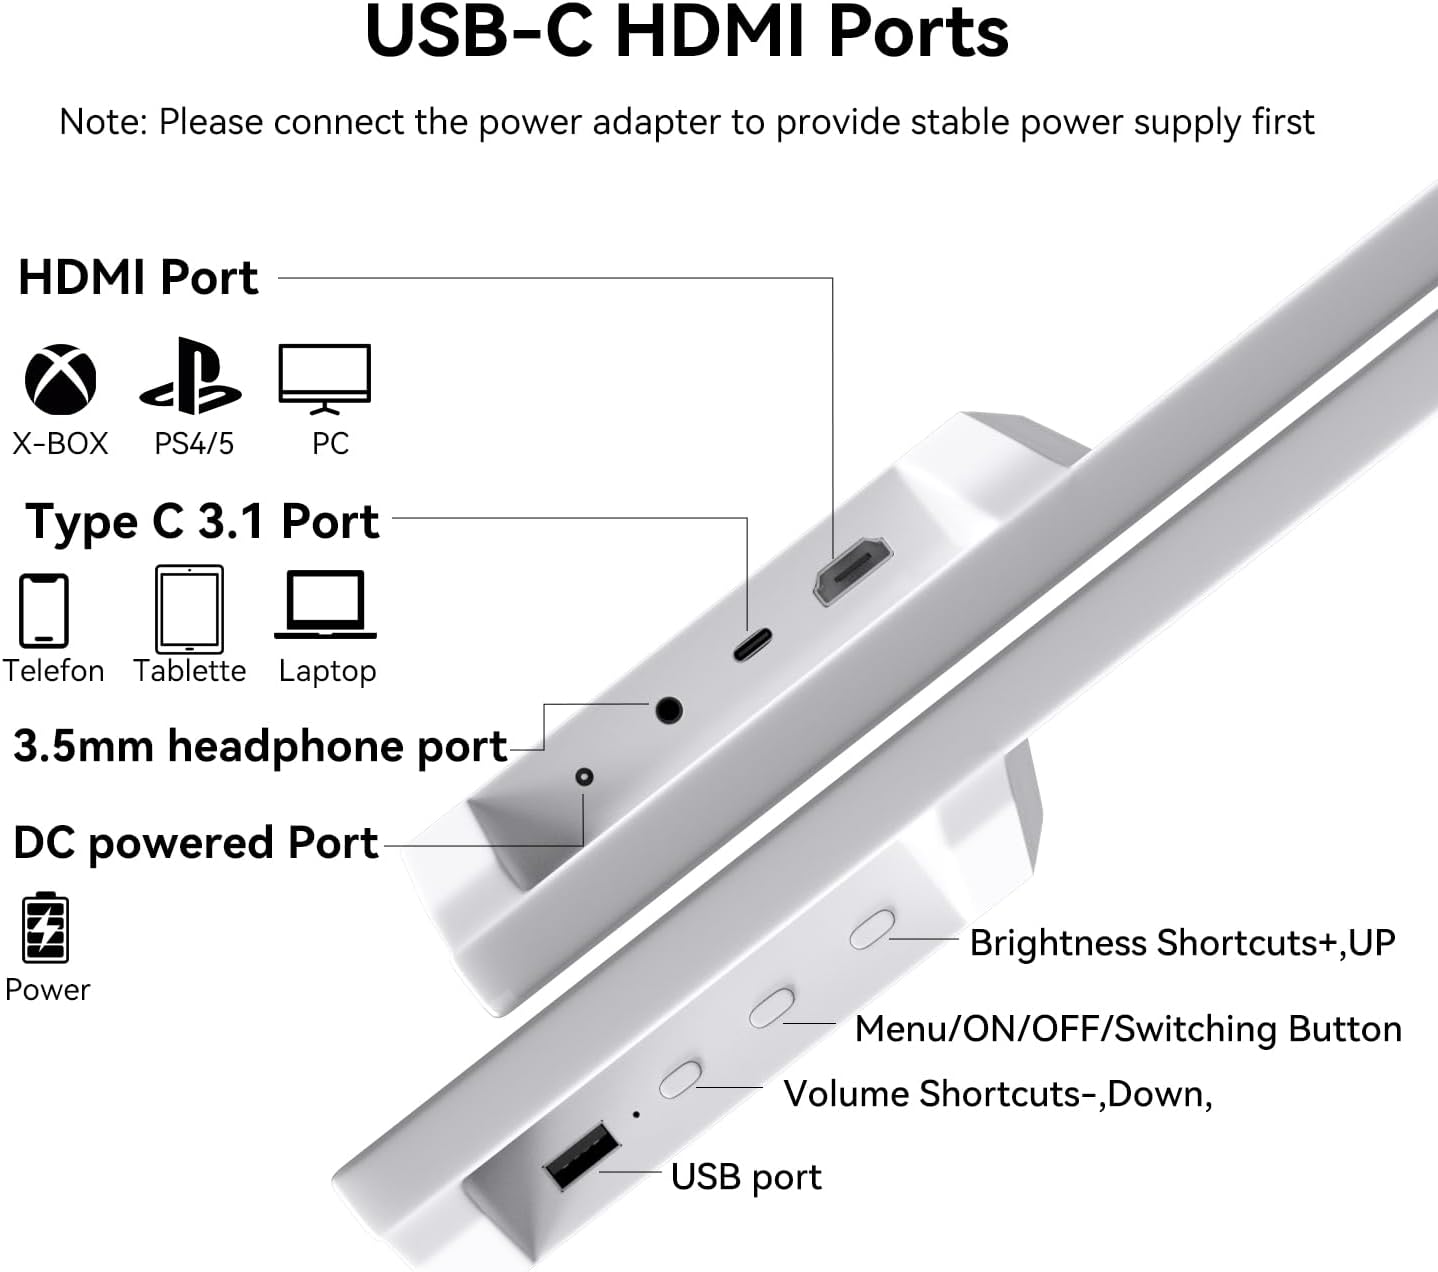
Irudia: Aldea view of the monitor detailing the HDMI Port, Type C 3.1 Port, 3.5mm headphone port, DC powered Port, Brightness Shortcuts (+UP), Menu/ON/OFF/Switching Button, Volume Shortcuts (-Down), and USB port.
- HDMI ataka: Connects to devices like X-BOX, PS4/5, and PCs for video and audio input.
- Type C 3.1 Port: Connects to phones, tablets, and laptops for video, audio, and touch signal transmission. Requires a full-featured USB-C port on the connected device.
- 3.5 mm-ko entzungailuen ataka: Kanpoko audio gailuak konektatzeko.
- DC Powered Port: Connects to the power adapter for stable power supply. Always connect power here first.
- USB ataka: USB gailuak konektatzeko.
- Brightness Shortcuts (+UP): Pantailaren distira doitzen du.
- Menu/ON/OFF/Switching Button: Accesses the OSD menu, powers the monitor on/off, and switches input sources.
- Volume Shortcuts (-Down): Audioaren bolumena doitzen du.
Konfigurazio Argibideak
Follow these steps to set up your Prechen portable touchscreen monitor.
1. Power Connection (Important)
Due to the touchscreen's power requirements, it is crucial to connect the monitor to a power source via the DC input first, before connecting any signal cables (HDMI or USB-C). This ensures stable power delivery for full multi-touch functionality.
2. Gailuetara konektatzea
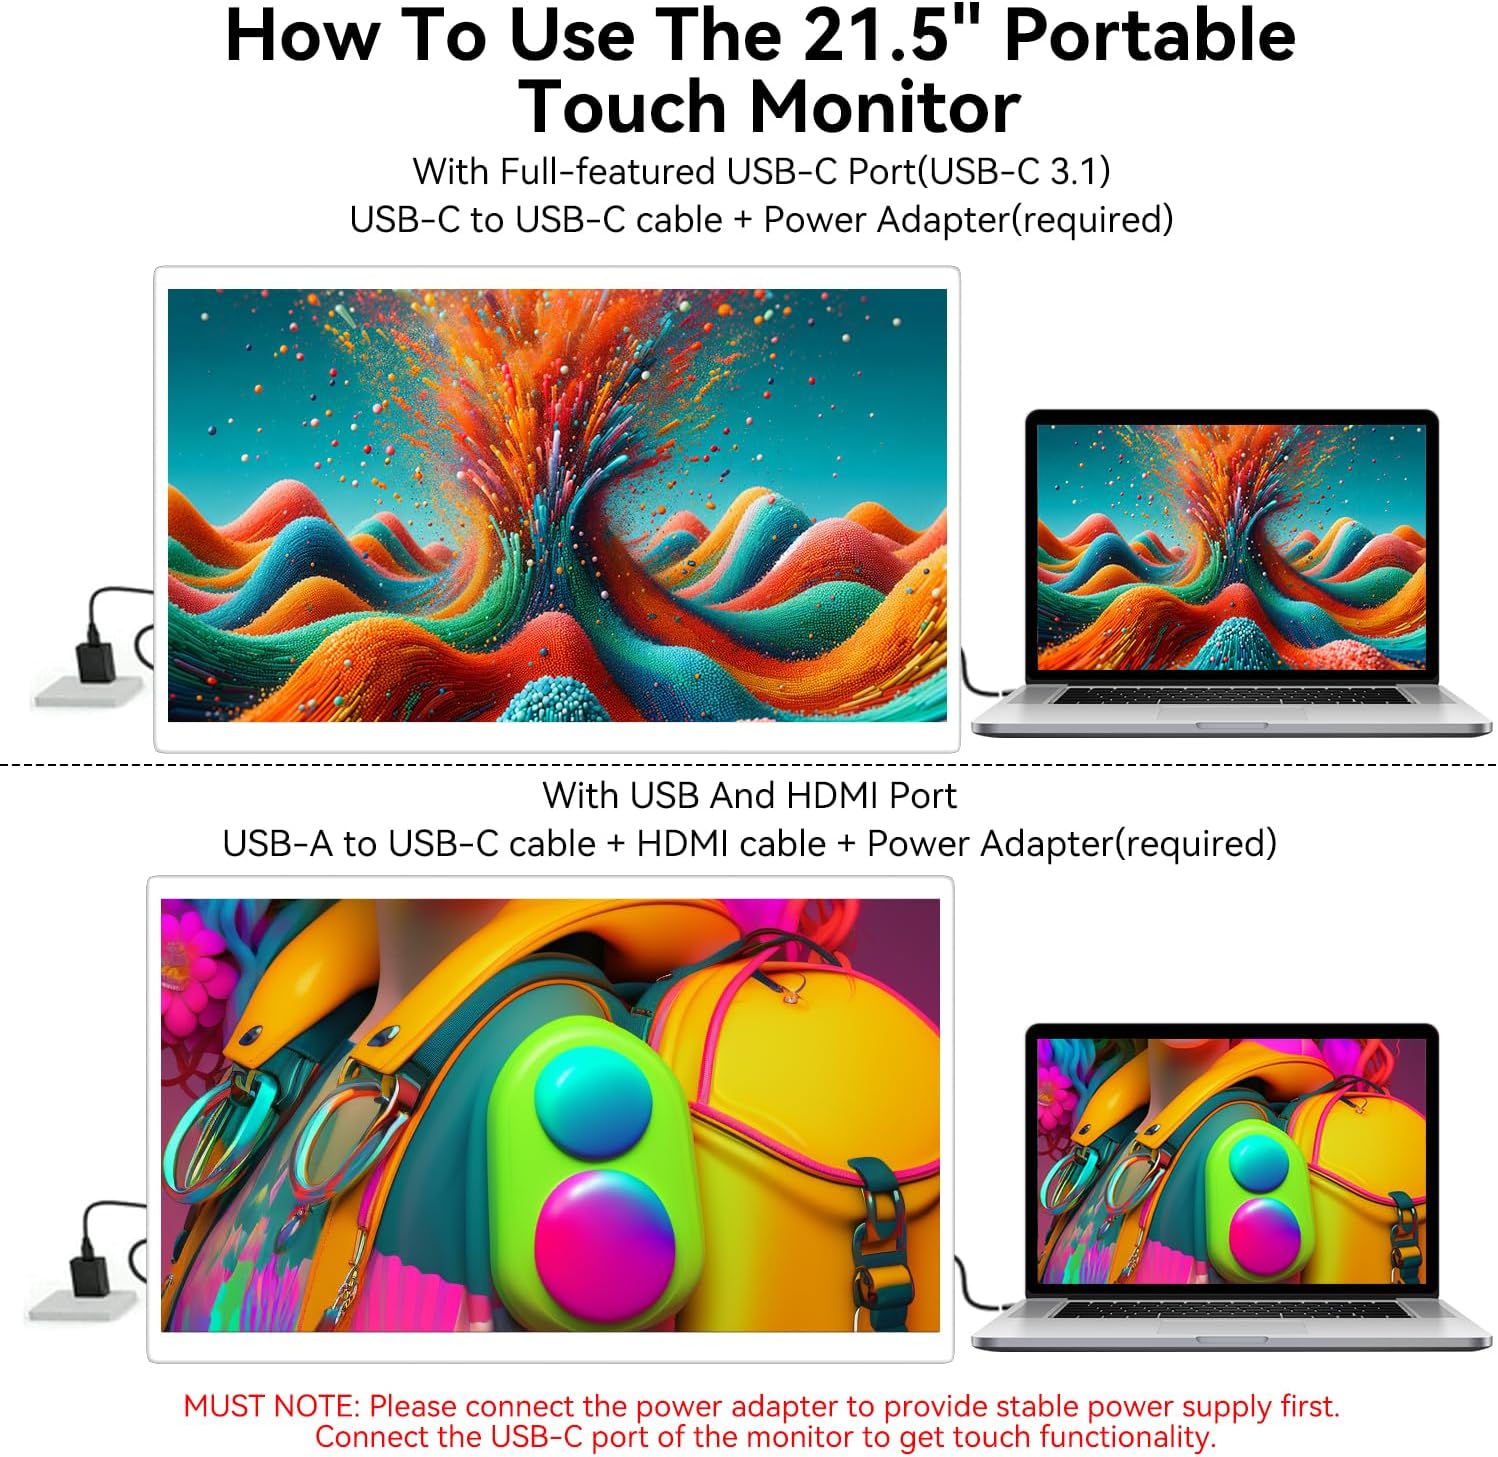
Irudia: Connection methods for the monitor. Top: USB-C to USB-C with power adapter. Bottom: USB-A to USB-C, HDMI, and power adapter.
Option A: Full-featured USB-C Port (USB-C 3.1)
- Connect the power adapter to the monitor's DC powered port.
- Connect one end of the USB-C to USB-C cable to the monitor's Type C 3.1 Port.
- Connect the other end of the USB-C to USB-C cable to your device's full-featured USB-C port. This single cable will transmit video, audio, and touch signals.
Option B: HDMI and USB-A Port
- Connect the power adapter to the monitor's DC powered port.
- Connect one end of the HDMI cable to the monitor's HDMI Port.
- Connect the other end of the HDMI cable to your device's HDMI output.
- Connect one end of the USB-A to USB-C cable to the monitor's Type C 3.1 Port.
- Connect the USB-A end of the cable to your device's USB-A port to enable touch functionality.
3. Adjusting the Stand and VESA Mounting

Irudia: The monitor's integrated stand allows for 0-90 degree adjustment, providing flexible viewangeluak.
The monitor features an integrated stand that can be adjusted up to 90 degrees for optimal viewing angles. For alternative setups, the monitor is compatible with standard VESA mounts (75x75mm), allowing for wall or arm mounting.
Funtzionamendu-argibideak
1. Piztu/Itzali
Sakatu Menu/ON/OFF/Switching Button located on the back of the monitor to power it on or off.
2. Ukipen-pantailaren funtzionaltasuna
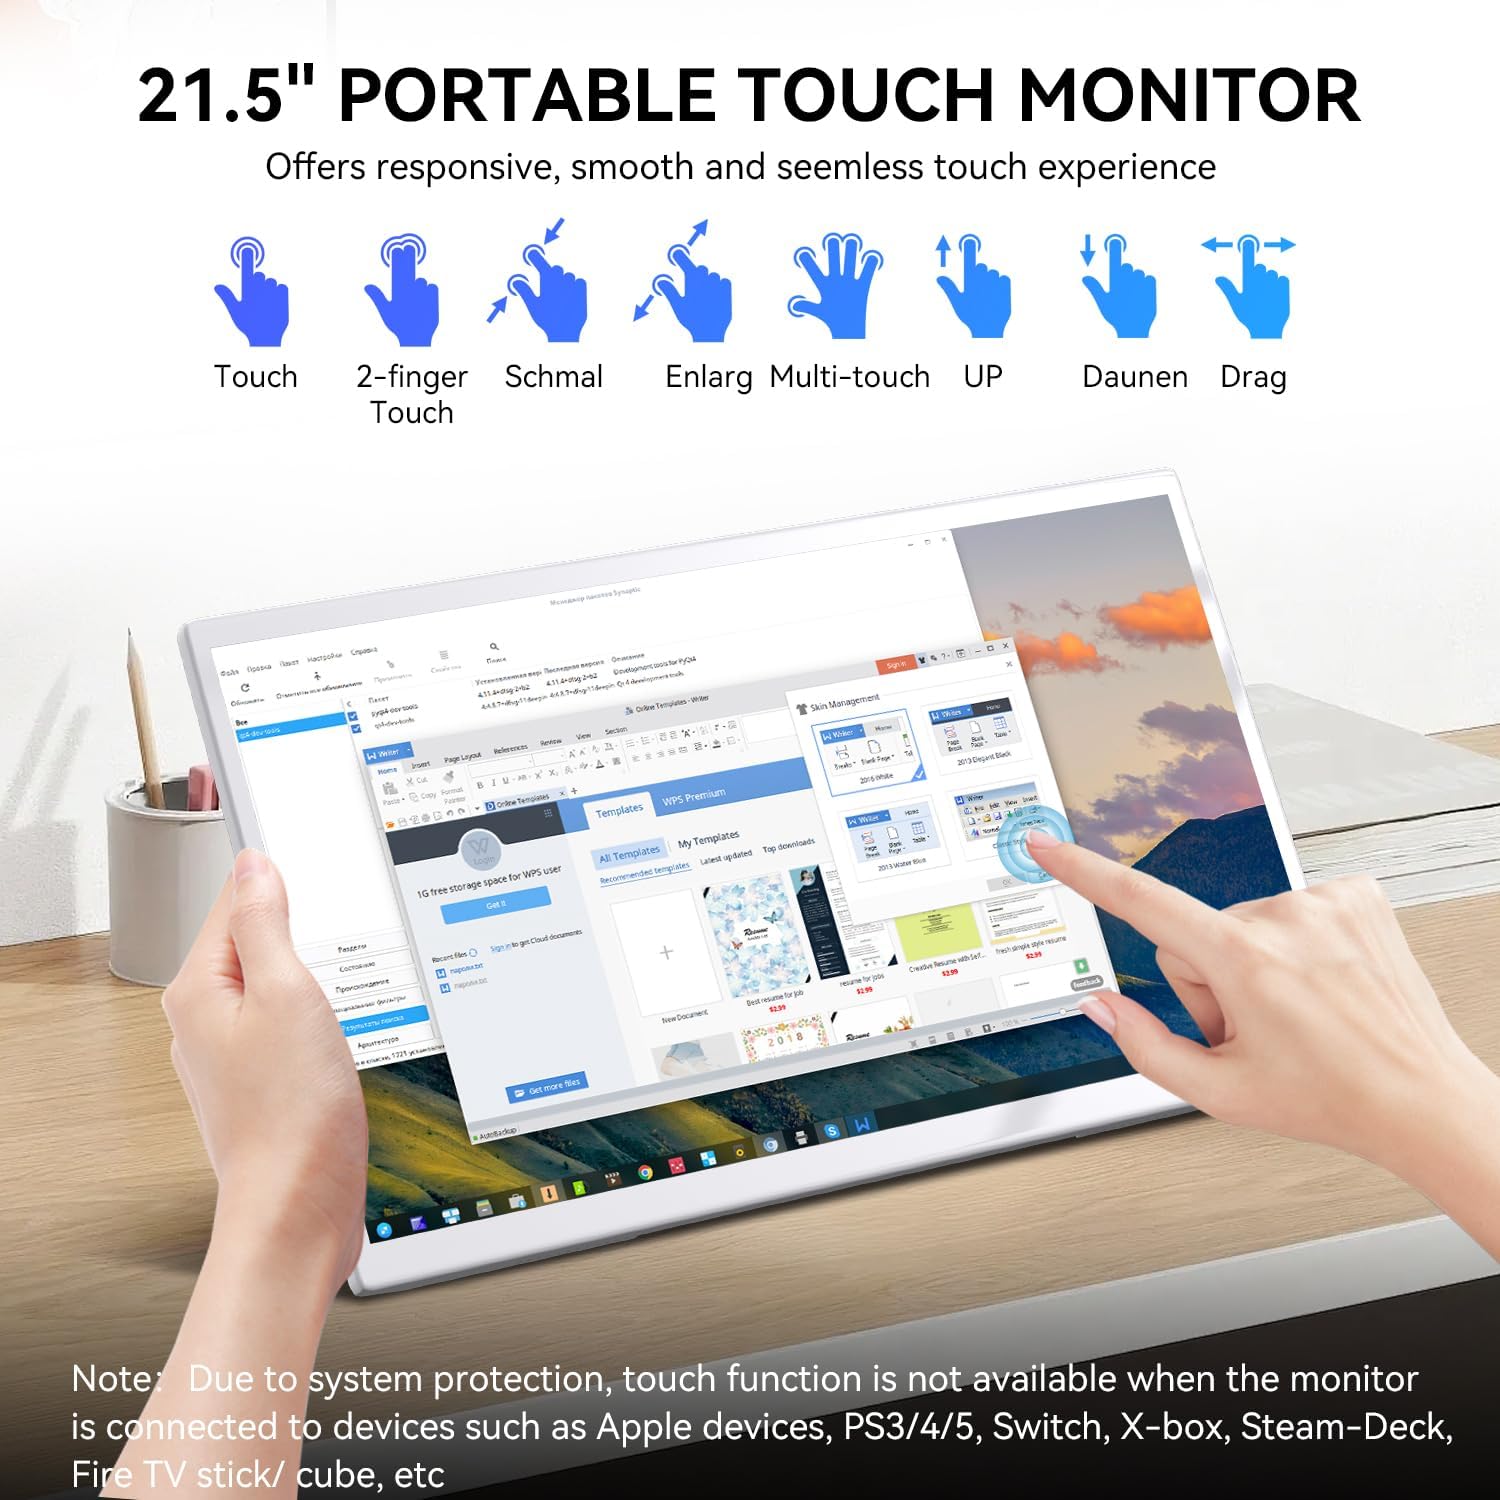
Irudia: The monitor supports various touch gestures including single touch, two-finger touch, multi-touch, and drag operations.
The monitor supports responsive capacitive multi-touch. Use gestures such as touch, two-finger touch, and drag for interaction.
Bateragarritasun ohar garrantzitsuak:
- The touchscreen is ez bateragarriak with Linux-based and gaming devices (e.g., PS3/4/5, Switch, X-box, Steam-Deck).
- Apple devices (iOS/macOS) support single-point touch only due to system protection and operating system limitations.
3. Pantailako pantaila (OSD) menua
Sakatu Menu/ON/OFF/Switching Button to access the OSD menu. Use the Brightness Shortcuts (+UP) and Volume Shortcuts (-Down) buttons to navigate and adjust settings within the menu.
4. Audio irteera

Irudia: The monitor features dual built-in speakers for clear and vivid sound.
The monitor includes dual built-in speakers for audio output. You can also connect external headphones or speakers via the 3.5mm headphone port.
Mantentzea
Proper care ensures the longevity of your monitor.
- Pantaila garbitzea: Garbitu pantaila astiro-astiro zapi leun eta pelusik gabeko batekin. Orba egoskorrak kentzeko, garbituampGarbitu oihal pixka bat urarekin edo pantaila garbitzeko soluzio batekin. Saihestu produktu kimiko gogorrak edo material urratzaileak.
- C garbiketaasing: Erabili zapi leun eta lehor bat monitorearen c garbitzeko.asing.
- Biltegiratzea: Denbora luzez erabiltzen ez baduzu, gorde monitoreak leku fresko eta lehor batean, eguzki-argitik eta muturreko tenperaturetatik urrun.
- Saihestu likidoak: Do not spray liquids directly onto the monitor or allow them to drip into openings.
Arazoak konpontzea
Arazoren bat izanez gero, jo ezazu honako arazo eta irtenbide ohikoenei.
| Arazoa | Kausa posiblea | Irtenbidea |
|---|---|---|
| No display/"No Signal" message | Loose cable connection, incorrect input source, device not outputting signal. | Ensure all cables (HDMI/USB-C) are securely connected. Press the Menu/ON/OFF/Switching Button to cycle through input sources. Verify your connected device is powered on and configured to output video. |
| Ukipen-pantailak ez du erantzuten | Insufficient power, incorrect cable connection, device incompatibility. | Always ensure the monitor is connected to its power adapter via the DC input first. For USB-C connections, ensure your device's USB-C port is full-featured (supports video, audio, and touch). If using HDMI, ensure the USB-A to USB-C cable is connected for touch. Remember, touchscreen is not compatible with Linux/gaming devices, and Apple devices support single-point touch only. |
| Ez dago audiorik bozgorailuetatik | Volume too low, mute enabled, audio source issue. | Increase volume using the Volume Shortcuts (-Down) button. Check your connected device's audio settings. Ensure no headphones are plugged into the 3.5mm jack if you want sound from the built-in speakers. |
| Buttons on back control brightness/volume inconsistently | Context-sensitive button functionality. | The Brightness Shortcuts (+UP) and Volume Shortcuts (-Down) buttons may have different functions depending on whether the OSD menu is active or not. When the OSD menu is not active, they typically control brightness and volume directly. When the OSD menu is open, they are used for navigation. |
| Irudia lausoa edo distortsionatua dago | Incorrect resolution, cable quality. | Ensure your device's display settings are set to the monitor's native resolution (1920x1080). Try using a different HDMI or USB-C cable if available. |
Zehaztapenak
Detailed technical specifications for the Prechen 21.5 Inch Portable Touchscreen Monitor.
| Ezaugarri | Xehetasuna |
|---|---|
| Marka | Prechen |
| Modelo zenbakia | HD-215 |
| Pantailaren tamaina | 21.5 hazbetekoa |
| Ebazpena | FHD 1080p (1920 x 1080 pixels) |
| Freskatze tasa | 75 hertz |
| Bistaratzeko Teknologia | IPS LEDak |
| Distira | 300 cd/m² |
| Kontraste-erlazioa | 1000:1 |
| Erantzun Denbora | 3 milisegundo |
| Pantailaren gainazalaren deskribapena | Distiratsua |
| Ezaugarri gehigarriak | Touchscreen, Built-in Speakers, VESA Mount Compatible |
| Konektibitate Teknologia | HDMI, USB mota C |
| Elementuaren neurriak (L x W x H) | 19.68" L x 1.18" W x 11.81" H |
| Kolorea | Zuria |
| UPC | 753018887438 |
Bermea eta Laguntza
Bermearen informazioa
This Prechen monitor comes with a 1-year limited warranty from the date of purchase. This warranty covers manufacturing defects and workmanship under normal use. It does not cover damage caused by misuse, accidents, unauthorized modifications, or external causes.
Bezeroarentzako Arreta
For technical assistance, warranty claims, or any questions regarding your Prechen monitor, please contact our customer support team. Refer to the contact information provided on the product packaging or the official Prechen webwebgunea laguntza-xehetasun eguneratuenak lortzeko.
When contacting support, please have your model number (HD-215) and proof of purchase readily available.