1. Sarrera
This manual provides essential instructions for the safe and efficient operation of your Grundig Scenos LCD 6000 HE Hi 8 Analog Camcorder, model GMI 7100. Please read this manual thoroughly before using the camcorder and retain it for future reference.
2. Segurtasun informazioa
OHARRA: Suteak edo deskarga elektrikoak saihesteko, ez jarri tresna hau euripean edo hezetasunean.
- Do not open the camcorder casing. Zerbitzu-lan guztiak zerbitzu-langile kualifikatuei eskatu.
- Keep the camcorder away from direct sunlight, heat sources, and excessive dust.
- Erabili zehaztutako korronte-egokitzailea eta bateria-paketea soilik.
- Saihestu bideo-kamera erortzea edo kolpe gogorren eraginpean jartzea.
- Do not use the camcorder near water or in wet conditions.
- Bota pilak behar bezala tokiko araudiaren arabera.
3. Paketearen edukia
Egiaztatu elementu guztiak paketean daudela:
- Grundig Scenos LCD 6000 HE Hi 8 Camcorder (GMI 7100)
- Korronte egokitzailea/kargagailua
- Bateria kargagarria
- Audio/Video Connection Cable
- Sorbalda-uhal
- Erabiltzailearen eskuliburua (dokumentu hau)
- (Actual contents may vary. Please check your product packaging.)
4. Produktua amaitu daview
Ezagutu zure kameraren osagai nagusiak.
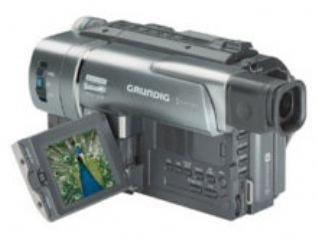
4.1. irudia: Aurrealdea view of the Grundig Scenos LCD 6000 HE Hi 8 Analog Camcorder. This image shows the lens, microphone, and general body shape.
Note: Detailed diagrams of specific buttons and ports are not available in the provided data. Please refer to the physical camcorder for exact button locations.
Funtsezko osagaiak:
- Lentea: Bideoak eta irudiak grabatzen ditu.
- Mikrofonoa: Audioa grabatzen du.
- LCD pantaila: Zuzeneko pantailak view, playback, and menu options.
- Viewbilatzailea: Alternative display for recording.
- Tape Compartment: Holds the Hi8 video cassette.
- Bateriaren konpartimendua: Bateria kargagarria gordetzen du.
- Kontrol-botoiak: Record, Play, Stop, Zoom, Menu, etc.
- Sarrera/Irteera Portuak: A/V Out, DC In, etc.
5. Konfigurazioa
5.1. Bateria kargatzea eta instalatzea
- Ireki bateriaren konpartimenduaren estalkia.
- Insert the battery pack, ensuring it clicks into place.
- Itxi bateriaren konpartimenduaren estalkia.
- Connect the power adapter to the camcorder's DC IN jack and then to a power outlet. The charging indicator will illuminate.
- Charge the battery fully before first use (typically 2-4 hours). The indicator will change or turn off when charging is complete.
5.2. Inserting a Hi8 Video Cassette
- Locate the tape compartment release button, usually on the top or side of the camcorder.
- Press the release button to open the tape compartment.
- Insert a Hi8 video cassette with the window facing outwards and the tape opening facing the camcorder's head mechanism.
- Gently push the cassette until it seats correctly.
- Close the tape compartment cover firmly until it latches.
6. Bideo-kameraren funtzionamendua
6.1. Piztu/Itzaltzea
Slide the POWER switch to the "ON" position to turn on the camcorder. To turn it off, slide the switch to "OFF".
6.2. Bideoa grabatzea
- Open the LCD screen or use the viewbilatzailea.
- Set the camcorder to "CAMERA" or "RECORD" mode.
- Point the lens at your subject. Use the zoom lever to adjust the focal length.
- Sakatu GRABATU button (usually red) to start recording. A red indicator or "REC" will appear on the screen.
- Sakatu GRABATU botoia berriro grabaketa gelditzeko.
6.3. Erreprodukzioa
- Set the camcorder to "VCR" or "PLAYBACK" mode.
- Sakatu JOLASTU button to start playback of the recorded tape.
- Erabili AURRERA AZKAR eta ATZERATU botoiak zintan nabigatzeko.
- Sakatu GELDITU botoia erreprodukzioa geldiarazteko.
6.4. Telebistara konektatzea
To view your recordings on a television:
- Ensure both the camcorder and TV are turned off.
- Connect the supplied A/V cable to the camcorder's A/V OUT port and the corresponding A/V INPUT ports on your television (typically yellow for video, white/red for audio).
- Turn on the TV and select the correct A/V input channel.
- Turn on the camcorder and switch to "VCR" or "PLAYBACK" mode.
- Start playback on the camcorder; the video should appear on your TV screen.
7. Mantentzea
7.1. Bideokamera garbitzea
- Use a soft, dry cloth to clean the exterior of the camcorder.
- Lentearentzat, erabili lenteak garbitzeko oihal eta disoluzio espezializatu bat. Saihestu lentearen gainazala hatzekin ukitzea.
- Ez erabili garbigarri indartsuak edo garbitzaile urratzaileak.
7.2. Zinta-buruaren garbiketa
Over time, tape heads can accumulate dirt, leading to poor picture quality. Use a dry head cleaning cassette periodically, following its instructions. Excessive use of cleaning cassettes can cause wear.
7.3. Biltegiratzea
- Store the camcorder in a cool, dry place, away from direct sunlight and extreme temperatures.
- Remove the battery if the camcorder will not be used for an extended period.
- Store video cassettes in their cases to protect them from dust and damage.
8. Arazoak
If you encounter problems with your camcorder, refer to the following table for possible solutions.
| Arazoa | Kausa posiblea | Irtenbidea |
|---|---|---|
| Bideokamerak ez du pizten. | Battery is discharged or not installed correctly. | Kargatu bateria guztiz. Ziurtatu bateria behar bezala sartuta dagoela. |
| No recording or poor picture quality. | Tape is full, write-protect tab is engaged, dirty tape heads, or incorrect mode. | Insert a new tape. Disengage the write-protect tab. Clean tape heads. Ensure camcorder is in "CAMERA" mode. |
| Erreprodukzioan ez dago soinurik. | Volume is too low or A/V cables are not connected properly. | Increase volume on camcorder/TV. Check A/V cable connections. |
| LCD pantaila hutsik dago. | Camcorder is off, battery is dead, or screen is switched off. | Turn on camcorder. Charge battery. Check display settings or switch. |
Irtenbide hauek probatu ondoren arazoa konpontzen ez bada, jarri harremanetan Grundig-en bezeroarentzako arreta-zerbitzuarekin.
9. Zehaztapenak
| Ezaugarri | Xehetasuna |
|---|---|
| Modelo zenbakia | GMI 7100 |
| Marka | Grundig |
| Grabaketa formatua | Hi8 Analog |
| Bistaratzea | LCD pantaila |
| ASIN | B0000D84LU |
| GTIN | 04013833445852 |
| Energia iturria | Rechargeable Battery Pack, AC Adapter |
| Konektibitatea | Audio/Bideo irteera |
10. Bermea eta Laguntza
10.1. Bermearen informazioa
Grundig products are manufactured to high quality standards and are covered by a manufacturer's warranty. Please refer to the warranty card included with your product or visit the official Grundig webzure eskualdeko berme-baldintza zehatzak ikusteko, bisitatu webgunea.
10.2. Bezeroarentzako arreta
For technical assistance, service, or further information, please contact Grundig customer support. Contact details can typically be found on the official Grundig website or in the documentation provided with your camcorder.
You may also find helpful resources, FAQs, and software updates (if applicable) on the Grundig Brand Store on Amazon.


