Segurtasun informazio garrantzitsua
Etxetresna elektrikoak erabiltzean, oinarrizko segurtasun-neurriak bete behar dira beti, besteak beste:
- Irakurri argibide guztiak frijigailua erabili aurretik.
- Ez ukitu gainazal beroak. Erabili heldulekuak edo eskutokiak.
- To protect against electrical shock, do not immerse cord, plugs, or the deep fryer in water or other liquid.
- Gainbegiratzea beharrezkoa da aparaturen bat umeek edo umeen ondoan erabiltzen dutenean.
- Deskonektatu entxufetik erabiltzen ez duzunean eta garbitu aurretik. Utzi hozten piezak jarri edo kendu aurretik.
- Ez erabili aparaturik kablea edo entxufea hondatuta dagoenean, edo aparatuak gaizki funtzionatzen duenean edo nolabait hondatu ondoren.
- Gailuaren fabrikatzaileak gomendatzen ez dituen osagarriak erabiltzeak lesioak eragin ditzake.
- Ez erabili kanpoan.
- Ez utzi kablea mahaiaren edo erakusmahaiaren ertzetik zintzilik zintzilik, ezta gainazal beroak ukitu ere.
- Ez jarri gas edo erregailu elektriko bero baten gainean edo inguruan, edo berotutako labe batean.
- Kontuz ibili behar da olio beroa edo beste likido beroa duen tresna bat mugitzean.
- Beti konektatu entxufea lehenik etxetresna elektrikora, eta gero konektatu kablea hormako entxufean. Deskonektatzeko, jarri edozein kontrol "itzali" posizioan, eta gero atera entxufea hormako entxufetik.
- Ez erabili aparatua aurreikusitako erabilera ez den beste baterako.
- Energia hornitzeko kable laburra ematen da korapilo luzearekin edo korapilatzearen ondorioz arriskuak murrizteko.
- Luzapen-kableak erabil daitezke haien erabileran kontuz ibiliz gero. Luzapen-kablea erabiltzen bada, luzapen-kablearen kalifikazio elektrikoa gutxienez gailuaren kalifikazio elektrikoa bezain handia izan behar du.
- Etxetresna honek entxufe polarizatua du (xafla bat bestea baino zabalagoa da). Deskarga elektrikoa jasateko arriskua murrizteko, entxufe hau modu bakarrean sartu behar da entxufe polarizatu batean. Entxufea entxufean guztiz sartzen ez bada, itzuli ezazu entxufea. Oraindik egokitzen ez bada, jarri harremanetan elektrizista kualifikatu batekin. Ez saiatu entxufea inola ere aldatzen.
GORDE JARRAIBIDE HAUEK.
Produktua amaituview
The Rival CF105-B 1-Liter Cool Touch Deep Fryer is designed for convenient home frying. It features a compact design with a cool-touch exterior for safety.
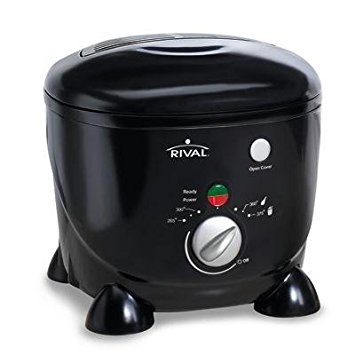
This image shows the Rival CF105-B 1-Liter Cool Touch Deep Fryer. It is black with a clear viewing window on the lid and a control dial on the front. The cool-touch housing is visible, designed for safe handling during operation.
Funtsezko osagaiak:
- Ukipen Hotzeko Etxebizitza: Exterior remains cool during operation.
- Blokeatzeko tapa: Prevents splattering and opens with a button.
- Viewleihoa: Allows monitoring of food without opening the lid.
- Termostato erregulagarria: Tenperatura zehatz-mehatz kontrolatzeko.
- Iragazkia: Reduces heavy grease odor.
- Frijitzeko saski kendugarria: For easy food handling.
- Kable magnetikoa: Detaches automatically for safety.
Konfigurazio Argibideak
- Desegin: Kontu handiz atera osagai guztiak ontzitik. Gorde ontzia etorkizunean biltegiratzeko edo garraiatzeko.
- Garbitu: Before first use, wash the frying basket and lid in warm, soapy water. Rinse thoroughly and dry completely. Wipe the interior and exterior of the fryer body with a damp oihal. Ez sartu unitate nagusia uretan.
- Lekua: Place the deep fryer on a stable, heat-resistant, and dry surface, away from the edge of the counter. Ensure there is adequate ventilation around the unit.
- Muntatu:
- Insert the frying basket into the fryer.
- Itxi estalkia ongi.
- Konektatu korronte kablea: Attach the magnetic power cord to the fryer's receptacle. Ensure it is firmly connected. Do not plug into a wall outlet yet.
Funtzionamendu-argibideak
- Gehitu olioa: Open the lid and carefully pour cooking oil into the fryer. Do not exceed the maximum fill line indicated inside the fryer. The oil capacity is 1 liter.
- Aurreberotu: Close the lid. Plug the magnetic power cord into a standard 120V AC electrical outlet. Turn the adjustable thermostat dial to the desired temperature setting. The indicator light will illuminate, signaling that the fryer is heating.
- Wait for Temperature: Allow the fryer to preheat until the indicator light turns off, indicating that the set temperature has been reached. This may take several minutes.
- Janaria kargatu: Kontu handiz jarri janaria frijitzeko saskian. Ez gainkargatu saskia, horrek olioaren tenperatura jaitsi eta janaria busti dezakeelako.
- Beheko saskia: With the lid open, slowly lower the basket containing the food into the hot oil. Close the lid immediately to prevent splattering.
- Frijitu: Fry for the recommended time, referring to your recipe or food packaging. The viewing window allows you to monitor the cooking process.
- Janaria kendu: Once cooking is complete, open the lid. Carefully lift the frying basket out of the oil and hook it onto the edge of the fryer to drain excess oil.
- Zerbitzatu: Transferitu frijituak paperezko eskuoihalekin forratutako plater batera, geratzen den olioa xurgatzeko.
- Itzali: Turn the thermostat dial to the "OFF" position. Unplug the fryer from the wall outlet.
Emaitza onenak lortzeko aholkuak:
- Always pat food dry before frying to reduce splattering and ensure crispiness.
- Ez nahastu olio mota desberdinak.
- Change oil regularly for best flavor and performance.
Mantentzea eta Garbiketa
Proper maintenance ensures the longevity and safe operation of your deep fryer.
- Hoztu: Always allow the fryer and oil to cool completely before cleaning. This can take several hours.
- Olioa hustu: Once cooled, carefully pour the used oil into a suitable container for disposal. Do not pour oil down the drain.
- Clean Basket and Lid: The frying basket and lid can be washed in warm, soapy water. Rinse thoroughly and dry completely.
- Clean Fryer Body: Wipe the interior and exterior of the fryer body with a damp cloth and mild detergent. Do not immerse the main unit in water or any other liquid. Ensure no water enters the electrical components.
- Iragazkiaren ordezkoa: The built-in filter helps reduce odors. Replace the filter as needed, following instructions for filter replacement (if applicable, refer to specific filter instructions).
- Biltegiratzea: Gorde frijigailu garbi eta lehorra leku fresko eta lehor batean.
Kontuz: Never use abrasive cleaners or scouring pads on any part of the fryer, as this can damage surfaces.
Arazoak konpontzea
| Arazoa | Kausa posiblea | Irtenbidea |
|---|---|---|
| Frijigailua ez da berotzen. |
|
|
| Oil is not hot enough. |
|
|
| Food is soggy. |
|
|
| Gehiegizko kea. |
|
|
Zehaztapenak
- Eredua: CF105-B
- Marka: Arerioa
- Materiala: Plastikoa
- Kolorea: Beltza
- Wattage: 1700 watt
- Olioaren edukiera: 1 litro
- Produktuaren neurriak: 10.4 x 9.2 x 12.2 hazbete
- Elementuaren pisua: 4 kilo
- UPC: 048894675072
Bermea eta Laguntza
Rival products are manufactured to high-quality standards. For specific warranty information, please refer to the warranty card included with your purchase or visit the official Rival webgunea.
For customer support, service, or replacement parts, please contact Rival customer service. Contact information can typically be found on the product packaging or the manufacturer's webgunea.
Mesedez, gorde zure erosketa-froga berme-erreklamazioetarako.


