1. Sarrera
This manual provides detailed instructions for the installation, operation, maintenance, and troubleshooting of the ASUS P7F-M Micro ATX Motherboard. Please read this manual thoroughly before installing or using the motherboard to ensure proper setup and functionality.
The ASUS P7F-M is designed for Intel Xeon 3400 series, Core i7, Core i5, and Core i3 processors with an LGA 1156 socket, supporting DDR3 memory and offering various expansion and connectivity options.
2. Konfigurazioa eta instalazioa
Before beginning installation, ensure your system is powered off and disconnected from the power source. Wear an anti-static wrist strap to prevent electrostatic discharge (ESD) damage to components.
2.1 Plaka amaierako diseinua

Irudia: Goitik behera view of the ASUS P7F-M motherboard, showing the CPU socket, RAM slots, PCIe slots, and various connectors.

Irudia: Angelua view of the ASUS P7F-M motherboard, highlighting the rear I/O panel, CPU socket, and expansion slots.
2.2 PUZaren instalazioa
- Bilatu LGA 1156 CPU socket-a plaka basean.
- Gently push down the load lever and pull it sideways to open the socket retention frame.
- Carefully align the CPU with the socket, ensuring the gold triangle on the CPU matches the triangle on the socket. Do not force the CPU into the socket.
- Itxi atxikitze-markoa eta bultzatu kargatzeko palanka berriro bere lekuan klik egin arte.

Irudia: Gertuko planoa view of the LGA 1156 CPU socket on the ASUS P7F-M motherboard, ready for processor installation.
2.3 Memoriaren instalazioa
The motherboard supports 4x DDR3-1333/1066 DIMMs, with a maximum capacity of 16GB. It supports both ECC and non-ECC un-buffered memory.
- Ireki DIMM zirrikituaren bi muturretan dauden klipak.
- Lerrokatu memoria-modulua zirrikituarekin, moduluko koska zirrikituan dagoen giltzarekin bat datorrela ziurtatuz.
- Sakatu gogor memoria-moduluaren bi muturretan, klipak bere lekuan sartu arte.
Irudia: Gertuko planoa view of the four DDR3 DIMM slots on the ASUS P7F-M motherboard, showing their arrangement.
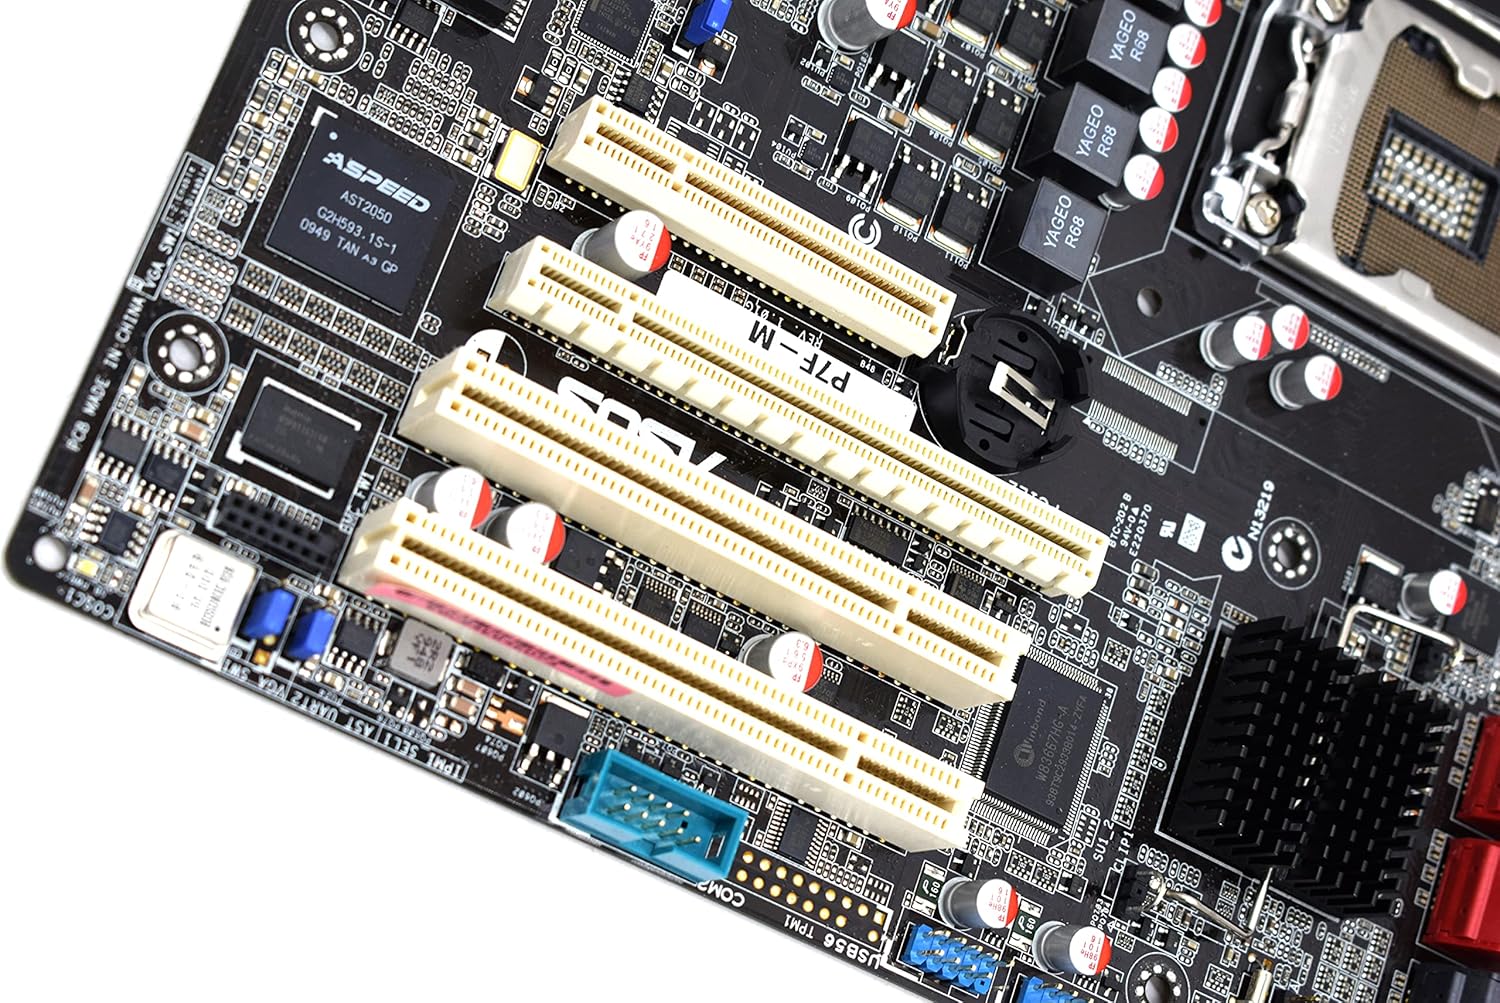
2.4 Hedapen Txartelaren Instalazioa
The motherboard features:
- 1x PCI-Express x16 Slot
- 1x PCI-Express x8 Slot (operates at x4)
- 2x 32bit/33MHz PCI Slots
- Select an appropriate expansion slot for your card.
- Remove the corresponding metal slot cover from your PC case.
- Align the card with the slot and press down firmly until it is securely seated.
- Txartela torloju batekin ordenagailuaren karkasari lotu.

Irudia: Gertuko planoa view of the PCI Express and PCI expansion slots on the ASUS P7F-M motherboard.
2.5 Biltegiratze gailuaren konexioa
Connect your SATA storage devices (HDDs, SSDs, optical drives) to the SATA ports on the motherboard.

Irudia: Gertuko planoa view of the SATA ports on the ASUS P7F-M motherboard, typically located near the chipset.
2.6 Potentzia-konexioak
Connect the 24-pin ATX main power connector and the 8-pin CPU power connector from your power supply unit (PSU) to the corresponding ports on the motherboard.
2.7 Atzeko panelaren konexioak
Connect peripherals to the rear I/O ports:
- USB 2.0 portuak: For keyboards, mice, and other USB devices.
- PS/2 atakak: For legacy PS/2 keyboards and mice.
- RJ45 LAN Ports: Sarearen konexiorako.
- Serieko portua: For serial devices.
- VGA ataka: For video output to a monitor.
3. Funtzionamendu-argibideak
3.1 Hasierako piztea
After all components are installed and connected, connect the power cable to your PSU and press the power button on your PC case. The system should initiate the Power-On Self-Test (POST).
3.2 BIOS/UEFI konfigurazioa
During POST, press the designated key (usually DEL or F2) to enter the BIOS setup utility. Here you can configure system settings, boot order, and monitor hardware status.
3.3 Gidariaren instalazioa
After installing your operating system, install the necessary drivers for the motherboard chipset, LAN, and any other integrated components. These drivers are typically provided on a support CD or available for download from the ASUS webgunea.
4. Mantentzea
4.1 Garbiketa
Regularly clean your computer's interior to prevent dust buildup, which can lead to overheating and component failure. Use compressed air to remove dust from fans, heatsinks, and other components. Ensure the system is powered off and unplugged before cleaning.
4.2 BIOS eguneraketak
Aldian-aldian egiaztatu ASUSen laguntza website for updated BIOS versions. BIOS updates can improve system stability, add support for new hardware, or fix bugs. Follow the instructions provided by ASUS carefully when performing a BIOS update to avoid system damage.
5. Arazoak
If you encounter issues with your ASUS P7F-M motherboard, consider the following troubleshooting steps:
- Potentziarik gabe: Ensure all power cables (24-pin ATX, 8-pin CPU) are securely connected. Verify the PSU is functioning correctly.
- Ez dago pantailarik: Check that the monitor is connected to the correct video output (VGA on the motherboard or a dedicated graphics card). Reseat the graphics card and memory modules.
- Sistemaren ezegonkortasuna: This can be caused by incompatible memory, insufficient power, or overheating. Verify memory compatibility and check CPU/case fan operation.
- POST bip kodeak: Listen for beep codes during startup. Refer to the ASUS website or a general BIOS beep code guide to diagnose the issue.
- Component Detection Issues: Ensure all components (CPU, RAM, expansion cards, storage drives) are properly seated and connected.
Laguntza gehiago behar baduzu, jo ASUSen laguntzara. webgunera edo jarri harremanetan haien laguntza teknikoarekin.
6. Zehaztapenak
Below are the detailed technical specifications for the ASUS P7F-M Motherboard:
| Ezaugarri | Zehaztapena |
|---|---|
| CPU Socketa | LGA 1156 |
| Prozesadore bateragarriak | Intel Quad Core Xeon 3400 series, Core i7-800, Core i5-700, Core i3 series |
| Chipset | Intel 3420 PCH Chipset |
| Memoria zirrikituak | 4x DDR3 DIMMs |
| Memoria Mota | DDR3-1333/1066, Dual Channel, Un-buffered, ECC/non-ECC |
| Gehienezko memoria-ahalmena | 16 GB |
| PCI-Express x16 zirrikituak | 1 |
| PCI-Express x8 zirrikituak | 1 (runs in x4 mode) |
| PCI zirrikituak | 2x 32bit/33MHz |
| LAN kontrolagailua | Intel 82574L Dual Port Gigabit LAN controller, 1x Management LAN |
| USB 2.0 Portuak | 7 (2 rear, 5 via header) |
| PS/2 Ports | 2 |
| RJ45 LAN Portuak | 3 |
| Serie Portuak | 2 (1 rear, 1 via header) |
| VGA ataka | 1 |
| Energia konektore nagusia | 1 x 24 pin |
| PUZaren konektorea | 1 x 8 pin |
| Forma-faktorea | Mikro ATX |
| Neurriak | 13.3 x 11.1 x 3.1 hazbete (Paketea) |
| Elementuaren pisua | 1.5 kilo |
7. Bermea eta Laguntza
For information regarding the product warranty, please refer to the warranty card included with your motherboard or visit the official ASUS website. ASUS provides technical support and resources, including driver downloads, FAQs, and contact information, on their support portal.
ASUS laguntza Webgunea: https://www.asus.com/support/


