1. Sarrera
Thank you for choosing the Voltcraft VC-11 Digital Multimeter. This portable, Category III, 250V multimeter with a 2000-count display is designed for accurate electrical measurements in various applications. This manual provides essential information for safe operation, proper use, and maintenance of your device. Please read it thoroughly before use and keep it for future reference.
2. Segurtasun informazioa
WARNING: Electrical shock hazard. Improper use of this meter can cause damage, shock, injury, or death. Read and understand this manual before operating the meter.
- Always ensure the meter is in good working condition and the test leads are not damaged.
- Ez aplikatu bolumen baloratua baino gehiagotage, neurgailuan markatuta dagoen bezala, terminalen artean edo edozein terminalen eta lurraren artean.
- Oso kontuz ibili voltages above 25V AC RMS or 35V DC. These voltagshock arriskua dakar.
- Funtzioak edo tarteak aldatu aurretik, deskonektatu beti proba-kableak zirkuitutik.
- Do not operate the meter with the battery cover removed or loosened.
- Adhere to local and national safety codes. Use personal protective equipment (PPE) such as approved safety glasses and electrically insulated gloves.
3. Produktua amaitu daview
The Voltcraft VC-11 is a compact digital multimeter featuring a clear LCD display, a rotary function switch, and input jacks for test leads. It is designed for measuring DC/AC voltage, DC current, resistance, and includes diode and continuity test functions.
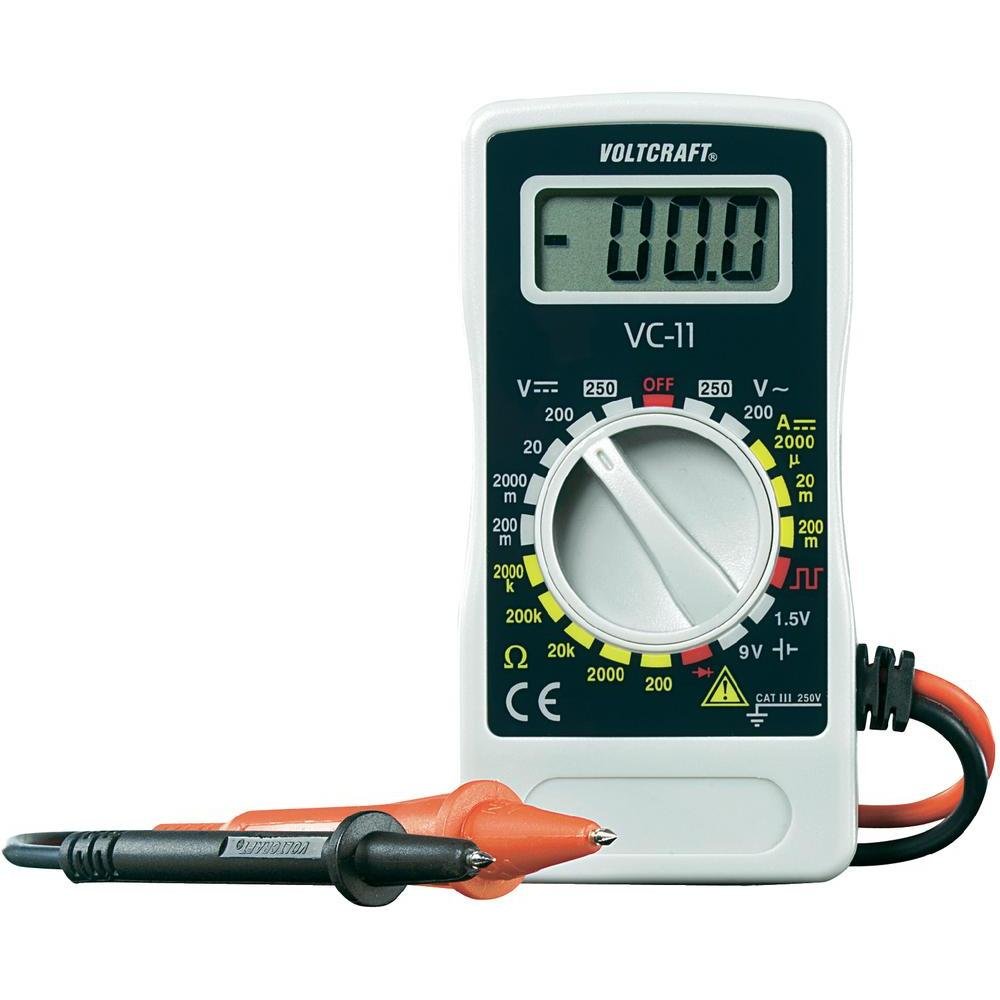
1. irudia: Aurrealdea view of the Voltcraft VC-11 Digital Multimeter with test leads connected. This image shows the LCD display, rotary switch, and input terminals.

2. irudia: Angeludun view of the Voltcraft VC-11 Digital Multimeter, highlighting the compact design and the CE marking.

Figure 3: The Voltcraft VC-11 Digital Multimeter shown with its test leads detached, illustrating the input ports.
3.1 Osagaiak
- LCD pantaila: Neurketa-irakurketak, unitateak eta funtzio-adierazleak erakusten ditu.
- Etengailu birakaria: Neurketa-funtzioak eta -tarteak hautatzeko erabiltzen da.
- Sarrerako Jackak: Ports for connecting the test leads (COM, VΩmA).
- Proba-buruak: Red and black leads for connecting to the circuit under test.
4. Konfigurazioa
4.1 Bateriaren instalazioa
The Voltcraft VC-11 requires a 9V battery for operation (not included). To install or replace the battery:
- Ziurtatu multimetroa itzalita dagoela eta deskonektatu proba-kable guztiak.
- Bilatu bateriaren konpartimentuaren estalkia neurgailuaren atzealdean.
- Erabili bihurkin bat bateriaren estalkia lotzen duen torlojua kentzeko.
- Kontu handiz kendu estalkia.
- Konektatu 9V-ko bateria berri bat bateriaren kliparekin, polaritate zuzena errespetatuz.
- Jarri bateria konpartimentuan eta jarri berriro estalkia, torlojuarekin finkatuz.
4.2 Proba-kableak konektatzea
Always connect the black test lead to the 'COM' (common) jack. Connect the red test lead to the appropriate input jack based on the desired measurement:
- Voltage (V), Resistance (Ω), Diode, and Continuity measurements, connect the red lead to the 'VΩmA' jack.
- For Current (A) measurements, connect the red lead to the 'VΩmA' jack (for mA range).
5. Funtzionamendu-argibideak
Before taking any measurement, ensure the test leads are correctly connected and the rotary switch is set to the desired function and range.
5.1 DC Vol. neurtzeatage (V=)
- Ezarri biraketa-etengailua nahi den DC bolumenera.tage (V=) range (e.g., 200mV, 2V, 20V, 200V, 250V). If the voltage ezezaguna da, hasi tarterik handienetik eta txikitu behar den moduan.
- Konektatu proba-kable beltza 'COM' konektorera eta proba-kable gorria 'VΩmA' konektorera.
- Konektatu proba-zundak paraleloan neurtu beharreko osagai edo zirkuituan.
- Irakurri liburukiatage balioa LCD pantailan.
5.2 AC Vol. neurtzeatage (V~)
- Ezarri biraketa-etengailua nahi den korronte alternoko bolumenera.tage (V~) tartea (adibidez, 200V, 250V).
- Konektatu proba-kable beltza 'COM' konektorera eta proba-kable gorria 'VΩmA' konektorera.
- Connect the test probes in parallel across the AC source or component.
- Irakurri liburukiatage balioa LCD pantailan.
5.3 Korronte zuzena neurtzea (A=)
- Set the rotary switch to the desired DC Current (A=) range (e.g., 2000µA, 20mA, 200mA).
- Konektatu proba-kable beltza 'COM' konektorera eta proba-kable gorria 'VΩmA' konektorera.
- OHARRA: To measure current, the meter must be connected in series with the circuit. Break the circuit and insert the meter.
- Konektatu proba-zundak zirkuituarekin seriean.
- Irakurri uneko balioa LCD pantailan.
5.4 Erresistentzia neurtzea (Ω)
- Ziurtatu zirkuitua deskonektatuta dagoela erresistentzia neurtu aurretik.
- Set the rotary switch to the desired Resistance (Ω) range (e.g., 200Ω, 2kΩ, 20kΩ, 200kΩ, 2000kΩ).
- Konektatu proba-kable beltza 'COM' konektorera eta proba-kable gorria 'VΩmA' konektorera.
- Konektatu proba-zundak neurtu beharreko osagaira.
- Irakurri erresistentziaren balioa LCD pantailan.
5.5 Diodoaren proba
- Ziurtatu zirkuitua desenergizatuta dagoela.
- Set the rotary switch to the Diode symbol (usually next to resistance).
- Konektatu proba-kable beltza 'COM' konektorera eta proba-kable gorria 'VΩmA' konektorera.
- Konektatu zunda gorria diodoaren anodora eta zunda beltza katodora. Pantailak aurreranzko bolumena erakutsiko du.tage tanta.
- Reverse the probes. The display should show 'OL' (Overload) for a good diode.
5.6 Jarraitasun proba
- Ziurtatu zirkuitua desenergizatuta dagoela.
- Set the rotary switch to the Continuity symbol (usually next to diode/resistance).
- Konektatu proba-kable beltza 'COM' konektorera eta proba-kable gorria 'VΩmA' konektorera.
- Konektatu proba-zundak zirkuituan edo osagaian.
- If the resistance is below a certain threshold (typically 30-50Ω), the meter will emit an audible beep, indicating continuity.
6. Mantentzea
6.1 Garbiketa
Garbitu neurgailua iragarkiarekinamp oihal eta detergente leun batekin. Ez erabili urratzailerik edo disolbatzailerik. Ziurtatu neurgailua guztiz lehor dagoela erabili aurretik.
6.2 Bateria ordezkatzea
When the battery symbol appears on the LCD display, the 9V battery needs to be replaced. Refer to section 4.1 for battery installation instructions.
7. Arazoak
| Arazoa | Kausa posiblea | Irtenbidea |
|---|---|---|
| Pantailarik ez edo pantaila iluna | Bateria agortuta edo baxua | Ordeztu 9Vko bateria. |
| Irakurketa okerrak | Incorrect function/range selected Proba-kablearen konexio txarra Kaltetutako proba-kableak | Select the correct function and range. Ensure test leads are firmly connected. Inspect and replace damaged test leads. |
| "OL" (Gainkarga) bistaratzen da | Neurketa hautatutako tartea gainditzen du Open circuit (for resistance/current) | Select a higher range. Check for breaks in the circuit. |
8. Zehaztapenak
- Marka: VOLTCRAFT
- Modelo zenbakia: VC11
- Fabrikatzailea: VOLTCRAFT
- Produktuaren pisua: Approximately 9.07 g (without packaging)
- Paketearen neurriak: 14.8 x 8 x 3.6 cm
- Kategoriaren balorazioa: CAT III 250V
- Pantaila: 2000 zenbaketa
- Energia iturria: 9V-ko bateria (ez dago barne)
9. Bermearen informazioa
This product is covered by a standard manufacturer's warranty. Please refer to the warranty card included with your purchase or contact your retailer for specific terms and conditions. The warranty typically covers defects in materials and workmanship under normal use.
10. Bezeroarentzako arreta
For technical assistance, troubleshooting, or service inquiries, please contact Voltcraft customer support or your local distributor. Contact information can usually be found on the manufacturer's webgunean edo produktuaren ontzian.