1. Produktua amaitu daview
AAXA LED PICO, poltsikoko proiektorea, multimedia proiekzio eramangarrirako diseinatutako gailu ultra-trinkoa da. LED teknologia iraunkorra integratzen du multimedia erreproduzitzaile batekin eta sarrera aukera polifazetikoekin, hainbat proiekzio mugikorrerako beharretarako egokia bihurtuz.
Ezaugarri nagusiak hauek dira:
- Ultra Distiratsua 25 Lumen: Irudi garbiak eskaintzen ditu 720p-ko (1280x720) bereizmen handiko bereizmenarekin, 1080p-raino onartzen dituena.
- Kolore biziko teknologia: 15,000 orduko LEDekin hornituta, iraupen luzeagoa eta kolore bizien erreprodukzioa lortzeko.
- Diseinu ultra-eramangarria: 80 minutuko iraupena duen litio-ioizko bateria kargagarria dauka, mikro USB kablearen bidez karga daitekeena.
- Audio integratua: Barneko bozgorailuek audio erreprodukzioa ahalbidetzen dute.
- Konektibitate-aukera anitz: Mini-HDMI, 3.5 mm-ko Aux audio irteera, A/V konexio konposatuak eta Micro SD/USB irakurgailuak ditu multimedia erreproduzitzeko (16 GB arte onartzen ditu).
- Konektatu eta erabili konfigurazioa: USB gailuekin berehala konfiguratzeko diseinatua, Apple Mac eta PC-rekin bateragarria.
- Irudi Handiaren Proiekzioa: Argi gutxiko baldintzetan 60 hazbeteko irudiak proiektatzeko gai da.

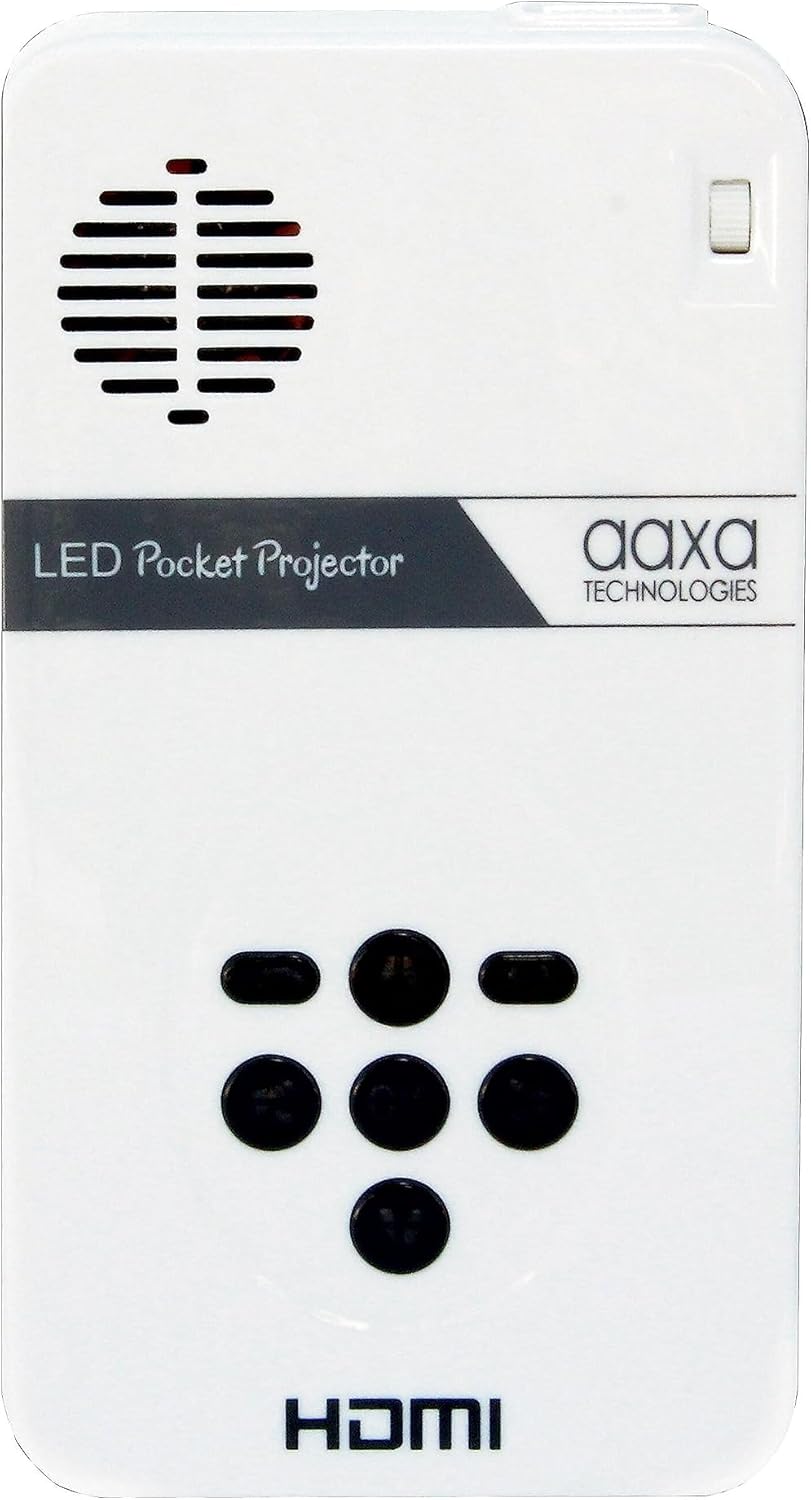
1. irudia: Goitik behera view AAXA LED Pico Mikro Bideo Proiektorearena, bere diseinu trinkoa, kontrol botoiak eta proiekzio lentea nabarmenduz.
2. Zer dago kutxan
Zure AAXA LED Pico Mikro Bideo Proiektorearen paketeak elementu hauek izan behar ditu:
- AAXA LED Pico Mikro Bideo Proiektore Unitatea
- Mikro USB kargatzeko kablea
- A/V kable konposatua (3.5 mm-ko jack-a)
- Mini-HDMItik HDMIra kablea
- Tripode txikia (paketearen arabera alda daiteke)
- Energia egokitzailea (kargatzeko)
3. Konfigurazio gida
3.1 Proiektorea kargatzea
Lehenengo aldiz erabili aurretik, kargatu guztiz proiektorearen barneko litio-ioizko bateria. Konektatu emandako mikro USB kablea proiektorearen DC 5V atakara eta beste muturra USB elikatze egokitzaile batera (ez da beti barne hartzen) edo ordenagailuaren USB atakara. Kargatzeko adierazlearen argiak kargatzeko egoera erakutsiko du.

2. irudia: Kargatzeko proiektorera konektatutako mikro USB kablea. Ziurtatu kablea ondo sartuta dagoela DC 5V atakan.
3.2 Piztu/Itzaltzea
Proiektorea pizteko, sakatu eta eutsi kontrol-panelean dagoen pizteko botoia gailua piztu arte. Itzaltzeko, sakatu eta eutsi berriro pizteko botoia proiektorea itzali arte.
3.3 Sarrera iturriak konektatzea
Proiektoreak hainbat sarrera-iturri onartzen ditu:
- HDMI: Erabili mini-HDMItik HDMIra kable bat ordenagailu eramangarrietara, joko-kontsoletara edo beste HDMI gaitutako gailuetara konektatzeko.
- A/V konposatua: Erabili 3.5 mm-ko A/V kable konposatua bideo-iturri zaharretara konektatzeko.
- Mikro SD txartela: Sartu Mikro SD txartel bat (16 GB-raino) dagokion zirrikituan multimedia erreproduzitzeko.
- USBa: Konektatu USB memoria-txartel bat USB atakan multimedia erreproduzitzeko zuzenean.

3. irudia: Aldea view Proiektorearen irudia, sarrera-ataka desberdinak erakusten dituena, besteak beste, HDMI, AV, USB eta Mikro SD txartelaren zirrikitua.
3.4 Fokua doitzea
Bilatu fokatze-gurpila proiektorearen alboan. Biratu gurpila proiektatutako irudia argi eta zorrotz agertu arte nahi duzun gainazalean. Irudiaren tamaina optimoa 60 hazbetekoa da argi gutxiko baldintzetan.

4. irudia: Tripode txiki batean muntatutako proiektorea, fokatze-gurpila (lentearen ondoan kokatua) irudia zorrozteko nola erabiltzen den erakusten duena.
4. Funtzionamendu-argibideak
4.1 Menuan nabigatzea
Erabili proiektorearen goiko aldean dauden kontrol-botoiak pantailako menuan nabigatzeko. Erdiko "Ados" botoiak hautaketak berresten ditu, eta gezi-teklek (gora, behera, ezkerra, eskuina) kurtsorea mugitzen dute. "Menua" edo "Atzera" botoiak (baldin badago) aurreko pantailara edo menu nagusira itzultzeko aukera ematen dizu.
5. irudia: Proiektorearen goiko kontrol-paneleko irudi hurbila, menuko interakziorako nabigazio-botoien diseinua zehaztuz.
4.2 Multimedia erreprodukzioa
Mikro SD txartel edo USB unitate bat sartzen denean, proiektorearen multimedia erreproduzitzaile integratuak automatikoki detektatuko du normalean. Joan "Media" edo "Filemenuko "s" atala bideoak, argazkiak edo testu-dokumentuak arakatu eta erreproduzitzeko hautatzeko.
4.3 Audio irteera
Proiektoreak bozgorailuak ditu barnean. Soinu-esperientzia murgilgarriagoa lortzeko, kanpoko bozgorailuak edo entzungailuak konekta ditzakezu 3.5 mm-ko Aux Audio Out ataka erabiliz.
5. Mantentzea
- Garbiketa: Erabili oihal leun eta lehor bat proiektorearen kanpoaldea garbitzeko. Lentearentzat, erabili lenteak garbitzeko oihal eta disoluzio espezializatu bat. Saihestu material urratzaileak.
- Bateria zaintzea: Bateriaren iraupena luzatzeko, saihestu bateria guztiz maiz deskargatzea. Gorde proiektorea leku fresko eta lehor batean denbora luzez erabiltzen ez duzunean.
- Aireztapena: Ziurtatu proiektorearen aireztapen-hodiak ez daudela blokeatuta funtzionatzen ari den bitartean, gehiegi berotzea saihesteko.
6. Arazoak
| Arazoa | Kausa posiblea | Irtenbidea |
|---|---|---|
| Ez da irudirik proiektatzen / Proiektorea ez da pizten. | Bateria baxua; Kablea ez dago konektatuta; Pizteko botoia ez da behar bezain denbora luzez sakatu. | Kargatu proiektorea; Ziurtatu kablea ondo konektatuta dagoela; Sakatu eta eutsi pizteko botoia 3-5 segundoz. |
| Irudia lausoa da. | Fokutik kanpo; Proiektorea gainazaletik hurbilegi/urrunegi. | Doitu fokatze-gurpila; Proiektorea proiekzio-gainazaletik hurbilago edo urrunago mugitu. |
| Audiorik ez. | Bolumena baxuegia; Kanpoko bozgorailuak/aurikularrak ez daude behar bezala konektatuta; Audio ezarpenak. | Igo bolumena; Egiaztatu kanpoko audio gailuen konexioak; Doitu audio ezarpenak proiektorearen menuan. |
| Ez dago seinalerik sarrera-iturritik. | Sarrera okerra hautatu da; Kablea ez da behar bezala konektatuta; Iturburu-gailuaren arazoa. | Hautatu sarrera-iturri zuzena menuan; Ziurtatu kableak ondo konektatuta daudela proiektorearekin eta iturburu-gailuarekin; Egiaztatu iturburu-gailuak seinalea igortzen ari den. |
7. Zehaztapenak
| Ezaugarri | Xehetasuna |
|---|---|
| Produktuaren neurriak | 4.25 x 2.36 x 0.7 hazbete |
| Elementuaren pisua | 6.4 ontza |
| Elementuaren eredu-zenbakia | KP-101-01 |
| Pilak | 1 litio ioi bateriak behar dira (barne) |
| Bistaratzeko ebazpena | 1280 x 720 (Natiboa) |
| Konektibitate Teknologia | USB, Mini-HDMI, A/V konposatua (3.5 mm-ko konektorea), MicroSD AV |
| Ezaugarri Berezia | Pico, bozgorailuak |
| Gomendatutako Erabilerak | Hezkuntza, multimedia pertsonala partekatzea |
| Fabrikatzailea | AAXA |
| Eskuragarri dagoen lehen data | 15ko urriaren 2013a |
8. Bermea eta Laguntza
Bermearen eta bezeroarentzako laguntzaren informazio zehatza lortzeko, jo AAXA Technologies-en webgune ofizialera. webgunea edo erosketarekin batera datorren dokumentazioa. Baliabide gehigarriak eta maiz egiten diren galderak ere aurki ditzakezu AAXA Technologies denda Amazonen.
Erabiltzailearen eskuliburuaren PDF bertsioa deskargatzeko ere eskuragarri egon daiteke: Erabiltzailearen eskuliburua (PDF).


