1. Sarrera
This manual provides detailed instructions for the installation, operation, and maintenance of your Soundstream VL-11A Single DIN Digital Media Receiver. Please read this manual thoroughly before using the product to ensure proper operation and to prevent damage.
The Soundstream VL-11A is designed to provide high-quality audio playback from various digital sources, including USB drives, SD cards, and auxiliary input devices. It features a compact single DIN chassis for easy integration into most vehicle dashboards.
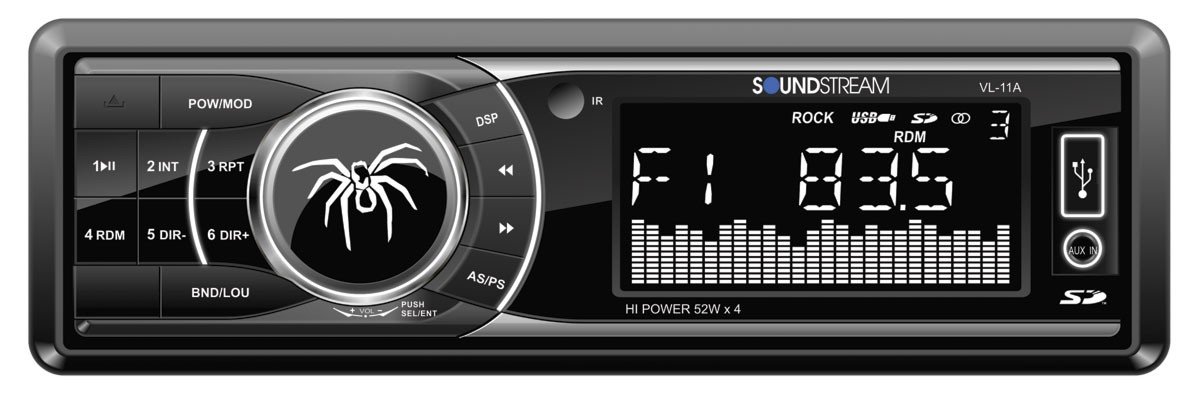
1.1. irudia: Aurrealdea view of the Soundstream VL-11A Digital Media Receiver. This image displays the main unit with its control buttons and display panel.
2. Segurtasun informazioa
Bete segurtasun neurri hauek unitateari lesioak edo kalteak saihesteko:
- Ez erabili unitatea gidatzeari arreta galarazten dizun moduan. Eman beti lehentasuna errepideko segurtasunari.
- Ziurtatu kableatu-konexio egokiak daudela. Kableatu okerrak sua eragin dezake edo ibilgailuaren sistema elektrikoan kalteak eragin ditzake.
- Saihestu unitatea hezetasun edo tenperatura altuen eraginpean jartzea.
- Ez saiatu unitatea desmuntatzen edo aldatzen. Mantendu konponketa guztiak langile kualifikatuen esku.
- Mantendu bolumena kanpoko trafikoaren soinuak entzuteko aukera ematen duen mailan.
3. Paketearen edukia
Egiaztatu elementu guztiak paketean daudela:
- Soundstream VL-11A Digital Media Receiver
- Kableatu Harness
- Mounting Hardware (Screws, Mounting Sleeve)
- Urruneko Kontrola
- Erabiltzailearen eskuliburua (dokumentu hau)
4. Produktua amaitu daview
4.1 Aurrealdeko panelaren kontrolak
The front panel provides access to primary functions and media inputs.
4.1. irudia: Illustrative diagram of the VL-11A front panel. This image highlights the display, volume knob, mode button, track controls, USB port, SD card slot, and auxiliary input.
- Pizteko / Modua botoia: Press to turn on/off. Short press to cycle through audio sources (Radio, USB, SD, AUX).
- Bolumen-eskulekua: Biratu bolumena doitzeko. Sakatu audio ezarpenetara sartzeko (Baxuak, Altuak, Balantzea, Iraungitzea, EQ).
- Pantaila: Uneko egoera, pistaren informazioa eta ezarpenak erakusten ditu.
- USB ataka: Konektatu USB biltegiratze gailuak multimedia erreproduzitzeko.
- SD txartelaren zirrikitua: Sartu SD txartelak multimedia erreproduzitzeko.
- AUX sarrera: Konektatu kanpoko audio gailuak 3.5 mm-ko jack baten bidez.
- Track/Tune Buttons: Nabigatu pistak edo sintonizatu irrati-maiztasunak.
4.2 Atzeko konexioak
The rear of the unit contains the main wiring harness and preamp irteerak.
4.2. irudia: Illustrative diagram of the VL-11A rear connections. This image shows the main wiring harness connector and the RCA preamp irteerak.
- Main Wiring Harness: Connects to vehicle power, ground, accessory, and speaker wires.
- RCA Aurreamp Irteerak: Two sets of 2V outputs for connecting external ampigogailuak.
5. Konfigurazioa
5.1 Instalazioa
Professional installation is recommended. If installing yourself, ensure the vehicle's battery is disconnected before beginning.
- Muntaketa: Insert the metal mounting sleeve into the vehicle's dashboard opening. Bend the tabs to secure it.
- Kableatua: Connect the supplied wiring harness to the vehicle's wiring. Match wire colors and functions carefully.
- Bozgorailu konexioak: Connect the speaker wires from the harness to your vehicle's speakers. Ensure correct polarity.
- Konexio elektrikoak: Connect the yellow wire (constant 12V), red wire (switched 12V), and black wire (ground) to the appropriate vehicle circuits.
- Antena: Connect the vehicle's antenna cable to the unit's antenna input.
- Unitate Segurua: Slide the VL-11A into the mounting sleeve until it clicks into place.
Warning: Incorrect wiring can cause severe damage to the unit or vehicle. Consult a professional if unsure.
5.2 Hasierako piztea
After installation, reconnect the vehicle's battery. Press the power button on the unit or remote control to turn it on. The display should illuminate.
6. Funtzionamendu-argibideak
6.1 Oinarrizko kontrolak
- Piztu/Itzali: Sakatu POWER/MODE botoia.
- Bolumenaren doikuntza: Biratu BOLUMENA botoia.
- Iturburuaren hautaketa: Sakatu laburra POWER/MODE button to cycle through Radio, USB, SD, and AUX.
6.2 Audio ezarpenak
Sakatu BOLUMENA knob to enter the audio menu. Rotate the knob to navigate options and press to select.
- BASS/AGUTZAK: Doitu baxu eta agudo mailak.
- OREKA: Adjust audio balance between left and right speakers.
- FADER: Adjust audio balance between front and rear speakers.
- EQ (Ekualizatzailea): Select from preset EQ curves (e.g., Pop, Rock, Classic) or a custom setting.
6.3 USB/SD erreprodukzioa
Insert a USB drive into the USB port or an SD card into the SD card slot. The unit will automatically switch to the respective source and begin playback.
- Erreproduzitu/Pausatu: Sakatu JOLASTU/PAUSTU botoia.
- Hurrengoa / Aurreko pista: Sakatu HURRENGO/AURR botoiak.
- Karpeta nabigazioa: Erabili FOLDER UP/DOWN buttons (if available on remote or unit).
6.4 Sarrera lagungarria (AUX)
Connect an external audio device (e.g., smartphone, MP3 player) to the 3.5mm AUX input on the front panel using an audio cable. Select AUX as the source using the MODUA botoia.
6.5 Irrati sintonizatzailea
Select Radio as the source. The unit supports AM/FM bands.
- Bandaren hautaketa: Sakatu BANDA button to switch between FM1, FM2, FM3, and AM.
- Eskuzko sintonizazioa: Sakatu laburra DOITU GORA/BEHERA buttons to adjust frequency step-by-step.
- Bilatu sintonizazioa: Luze sakatu DOITU GORA/BEHERA botoiak hurrengo irrati sendoa automatikoki bilatzeko.
- Aurrez ezarritako geltokiak: Press and hold a numbered preset button (1-6) to save the current station. Short press to recall a saved station.
6.6 Urruneko kontrola
The included remote control provides convenient access to most functions. Point the remote control towards the unit's front panel sensor.
6.1. irudia: Illustrative diagram of the VL-11A remote control. This image shows the various buttons for power, mode, volume, track control, and numeric presets.
7. Mantentzea
7.1 Unitatea garbitzea
- Erabili zapi leun eta lehor bat aurrealdeko panela eta pantaila garbitzeko.
- Ez erabili garbitzaile urratzailerik, argizaririk edo disolbatzailerik.
- Avoid spraying cleaning solutions directly onto the unit.
7.2 Arreta orokorra
- Ziurtatu aireztapen egokia unitatearen inguruan, gehiegi berotzea saihesteko.
- Saihestu objektu astunak unitatean jartzea.
- If the unit is exposed to extreme cold, allow it to warm up before operation to prevent condensation.
8. Arazoak
Arazoren bat izanez gero, kontsultatu hurrengo taula laguntzarekin harremanetan jarri aurretik:
| Arazoa | Kausa posiblea | Irtenbidea |
|---|---|---|
| Botererik ez | Blown fuse; Incorrect wiring; Disconnected battery. | Check vehicle fuses and unit fuse. Verify wiring connections. Ensure battery is connected. |
| Soinurik ez | Bolumena baxuegia; Isilarazi aktibatuta; Bozgorailuen kableatu okerra; Iturria ez da hautatu. | Increase volume. Deactivate mute. Check speaker connections and polarity. Select correct audio source. |
| USB/SD ez da erreproduzitzen | Onartu gabe file format; Corrupt media; Incorrectly inserted device. | Ziurtatu multimediak onartutako audioa duela files (e.g., WMA). Try a different USB/SD. Reinsert device. |
| Irrati-harrera eskasa | Antenna not connected; Weak signal area. | Egiaztatu antenaren konexioa. Saiatu irrati indartsuago batera sintonizatzen. |
| Urruneko kontrola ez dabil | Dead battery; Obstruction; Not pointing at sensor. | Replace remote battery. Remove obstructions. Ensure direct line of sight to unit's IR sensor. |
9. Zehaztapenak
Technical specifications for the Soundstream VL-11A Digital Media Receiver:
- Eredua: VL-11A
- Marka: Soundstream
- Fabrikatzailea: Soundstream
- Produktuaren neurriak: 22.35 x 20.32 x 9.65 cm
- Elementuaren pisua: 771.11 g (1.7 libera)
- Audio Wattage: 52 watt (gehienez)
- Kanal kopurua: 4
- Aurreamp Irteerak: 2 Sets of 2V
- Media formatua: WMA (and other common digital audio formats)
- Ezaugarri bereziak: SD Card Input, USB Input, Auxiliary Input
- Konektore mota: Laguntzailea, USB, 3.5 mm-ko jack-a
- Gailu bateragarriak: Hizlaria
- Kontrol-metodoa: Urrunekoa
10. Bermea eta laguntza
Soundstream products are designed and manufactured to the highest quality standards. For specific warranty information, please refer to the warranty card included with your product or visit the official Soundstream webgunea.
For technical support or service inquiries, please contact Soundstream customer service through their official channels. Keep your purchase receipt and product model number (VL-11A) handy when contacting support.


