1. Sarrera
Thank you for choosing the Melitta MKM-531-W Pure White Aroma Thermo Stainless Coffee Maker. This manual provides essential information for the safe and efficient operation, maintenance, and care of your new coffee maker. Please read these instructions thoroughly before first use and keep them for future reference.

1. irudia: Melitta MKM-531-W Coffee Maker. This image shows the complete coffee maker unit with its thermal carafe and filter cone.
2. Segurtasun-argibide garrantzitsuak
- Irakurri argibide guztiak aparatua erabili aurretik.
- Ez ukitu gainazal beroak. Erabili heldulekuak edo eskutokiak.
- Suaren, deskarga elektrikoaren eta pertsonen lesioen aurka babesteko, ez murgildu kablea, entxufeak edo aparatua uretan edo beste likido batzuetan.
- Gainbegiratzea beharrezkoa da aparaturen bat umeek edo umeen ondoan erabiltzen dutenean.
- Deskonektatu entxufetik erabiltzen ez duzunean eta garbitu aurretik. Utzi hozten piezak jarri edo kendu aurretik, eta aparatua garbitu aurretik.
- Ez erabili aparaturik kablea edo entxufea hondatuta dagoenean, edo gailuak gaizki funtzionatzen duenean, edo nolabait hondatu bada. Itzul ezazu aparatua baimendutako zerbitzu-instalazio hurbilenera, aztertzeko, konpontzeko edo doitzeko.
- Gailuaren fabrikatzaileak gomendatzen ez dituen osagarri osagarriak erabiltzeak sua, deskarga elektrikoa edo pertsonetan zauriak eragin ditzake.
- Ez erabili kanpoan.
- Ez utzi kablea mahaiaren edo erakusmahaiaren ertzetik zintzilik zintzilik, ezta gainazal beroak ukitu ere.
- Ez jarri gas edo erregailu elektriko bero baten gainean edo inguruan, edo berotutako labe batean.
- Beti konektatu entxufea lehenik etxetresna elektrikora, eta gero konektatu kablea hormako entxufean. Deskonektatzeko, jarri edozein kontrol "itzali" posizioan, eta gero atera entxufea hormako entxufetik.
- Ez erabili aparatua aurreikusitako erabilera ez den beste baterako.
- Garatze-zikloan estalkia kentzen bada erretzea gerta daiteke.
3. Piezen identifikazioa
Familiarize yourself with the components of your Melitta coffee maker:
- Ur biltegia
- Ur mailaren adierazlea
- Filter Holder (removable)
- Drip Stop Mechanism
- Thermal Carafe with Lid
- Heating Plate (for filter holder, not for carafe warming)
- Argi adierazledun etengailua
- Elikatze kablea

2. irudia: View of the filter basket area. This image highlights the internal structure of the filter holder where the coffee grounds are placed.

3. irudia: Diagram of the filter's drip stop mechanism. This illustration shows how the stopper at the bottom of the filter interacts with the carafe to prevent dripping when the carafe is removed.
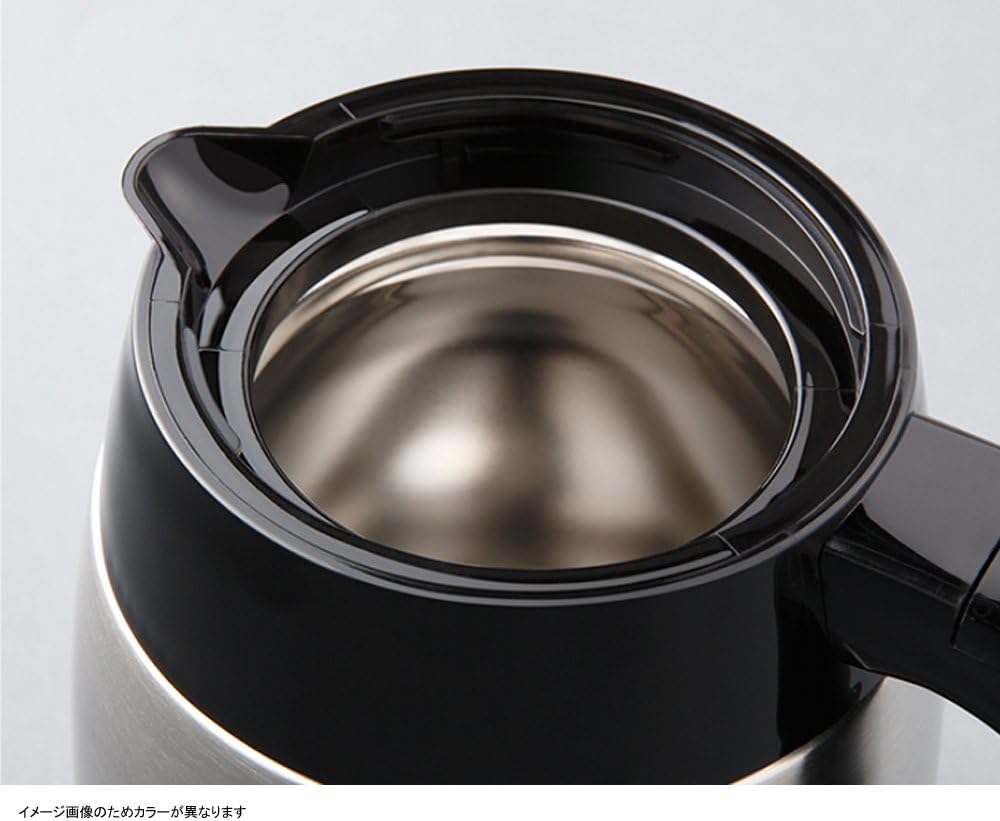
4. irudia: Goiena view of the thermal carafe. This image displays the opening of the stainless steel thermal carafe, designed to keep coffee warm.
4. Konfigurazioa eta lehen erabilera
- Desegin: Kontu handiz kendu ontziratzeko material guztiak eta ziurtatu pieza guztiak daudela.
- Garbitu: Wash the thermal carafe, its lid, and the removable filter holder in warm, soapy water. Rinse thoroughly and dry. Wipe the exterior of the coffee maker with a damp oihal.
- Lehenengo prestaketa zikloa (garbiketa):
- Bete ur-depositua ur hotzarekin gehienezko betetze-marraraino.
- Place the empty thermal carafe with its lid on the heating plate.
- Do not add coffee grounds for this cycle.
- Entxufatu kafe-makina lurrera konektatutako entxufe elektriko batera.
- Press the power switch to start the brewing cycle.
- Utzi ziklo osoa osatzeko. Bota ur beroa.
- Repeat this cleaning cycle once more with fresh water.
- Zure kafe-makina erabiltzeko prest dago.
5. Funtzionamendu-argibideak
Jarraitu urrats hauek kafea prestatzeko:
- Ur biltegia bete: Open the lid of the water reservoir and fill it with fresh, cold water to your desired level, indicated by the water level markings. Do not exceed the maximum fill line.
- Txertatu iragazkia: Place a Melitta #1x2 or #1x4 cone-shaped paper filter (depending on model variant, check your filter holder size) into the removable filter holder.
- Gehitu kafe-lurra: Add your desired amount of ground coffee into the paper filter. A general guideline is one tablespoon of coffee per cup (5 oz). Adjust to taste.
- Karafearen posizioa: Ensure the thermal carafe, with its lid securely attached, is placed correctly on the heating plate beneath the filter holder. The lid must be properly aligned to activate the drip stop mechanism.
- Hasi garagardoa egiten: Plug the coffee maker into a grounded electrical outlet. Press the power switch. The indicator light will illuminate, and brewing will begin.
- Itzaltze automatikoa: The coffee maker will automatically shut off approximately 10 minutes after the brewing cycle is complete. The indicator light will turn off.
- Zerbitzatu: Once brewing is complete, carefully remove the thermal carafe to serve. The thermal carafe is designed to keep coffee warm for an extended period without a heating plate.

5. irudia: Power indicator light showing auto-off. This image illustrates the power indicator light, showing it illuminated during operation and off approximately 10 minutes after brewing, indicating the automatic shut-off feature.
6. Garbiketa eta Mantentze-lanak
Garbiketa erregularrak kafe-makinaren errendimendu optimoa bermatzen du eta bizitza luzatzen du.
Eguneko garbiketa:
- Deskonektatu beti kafe-makina garbitu aurretik.
- Bota erabilitako kafe-hondarra eta paper-iragazkia.
- Wash the thermal carafe, its lid, and the removable filter holder in warm, soapy water. Rinse thoroughly and dry. These parts are generally not dishwasher safe; refer to specific markings if present.
- Garbitu kafe-makinaren kanpoaldea leun batekin, damp oihal. Ez erabili garbitzaile urratzaileak edo zurgatzaileak.
- Ez murgildu inoiz kafe-makinaren unitate nagusia uretan edo beste edozein likidotan.
Kaltziogabetzea (hilero edo beharren arabera):
Mineral deposits from water can build up and affect performance. Descale your coffee maker regularly.
- Prepare a descaling solution according to the descaler manufacturer's instructions, or use a solution of white vinegar and water (e.g., 1 part vinegar to 2 parts water).
- Bota kalka kentzeko disoluzioa ur-deposituan.
- Place the empty thermal carafe with its lid on the heating plate.
- Start a brewing cycle. Allow half of the solution to brew through, then turn off the coffee maker and let it stand for 15-20 minutes to allow the solution to work.
- Piztu berriro kafe-makina eta utzi gainerako disoluzioa irakiten.
- Discard the solution and rinse the carafe.
- Run two full cycles with fresh, cold water to rinse out any remaining descaling solution.
7. Arazoak
| Arazoa | Kausa posiblea | Irtenbidea |
|---|---|---|
| Kafea ez da prestatzen. | Coffee maker not plugged in; power switch not on; no water in reservoir. | Ensure plug is securely in outlet; press power switch; fill water reservoir. |
| Kafeak zapore ahula du. | Not enough coffee grounds; coffee too coarsely ground; water reservoir overfilled. | Add more coffee grounds; use finer ground coffee; ensure water level matches desired cups. |
| Kafea iragazkitik gainezka egiten du. | Too much coffee grounds; filter not seated correctly; clogged drip stop; carafe not positioned correctly. | Reduce coffee grounds; ensure filter is properly seated; clean drip stop; ensure carafe is fully pushed in. |
| Kafea ez da nahikoa beroa. | Thermal carafe not pre-warmed; carafe lid not sealed properly. | Rinse carafe with hot water before brewing; ensure carafe lid is tightly closed. |
| Garagardoa motela da. | Mineral deposits (scale) in the coffee maker. | Perform a descaling cycle as described in the maintenance section. |
8. Produktuaren zehaztapenak
| Ezaugarri | Xehetasuna |
|---|---|
| Modelo zenbakia | MKM-531 |
| Marka | Melitta |
| Edukiera | 0.7 litro (gutxi gorabehera 5 edalontzi) |
| Kolorea | White (with stainless steel accents) |
| Eragiketa modua | Erabat automatikoa |
| Elementuaren pisua | 1.7 kilogramo (3.74 libra) |
| Paketearen neurriak | 12.68 x 11.02 x 6.54 hazbete |
| Eskuragarri dagoen lehen data | 21ko apirilaren 2013a |
9. Bermea eta Laguntza
Melitta products are manufactured to high-quality standards. For specific warranty information, please refer to the warranty card included with your purchase or visit the official Melitta website. If you encounter any issues not covered in the troubleshooting section, or require further assistance, please contact Melitta customer support.
Melitta Customer Support: Mesedez, bisitatu www.melitta.com for contact details and further product information.


