1. Sarrera
This manual provides detailed instructions for the proper setup, operation, maintenance, and troubleshooting of your JVC HR-VP58U 4 Head Hi-Fi Stereo VCR. Please read this manual thoroughly before using the unit to ensure optimal performance and safety. Keep this manual for future reference.
2. Segurtasun informazio garrantzitsua
OHARRA: To reduce the risk of fire or electric shock, do not expose this appliance to rain or moisture. Do not remove the cover. Refer servicing to qualified personnel only.
- Ziurtatu elikadura hornidura boltage matches the rating on the unit.
- Ez blokeatu aireztapen baoak.
- Saihestu unitatea bero-iturrien ondoan edo eguzki-argiaren eraginpean jartzea.
- Ez jarri unitatea tantaka edo zipriztintzen duen likidoetara.
- Deskonektatu unitatea tximista-ekaitzetan edo denbora luzez erabiltzen ez duzunean.
3. Paketearen edukia
Egiaztatu zure paketeak elementu hauek dituela:
- JVC HR-VP58U VCR Unit
- Urruneko Kontrola
- Elikatze kablea (eransita)
- Audio/Video Cables (RCA type, typically red, white, yellow)
- Argibide eskuliburua (dokumentu hau)
4. Produktua amaitu daview
4.1 Aurreko panela

1. irudia: Aurrealdea view of the JVC HR-VP58U VCR with its remote control. The VCR features a power button, tape slot, and front audio/video input jacks.

2. irudia: Xehetasuna view of the JVC HR-VP58U VCR's front panel, showing playback controls (Play, Rewind, Fast Forward, Stop/Eject, Pause) and the remote control.
The front panel provides access to essential controls and input jacks for convenient operation. Key features include:
- POWER botoia: VCR-a pizten edo itzaltzen du.
- Zinta-zirrikitua: Sartu VHS zintak erreproduzitzeko edo grabatzeko.
- VIDEO (MONO) L-AUDIO-R Jacks: Front panel audio/video input for temporary connections (e.g., camcorder).
- Erreprodukzio kontrolak: Buttons for Play, Stop/Eject, Rewind, Fast Forward, and Pause.
- Pantaila: Shows current channel, time, and operational status.
4.2 Atzeko panela

3. irudia: Rear panel of the JVC HR-VP58U VCR, displaying the power cord, serial number, and various audio/video input/output ports.
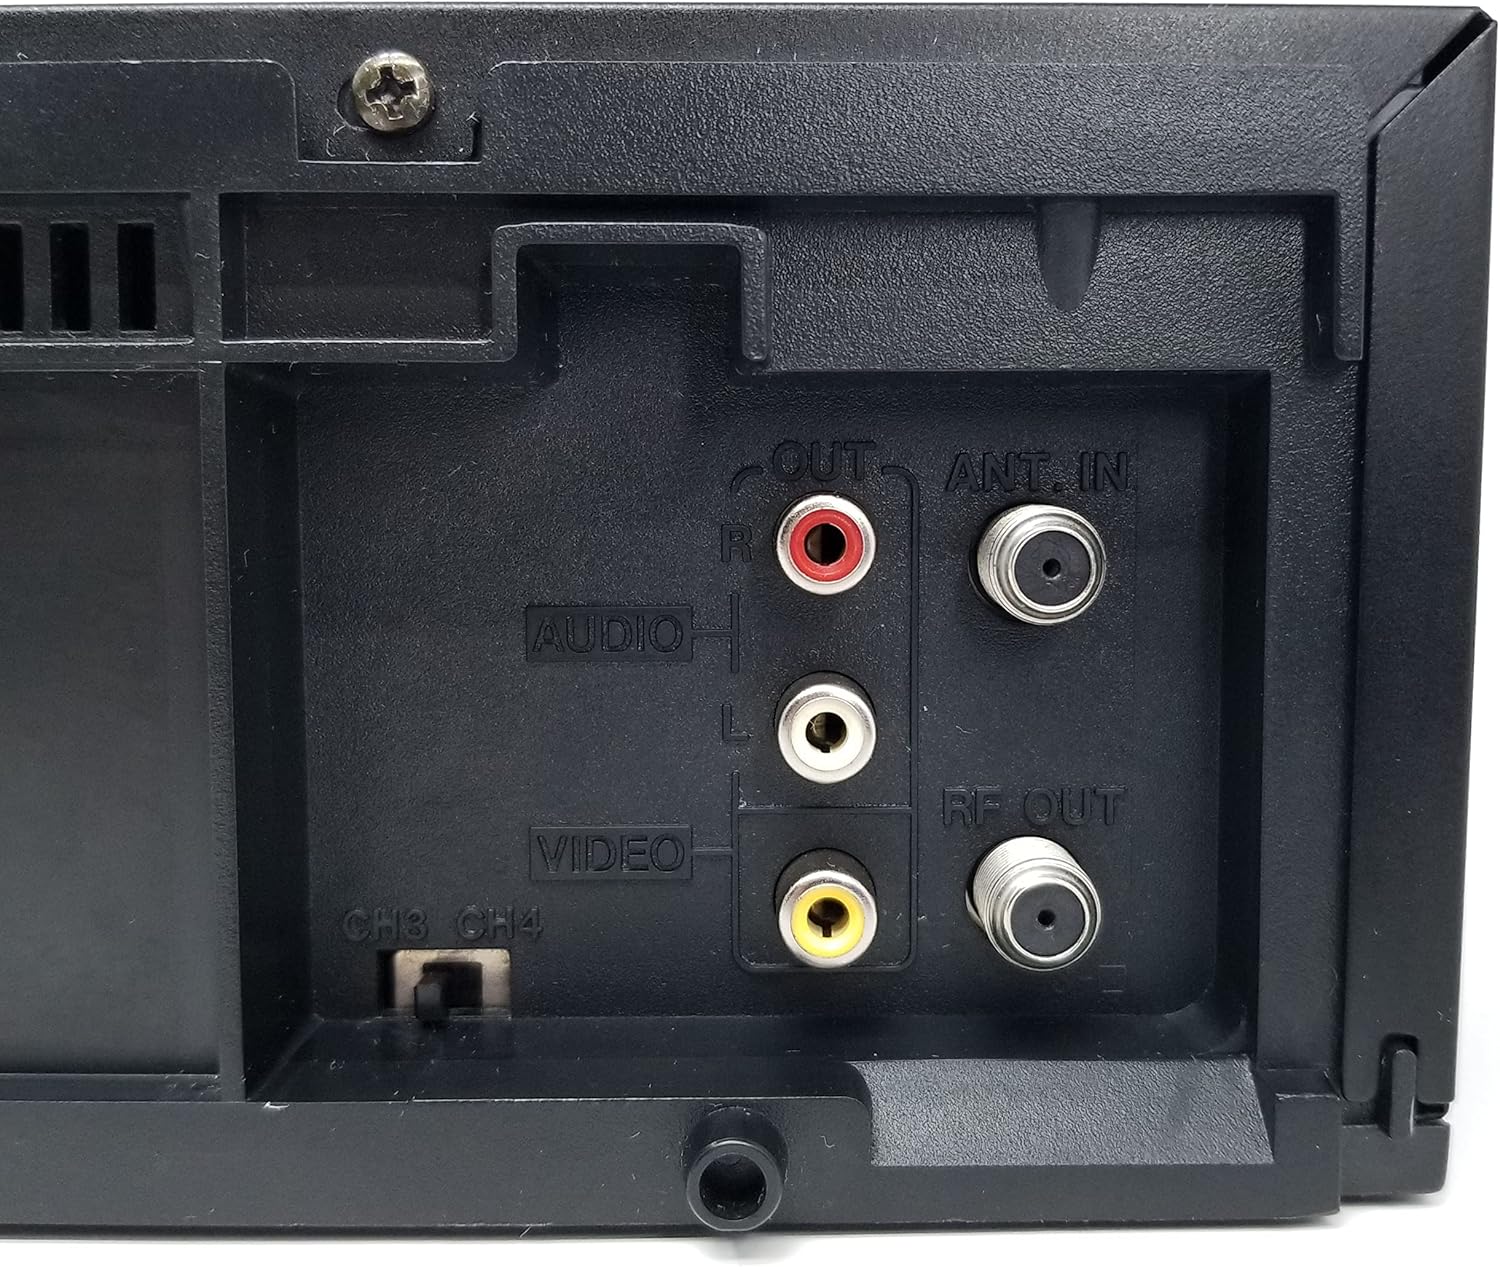
4. irudia: Close-up of the rear audio (red/white RCA), video (yellow RCA), RF OUT, and ANT. IN connections on the JVC HR-VP58U VCR.
The rear panel houses all necessary connections for integrating the VCR into your home entertainment system.
- ANT. IN: Connects to your antenna or cable TV signal.
- RF OUT: Connects to your TV's antenna input (typically for older TVs).
- AUDIO OUT (L/R) & VIDEO OUT: RCA jacks (red, white, yellow) for connecting to your TV or audio receiver.
- AUDIO IN (L/R) & VIDEO IN: RCA jacks (red, white, yellow) for connecting external devices for recording.
- CH3/CH4 Switch: Selects the RF output channel for your TV.
5. Konfigurazioa
5.1 Telebistara konektatzea
There are two primary methods for connecting your VCR to a television:
- Using RCA Audio/Video Cables (Recommended for best quality):
- Connect the yellow VIDEO OUT jack on the VCR to the yellow VIDEO IN jack on your TV.
- Connect the white AUDIO OUT (L) jack on the VCR to the white AUDIO IN (L) jack on your TV.
- Connect the red AUDIO OUT (R) jack on the VCR to the red AUDIO IN (R) jack on your TV.
- Select the corresponding Video Input (e.g., Video 1, AV1) on your TV.
- Using an RF Coaxial Cable (for older TVs or limited inputs):
- Connect your antenna or cable TV signal to the ANT. IN jack on the VCR.
- Connect an RF coaxial cable from the RF OUT jack on the VCR to the ANT. IN jack on your TV.
- Set the CH3/CH4 switch on the VCR's rear panel to either 3 or 4.
- Tune your TV to the corresponding channel (3 or 4) to receive the VCR's signal.
5.2 Energia-konexioa
Plug the attached power cord into a standard AC wall outlet (120V, 60Hz).
6. Funtzionamendu-argibideak
6.1 Oinarrizko erreprodukzioa
- Turn on your TV and select the correct input source (AV input or Channel 3/4).
- Sakatu BOTEREA button on the VCR or remote control to turn on the unit.
- Insert a VHS tape into the tape slot. The VCR will automatically load the tape.
- Sakatu JOLASTU button on the VCR or remote control to begin playback.
- Erabili REW (Rewind) and FF (Fast Forward) buttons to navigate the tape.
- Sakatu PAUSENA botoia erreprodukzioa aldi baterako gelditzeko. Sakatu berriro jarraitzeko.
- Sakatu GELDITU/KALTUZ botoia erreprodukzioa gelditzeko eta zinta kanporatzeko.
6.2 Grabaketa
The JVC HR-VP58U allows for recording from various sources.
- Insert a recordable VHS tape with the erase protection tab intact.
- To record from TV: Select the desired TV channel on the VCR.
- To record from external device (e.g., camcorder): Connect the device to the front or rear AUDIO IN/VIDEO IN jacks. Select the appropriate input source on the VCR (e.g., Line 1, L1).
- Sakatu REC (Record) button. Recording will begin immediately.
- Sakatu GELDITU botoia grabazioa amaitzeko.
Refer to the remote control section for advanced recording features like timer recording.
6.3 Urruneko kontrolaren funtzioak
The included remote control provides full functionality for your VCR. Familiarize yourself with its buttons for convenient operation.
- POTENTZIA: Turns the VCR on/off.
- SHUTTLE PLUS: For variable speed playback and search.
- MENU/Ados: Accesses and confirms menu selections.
- CH +/-: Kanalak aldatzen ditu edo menuetan nabigatzen du.
- Telebista/VCR: Telebista eta VCR moduen artean aldatzen da.
- REC/STOP/PLAY/PAUSE/FF/REW: Standard transport controls.
- TEMPORIZATORIA: Accesses timer recording settings.
- DISPLAY: Shows on-screen display information.
7. Mantentzea
7.1 Unitatea garbitzea
- Wipe the exterior of the VCR with a soft, dry cloth.
- Ez erabili garbitzaile likido edo aerosolik, akabera edo barneko osagaiak kaltetu ditzaketelako.
- Zikinkeria egoskorrerako, apur bat lehortuampGarbitu oihal bat urarekin, eta gero berehala lehortu.
7.2 Tape Head Cleaning
Over time, tape heads can accumulate dirt, leading to poor picture or sound quality. Use a dry-type VHS head cleaning cassette periodically (e.g., every 50-100 hours of use) according to the cleaning cassette's instructions. Avoid wet-type cleaners unless specifically recommended, as they can cause damage if used improperly.
8. Arazoak
| Arazoa | Kausa posiblea | Irtenbidea |
|---|---|---|
| Botererik ez | Kable elektrikoa deskonektatuta; entxufea ez dago aktibo. | Egiaztatu kablearen konexioa; probatu entxufea beste gailu batekin. |
| No picture/sound during playback | Incorrect TV input selected; A/V cables loose or incorrect; dirty tape heads. | Select correct TV input; check all cable connections; use a head cleaning cassette. |
| Tape will not play or eject | Tape jammed; VCR malfunction. | Do not force the tape. Power cycle the VCR. If issue persists, seek professional service. |
| Irudiaren kalitate eskasa (elurrarekin, distortsionatuta) | Dirty tape heads; worn-out tape; weak signal. | Clean tape heads; try a different tape; check antenna/cable connection. |
| Urruneko kontrola ez dabil | Bateriak agortuta; oztopoa; urrutiko aginteko sentsorea blokeatuta. | Replace batteries; remove obstructions; ensure clear line of sight to VCR sensor. |
9. Zehaztapenak
- Eredua: HR-VP58U
- Buruak: 4 buruko Hi-Fi estereoa
- Bideo sistema: NTSC
- Elikatze-iturria: AC 120V, 60Hz
- Neurriak (W x H x D): Approximately 19.72 x 8.82 x 13.82 inches (based on package dimensions, actual unit may vary slightly)
- Pisua: 8.98 kilo inguru
- Audioa: Hi-Fi estereo
- Sarrerak: Front A/V (RCA), Rear A/V (RCA), RF (Coaxial)
- Irteerak: Rear A/V (RCA), RF (Coaxial)
10. Bermea eta Laguntza
For warranty information or technical support, please refer to the documentation provided at the time of purchase or contact your retailer. If you encounter any issues with the product, it is recommended to contact the seller directly for assistance before attempting repairs.
Note: This product is a JVC HR-VP58U VCR. For specific support related to this model, please have your model number and serial number ready when contacting support.


