1. Sarrera
The Mastech MS6612 is a digital luxmeter designed for measuring illuminance. It features a large LCD display with backlight and a bar graph for easy reading. This device offers automatic and manual range switching, data hold, peak value measurement, relative value measurement, and zero calibration functions. It is capable of measuring up to 200,000 Lux or 20,000 Foot-Candles (Fc).
2. Segurtasun informazioa
Please read and understand all safety instructions before operating the device. Failure to follow these instructions may result in injury or damage to the meter.
- Do not operate the meter in environments with explosive gas, vapor, or dust.
- Avoid exposing the meter to extreme temperatures or high humidity.
- Kendu bateriak neurgailua denbora luzez erabiltzen ez bada, isuriak saihesteko.
- Do not attempt to repair or modify the meter. Refer all servicing to qualified personnel.
- Mantendu neurgailua garbi eta lehor.
3. Produktua amaitu daview
The Mastech MS6612 Digital Luxmeter consists of a main unit with an LCD display and control buttons, and a silicon photoelectric diode sensor for light detection.
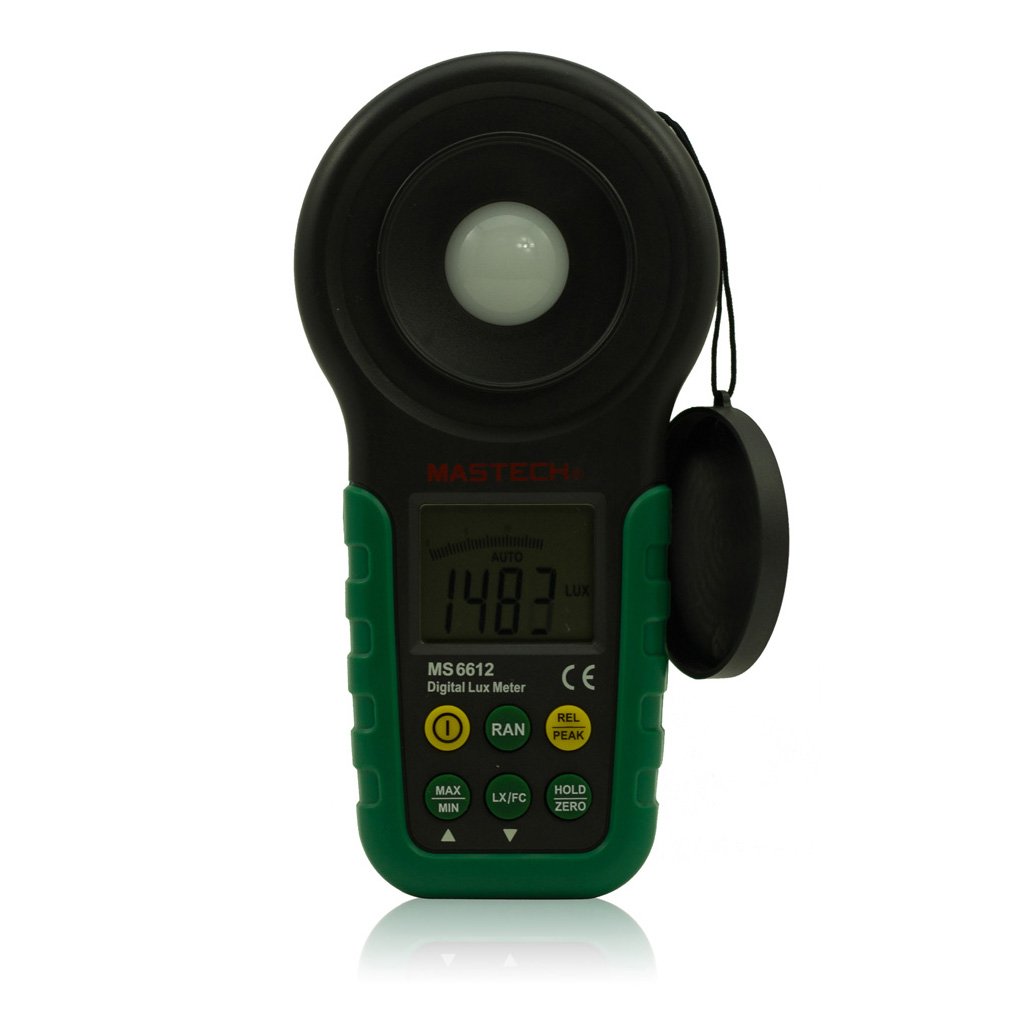
1. irudia: Aurrealdea view of the Mastech MS6612 Digital Luxmeter. This image shows the main body of the device, including the large LCD screen, control buttons, and the light sensor located at the top.
Funtsezko osagaiak:
- LCD pantaila: 3½ digits with analog bar display for clear readings.
- Kontrol-botoiak: For various functions such as power, range, hold, peak, relative, zero, unit conversion, and mute.
- Argi-sentsorea: Silicon photoelectric diode for accurate light measurement.
- Bateriaren konpartimendua: Located at the rear for a 9V battery.
4. Konfigurazioa
4.1 Bateriaren instalazioa
- Bilatu bateriaren konpartimentuaren estalkia neurgailuaren atzealdean.
- Use a screwdriver (if necessary) to open the battery compartment.
- Insert one 9V (IEC 6LR61) battery, observing the correct polarity (+/-).
- Jarri bateriaren konpartimentuaren estalkia eta ziurtatu.
Note: A low battery indicator will appear on the display when the battery needs replacement.
5. Funtzionamendu-argibideak
5.1 Piztu/Itzali
- Sakatu BOTEREA neurgailua pizteko botoia.
- Sakatu BOTEREA botoia berriro sakatu neurgailua itzaltzeko.
- The meter features an automatic power-off function, which will turn off the device if no keys are operated for more than 10 minutes.
5.2 Oinarrizko neurketa
- Piztu neurgailua.
- Point the light sensor towards the light source to be measured.
- The illuminance value will be displayed on the LCD. The meter automatically selects the appropriate range.
5.3 Range Switching (Auto/Manual)
The MS6612 supports both automatic and manual range switching.
- In auto-ranging mode, the meter automatically selects the best measurement range.
- Sakatu RANGE button to switch between auto and manual ranging modes. In manual mode, you can cycle through available ranges.
- If the measured value exceeds the current range in manual mode, the LCD will display "OL" (Overload).
5.4 Datuak gordetzeko funtzioa
Uneko irakurketa pantailan izozteko:
- Sakatu EUTSI button. The "HOLD" indicator will appear on the display.
- Sakatu EUTSI botoia berriro sakatu datuak atxikitzeko eta neurketa zuzena jarraitzeko.
5.5 Maximum/Minimum Value Measurement
To view the maximum or minimum illuminance recorded during a measurement session:
- Sakatu MAX/MIN button. The display will show the maximum recorded value.
- Sakatu MAX/MIN again to cycle to the minimum recorded value.
- Sakatu MAX/MIN a third time to exit this mode and return to live measurement.
5.6 Peak Value Measurement
This function captures the highest instantaneous illuminance value.
- Sakatu TONTORRA button to activate peak measurement. The "PEAK" indicator will appear.
- The display will show the highest illuminance detected since activating the function.
- Sakatu TONTORRA berriro modu honetatik irteteko.
5.7 Balio erlatiboaren neurketa
This function allows you to set a reference point and measure the difference from that point.
- In a stable light environment, press the REL button. The current reading becomes the reference, and the display will show "0".
- Subsequent measurements will show the difference (positive or negative) from this reference value.
- Sakatu REL again to exit relative measurement mode.
5.8 Zero Calibration Function
To ensure accuracy, especially in low light conditions, perform a zero calibration.
- Place the light sensor in a completely dark environment (e.g., cover it with an opaque cap).
- Sakatu ZERO button. The display should read "0.00".
- This calibrates the meter to account for any residual sensor output in darkness.
5.9 Unit Conversion (Fc/Lux)
The meter can display measurements in Lux or Foot-Candles (Fc).
- Sakatu UNITATEA button to toggle between Lux and Fc units.
- The selected unit will be indicated on the LCD.
- Bihurketa: 1 Fc = 10.764 Lux; 1 Lux = 0.09290 Fc.
5.10 Touch Tone and Mute Function
The meter may emit a touch tone when buttons are pressed. This can be muted.
- Refer to the specific button on your device for muting the touch tone.
6. Mantentzea
6.1 Garbiketa
- Garbitu neurgailuaren casing bigun batekin, damp oihal. Ez erabili garbitzaile edo disolbatzaile urratzailerik.
- Keep the light sensor clean and free from dust or smudges to ensure accurate readings. Use a soft, lint-free cloth.
6.2 Bateria ordezkatzea
Replace the 9V battery when the low battery indicator appears on the display. Follow the steps in Section 4.1 for battery installation.
6.3 Biltegiratzea
- If storing the meter for an extended period, remove the battery to prevent leakage and potential damage.
- Gorde neurgailua leku fresko eta lehor batean, eguzki-argitik eta muturreko tenperaturetatik babestuta.
7. Arazoak
| Arazoa | Kausa posiblea | Irtenbidea |
|---|---|---|
| Neurgailua ez da pizten. | Bateria hilda edo gaizki instalatuta. | Check battery polarity, replace battery. |
| "OL" displayed on screen. | Measurement value exceeds current range (manual mode). | Switch to a higher range or enable auto-ranging. |
| Irakurketa okerrak. | Dirty sensor, uncalibrated zero, or incorrect range. | Clean sensor, perform zero calibration, ensure correct range. |
| Bateria baxuaren adierazlea. | Bateria gutxi dago. | Ordeztu 9Vko bateria. |
8. Zehaztapenak
| Parametroa | Balioa |
|---|---|
| Neurketa-eremuak | 20, 200, 2000, 20000, 200000 Lux 20, 200, 2000, 20000 Fc |
| Bistaratzea | 3½ digits, max reading of 1999, with analog bar display |
| Sentsore | Silicon photoelectric diode |
| Measured Spectral Range | 320~730nm |
| Sampling Tarifa | ≥2 times/s |
| Funtzionamendu-tenperatura | -10~50 °C, max 80% RH (Non-Condensed) |
| Biltegiratze Tenperatura | -10~50 °C, max 80% RH (Non-Condensed, removing batteries) |
| Ingurune Operatiboa | Barruko erabilera |
| Altuera | 2000m highest |
| Elikatze Hornidura | 1 x 9V, IEC 6LR61 battery |
| Bateriaren iraupena | Gutxi gorabehera. 200 ordu |
| Neurriak (HxWxD) | 190 mm x 89 mm x 42.5 mm (7.48 x 3.50 x 1.67 hazbete) |
| Pisua (pilarik gabe) | Gutxi gorabehera. 360 g (12.7 oz) |
| Pisua (pilekin) | Gutxi gorabehera. 420 g (14.8 oz) |
Illuminance Unit Conversion:
- 1 Foot-Candle (Fc) = 10.764 Lux
- 1 Lux = 0.09290 Foot-Candle (Fc)
9. Bermea eta Laguntza
Mastech products are designed for reliability and performance. For specific warranty information, please refer to the warranty card included with your purchase or visit the official Mastech website. For technical support or service inquiries, please contact Mastech customer service through their official channels.
Gorde erosketa-agiria erosketaren frogagiri gisa, berme-erreklamazioetarako.