1. Sarrera
Eskerrik asko erosketagatik.asing the RHYTHM 8RZ166SR03 Fit Wave Smart Alarm Clock. This device is a radio-controlled alarm clock equipped with a thermometer, hygrometer, and calendar display. Its compact design and user-friendly interface make it ideal for various indoor settings. This manual provides detailed instructions to help you set up, operate, and maintain your new alarm clock.
Ezaugarri nagusiak:
- Atomic Clock Movement: Automatically synchronizes time via radio waves for precise accuracy.
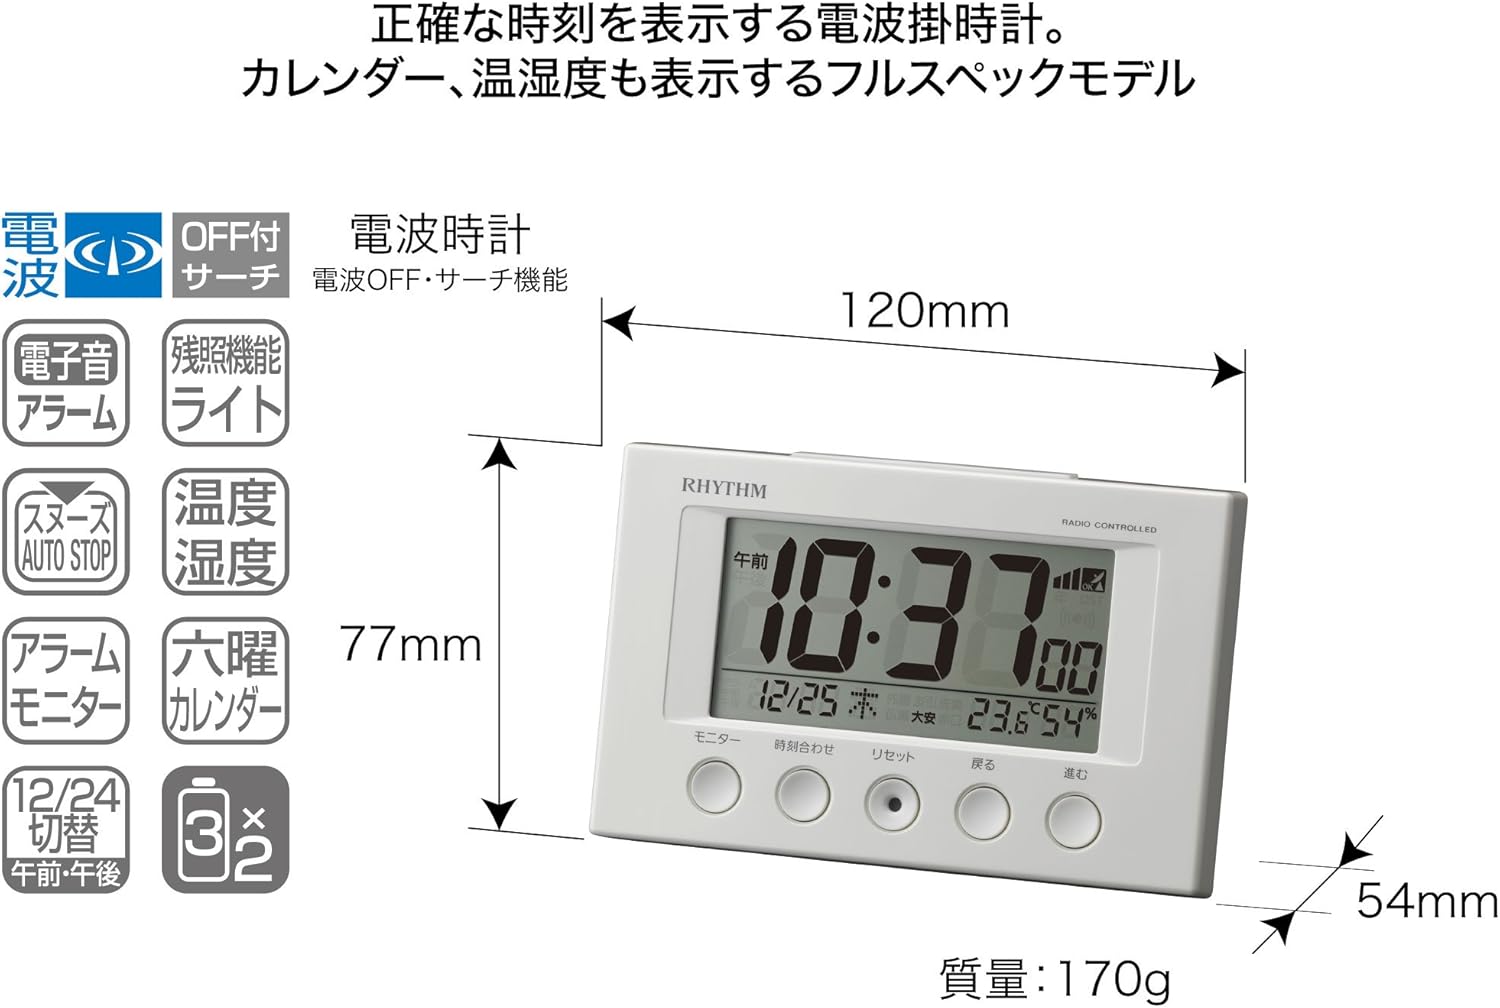
- Tenperatura bistaratzea: Shows ambient temperature from -9.9 to 50 ℃.
- Hezetasuna bistaratzea: Shows ambient humidity from 20% to 95%.
- Electronic Sound Alarm: Features an alarm with an auto-stop function.
- Atzeratzea Funtzioa: Alarma aldi baterako isilarazten du.
- Dial Light: Includes an afterglow function for visibility in low light (5 seconds).
- Egutegiaren bistaratzea: Shows date and day of the week, including Rokuyoku (Japanese traditional calendar).
- 12/24 orduko pantaila: Switchable time format.
2. Paketearen edukia
Mesedez, egiaztatu elementu guztiak paketean daudela:
- RHYTHM 8RZ166SR03 Fit Wave Smart Alarm Clock
- Argibide eskuliburua (dokumentu hau)
Note: 2 x AA manganese batteries are required and sold separately.
3. Produktua amaitu daview
Aurrealdea View and Display Elements:

This image displays the front of the RHYTHM 8RZ166SR03 alarm clock. It features a large digital LCD screen at the top, showing time, date, temperature, and humidity. Below the screen are five circular control buttons labeled (from left to right): Monitor, Time Adjustment, Reset, Back, and Forward.

This diagram illustrates the various elements of the LCD display:
- Denbora bistaratzea: Shows the current time in 12-hour (AM/PM) or 24-hour format.
- Radio Wave Reception Indicator: Displays the status of radio wave reception.
- Alarma adierazlea: An icon appears when the alarm is activated.
- Tenperatura bistaratzea: Uneko giro tenperatura erakusten du.
- Hezetasuna bistaratzea: Shows the current room humidity.
- Egutegiaren bistaratzea: Shows the current date and day of the week, including Rokuyoku.
Itzuli View eta Kontrolak:
The back of the clock features the alarm ON/OFF slide switch on the left side and the battery compartment cover in the center. The model number '8RZ166' and 'MADE IN CHINA' are also visible.
Control Buttons Explained:

This image details the function of each button:
- Monitorearen botoia: Used to check the alarm sound.
- Time Adjustment Button: Used for manual time setting and switching between 12/24 hour display.
- Berrezarri botoia: Resets the clock and also functions as a forced radio wave reception button.
- Atzera botoia (←): Used to decrease values during alarm or time settings.
- Forward Button (→): Used to increase values during alarm or time settings.
- Alarm Switch (on back): Slides up for ON, down for OFF.
- Snooze Button (top): Activates the snooze function and the dial light.
4. Konfigurazioa
4.1 Bateriaren instalazioa
- Remove the battery compartment cover on the back of the clock.
- Insert two (2) AA manganese batteries, ensuring the correct polarity (+/-) as indicated inside the compartment.
- Jarri bateriaren konpartimentuaren estalkia.
This image shows the open battery compartment with two AA batteries correctly inserted, indicating the positive and negative terminals.
4.2 Initial Power On and Radio Wave Reception
After battery installation, the clock will automatically attempt to receive radio waves to set the correct time. This process may take several minutes. Ensure the clock is placed in an area with good reception, away from electronic devices that may cause interference.

This diagram illustrates how radio-controlled clocks receive standard time signals from two transmission stations (one in Fukushima, 40kHz, and one in Fukuoka/Saga, 60kHz) to automatically correct and display the precise time. The clock will automatically adjust its time based on these signals.
If reception is successful, the time will be set automatically. If not, you may need to manually set the time (refer to Section 5.1).
5. Funtzionamendu-argibideak
5.1 Ordua eta data eskuz ezartzea
In cases where radio wave reception is difficult or for specific time zone adjustments:
- Eduki sakatuta Denbora Egokitzapena botoia sakatu orduaren pantaila keinuka hasi arte.
- Erabili Back (←) eta Forward (→) orduak doitzeko botoiak.
- Sakatu Denbora Egokitzapena button again to move to minutes, then adjust using Back (←) eta Forward (→).
- Jarraitu sakatzen Denbora Egokitzapena urte, hilabete eta egun ezarpenak zeharkatzeko, bakoitza doituz Back (←) eta Forward (→).
- Ezarpen guztiak zuzenak direnean, sakatu botoia Denbora Egokitzapena button one last time to confirm and exit the setting mode.
5.2 Alarma ezarpenak
- Alarmaren ordua ezartzeko, sakatu eta eutsi botoiari Denbora Egokitzapena button until the alarm time starts flashing (this may require cycling past the current time settings if already in manual time setting mode).
- Erabili Back (←) eta Forward (→) botoiak nahi duzun alarmaren ordua eta minutua ezartzeko.
- Sakatu Denbora Egokitzapena botoia alarmaren ordua berresteko.
5.3 Alarma aktibatzea/desaktibatzea
Erabili Alarm ON/OFF slide switch located on the back of the clock:
- Irristatu etengailua UP to activate the alarm. An alarm icon will appear on the display.
- Irristatu etengailua BEHERA to deactivate the alarm. The alarm icon will disappear.
5.4 Snooze Function and Dial Light
Alarma jotzen duenean, sakatu botoi handia Atzeratu botoia located on the top of the clock. This will:
- Temporarily silence the alarm (snooze duration is preset).
- Activate the dial light for approximately 5 seconds, illuminating the display for easy viewiluntasunean aritzen.
The alarm will sound again after the snooze period. To stop the alarm completely, slide the Alarma ON/OFF etengailua OFF-ra.
5.5 Display Modes (12/24 Hour Format)
To switch between 12-hour (with AM/PM indicator) and 24-hour time formats, briefly press the Denbora Egokitzapena button outside of setting mode.
5.6 Checking Alarm Sound
Aurretikview the alarm sound, press the Monitorea button on the front of the clock.
6. Mantentzea
6.1 Garbiketa
To clean the clock, wipe it gently with a soft, dry cloth. Do not use abrasive cleaners, solvents, or chemical sprays, as these can damage the casing edo pantaila.
6.2 Bateria ordezkatzea
When the display becomes dim or the clock functions erratically, it is time to replace the batteries. Follow the battery installation steps in Section 4.1. It is recommended to replace both batteries at the same time with new ones.
7. Arazoak
| Arazoa | Kausa posiblea | Irtenbidea |
|---|---|---|
| Clock does not display anything or display is dim. | Bateriak agortuta daude edo gaizki sartuta daude. | Ordeztu bateriak AA bateria berriekin, polaritate zuzena ziurtatuz. |
| Time is incorrect or does not set automatically. | Poor radio wave reception; clock is outside reception area; interference from other electronics. | Move the clock to a different location, away from electronic devices. Try manual time setting (Section 5.1). Press the Reset button to force reception. |
| Alarmak ez du jotzen. | Alarma ez dago aktibatuta; alarmaren bolumena baxuegia da (doigarria bada); alarmaren ordua okerra da. | Ensure the Alarm ON/OFF switch is in the ON position. Verify the alarm time is set correctly. |
| Time drifts by an hour occasionally. | Daylight Saving Time (DST) adjustment issues, especially if the clock is designed for a specific region's DST rules. | Manually adjust the time if the automatic DST adjustment is not suitable for your region. Some radio-controlled clocks are optimized for specific regional signals. |
| Display is difficult to read from certain angles. | LCD displays have optimal viewangeluak. | Egokitu viewing angle or the position of the clock for better clarity. |
8. Zehaztapenak
| Ezaugarri | Zehaztapena |
|---|---|
| Modelo zenbakia | 8RZ166SR03 |
| Marka | ERRITMOA |
| Mugimendua | Atomic clock (Radio-controlled) |
| Markoaren materiala | Plastikoa |
| Bistaratzeko mota | LCD digitala |
| Energia iturria | Battery Powered (2 x AA manganese batteries, sold separately) |
| Elementuaren pisua | 0.17 kilogramo |
| Produktuaren neurriak | 12W x 7.7H x 5.4D centimetres (approx. 4.7 x 3.0 x 2.1 inches) |
| Tenperatura bistaratzeko tartea | -9.9 ℃ eta 50 ℃ |
| Hezetasuna bistaratzeko tartea | % 20 eta % 95 RH |
| Ezaugarri bereziak | Calendar Display, Humidity Display, Snooze, Temperature Display, Dial Light (afterglow function) |
| Gela Mota | Bedroom, General Indoor Use |
9. Bermea eta Laguntza
RHYTHM products are manufactured with high-quality standards. For warranty information, please refer to the documentation provided at the time of purchase or contact your retailer. If you encounter any issues or require technical assistance, please contact the RHYTHM customer support or your local distributor. Keep your purchase receipt as proof of purchase.


