1. Sarrera
This manual provides detailed instructions for the safe and effective operation of the Extech EX355 True RMS Multimeter. The EX355 is a professional digital multimeter designed for a wide range of electrical measurements, including AC/DC voltage, current, resistance, capacitance, frequency, duty cycle, and temperature. It features True RMS for accurate readings of non-sinusoidal waveforms, Non-Contact Voltage (NCV) detection for enhanced safety, Low Impedance (LoZ) mode to prevent ghost voltage readings, and a Low Pass Filter (LPF) for noise reduction in electrical environments.
Please read this manual thoroughly before using the device to ensure proper function and to prevent potential hazards.
2. Segurtasun informazioa
Always adhere to the following safety precautions to avoid personal injury or damage to the multimeter:
- Irakurri argibide guztiak: Familiarize yourself with the operation and safety features before use.
- Observe all warnings: Pay close attention to all warnings and cautions marked on the meter and in this manual.
- Use proper range: Always select the correct function and range for your measurement.
- Inspect test leads: Before each use, check test leads for damaged insulation or exposed metal. Replace if damaged.
- Do not exceed maximum input limits: Inoiz ez aplikatu liburukiatage or current that exceeds the specified maximum limits for the meter.
- Avoid live circuits: Do not measure resistance, continuity, or diode on live circuits.
- Kontuz ibili bolumen altuarekintages: Be extremely careful when working with voltag60V DC edo 30V AC RMS-tik gorako tentsioak, deskarga elektrikoaren arriskua baitakarte.
- Do not operate if damaged: If the meter appears damaged or is not operating properly, discontinue use immediately.
- Bateria ordezkatzea: Irakurketa zehatzak bermatzeko, aldatu bateriak bateria baxuaren adierazlea agertzen den bezain laster.
- CAT III 600V: This meter is designed for measurements in CAT III 600V environments.
3. Produktua amaitu daview
The Extech EX355 is a versatile True RMS Multimeter equipped with several advanced features for accurate and safe electrical testing.
Ezaugarri nagusiak:
- 12 Measurement Functions: Includes AC/DC voltage, korrontea, erresistentzia, kapazitantzia, maiztasuna, betebehar-zikloa eta tenperatura.
- Benetako RMS zehaztasuna: Ensures precise readings for both standard and distorted electrical waveforms.
- Kontaktu gabeko boltage (NCV) Detekzioa: Allows for quick and safe detection of AC voltage kontaktu zuzenik gabe.
- Low Impedance (LoZ) Mode: Prevents false readings caused by ghost voltages in circuits.
- Pasabide baxuko iragazkia (LPF): Reduces high-frequency noise for stable and accurate measurements in noisy environments.
- Pantaila: 4000 count LCD display with backlight.
- Data Hold, Min/Max, Relative Mode: For capturing and analyzing measurements.
- Itzali automatikoa: Bateriaren iraupena aurrezten du.
- Continuity and Diode Test: Essential for circuit diagnostics.

Figure 1: The Extech EX355 True RMS Multimeter. This image shows the front view of the multimeter, highlighting its display, rotary dial, function buttons, and input jacks.
4. Konfigurazioa
4.1 Bateriaren instalazioa
The Extech EX355 requires two (2) AA batteries for operation. These are typically included with the device.
- Ziurtatu multimetroa itzalita dagoela.
- Bilatu bateriaren konpartimentuaren estalkia unitatearen atzealdean.
- Unscrew the retaining screw(s) and carefully remove the cover.
- Sartu bi AA pila, konpartimentuaren barruan adierazten den polaritate zuzena (+ eta -) errespetatuz.
- Jarri berriro bateriaren konpartimentuaren estalkia eta finkatu torloju(ekin) erabiliz.
Oharra: Replace batteries immediately when the low battery indicator appears on the display to maintain measurement accuracy.
4.2 Proba-kableak konektatzea
Always connect the test leads correctly for the desired measurement function.
- Bolumen gehienarentzattage, resistance, continuity, diode, capacitance, and frequency measurements, insert the red test lead into the VΩHzCAP jack and the black test lead into the COM jack.
- 10A-rainoko korronte neurketetarako, sartu proba-kable gorria entxufean. 10A jack and the black test lead into the COM jack.
- 400 mA-rainoko korronte neurketetarako, sartu proba-kable gorria mAµA jack and the black test lead into the COM jack.
- Ensure test leads are fully inserted into the jacks.
5. Funtzionamendu-argibideak
This section details how to perform various measurements using the Extech EX355 multimeter.
5.1 AC/DC Voltage Neurketa
- Ezarri dial birakaria V~ (AC bolumenatage) edo V- (DC Voltage) posizioa.
- Konektatu proba beruna gorriarekin VΩHzCAP jack-a eta proba-kable beltza COM jack.
- Ukitu proba-zundak zirkuituko puntuetan, non bolumena dagoen.tage neurtu behar da.
- Irakurri liburukiatagPantailako balioa.
5.2 AC/DC korrontearen neurketa
Kontuz: Ez konektatu inoiz multimetroa bolumen batekin paraleloan.tagKorrontea neurtzean, korronte-iturria. Konektatu beti kargarekin seriean.
- Set the rotary dial to the appropriate A~ (AC Current) or A- (DC Current) range (e.g., 10A or mAµA).
- Konektatu proba beruna gorriarekin 10A or mAµA jack-a eta proba-kable beltza COM jack.
- Open the circuit where current is to be measured and connect the test probes in series.
- Irakurri uneko balioa pantailan.
5.3 Erresistentzia Neurketa
Abisua: Ziurtatu zirkuitua deskonektatuta dagoela erresistentzia neurtu aurretik.
- Ezarri dial birakaria Ω (Erresistentzia) posizioa.
- Konektatu proba beruna gorriarekin VΩHzCAP jack-a eta proba-kable beltza COM jack.
- Touch the test probes across the component or circuit segment to be measured.
- Irakurri erresistentziaren balioa pantailan.
5.4 Kapazitatearen Neurketa
Abisua: Discharge capacitors before measuring to prevent damage to the meter.
- Ezarri dial birakaria CAP (Kapazitantzia) posizioa.
- Konektatu proba beruna gorriarekin VΩHzCAP jack-a eta proba-kable beltza COM jack.
- Ukitu proba-zundak kondentsadorearen terminaletan.
- Irakurri kapazitantziaren balioa pantailan.
5.5 Maiztasunaren eta lan-zikloaren neurketa
- Ezarri dial birakaria Hz /% (Frequency/Duty Cycle) position.
- Konektatu proba beruna gorriarekin VΩHzCAP jack-a eta proba-kable beltza COM jack.
- Touch the test probes to the signal source.
- Sakatu Hz /% button to toggle between frequency and duty cycle readings.
5.6 Tenperaturaren Neurketa
The EX355 includes a general purpose bead wire temperature probe.
- Ezarri dial birakaria Tenperatura (Tenperatura) posizioa.
- Sartu tenperatura-sonda VΩHzCAP (positive) and COM (negative) jacks, observing polarity.
- Place the tip of the temperature probe on or in the object to be measured.
- Read the temperature value on the display. The unit can display in Celsius or Fahrenheit.

Figure 2: Using the Extech EX355 to measure temperature in an HVAC vent. The image shows a person holding the multimeter and inserting the temperature probe into an air conditioning vent.
5.7 Harremanik gabeko Voltage (NCV) Detekzioa
NCV mode allows for quick detection of AC voltagKontaktu zuzenik gabe, segurtasuna hobetuz.
- Ezarri dial birakaria NCV posizioa.
- Move the top of the multimeter near a conductor or outlet.
- The NCV indicator light will illuminate and an audible beep will sound if AC voltage is detected. The intensity of the beep and light may increase with stronger fields.
5.8 Low Impedance (LoZ) Mode
LoZ mode helps eliminate false readings caused by ghost voltages.
- Ezarri dial birakaria LoZ V posizioa.
- Connect the test leads as for standard voltage neurketa.
- The meter will present a low impedance load to the circuit, dissipating ghost voltages and providing a more accurate reading of actual voltage.
5.9 Pase baxuko iragazkia (LPF)
The LPF function is used to filter out high-frequency noise, providing stable readings in variable frequency drive (VFD) applications or other noisy electrical environments.
- Set the rotary dial to an AC Voltage (V~) or AC Current (A~) barrutia.
- Sakatu LPF button to activate the low pass filter. The LPF icon will appear on the display.
- Perform your measurement as usual. The meter will now display readings with high-frequency noise attenuated.
- Sakatu LPF button again to deactivate the filter.
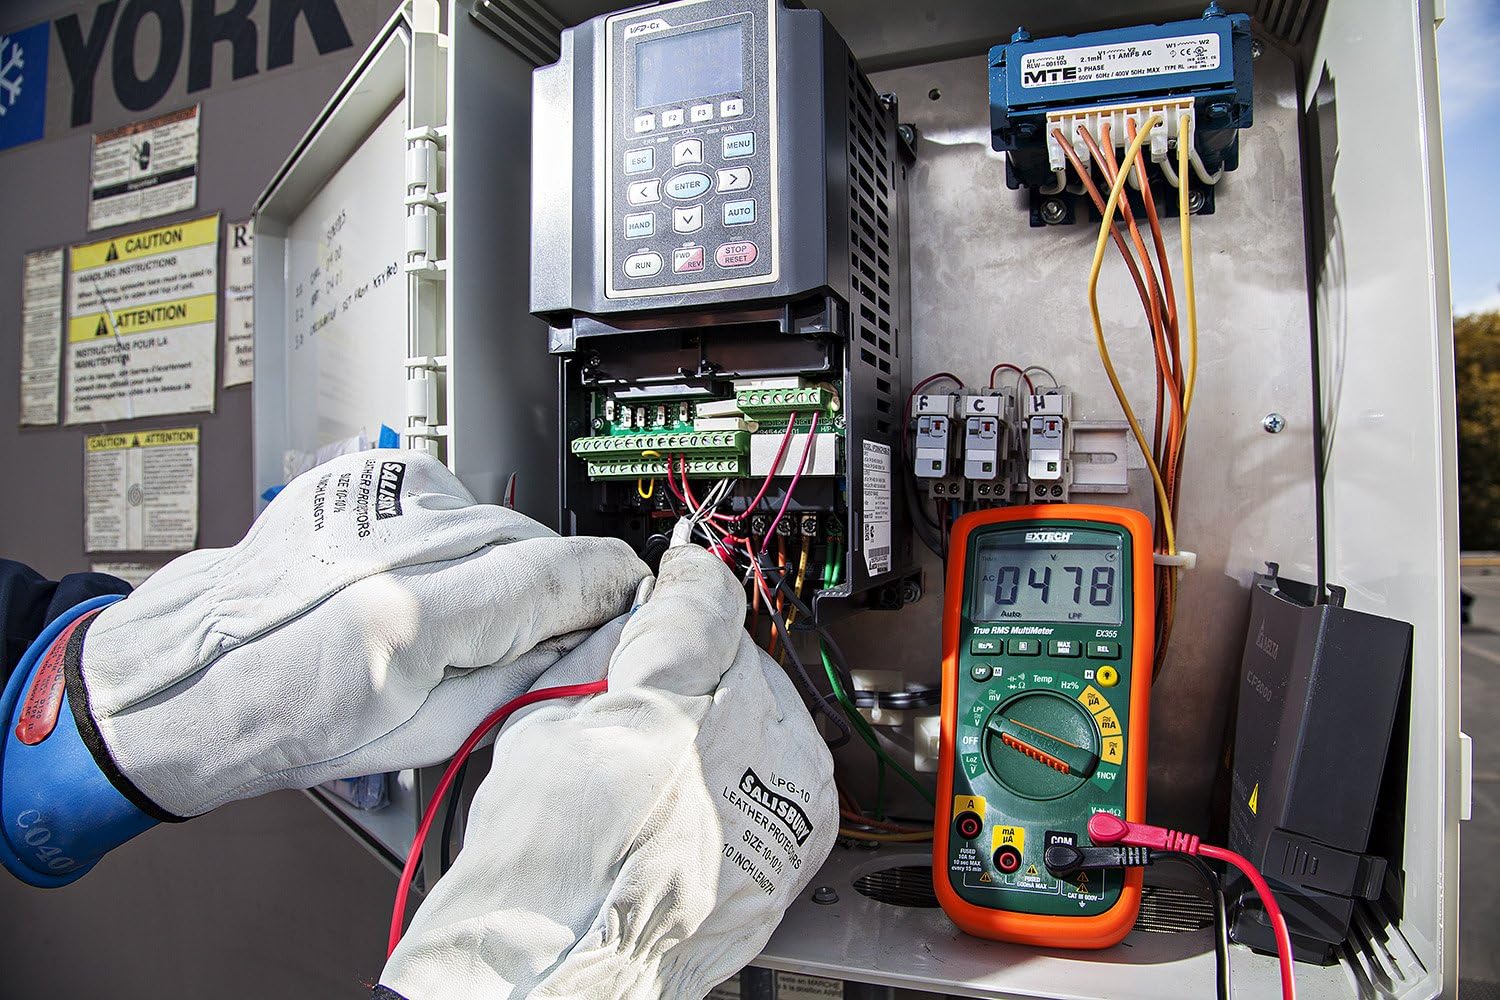
Figure 3: The Extech EX355 Multimeter in use, connected to an electrical control panel. This image demonstrates the multimeter's application in industrial or commercial electrical diagnostics.

Figure 4: The Extech EX355 Multimeter connected to a fuse box. This image illustrates the multimeter being used for testing within a residential or commercial electrical distribution system.
5.10 Data Hold, Min/Max, Relative Mode
- Datuak gordetzea: Sakatu EUTSI botoia pantailan uneko irakurketa izozteko. Sakatu berriro askatzeko.
- Min/Max: Sakatu MIN / MAX button to enter Min/Max recording mode. The meter will display the maximum reading. Press again to cycle through minimum and average readings. Hold the button to exit.
- Modu erlatiboa: Sakatu REL button to store the current reading as a reference value. Subsequent measurements will be displayed as a difference from this reference. Press again to exit.
5.11 Continuity and Diode Test
Abisua: Ensure the circuit is de-energized before performing continuity or diode tests.
- Jarraipena: Ezarri dial birakaria Ω (Resistance) position and press the AUKERATU button until the continuity symbol (♫) appears. A continuous beep indicates a low resistance path (continuity).
- Diodo proba: Ezarri dial birakaria Ω (Resistance) position and press the AUKERATU button until the diode symbol (→|) appears. Connect the red lead to the anode and black lead to the cathode for forward bias voltage drop. Reverse leads for reverse bias.
6. Mantentzea
6.1 Bateria ordezkatzea
Refer to section 4.1 for detailed instructions on replacing the two AA batteries. Always use fresh, high-quality AA batteries.
6.2 Fusiblearen ordezkapena
If the current measurement functions cease to work, the fuse may need replacement. This procedure should only be performed by qualified personnel.
- Ensure the multimeter is powered off and all test leads are disconnected.
- Kendu bateriaren konpartimentuaren estalkia eta bateriak.
- Unscrew the case screws and carefully separate the two halves of the meter casing.
- Locate the blown fuse(s). The EX355 typically uses two fuses: a 0.5A/600V fast-blow fuse for the mA/µA input and a 10A/600V fast-blow fuse for the 10A input.
- Replace the fuse(s) with fuses of the exact same type and rating. Never use a fuse with a different rating.
- Carefully reassemble the meter casing, ensuring all screws are tightened. Reinstall batteries and the battery cover.
6.3 Garbiketa eta biltegiratzea
- Clean the meter regularly with a damp oihala eta detergente leuna. Ez erabili urratzaileak edo disolbatzaileak.
- Ensure the meter is completely dry before use.
- When storing the meter for extended periods, remove the batteries to prevent leakage.
- Gorde neurgailua leku fresko eta lehor batean, eguzki-argitik eta muturreko tenperaturetatik babestuta.
7. Arazoak
| Arazoa | Kausa posiblea | Irtenbidea |
|---|---|---|
| Pantailarik ez edo pantaila ahula | Bateria agortuta edo gutxituta | Ordeztu bateriak (ikusi 4.1 atala). |
| Irakurketa okerrak | Incorrect function/range selected; Damaged test leads; External interference; Blown fuse (for current) | Verify function/range; Inspect/replace test leads; Move away from strong electromagnetic fields; Check/replace fuses (refer to Section 6.2). |
| Jarraitutasun-txirrinik ez | Open circuit; High resistance; Incorrect mode | Ensure circuit is closed; Check for high resistance; Verify continuity mode is selected. |
| Korrontearen neurketa ez dabil | Blown fuse; Incorrect lead connection | Check and replace appropriate fuse (refer to Section 6.2); Ensure leads are in the correct current jacks. |
| NCV-k ez du bolumena detektatzentage | Ez AC voltage present; Weak field; Incorrect mode | Egiaztatu korronte alternoaren bolumenatage with direct contact method; Ensure NCV mode is selected; Move closer to the conductor. |
8. Zehaztapenak
The following table outlines the key specifications for the Extech EX355 True RMS Multimeter:
| Parametroa | Balioa |
|---|---|
| Modelo zenbakia | EX355 |
| Neurketa-funtzioak | AC / DC boltage, AC/DC Current, Resistance, Capacitance, Frequency, Duty Cycle, Temperature, Diode, Continuity |
| Egiazko RMS | Bai |
| Kontaktu gabeko boltage (NCV) | Bai |
| Low Impedance (LoZ) | Bai |
| Behe pasako iragazkia (LPF) | Bai |
| Gehienezko bolumen operatiboatage | 600 Volt |
| Neurketaren Zehaztasuna | +/-0.5% (typical, varies by function/range) |
| Bistaratzea | 4000 Count LCD |
| Energia iturria | 2 x AA pila (barne) |
| Neurriak (L x W x H) | 8.1 x 4.8 x 17 cm (3.2 x 1.9 x 6.7 hazbete) |
| Elementuaren pisua | 372 g (0.82 lb) |
| Materiala | ABS |
| Ziurtagiria | IEC 61010-1, CE, CAT III 600V |
| Dakarten osagaiak | Test leads, two AA batteries, general purpose bead wire temperature probe |

Figure 5: Extech EX355 Multimeter with approximate dimensions shown in inches and centimeters. This image provides a visual reference for the physical size of the device.
9. Bermearen informazioa
Extech provides a warranty for its products. Specific warranty terms and conditions, including duration and coverage, may vary by region and product. For detailed warranty information, please refer to the warranty card included with your product or visit the official Extech webgunea. Gorde erosketa-agiria erosketaren frogagiri gisa, berme-erreklamazioetarako.
10. Bezeroarentzako arreta
For technical assistance, troubleshooting, or service inquiries regarding your Extech EX355 Multimeter, please contact Extech customer support. You can typically find contact information, including phone numbers and email addresses, on the official Extech webgunean edo zure produktuarekin batera emandako dokumentazioan.
Sareko baliabideak: Visit the official Extech website for FAQs, product downloads, and additional support resources.