1. Sarrera
This manual provides detailed instructions for the installation, operation, and maintenance of your Focal FPX1.1000 Class D Mono AmpLikidatzailea. Mesedez, irakurri arretaz eskuliburu hau instalazioa edo erabilera saiatu aurretik, funtzionamendu egokia eta segurtasuna bermatzeko. Gorde eskuliburu hau etorkizunean erreferentzia gisa.
2. Segurtasun-argibideak
Jarraitu segurtasun neurri hauek lesioak edo kalteak saihesteko ampbizigarria eta ibilgailua:
- Instalazio profesionala gomendatzen da: Installation of car audio equipment can be complex. It is highly recommended that a qualified professional install this ampbiziagoa.
- Deskonektatu bateria: Zirkuitulaburrak saihesteko, deskonektatu beti ibilgailuaren bateriaren terminal negatiboa edozein lan elektriko hasi aurretik.
- Kableatu egokia: Use appropriate gauge wiring for power, ground, and speaker connections as specified in the installation section. Incorrect wiring can cause overheating, fire, or damage to components.
- Aireztapena: Ziurtatu amplifier is mounted in a location with adequate ventilation to prevent overheating. Do not block cooling fins.
- Saihestu hezetasuna: Ez busti amphezetasunarekiko edo urarekiko bizigarri.
- Muntaketa segurua: Muntatu ampLikidatzailea ondo lotu, ibilgailua martxan dagoen bitartean askatu ez dadin, lesioak edo kalteak eragin baititzake.
- Fusibleen babesa: Always use an external fuse on the main power wire, close to the battery, with the recommended amparoa.
3. Produktua amaitu daview
3.1 Ezaugarri nagusiak
- CEA Power (4 Ohms): 1×420 Wrms
- Maximum Power (2 Ohms): 1×700 Wrms
- Maximum Power (1 Ohm): 1×1000 Wrms
- Bandwidth: 15Hz–250Hz
- Integrated Protections: Short Circuit, low impedance, reversal of polarity, DC, power drop, heat protection.
- D klasea Mono Amplifier design for high power and efficiency.
3.2 Zer dago kutxan
- Focal FPX1.1000 Mono Ampbiziagoa
- Erabiltzailearen eskuliburua (dokumentu hau)
- Muntatzeko hardwarea (torlojuak, etab.)
4. Instalazioa eta konfigurazioa
Proper installation is crucial for optimal performance and safety. Consult a professional installer if you are unsure about any steps.
4.1 Muntatzeko kokapena
Aukeratu muntatzeko kokapen bat:
- Dry and free from moisture.
- Ondo aireztatuta beroa xahutzeko aukera emateko.
- Secure and protected from physical damage.
- Away from fuel lines, brake lines, and electrical wiring harnesses.
Leku ohikoenen artean daude eserleku baten azpian, maletategian edo panel baten atzean.
4.2 Kableatutako konexioak
Konexiorik egin aurretik, deskonektatu ibilgailuaren bateriaren terminal negatiboa.
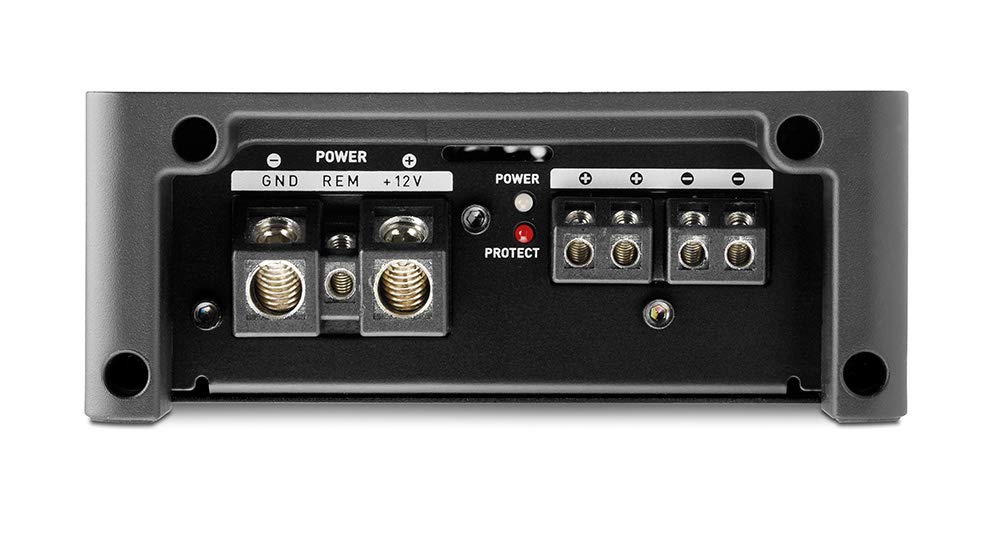
Image 1: Power and Speaker Terminal Connections. This image displays the rear panel of the amplifier, highlighting the power input terminals (GND, REM, +12V) and the speaker output terminals. A red 'PROTECT' indicator light is also visible.
- Elikatze-kablea (+12V): Run a heavy-gauge power wire (e.g., 4 AWG or larger, depending on total system power) directly from the positive terminal of the vehicle's battery to the +12V terminal on the amplifier. Install an inline fuse holder with the appropriate fuse (refer to specifications for recommended fuse size) within 18 inches (45 cm) of the battery.
- Lurrerako kablea (GND): Connect a heavy-gauge ground wire (same gauge as power wire) from the GND terminal on the amplifier to a clean, unpainted metal surface on the vehicle's chassis. Ensure a good electrical connection by scraping away any paint or rust. The ground wire should be as short as possible, ideally less than 3 feet (1 meter).
- Urruneko pizte-kablea (REM): Connect a smaller gauge wire (e.g., 18 AWG) from the REM terminal on the amplifier to the remote turn-on output of your head unit or other switched 12V source. This wire turns the ampLifizer-a zure audio-sistemarekin piztu eta itzali.
- Bozgorailuaren irteera: Connect your subwoofer(s) to the speaker output terminals. Ensure correct polarity (+ to + and - to -). This is a mono amplifier, designed for a single subwoofer or multiple subwoofers wired to present a 1-ohm or 2-ohm load. Refer to your subwoofer's specifications for impedance matching.
- RCA sarrera: Connect RCA cables from the subwoofer output of your head unit to the INPUT CH1/CH2 RCA jacks on the ampbiziagoa.

Image 2: Input and Control Panel. This image shows the front panel of the amplifier, featuring RCA input and output jacks, a remote port, and various control knobs for Gain, Subsonic filter, Bass Boost, Phase, and Low Pass Filter (LPF).
5. Funtzionamendu-argibideak
Behin instalatuta, egokitu ampSoinu-errendimendu optimoa lortzeko lifizer ezarpenak.
5.1 Control Panel Adjustments
- GAIN (Input Sensitivity): Kontrol hau bat dator amplifier's input sensitivity to the output level of your head unit. Start with the gain at minimum (Min) and slowly increase it until you hear distortion, then back off slightly. Do not use the gain control as a volume knob.
- SUBSONIKOA: Iragazki honek entzunezinak diren eta alferrik galdu ditzaketen maiztasun oso baxuak kentzen ditu amplifier power or damage subwoofers. Adjust it to a frequency below your subwoofer's resonant frequency or port tuning frequency (typically 15-30Hz).
- BASS BOST: This control provides an increase in bass output at a specific frequency. Use sparingly to avoid distortion and potential damage to subwoofers.
- FASEA: This control adjusts the phase of the subwoofer output relative to the main speakers (0° to 180°). Adjust for the best blend and impact with your front speakers.
- LPF (pasa baxuko iragazkia): This filter allows only frequencies below the set point to pass through to the subwoofer. Adjust it to blend smoothly with your main speakers, typically between 50Hz and 80Hz.
5.2 Energia eta Babes Adierazleak
- Potentzia adierazlea: Pizten denean ampLikidorea energia jasotzen ari da eta normal funtzionatzen ari da.
- Protect Indicator: Pizten denean amplifier detects a fault (e.g., short circuit, overheating, low impedance). If this light comes on, turn off your audio system immediately and troubleshoot the issue.
6. Mantentzea
The Focal FPX1.1000 ampBizi-garbigailuak mantentze-lan minimoa behar du. Jarraitu jarraibide hauek iraupena bermatzeko:
- Garbiketa: Aldian-aldian garbitu ampGarbitu garbigailuaren kanpoaldea oihal leun eta lehor batekin. Ez erabili produktu kimiko gogorrik edo garbitzaile urratzailerik.
- Aireztapena: Ensure that the cooling fins remain free of dust and debris. Use compressed air to gently clear any blockages if necessary.
- Konexioak: Noizean behin egiaztatu kableatu-konexio guztiak ondo finkatuta daudela eta korrosiorik gabe daudela ziurtatzeko.
7. Arazoak
Zurearekin arazoak badituzu ampprofesional baten bila bazabiltza, kontsultatu hurrengo taula zerbitzu profesionala bilatu aurretik:
| Arazoa | Kausa posiblea | Irtenbidea |
|---|---|---|
| Argirik ez / Amplifier ez da pizten |
|
|
| Protect light is on |
|
|
| Soinurik ez |
|
|
| Soinu distortsionatua |
|
|
8. Zehaztapenak
| Ezaugarri | Xehetasuna |
|---|---|
| Modelo zenbakia | FPX1.1000 |
| Marka | Fokua |
| CEA potentzia (4 ohmios) | 1×420 Wrms |
| Maximum Power (2 Ohms) | 1×700 Wrms |
| Maximum Power (1 Ohm) | 1×1000 Wrms |
| Banda zabalera | 15Hz – 250Hz |
| Babesak | Short Circuit, low impedance, reversal of polarity, DC, power drop, heat protection |
| Produktuaren neurriak | 11.81 x 11.81 x 11.81 hazbete; 6 kilo |
| Muntatze Mota | Gainazaleko muntaia |
| liburukiatage | 10 Volts, 14.4 Volts, 5 Volts (Operating Voltage barrutia) |
9. Bermea eta Laguntza
Focal products are designed and manufactured to high quality standards. This product is covered by a limited warranty against defects in materials and workmanship. The specific terms and duration of the warranty may vary by region and retailer. Please retain your proof of purchase for warranty claims.
For technical support, warranty service, or further assistance, please contact your authorized Focal dealer or visit the official Focal webharremanetarako informazioa lortzeko gunea.


