1. Sarrera
The PreSonus AIR10 is a compact and lightweight 2-way active sound-reinforcement loudspeaker designed to deliver rich low-end and natural high-frequency extension. Its enclosure is engineered for portability and versatility, fitting easily into various setups.
Key features of the AIR10 include:
- 10-inch custom low-frequency driver with 2-inch voice coil.
- 1-inch high-frequency compression driver.
- 90° horizontal dispersion x 60° vertical dispersion.
- Hybrid 1,200W power amplifier configuration (Class D for low-end, Class AB for high-frequency).
- Onboard mixer with two combo XLR and ¼” inputs, plus a stereo 1/8” input.
- Easy-to-use Digital Signal Processing (DSP) performance presets.
2. Segurtasun informazioa
Before operating your PreSonus AIR10 loudspeaker, please read and understand all safety instructions. Retain this manual for future reference.
- Energia iturria: Konektatu unitatea eskuliburu honetan edo unitatean bertan deskribatutako motako elikatze-iturri batera soilik.
- Lurreratzea: Ziurtatu unitatea behar bezala lurrera konektatuta dagoela deskarga elektrikoak saihesteko.
- Aireztapena: Ez blokeatu aireztapen baoak. Instalatu fabrikatzailearen argibideen arabera.
- Ura eta hezetasuna: Ez erabili aparatu hau uraren ondoan, ezta tantaka edo zipriztinen eraginpean jarri ere.
- Beroa: Ez instalatu bero-iturri inongo ondoan, esate baterako, erradiadoreak, bero-erregistroak, sukaldeak edo beste aparatu batzuk (barne ampberoa sortzen duten argitzaileak).
- Zerbitzua: Bidali zerbitzu guztiak zerbitzu kualifikatuko langileengana. Aparatuak edozein modutan hondatu direnean mantenimendua egin behar da.
- Entzumenaren babesa: Prolonged exposure to high sound pressure levels can cause permanent hearing damage. Use caution when setting volume levels.
3. Konfigurazioa
Proper setup ensures optimal performance and safety for your AIR10 loudspeaker.
3.1 Paketatzea
Carefully remove the AIR10 from its packaging. Inspect the unit for any signs of damage that may have occurred during shipping. If damage is found, contact your dealer or PreSonus immediately.
3.2 Kokatzea eta Muntatzea
The AIR10 is designed for versatile placement, including front-of-house (FOH), floor wedge monitoring, stand mounting, bracket mounting, or flown installations. Location presets optimize performance for these different configurations.

1. irudia: Aurrealdea view of the PreSonus AIR10 Active Loudspeaker.

2. irudia: Aldea view of the PreSonus AIR10 Active Loudspeaker, showing integrated handles.
3.3 Energia-konexioa
Connect the provided power cord to the AC inlet on the rear panel of the AIR10 and then to a suitable grounded power outlet. Ensure the voltage selector switch matches your local power supply before powering on the unit.
3.4 Sarrera-konexioak
The AIR10 features an onboard mixer with various input options:
- Mic/Line 1 & 2: Two combo XLR and ¼” inputs for microphones or line-level sources.
- Laguntza Sarrera: A stereo 1/8” input for connecting portable media players or other consumer-level devices.
- Nahastu: An XLR output for sending the mixed signal to another AIR series loudspeaker or a subwoofer.
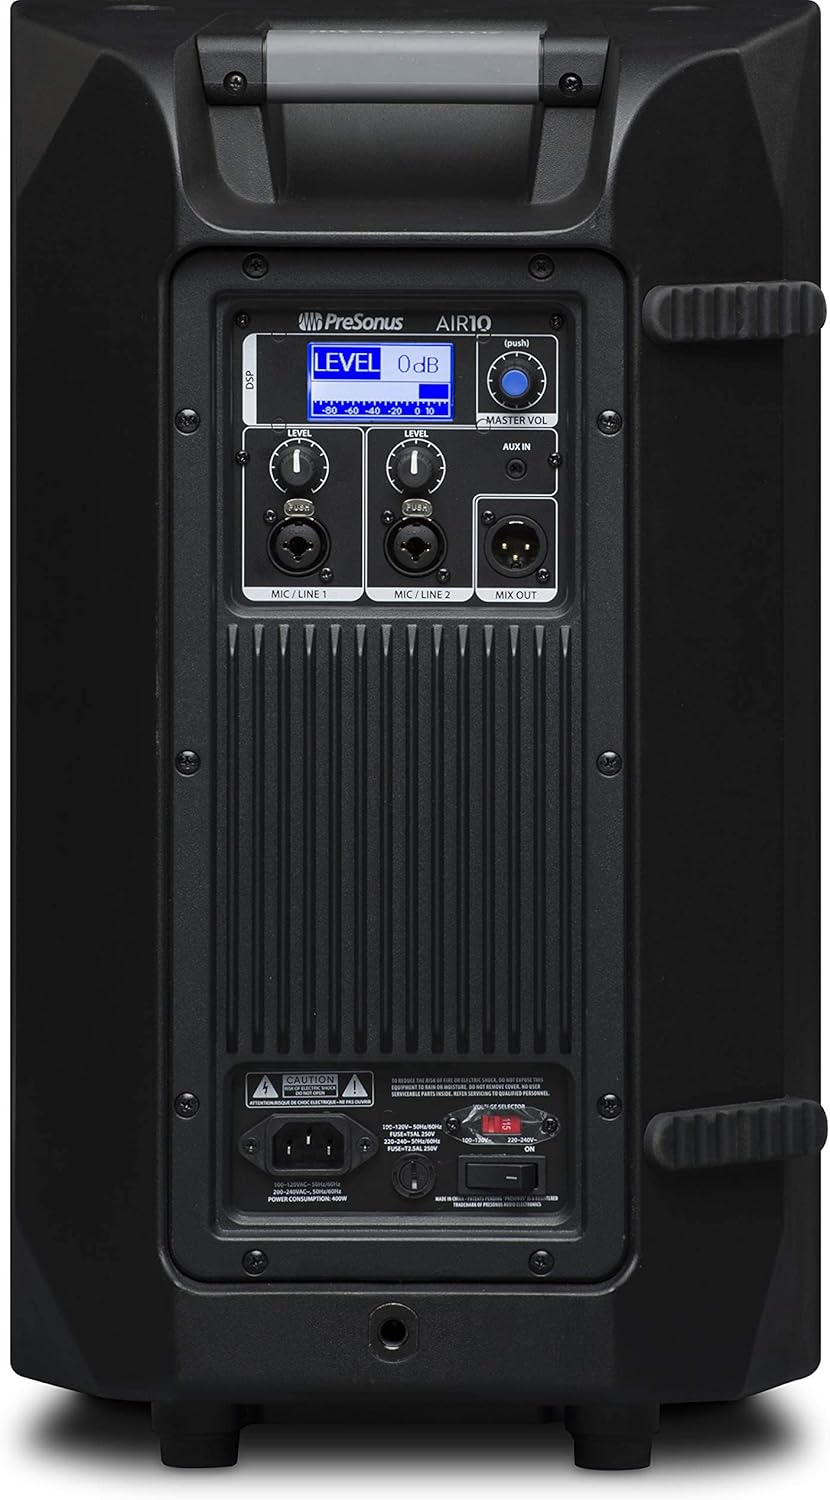
Figure 3: Rear panel of the PreSonus AIR10, showing input/output connections, level controls, DSP display, and power switch.
4. Funtzionamendua
The AIR10 is designed for straightforward operation with powerful DSP controls.
4.1 Piztu/Itzaltzea
After connecting the power cord, locate the power switch on the rear panel. Flip the switch to the 'ON' position. The front panel LED will illuminate to indicate power. Always power on your AIR10 after connecting all audio sources and power off before disconnecting.
4.2 Level Controls
Adjust the individual LEVEL knobs for Mic/Line 1 and Mic/Line 2 to set the input gain for your sources. The MASTER VOL knob controls the overall output level of the loudspeaker.
4.3 DSP Performance Presets
The AIR10 features easy-to-use DSP presets to optimize its performance for various applications. These presets include options for front-of-house use, floor wedge placement, music playback, enhanced low-end warmth, and improved speech intelligibility. Use the DSP button and display on the rear panel to navigate and select the appropriate preset for your environment.
4.4 EQ kontrolak
The onboard EQ controls allow you to compensate for room anomalies and fine-tune the sound. Access these controls via the DSP menu to adjust frequency response as needed for your specific acoustic space.
4.5 Bideoa Gainetikview
1. bideoa: Ofizial bat amaitu daview of the PreSonus AIR series loudspeakers, demonstrating features and sound quality. This video provides a visual guide to the product's capabilities and design.
5. Mantentzea
Regular maintenance helps prolong the life and performance of your AIR10 loudspeaker.
- Garbiketa: Use a soft, dry cloth to clean the exterior of the loudspeaker. Do not use abrasive cleaners, waxes, or solvents.
- Parrilla: Periodically check the front grille for dust or debris accumulation. Gently clean with a soft brush or vacuum if necessary.
- Biltegiratzea: When not in use for extended periods, store the loudspeaker in a dry, temperature-controlled environment, ideally in its original packaging or a protective cover.
6. Arazoak
This section addresses common issues you might encounter with your AIR10 loudspeaker.
6.1 Potentziarik gabe
- Check that the power cord is securely connected to both the loudspeaker and the power outlet.
- Egiaztatu korronte hartunea aktibo dagoela.
- Ziurtatu liburukiatage selector switch on the rear panel is set correctly for your region.
- Check the fuse on the rear panel. Replace if blown with a fuse of the correct type and rating.
6.2 Soinurik ez
- Confirm the loudspeaker is powered on and the front LED is illuminated.
- Check all audio cable connections from your source to the AIR10 inputs.
- Ensure the input LEVEL knobs and the MASTER VOL knob are turned up.
- Verify that your audio source is active and producing sound.
- If using the Mix Out, ensure the connected device is receiving a signal and its volume is adjusted.
6.3 Hissing or Noise
- Reduce the input gain (LEVEL knobs) if the input signal is too strong.
- Ziurtatu kable guztiak egoera onean daudela eta behar bezala babestuta daudela.
- Try connecting the loudspeaker to a different power outlet to rule out ground loop issues.
- Disconnect all inputs and listen for the noise. If the noise persists, the issue may be internal.
7. Zehaztapenak
| Ezaugarri | Zehaztapena |
|---|---|
| Ereduaren izena | AIR10 |
| Hizlari mota | 2-Way Active Sound-Reinforcement Loudspeaker |
| Wooferaren diametroa | 10 hazbete |
| Tweeter Diametroa | 1 hazbete |
| Hizlaria Amplifikazio Mota | Active (Hybrid Class D/Class AB) |
| Bozgorailuaren irteera-potentzia maximoa | 1200 Watt |
| Konektibitate Teknologia | XLR, 1/4", 1/8" |
| Audio irteera modua | Estereoa |
| Elementuaren pisua | 28.7 kilo |
| Produktuaren neurriak | 14.1 x 14.6 x 24.4 hazbete |
| Muntatze Mota | Car Mount, Floor Mount, Stand, Bracket, Suspend |
| Kontrol-metodoa | Touch (DSP) |
8. Zer dago kutxan
Your PreSonus AIR10 package should contain the following items:
- PreSonus AIR10 10" 2-Way Active Sound-Reinforcement Loudspeaker
- Elikatze kablea
- Product Documentation (including this manual)
9. Bermea eta Laguntza
PreSonus provides a limited warranty for the AIR10 loudspeaker. For detailed warranty information, please refer to the warranty card included with your product or visit the official PreSonus webgunea.
For technical support, product registration, or to access additional resources, please visit the PreSonus support page or contact their customer service directly. Keeping your product registered can facilitate warranty claims and support.


