1. Sarrera
This manual provides essential information for the safe and effective operation, setup, and maintenance of your Virutex Plunge-Cut Saw, model SRI174T-UCP. Please read these instructions carefully before using the tool to ensure proper function and to prevent injury.
The Virutex SRI174T-UCP is a powerful and ergonomic plunge-cut saw designed for precise cutting of various materials. It features a robust motor, automatic overload protection, and a soft start system for smooth operation. The included cutting guide (UCP174T) facilitates straight, parallel, and stable cuts.
2. Segurtasun Jarraibide Orokorrak
OHARRA: Irakurri tresna elektriko honekin emandako segurtasun-abisu, argibide, ilustrazio eta zehaztapen guztiak. Behean zerrendatzen diren argibide guztiak ez betetzeak deskarga elektrikoa, sutea edo/edo lesio larriak eragin ditzake.
- Always wear eye protection, hearing protection, and a dust mask when operating the saw.
- Mantendu lan-eremua garbi eta ondo argiztatuta. Eremu nahasiak edo ilunek istripuak gonbidatzen dituzte.
- Ez erabili tresna elektrikoak atmosfera lehergarrietan, adibidez, likido sukoiak, gasak edo hautsak daudenean.
- Mantendu haurrak eta ingurukoak urrun, erreminta elektrikoa erabiltzen duzun bitartean. Distrakzioek kontrola galtzea eragin dezakete.
- Ensure the power cord is undamaged and positioned to avoid tripping hazards.
- Deskonektatu beti entxufea energia-iturritik doikuntzak egin, osagarriak aldatu edo tresna elektrikoak gorde aurretik.
- Erabili clamps edo piezak plataforma egonkor batean ziurtatzeko eta eusteko beste modu praktiko batzuk. Lana eskuz edo gorputzaren kontra eustea ezegonkorra da eta kontrola galtzea ekar dezake.
- Erabili bitartean, eutsi tresnari bi eskuekin ondo helduta.
- Ensure the saw blade is sharp and correctly installed.
- Ez behartu inoiz tresna. Utzi tresnak bere abiaduran lana egiten.
- Do not reach underneath the workpiece when the saw is running.
- Allow the blade to stop completely before setting the tool down.
3. Produktua amaitu daview eta Osagaiak
The Virutex SRI174T-UCP Plunge-Cut Saw is designed for precision cutting tasks. Familiarize yourself with its main components for safe and efficient use.
- Motor indartsua: 1150 W input power for cutting various materials.
- Soft Start System: Ensures a smooth start, reducing kickback.
- Gainkargaren babes automatikoa: Protects the motor from damage.
- Fast Saw Blade Stop: Segurtasuna hobetzen du pala azkar geldituz.
- Soft Grip Rear Handle: Manipulazio erosoa eta segurua eskaintzen du.
- Blocking Lever: For easy saw blade changes and dividing knife adjustment.
- External Dust Collector Connection: Allows connection to a dust extraction system.
- Cutting Guide (UCP174T): 800 mm length, for straight and parallel cuts.
- Depth Adjustment Scale: For precise control over cutting depth.
- Angeluaren doikuntza: Allows for bevel cuts up to 45 degrees.
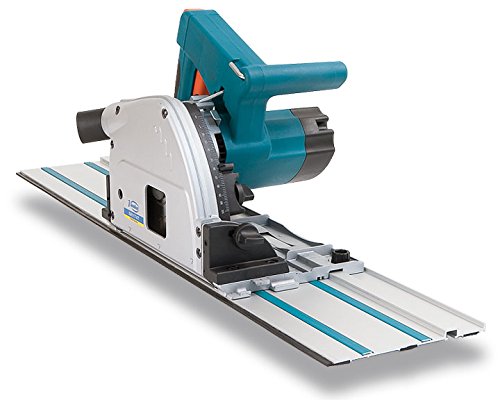
1. irudia: The Virutex SRI174T-UCP Plunge-Cut Saw mounted on its cutting guide. This image highlights the robust construction and the integration of the saw with the guide rail system, essential for achieving straight and precise cuts.
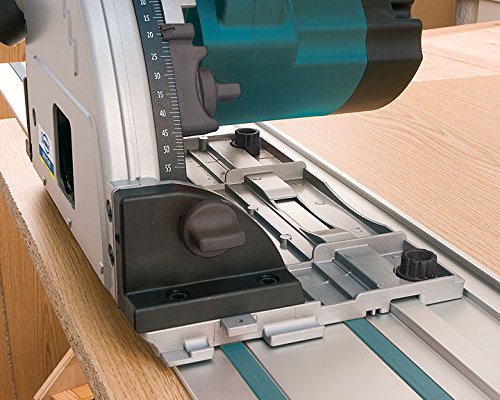
2. irudia: Xehetasun bat view of the saw's base plate and its interaction with the cutting guide. The depth adjustment scale, visible on the side, allows for precise setting of the cutting depth. The two adjusting knobs ensure the machine glides smoothly on the guide without lateral movement.
4. Konfigurazioa
4.1 Attaching the Cutting Guide
The cutting guide (UCP174T) is crucial for achieving straight and accurate cuts.
- Place the cutting guide on the workpiece, aligning it with your desired cut line.
- Position the plunge-cut saw onto the guide rail. The saw is designed to glide directly on the guide without additional accessories.
- Adjust the two knobs on the saw's base to ensure a snug fit on the guide, preventing any lateral movement during operation.
- For enhanced stability, especially on smooth surfaces, consider using optional suction cups (7445819) or clamping pliers (6045710) to secure the guide to the workpiece.
4.2 Zerra-xafla instalatzea/aldatzea
Always ensure the tool is disconnected from the power supply before changing the blade.
- Locate the blocking lever on the saw. Engage the lever to lock the saw blade in place.
- Using the provided service keys, loosen the arbor nut that secures the saw blade.
- Kontu handiz kendu pala zaharra, biraketa-norabidea kontuan hartuta.
- Install the new carbide saw blade (Ø 160 mm, 28 Z for wood and plastic), ensuring the teeth are oriented correctly for cutting.
- Tighten the arbor nut securely with the service keys.
- Disengage the blocking lever.
4.3 Hauts-bilketa konektatzea
For a cleaner work environment and improved visibility, connect an external dust collection system.
- Locate the external dust collector connection port on the saw.
- Attach a standard dust collector attachment (optional, code 6446073) to this port.
- Connect your dust extraction hose to the attachment.
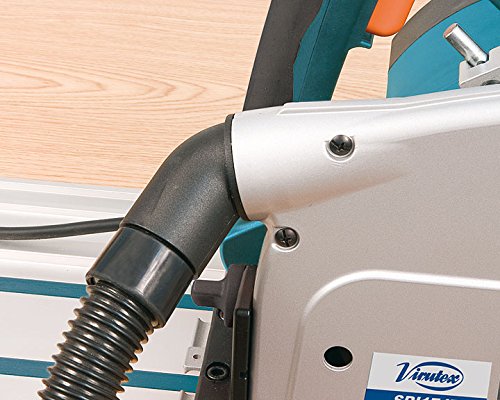
3. irudia: Gertutik view of the dust collection port on the Virutex SRI174T-UCP saw. This port allows for connection to an external dust extraction system, significantly reducing airborne dust during operation and maintaining a cleaner workspace.
5. Funtzionamendu-argibideak
5.1 Ebaketa-sakonera doitzea
The cutting depth can be precisely adjusted to suit your material and desired cut.
- Ensure the saw is disconnected from the power supply.
- Locate the depth adjustment mechanism, typically a lever or knob with a scale.
- Set the desired cutting depth using the scale. The maximum cutting depth at 90° is 55 mm, and at 45° is 35 mm.
- Secure the depth adjustment mechanism.
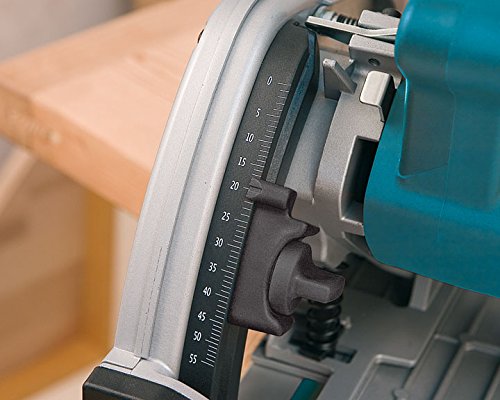
4. irudia: A close-up of the depth adjustment scale on the Virutex SRI174T-UCP. This scale allows users to accurately set the cutting depth, ensuring precise and consistent results for various material thicknesses.
5.2 Adjusting Cutting Angle (Bevel Cuts)
The saw allows for angle adjustments for bevel cuts.
- Ensure the saw is disconnected from the power supply.
- Locate the angle adjustment mechanism.
- Set the desired cutting angle (e.g., 45 degrees).
- Secure the angle adjustment mechanism.
5.3 Performing a Plunge Cut
A key feature of this saw is its ability to perform plunge cuts, starting a cut in the middle of a workpiece.
- Position the saw on the cutting guide at the desired starting point of your cut.
- Ensure the saw blade is retracted (not in contact with the workpiece).
- Eutsi irmo zerra bi eskuekin.
- Start the saw. The soft start system will ensure a smooth power-up.
- Once the blade reaches full speed, slowly and steadily plunge the blade into the workpiece by pressing down on the saw.
- Maintain a consistent feed rate as you push the saw along the cutting guide to complete the cut.
- Ebaketa amaitutakoan, askatu gatilua eta utzi xafla erabat gelditzen zerra piezatik altxatu aurretik.
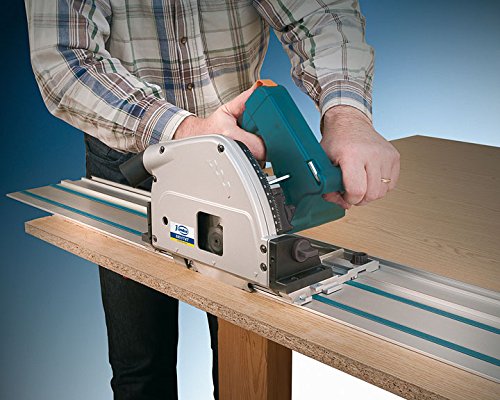
5. irudia: An operator demonstrating the use of the Virutex SRI174T-UCP Plunge-Cut Saw with the cutting guide. This illustrates the proper two-hand grip and the saw's movement along the guide for a controlled and accurate cut.
6. Mantentzea
Regular maintenance ensures the longevity and optimal performance of your Virutex Plunge-Cut Saw. Always disconnect the tool from the power supply before performing any maintenance.
- Garbiketa: After each use, clean the saw and guide rail to remove dust and debris. Use a soft cloth and avoid harsh chemicals. Ensure ventilation slots are clear.
- Palan ikuskatzea: Regularly inspect the saw blade for sharpness and damage. A dull or damaged blade can cause kickback and poor cut quality. Replace blades as needed.
- Kableen ikuskapena: Check the power cord for any signs of damage, cuts, or fraying. Replace damaged cords immediately.
- Lubrifikazioa: Refer to the detailed service manual for specific lubrication points, if any. Generally, power tools require minimal user lubrication.
- Biltegiratzea: Store the saw and its accessories in the provided carrying case in a dry, secure location, out of reach of children.
7. Arazoak
This section addresses common issues you might encounter with your plunge-cut saw.
| Arazoa | Kausa posiblea | Irtenbidea |
|---|---|---|
| Zerra ez da hasten | Energia-iturririk ez; Elikatze-kablea hondatuta; Etengailu akastuna | Check power connection; Inspect cord for damage; Contact service center if switch is faulty. |
| Poor cut quality / Excessive splintering | Dull or incorrect blade; Incorrect cutting depth; Improper feed rate | Replace blade or use appropriate blade for material; Adjust cutting depth; Maintain consistent, moderate feed rate. |
| Saw binds or kicks back | Dull blade; Improper workpiece support; Saw not aligned with guide; Forcing the tool | Replace blade; Secure workpiece properly; Ensure saw glides freely on guide; Do not force the saw. |
| Gehiegizko hautsa | Dust collection not connected; Dust port blocked | Connect dust collection system; Clear any blockages in the dust port. |
8. Zehaztapen Teknikoak
| Ezaugarri | Zehaztapena |
|---|---|
| Eredua | SRI174T-UCP |
| Sarrerako potentzia | 1150 W |
| Zerra-orriaren diametroa | 160 mm |
| Zerra-xaflaren zuloa | 20 mm |
| Ebaketa-sakonera 90°-tan | 55 mm |
| Ebaketa-sakonera 45°-tan | 35 mm |
| Kargarik gabeko Abiadura | 5500 /min |
| Pisua | 4.7 Kg (Tool only) / 15 kg (Package) |
| Isolamendua | Isolamendu bikoitza |
| Energia iturria | Kable elektrikoa |
| Azalera gomendioa | Plastic (and Wood, as per blade description) |
| Cutting Guide (UCP174T) | 800 mm length (standard with SRI174T-UCP) |
9. Bermea eta Laguntza
For specific warranty information, please refer to the warranty card included with your product or contact your local Virutex dealer. Keep your purchase receipt as proof of purchase.
For technical support, spare parts, or service, please contact the authorized Virutex service center in your region. Contact details can typically be found on the Virutex official webgunea edo zure produktuen saltzailearen bidez.