1. Sarrera eta Overview
The AT&T Air 4920 Airties Smart Wi-Fi Extender is designed to expand the coverage and improve the signal strength of your existing Wi-Fi network. It creates a seamless mesh network, allowing your devices to automatically connect to the strongest Wi-Fi signal as you move around your home or office. This manual provides detailed instructions for setting up, operating, maintaining, and troubleshooting your Wi-Fi extender.

1. irudia: Aurrealdea view of the AT&T Air 4920 Airties Smart Wi-Fi Extender.
2. Paketearen edukia
Mesedez, egiaztatu elementu guztiak zure paketean daudela:
- AT&T Air 4920 Airties Smart Wi-Fi Extender Unit
- Elikatze-moldagailua
- Hasiera Azkarreko Gida (eskuliburu honek gida osoa eskaintzen du)
3. Produktuaren ezaugarriak eta osagaiak
Familiarize yourself with the various ports, buttons, and indicator lights on your Wi-Fi Extender.

2. irudia: Aurrealdea eta atzealdea view of the Wi-Fi Extender with labeled components.
- 5 GHz-ko Wi-Fi adierazlea: Shows the status of the 5 GHz Wi-Fi band.
- 2.4 GHz-ko Wi-Fi adierazlea: Shows the status of the 2.4 GHz Wi-Fi band.
- Power Indicator / On/Off Button: Indicates power status. Can also be used to turn the device on/off.
- WPS botoia: Used for Wi-Fi Protected Setup to quickly connect to your router.
- Gigabit Ethernet Ports (1 & 2): Ordenagailuetara, joko-kontsoletara edo telebista adimendunetara kable bidezko konexioetarako.
- Piztu/Itzali etengailua: A physical switch to turn the device completely off or on.
- Korronte zuzeneko elikatze sarrera (12V): Konektatu hemen emandako energia-egokigailua.
- Berrezarri botoia: Used to restore the device to factory default settings. (Requires a paperclip or similar pointed object).
4. Konfigurazio gida
Follow these steps to set up your AT&T Air 4920 Wi-Fi Extender:
4.1 Hasierako kokapena
For initial setup, place the Wi-Fi Extender near your AT&T gateway (router). Once paired, you can move it to a more central location in your home where Wi-Fi signal is weak.
4.2 Energia-konexioa
- Connect the provided power adapter to the DC Power Input (7) on the back of the extender.
- Entxufatu korronte-egokigailua hormako entxufe batera.
- Ensure the Power On/Off Switch (6) is in the 'On' position. The Power Indicator (3) should light up.
4.3 Pairing with Your AT&T Gateway (Router)
There are two primary methods for pairing:
Method A: Using WPS (Wi-Fi Protected Setup) - Recommended
- Eduki sakatuta WPS Button (4) on the front of the Wi-Fi Extender for 2-3 seconds until the indicator lights start blinking.
- Bi minuturen buruan, sakatu WPS botoia on your AT&T gateway (router). Refer to your gateway's manual for the exact location of its WPS button.
- Wait for the indicator lights on the extender (1, 2, and 3) to turn solid green, indicating a successful connection. This may take a few minutes as the extender updates its firmware and synchronizes with your gateway.
Method B: Using an Ethernet Cable (If WPS fails or is not preferred)
- Connect one end of an Ethernet cable (not included) to one of the Gigabit Ethernet Ports (5) on the back of the extender.
- Connect the other end of the Ethernet cable to an available LAN port on your AT&T gateway (router).
- The extender will automatically detect the connection and begin pairing. Wait for the indicator lights (1, 2, and 3) to turn solid green.
- Once paired, you can disconnect the Ethernet cable if you wish to use the extender wirelessly.
4.4 Kokapen optimoa
After successful pairing, unplug the extender and move it to a location roughly halfway between your AT&T gateway and the area where you need improved Wi-Fi coverage. Ensure the extender is placed in an open area, away from large metal objects, concrete walls, or other electronic devices that might cause interference. Plug it back into a power outlet. The indicator lights should turn solid green again, confirming a good connection.

Figure 3: The Wi-Fi Extender connected to its power adapter.
5. Operating Your Wi-Fi Extender
Once set up, the AT&T Air 4920 operates automatically to extend your Wi-Fi network. Your devices will seamlessly connect to the strongest signal, whether from your gateway or the extender, using your existing Wi-Fi network name (SSID) and password.
Adierazle argiaren egoera:
- Berde trinkoa: Excellent connection and operation.
- Solid Amber/Orange: Fair connection. Consider repositioning the extender closer to your gateway.
- Gorri trinkoa: No connection or poor signal. Reposition the extender or check connections.
- Keinuka: During WPS pairing or firmware update.
- Desaktibatuta: Gailua itzalita dago edo ez du energia jasotzen.
Kable bidezko konexioak:
You can connect wired devices (e.g., desktop computers, smart TVs, gaming consoles) to the Gigabit Ethernet Ports (5) on the back of the extender for a stable, high-speed connection.
6. Mantentzea
To ensure optimal performance and longevity of your Wi-Fi Extender:
- Garbiketa: Garbitu kanpoaldea oihal leun eta lehor batekin. Ez erabili garbitzaile likidorik edo aerosolik.
- Aireztapena: Ziurtatu aireztapen-zirrikituak ez daudela blokeatuta gehiegi berotzea saihesteko.
- Firmware eguneraketak: The extender typically receives automatic firmware updates from AT&T. Ensure it remains connected to power and your network for these updates to occur.
- Potentzia-zikloa: If you experience minor issues, try unplugging the extender from the power outlet for 10 seconds and then plugging it back in.
7. Arazoak
If you encounter issues with your Wi-Fi Extender, refer to the following common problems and solutions:
| Arazoa | Kausa posiblea | Irtenbidea |
|---|---|---|
| Extender lights are off. | Botererik ez. | Ensure the power adapter is securely connected and plugged into a working outlet. Check the Power On/Off Switch (6). |
| Indicator lights are red or amber. | Poor or no connection to the gateway. |
|
| Wi-Fi signal is still weak in extended areas. | Suboptimal placement. | Move the extender to a more central location between your gateway and the weak signal area. Avoid placing it in corners or behind furniture. |
| Devices not connecting to the extender. | Extender not properly paired or network issues. |
|
| Need to reset to factory settings. | Configuration issues or preparing for new setup. | With the extender powered on, use a paperclip or similar pointed object to press and hold the Berrezarri botoia (8) for about 10 seconds until the lights flash. The extender will restart with factory defaults. |
8. Zehaztapenak
| Ezaugarri | Xehetasuna |
|---|---|
| Modelo zenbakia | AIR-4920 |
| Produktuaren neurriak (H x W x D) | 3.94 x 4.27 x 1.63 hazbete (gutxi gorabehera) |
| Elementuaren pisua | 15 ontza |
| Haririk gabeko komunikazio estandarra | 802.11ac |
| Datuen transferentzia-tasa | 1000 megabit segundoko gehienez |
| Konektore mota | RJ45 (Ethernet) |
| Kolorea | Zuria |
| Fabrikatzailea | AirTies |
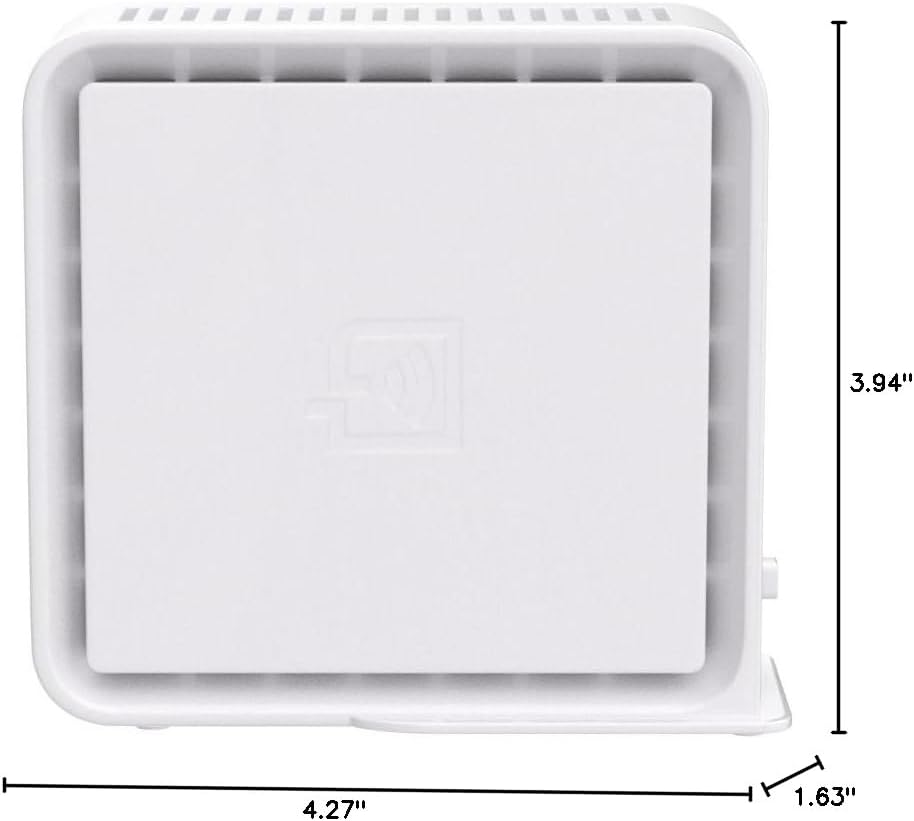
Figure 4: Approximate dimensions of the Wi-Fi Extender.


