1. Sarrera
The Godox XPro-C TTL Wireless Flash Trigger is designed for Canon EOS cameras, offering advanced control over various flash units. This trigger utilizes the Godox 2.4G wireless X system, enabling multi-channel triggering and stable signal transmission up to 100 meters. It supports E-TTL II autoflash, high-speed sync (HSS) up to 1/8000s, multi-flash, and manual flash modes.
Key features include a large LCD panel, five dedicated group buttons, and four function buttons for intuitive operation. The XPro-C also incorporates a TCM (TTL-Convert-Manual) transform function, magnification function, one-shoot & multi-shoot settings, group modeling lamp control, and group zooming. Firmware upgrades are supported via a Type-C USB port.

Figure 1.1: Godox XPro-C TTL Wireless Flash Trigger mounted on a Canon camera, showcasinbere diseinua eta integrazioa g.
2. Konfigurazioa
2.1 Bateriaren instalazioa
The XPro-C requires two AA batteries for power. To install:
- Locate the battery compartment cover on the side of the unit.
- Lerratu estalkia ireki.
- Sartu bi AA pila, polaritate zuzena ziurtatuz (+/-).
- Itxi bateriaren konpartimenduaren estalkia ondo.

2.1. irudia: Aldea view of the Godox XPro-C, highlighting the battery compartment and Type-C USB port.
2.2 Kameran muntatzea
To mount the XPro-C on your Canon camera:
- Slide the XPro-C's hotshoe foot into your camera's hotshoe.
- Rotate the locking ring clockwise until it is securely tightened.
2.3 Piztu/Itzaltzea
Use the power switch located on the side of the unit to turn the XPro-C ON or OFF.
Video 2.1: Detailed operation and setup guide for the Godox XPro-C, demonstrating physical features and basic controls.
3. Funtzionamendu-argibideak
3.1 Interfazea baino gehiagoview
The XPro-C features an extra-large LCD panel for clear display of settings. On the left side are five group selection buttons (A-E), and below the screen are four function buttons (MODE, RST, MENU, TCM) and a central SET button with a rotary dial.

3.1. irudia: Aurrealdea view of the Godox XPro-C, illustrating the extra-large LCD panel, group buttons, and function buttons.
3.2 Group and Mode Selection
To control flash groups and modes:
- Hautatu taldea: Press one of the dedicated group buttons (A-E) on the left side to select a specific flash group.
- Aukeratu modua: After selecting a group, press the MODUA button to cycle through available flash modes: TTL, Manual (M), and OFF.
- Adjust Output/Compensation: Turn the rotary dial to adjust the flash output power (in Manual mode) or Flash Exposure Compensation (FEC) (in TTL mode). Press the EZARTU botoia berresteko.
3.3 TCM Transform Function
The TCM (TTL-Convert-Manual) function allows you to quickly convert a TTL flash value into a manual power output. This is useful for maintaining consistent lighting when switching from TTL to manual mode.
- Activate TCM: Luze sakatu TCM button for 2 seconds. The current TTL flash value will be transformed and displayed as a manual power output.
3.4 Zoom Setting
To adjust the flash zoom value:
- Enter Zoom Setting: Long press the function button 1 (CH/ZM) for 1-2 seconds.
- Zooma doitu: Use the rotary dial to change the zoom value (e.g., AUTO, 24mm, 50mm, 80mm, 200mm). Press EZARTU baieztatzeko.
3.5 Channel and Wireless ID Settings
The XPro-C supports 16 groups and 32 channels for wireless control. Additionally, 01 to 99 wireless ID settings can be used to prevent signal interference.
- Ezarri kanala: Short press function button 1 (CH/ZM) to enter channel selection. Use the rotary dial to select a channel (1-32) and press EZARTU baieztatzeko.
- Set Wireless ID: Access the custom function settings (C.Fn) via the MENUA button. Navigate to the ID setting and use the rotary dial to select an ID (1-99) or turn it OFF.
3.6 Sync Modes
The XPro-C supports High-Speed Sync (HSS) and Second Curtain Sync.
- Select Sync Mode: Short press function button 2 (SYNC) to cycle through available sync modes.
3.7 L modelatzeaamp Kontrola
Modelatzea kontrola dezakezu.amps of compatible flashes directly from the XPro-C.
- Toggle All Modeling Lamps: Short press function button 4 (MOD) to turn all modeling lamps ON or OFF.
- Toggle Individual Group Modeling Lamps: Select a specific group (A-E) and then short press function button 4 (MOD) to toggle its modeling lamp.
3.8 Pantaila blokeatzea
To prevent accidental changes to settings, you can lock the screen.
- Blokeatu pantaila: Luze sakatu MODUA botoia 2 segundoz.
- Desblokeatu pantaila: Luze sakatu MODUA botoia berriro 2 segundoz.
3.1. bideoa: Amaitu daview of the Godox XPro-C's features and basic operation, including button functions and screen display.
4. Mantentzea
4.1 Firmware berritzea
The XPro-C supports firmware upgrades via its Type-C USB port. This allows for improved functionality and compatibility updates.
- Connect the XPro-C to a computer using a Type-C USB cable.
- Visit the official Godox website to download the latest firmware and update instructions.
4.2 Arreta orokorra
To ensure the longevity of your XPro-C:
- Keep the unit dry and clean. Avoid exposure to water or excessive humidity.
- Use a soft, dry cloth (like the included LETWING cloth) to clean the unit.
- Gorde leku fresko eta lehor batean erabiltzen ez duzunean.
- Denbora luzez gordetzen baduzu, kendu bateriak isuriak saihesteko.
5. Arazoak
5.1 Fabrika berrezarri
If you encounter persistent issues or wish to revert all settings to their default values:
- Long press the function buttons simultaneously for 2-3 seconds to restore factory defaults.
5.2 Gai arruntak
- Flash not triggering: Ensure the XPro-C is securely mounted, batteries are charged, and the flash unit is powered on and set to a compatible wireless mode (e.g., Godox X system slave mode). Verify channel and ID settings match between the trigger and flash.
- Inconsistent triggering: Check for environmental interference. Ensure the trigger and flash are within the effective transmission range (0-100m).
- Pantailak ez du erantzuten: Try locking and unlocking the screen (long press MODE button). If unresponsive, remove and reinsert batteries.
6. Zehaztapenak
| Ezaugarri | Xehetasuna |
|---|---|
| Produktuaren neurriak | 4.8 x 4.8 x 2.44 hazbete |
| Elementuaren pisua | 6.4 ontza |
| Elikatze Hornidura | 2 * AA bateria (ez dago barne) |
| Haririk gabeko sistema | Godox 2.4G Haririk gabeko X Sistema |
| Transmisio-barrutia | Approx. 0-100m |
| Flash Sinkronizazio Abiadura | 1/8000s arte (HSS) |
| Flash moduak | TTL flash automatikoa, flash manuala, flash anitza |
| Flash Esposizio Konpentsazioa | ±3 geldialdi 1/3 geldialdiko gehikuntzetan |
| Taldeak | 16 Groups (A-F, 0-9) or 5 Groups (A-E) |
| Kanalak | 32 kanal |
| Hari gabeko ID ezarpenak | 01-99 (for newer flashes) |
| Firmware-berritzea | C motako USB ataka |
| Sinkronizatu kablea | 2.5 mm |
7. Bateragarritasuna
7.1 Compatible Canon Camera Models
The Godox XPro-C is compatible with Canon EOS cameras that support E-TTL II autoflash and have a PC sync socket. Tested models include, but are not limited to:
- 1Dx Mark II, 1Dx, 5Ds/5Dsr, 5DIV, 5D Mark III, 5D Mark II, 5D
- 7D Mark II, 7D, 6D, 80D, 70D, 60D, 50D
- 500D, 450D, 400D Digital, 350D DIGITAL, 100D, 1200D, 1000D, 1100D
- M5, M3
For other Canon camera models, self-testing is recommended to confirm compatibility.
7.2 Compatible Godox Flashes and Receivers
The XPro-C can control flashes with built-in Godox wireless X system (e.g., camera flashes, outdoor flashes, studio flashes). It can also control Canon original flashes when used with an X1R-C receiver.
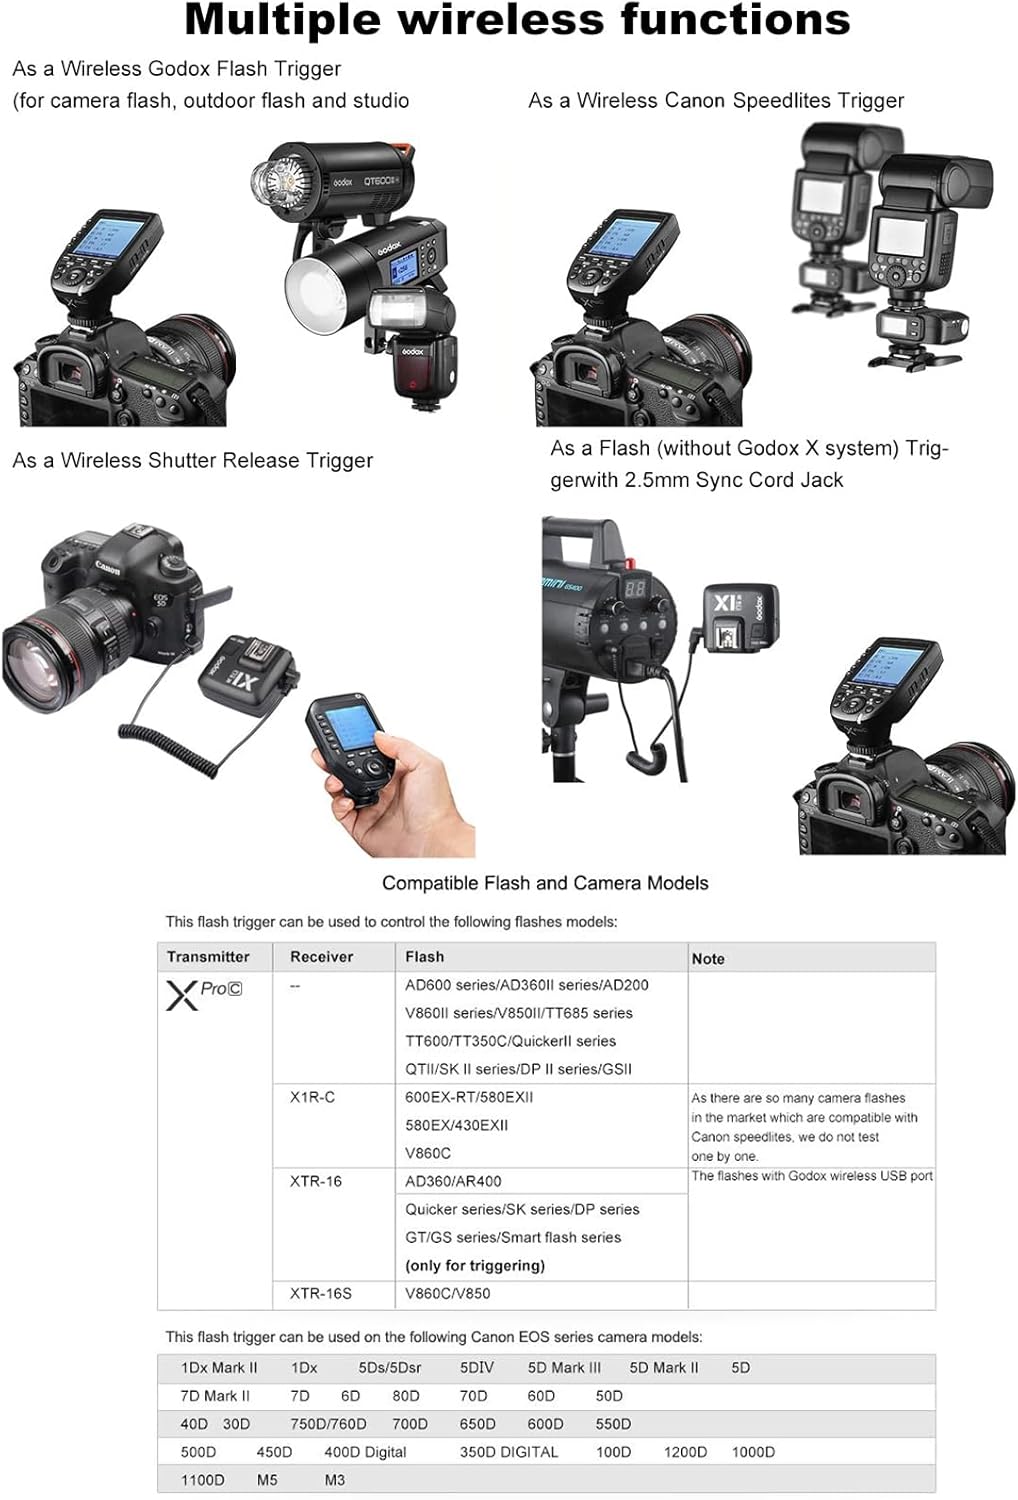
Figure 7.1: The Godox XPro-C trigger shown in a setup controlling multiple Godox flash units, demonstrating its versatility.
8. Bermea eta Laguntza
8.1 Bermearen informazioa
Please refer to the warranty card included with your product for detailed warranty terms and conditions. Warranty coverage typically includes manufacturing defects for a specified period from the date of purchase.
8.2 Bezeroarentzako laguntza
Laguntza teknikoa, arazoak konpontzea edo zerbitzu-kontsultak egiteko, jarri harremanetan Godox bezeroarentzako arreta-zerbitzu ofizialaren bidez. website or the contact information provided in your product packaging. Keep your purchase receipt and product serial number handy for faster service.


