Sarrera
This manual provides comprehensive instructions for the setup, operation, and maintenance of your TFA Sphere 35.1148.01.IT Wireless Weather Station. This device offers precise measurements of indoor and outdoor temperature and humidity, along with a dynamic color display and weather forecasting capabilities. Please read this manual carefully to ensure optimal performance and longevity of your weather station.
Paketearen edukia
Konfigurazioarekin jarraitu aurretik, egiaztatu behean zerrendatutako elementu guztiak zure paketean daudela:
- 1 x TFA Sphere Wireless Weather Station (Main Unit)
- 1 x Haririk gabeko Kanpoko Sentsore
- 1 x Power Adapter for Main Unit
- 4 x 1.5V AA Batteries (for main unit backup)
- 2 x 1.5V AA Batteries (for outdoor sensor)
- 1 x Erabiltzailearen eskuliburua
Produktua amaituview
The TFA Sphere Wireless Weather Station consists of a main display unit and a remote outdoor sensor. The main unit features a high-contrast 'Color Sharp' display that can change colors automatically or be set to a fixed color. It displays indoor temperature and humidity, outdoor temperature and humidity, time, date, and weather forecasts.

This image shows the main display unit of the TFA Sphere Wireless Weather Station. The display is illuminated in blue, presenting indoor temperature, outdoor temperature, humidity levels, current time, and a graphical weather forecast.

This image displays the compact, white outdoor sensor unit. This sensor wirelessly transmits outdoor temperature and humidity data to the main weather station.
Ezaugarri nagusiak
- High-Contrast 'Color Sharp' Display: Features intense colors and excellent readability.
- Dynamic Color Change: Automatic cycling through 600 color shades or fixed color selection (22 colors), including a mode where display color changes based on outdoor temperature.
- Distira erregulagarria: Three levels of display brightness.
- Wireless Data Transmission: Receives outdoor temperature and humidity data wirelessly from the external sensor.
- Indoor Climate Monitoring: Displays indoor temperature and humidity.
- Max/Min Function: Records maximum and minimum temperature values.
- Eguraldi Iragarpena: Provides weather predictions based on atmospheric pressure changes.
- Air Pressure Trend: Graphical representation of atmospheric pressure changes over the last 12 hours.
- Radio-Controlled Clock: Automatic time and date synchronization, with alarm function and time zone setting.
- WeatherHub Compatibility: Optional connectivity to the WeatherHub Gateway for smartphone integration (Gateway sold separately).
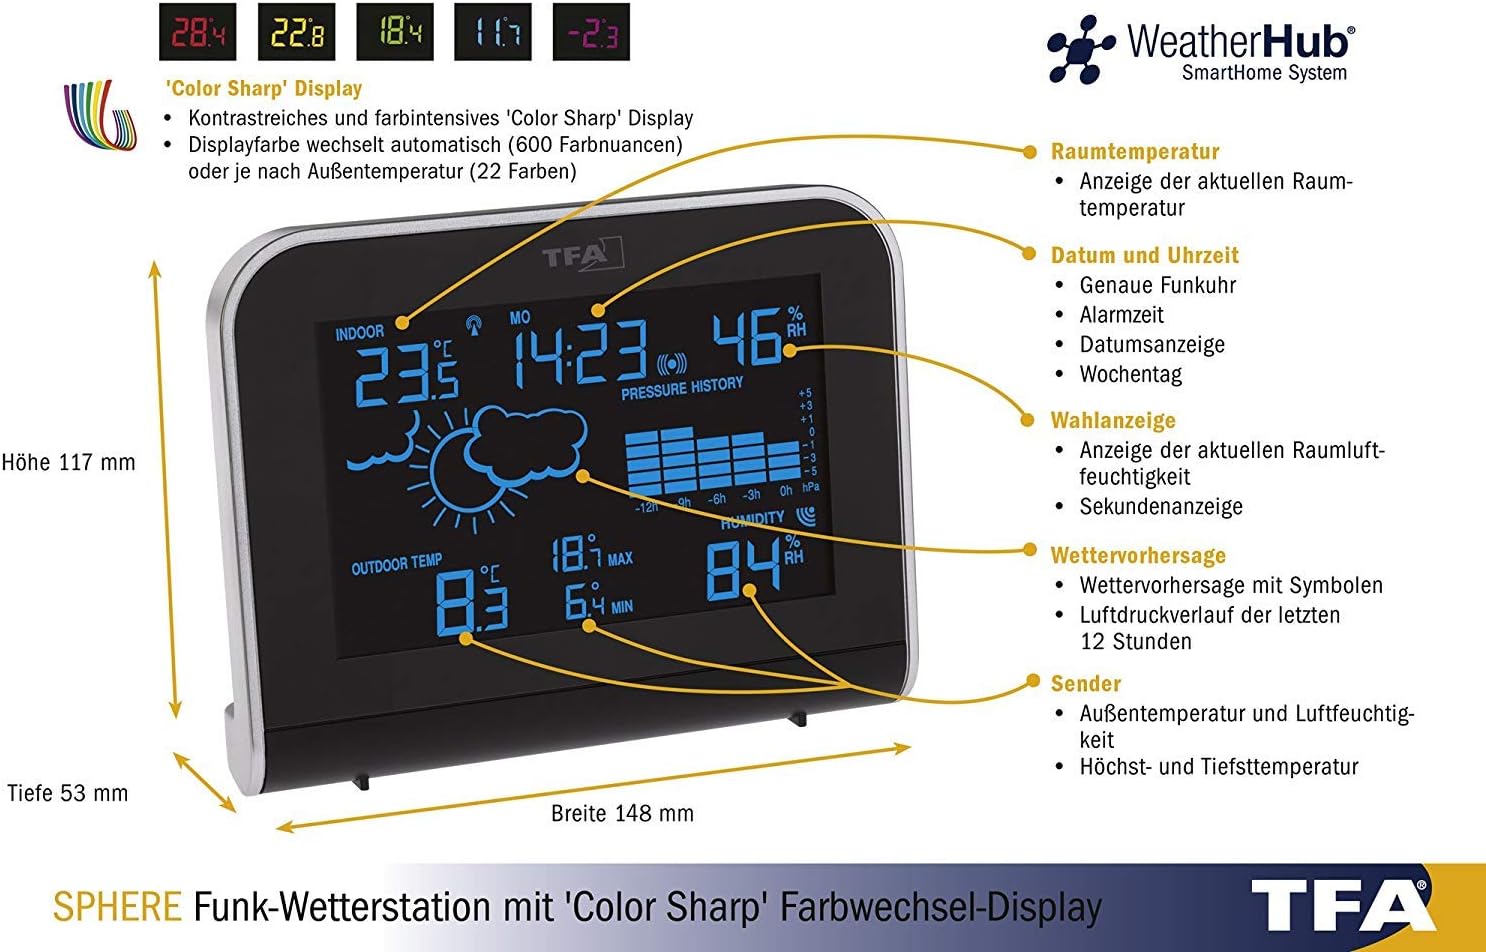
This detailed diagram labels various sections of the weather station's display, including indoor temperature, date and time, humidity, weather forecast, air pressure trend, and outdoor sensor data. It also shows the dimensions of the main unit.


These images demonstrate the customizable display colors, showing the main unit with pink and red illumination.
Konfigurazio Argibideak
1. Deskargatzea
Carefully remove all components from the packaging and place them on a flat, stable surface. Retain the packaging for future storage or transport.
2. Powering the Main Unit
- Connect the provided power adapter to the main unit's power input port.
- Entxufatu korronte-egokitzailea entxufe elektriko estandar batera. Pantaila piztuko da.
- For backup power, insert the 4 x 1.5V AA batteries into the battery compartment on the back of the main unit, observing correct polarity. These batteries will maintain settings during power outages.
3. Installing Outdoor Sensor Batteries
- Ireki kanpoko sentsorearen bateriaren konpartimendua.
- Insert the 2 x 1.5V AA batteries, ensuring correct polarity.
- Itxi bateriaren konpartimendua ongi.
4. Pairing Sensor and Main Unit
The main unit will automatically attempt to connect with the outdoor sensor upon initial power-up. This process may take a few minutes. Ensure the sensor is within range of the main unit (up to 100 meters in open areas). If the connection is not established automatically, refer to the troubleshooting section.
5. Initial Settings (Time, Date, Time Zone)
The weather station features a radio-controlled clock that automatically sets the time and date. Allow some time for the unit to receive the radio signal. If manual adjustment is needed, consult the operating instructions for specific button functions.
Funtzionamendu-argibideak
Erakutsiview
The main display provides a wealth of information at a glance. Refer to the diagram below for a detailed breakdown of each display segment.
This diagram provides a visual guide to the various indicators and data points on the weather station's display.
Pantailaren distira doitzea
The display has three brightness levels. Use the 'DIM' button (usually located on the back or side of the unit) to cycle through the brightness settings to suit your environment.
Changing Display Color Mode
The weather station offers several display color modes:
- Automatic Color Change: The display cycles through 600 different color shades.
- Fixed Color: Select one of 22 available solid colors.
- Outdoor Temperature Dependent Color: The display color changes automatically based on the current outdoor temperature.
Consult the specific buttons on your device (e.g., 'COLOR' or 'MODE' button) to switch between these modes.
Weather Forecast Interpretation
The weather forecast is indicated by graphical symbols (e.g., sun, clouds, rain) and is based on changes in atmospheric pressure. These forecasts are predictions and may not always be 100% accurate.
Max/Min Tenperatura eta Hezetasuna
The weather station records the maximum and minimum indoor and outdoor temperature and humidity values. Press the 'MAX/MIN' button to view these recorded values. Press again to clear them or to return to current readings.
Erlojuaren funtzioa
The integrated alarm clock allows you to set a daily alarm. Refer to the specific button instructions (e.g., 'ALARM' button) to set and activate/deactivate the alarm.
WeatherHub Connectivity (Optional)
The TFA Sphere weather station is compatible with the TFA WeatherHub SmartHome System. To utilize this feature, a WeatherHub Gateway (sold separately) is required. Once connected, you can monitor your weather data remotely via a smartphone application.

This diagram explains the optional WeatherHub connectivity, illustrating how the weather station can integrate with the WeatherHub Gateway to transmit data to a smartphone application.
Zehaztapenak
| Ezaugarri | Zehaztapena |
|---|---|
| Barruko Tenperatura Tartea | -10 °C eta +60 °C artean |
| Kanpoko tenperatura-tartea | -40 °C eta +60 °C artean |
| Barruko hezetasun tartea | % 1 eta % 99 RH |
| Unitate Nagusiaren Neurriak (L x Z x A) | 148 x 117 x 53 mm |
| Unitate Nagusiaren Potentzia | Power Adapter (included), 4 x 1.5V AA batteries (backup, included) |
| Kanpoko sentsorearen potentzia | 2 x 1.5 V AA bateria (barne) |
| Haririk gabeko transmisio-maiztasuna | 868 MHz |
| Konektibitate Teknologia | Haririk gabekoa |
Mantentzea
Garbiketa
Clean the main unit and outdoor sensor with a soft, damp cloth. Do not use abrasive cleaners or solvents, as these may damage the surfaces or electronic components. Ensure the outdoor sensor is kept free from excessive dirt or debris.
Bateria ordezkatzea
Replace batteries in the outdoor sensor and main unit (backup) when the low battery indicator appears on the display. Always replace all batteries in a set with new ones of the same type. Dispose of used batteries according to local regulations.
Arazoak konpontzea
- No Outdoor Temperature/Humidity Reading:
- Ensure batteries in the outdoor sensor are correctly installed and not depleted.
- Check that the outdoor sensor is within range of the main unit and not obstructed by thick walls or metal objects.
- Try resetting both units by removing batteries/power, waiting a few seconds, and then re-powering the main unit first, followed by the outdoor sensor.
- Irakurketa okerrak:
- Ensure the outdoor sensor is placed in a shaded, well-ventilated area, away from direct sunlight or heat sources.
- Allow both units to stabilize for at least 30 minutes after setup for accurate readings.
- Pantaila ez dabil:
- Verify the power adapter is securely connected and the outlet is functional.
- Check the backup batteries in the main unit.
- Radio Clock Not Synchronizing:
- Place the main unit near a window, away from electronic devices that may cause interference.
- Utzi 24 ordu arte hasierako sinkronizaziorako.
Bermea eta Laguntza
For warranty information and technical support, please refer to the documentation provided with your purchase or visit the official TFA webgunea. Gorde erosketaren egiaztagiria berme-erreklamazioetarako.


