SINOTIMER MC901-611 Universal Intelligent Temperature Control Meter User Manual
Marka: SINOTIMER
Eredua: MC901-611
1. Sarrera
The SINOTIMER MC901-611 is a universal intelligent temperature control meter designed for precise temperature regulation in various industrial and laboratory applications. This device features a clear LCD display, multiple input types, and reliable output options, making it suitable for a wide range of temperature control needs. This manual provides essential information for the safe and effective operation, installation, and maintenance of your MC901-611 temperature controller.
2. Segurtasun informazioa
Please read this manual thoroughly before operating the device to ensure safe and correct usage. Keep this manual for future reference.
Segurtasun-neurri orokorrak:
- Ziurtatu elikadura hornidura boltage matches the specifications of the device (100-240V AC, 50/60Hz).
- Do not operate the device in environments with excessive dust, humidity, corrosive gases, or strong vibrations.
- Disconnect power before performing any wiring, maintenance, or inspection.
- Langile kualifikatuek bakarrik egin behar dute instalazioa eta kableatua.
- Avoid touching internal components when the device is powered on.
- Ziurtatu lurra egokia deskarga elektrikoa saihesteko.
- Ez desmuntatu edo aldatu gailua. Baimenik gabeko aldaketek bermea baliogabetu eta segurtasun arriskuak sor ditzakete.
3. Produktua amaitu daview
The MC901-611 temperature controller features a compact design with a clear digital display and intuitive control buttons.

3.1. irudia: Aurrealdeko panela
This image displays the front panel of the MC901-611. It features two digital displays: PV (Process Value) in red, showing the current temperature, and SV (Set Value) in green, showing the target temperature. Below the displays are indicator lights for OUT (Output), AT (Auto-tuning), ALM1 (Alarm 1), and ALM2 (Alarm 2). The control buttons include SET, R/S (Run/Stop), Down arrow, and Up arrow.
Funtsezko osagaiak:
- PV pantaila: Shows the current measured temperature (Process Value).
- SV pantaila: Shows the set target temperature (Set Value).
- Adierazle argiak: OUT (Output status), AT (Auto-tuning status), ALM1 (Alarm 1 status), ALM2 (Alarm 2 status).
- Kontrol-botoiak: SET (Enter/Confirm settings), R/S (Run/Stop), Up/Down arrows (Adjust values).
- Terminal blokea: Located at the rear for electrical connections.
- Muntatzeko euskarriak: For secure panel installation.

Figure 3.2: Side Panel with Specifications Label
This image shows the side of the MC901-611, highlighting the product label. The label provides crucial information such as Model (MC901-611), Input type (K, default setting), Temperature Range (0-1300°C), Temperature Unit (Celsius/Fahrenheit), Output type (Relay/SSR), Alarm (ALM1), Accuracy Class (0.5), and Power Supply (100-240V AC, 50/60Hz).
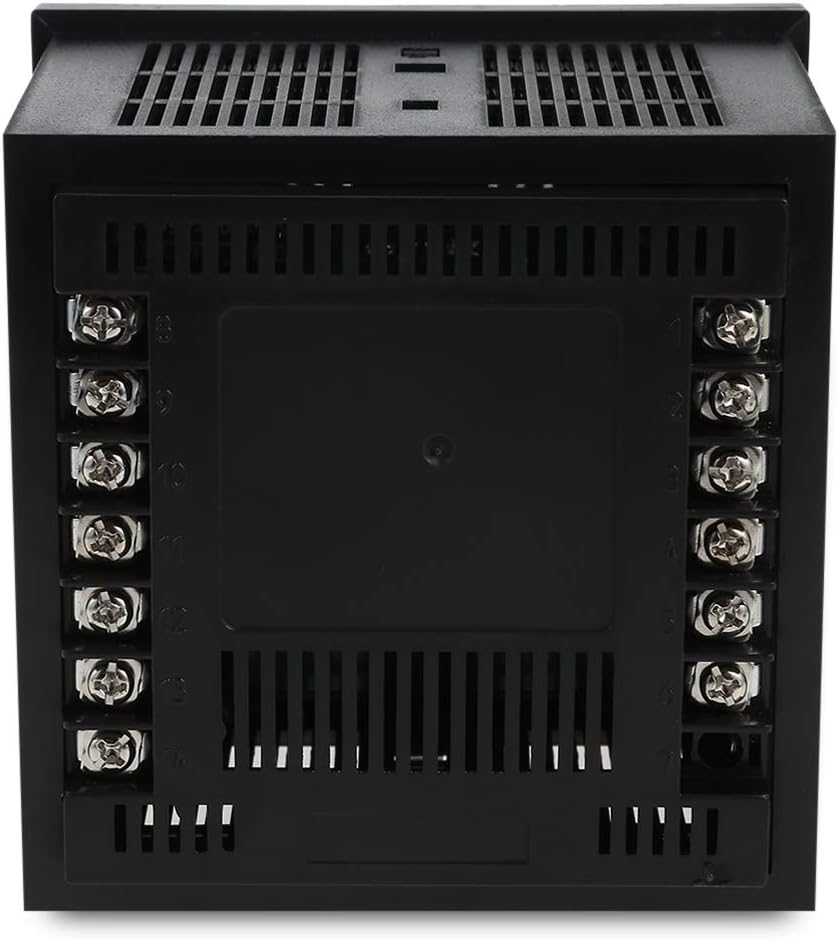
Figure 3.3: Rear Panel with Terminal Block
This image displays the rear of the MC901-611, featuring the terminal block for electrical connections. The terminals are clearly numbered, indicating where to connect power, sensor inputs, and control outputs. Proper wiring according to the provided diagram is essential for safe and correct operation.
4. Konfigurazioa eta instalazioa
4.1 Panel Mounting:
The MC901-611 is designed for panel mounting. Ensure the cutout dimensions in your panel match the device's specifications.
- Cut an opening in your panel according to the specified dimensions (refer to specifications section for exact size).
- Insert the MC901-611 into the panel cutout from the front.
- Attach the provided mounting brackets to the sides of the controller from the rear of the panel.
- Tighten the screws on the mounting brackets to secure the controller firmly in place. Do not overtighten.

4.1. irudia: Muntatzeko euskarriak
This image shows the two mounting brackets included with the MC901-611. These brackets are used to secure the temperature controller firmly within a panel cutout, ensuring stable installation.
4.2 Kableatu-diagrama:
Refer to the wiring diagram on the side of the unit or in the detailed manual for correct connections. Ensure all connections are secure and insulated.
- Elikatze-iturria: Connect the main power supply (100-240V AC, 50/60Hz) to the designated terminals.
- Sentsore sarrera: Connect your temperature sensor (e.g., K-type thermocouple) to the sensor input terminals. Ensure correct polarity for thermocouples.
- Kontrol-irteera: Connect your heating/cooling element or SSR to the control output terminals.
- Alarm Output (Optional): If using alarm functions, connect external alarm devices to the alarm output terminals.
Note: A detailed wiring diagram is typically provided on the physical unit or in a separate wiring guide. Always consult the specific diagram for your model.
5. Funtzionamendu-argibideak
5.1 Piztu:
Once wired correctly, apply power to the unit. The PV display will show the current temperature, and the SV display will show the last set temperature.
5.2 Setting the Target Temperature (SV):
- Sakatu EZARTU button once. The SV display will start flashing.
- Erabili Up (▲) eta Behera (▼) arrow buttons to adjust the target temperature.
- Sakatu EZARTU button again to confirm the new SV and exit the setting mode. The SV display will stop flashing.
5.3 Parametroen ezarpenak:
To access advanced parameter settings (e.g., input type, control mode, alarm settings):
- Eduki sakatuta EZARTU button for approximately 3-5 seconds until the first parameter code appears on the PV display.
- Erabili Up (▲) eta Behera (▼) arrow buttons to navigate through different parameter codes.
- Sakatu EZARTU to view the value of the currently displayed parameter.
- Erabili Up (▲) eta Behera (▼) arrow buttons to change the parameter value.
- Sakatu EZARTU to confirm the new value and return to the parameter code display.
- To exit parameter setting mode, press and hold the EZARTU button again for 3-5 seconds, or wait for the device to automatically exit after a period of inactivity.
Consult the full product manual for a complete list of parameter codes and their functions.
5.4 Auto-tuning (AT):
Auto-tuning helps the controller optimize its PID parameters for stable and accurate temperature control. This process is recommended after initial setup or if control performance is unsatisfactory.
- Set the desired target temperature (SV).
- Eduki sakatuta R/S button for approximately 3-5 seconds. The AT indicator light will illuminate, and the controller will begin the auto-tuning process.
- Allow the auto-tuning process to complete. This may take some time as the controller cycles the output to learn the system's characteristics. The AT light will turn off once tuning is complete.
- Do not interrupt the auto-tuning process.
6. Mantentzea
Regular maintenance ensures the longevity and optimal performance of your MC901-611 temperature controller.
- Garbiketa: Disconnect power before cleaning. Use a soft, dry cloth to wipe the surface of the unit. Do not use abrasive cleaners, solvents, or water, as these can damage the display or internal components.
- Ikuskapena: Periodically check all wiring connections for looseness or damage. Ensure the terminal screws are tight.
- Ingurumena: Ziurtatu funtzionamendu-ingurunea zehaztutako tenperatura eta hezetasun tarteetan dagoela kalteak saihesteko.
- Sentsorearen egiaztapena: If temperature readings appear inaccurate, check the sensor and its wiring for damage or corrosion.
7. Arazoak
This section addresses common issues you might encounter with your MC901-611 temperature controller.
| Arazoa | Kausa posiblea | Irtenbidea |
|---|---|---|
| Ez dago pantailarik/Itzali | Ez dago energia-iturririk; Kableatu soltea; Fusiblea erreta. | Check power connection; Verify wiring; Replace fuse if necessary (by qualified personnel). |
| PV display shows "HHHH" or "LLLL" | Sensor open circuit (HHHH); Sensor short circuit or reverse connection (LLLL); Sensor type mismatch. | Check sensor wiring and connections; Ensure correct sensor type is selected in parameters. |
| Temperature not controlled accurately | Incorrect PID parameters; Sensor not properly installed; Load capacity mismatch. | Perform auto-tuning; Ensure sensor is in good thermal contact with the process; Verify output capacity matches load. |
| Output indicator (OUT) not lighting up | SV is equal to PV (no control action needed); Output wiring issue; Internal fault. | Check SV and PV values; Inspect output wiring; If problem persists, contact support. |
Konponbide hauek saiatu ondoren arazoa konpontzen ez bada, jarri harremanetan bezeroarentzako arreta-zerbitzuarekin.
8. Zehaztapenak
Technical specifications for the SINOTIMER MC901-611 Universal Intelligent Temperature Control Meter.
| Ezaugarri | Zehaztapena |
|---|---|
| Eredua | MC901-611 |
| Sarrera mota | K (default setting), Universal Input |
| Tenperatura tartea | 0-1300°C (depending on sensor type) |
| Tenperatura Unitatea | Celsius/Fahrenheit selectable |
| Irteera mota | Relay/SSR |
| Alarma | ALM1 |
| Zehaztasun Klasea | 0.5 |
| Elikatze Hornidura | 100-240V AC, 50/60Hz |
| Bistaratzeko mota | LCDa |
| Elementuaren pisua | 8.8 ontza |
| Paketearen neurriak | 4.3 x 4.3 x 3.6 hazbete |
9. Bermea eta Laguntza
Bermearen informazioa:
SINOTIMER products are typically covered by a limited warranty against defects in materials and workmanship. Please refer to the warranty card included with your product or contact SINOTIMER customer service for specific warranty terms and conditions.
Bezeroarentzako laguntza:
For technical assistance, troubleshooting beyond this manual, or warranty claims, please contact SINOTIMER customer support. Have your product model number (MC901-611) and purchase information ready when contacting support.
Contact information for SINOTIMER can usually be found on their official webgunean edo produktuaren ontzian.


