1. Sarrera
This manual provides detailed instructions for the installation, operation, and maintenance of your KICKER car audio system. This system includes a KICKER 48DCWR122-RS Dual 12" CompR Series Subwoofer Enclosure, a KICKER 46CXA8001 Mono Amplifier, and a Harmony Audio HA-AK8 Amplifier Installation Kit. Please read this manual thoroughly before attempting installation or operation to ensure proper function and safety.
Segurtasun neurriak:
- Deskonektatu beti ibilgailuaren bateriaren terminal negatiboa edozein lan elektriko hasi aurretik.
- Ziurtatu kableatu guztia behar bezala bideratuta eta finkatuta dagoela kalteak edo zirkuitulaburrak saihesteko.
- Use appropriate personal protective equipment during installation.
- Instalazio prozesuaren edozein atalen inguruan ziur ez bazaude, kontsultatu autoko audio instalatzaile profesional bati.
2. Paketearen edukia
Egiaztatu elementu guztiak zure paketean daudela:
- 1 x KICKER 48DCWR122-RS Dual 12" CompR Series Subwoofer Enclosure
- 1 x KICKER 46CXA8001 Car Audio Class D Mono Ampbiziagoa
- 1 x Harmony Audio HA-AK8 Car Stereo Complete 8 Gauge Amplifier Instalazio Kit

2.1. irudia: Aurrealdea view of the KICKER Dual 12 inch CompR Subwoofer Enclosure. This image shows the two 12-inch subwoofers mounted in a black carpeted enclosure with the KICKER logo.

2.2. irudia: Goikoa view of the KICKER 46CXA8001 Mono Ampbiziagoa. The amplifier is a compact black unit with the KICKER logo and model number CXA800.1 visible.

Figure 2.3: Harmony Audio HA-AK8 8 Gauge Amplifier Installation Kit components. This image displays various cables, a fuse holder, terminals, and zip ties included in the installation kit.
3. Konfigurazioa eta instalazioa
Proper installation is crucial for optimal performance and safety. It is recommended to have this system installed by a qualified professional.
3.1 Subwoofer Enclosure Placement
The KICKER 48DCWR122-RS enclosure is designed for freestanding placement. Choose a secure location in your vehicle, typically the trunk or cargo area, where it will not shift during driving. Ensure adequate ventilation around the enclosure.

3.1. Irudia: Atzealdea view of the KICKER Dual 12 inch CompR Subwoofer Enclosure. This view shows the rear panel, typically where the speaker terminals are located for connection to an ampbiziagoa.
3.2 Amplifier Installation (KICKER 46CXA8001)
Muntatu amplifier in a location that provides good air circulation and is protected from moisture and excessive heat. Common locations include under a seat, in the trunk, or attached to the subwoofer enclosure.
3.2.1 Power Wiring (HA-AK8 Kit)
- Elikatze-kablea (+12V): Connect the 8-gauge power cable from the HA-AK8 kit to the vehicle's positive battery terminal. Install the fuse holder (included in HA-AK8 kit) as close to the battery as possible (within 18 inches) to protect the vehicle's electrical system. Route the power cable to the ampbizigarriaren +12V terminala.
- Lurreko kablea (GND): Connect the 8-gauge ground cable from the HA-AK8 kit to a clean, unpainted metal surface on the vehicle's chassis. Ensure a solid, low-resistance connection. Connect the other end to the amplifier's GND terminal. The ground cable should be as short as possible, ideally less than 3 feet.
- Urruneko pizte-kablea (REM): Connect a thin gauge wire (typically blue) from your head unit's remote output to the ampLifter-aren REM terminala. Hari honek pizten du amppiztu eta itzali lifatzailea unitate nagusiarekin.
3.2.2 seinale sarrera
The 46CXA8001 amplifier supports both high-level (speaker level) and low-level (RCA) inputs. Use the appropriate input type based on your head unit's outputs.
- Maila baxuko sarrera: If your head unit has RCA outputs, connect them to the amplifier-aren RCA sarrera-konektoreak.
- Goi-mailako sarrera: If your head unit does not have RCA outputs, use the speaker-level inputs. Refer to the amplifier's specific wiring diagram for connecting speaker wires directly to the ampbiziagoa.
3.2.3 Bozgorailuaren irteera
Connect the subwoofer enclosure's speaker terminals to the amplifier's SPEAKER output terminals. Ensure correct polarity (+ to + and - to -) for optimal sound. The 48DCWR122-RS enclosure is wired for a 2 Ohm load.
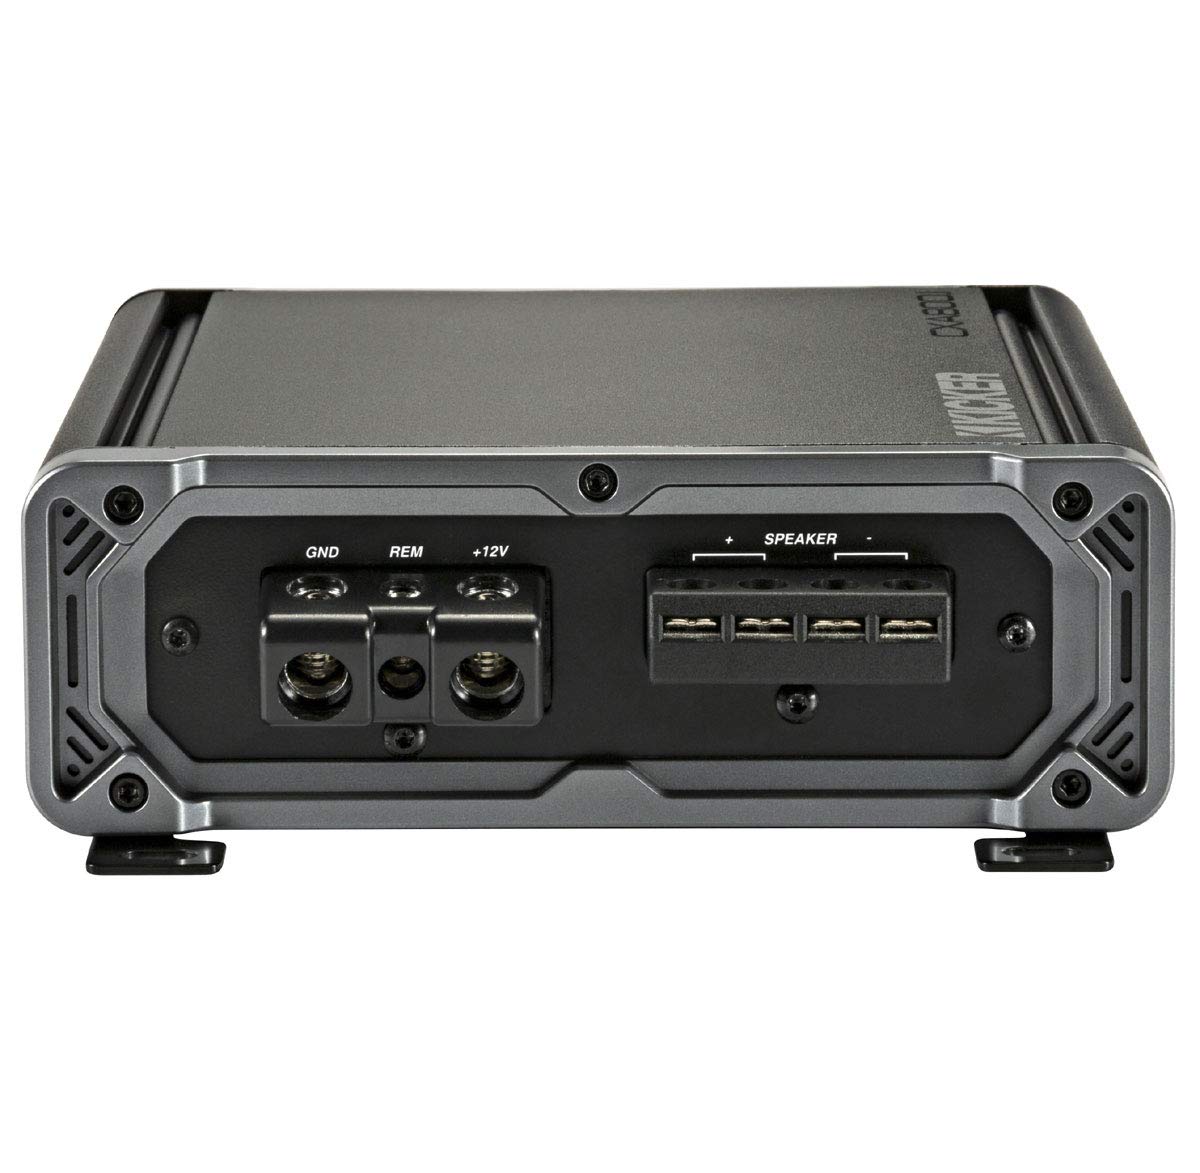
Figure 3.2: Connection side of the KICKER 46CXA8001 Mono Amplifier. This image shows the power (GND, REM, +12V) and speaker output terminals on one side of the ampbiziagoa.
4. Funtzionamendu-argibideak
Once the system is installed, follow these steps for initial setup and operation:
4.1 Hasierako piztea
- Egiaztatu birritan kable-konexio guztiak.
- Reconnect the vehicle's battery negative terminal.
- Piztu zure unitate nagusia. amplifier should power on (indicated by an LED).
4.2 Amplifier Settings (KICKER 46CXA8001)
The 46CXA8001 amplifier features several adjustable controls:
- Gain Control: Egokitu irabazia irteerako bolumenarekin bat etortzekotagZure unitate nagusiaren e. Hasi irabazi minimoarekin eta handitu poliki-poliki distortsioa entzun arte, eta gero jaitsi apur bat. Hau ez da bolumen-kontrola.
- Behe-paseko gurutzaketa (LPF): Variable from 50-200Hz. Set this to filter out frequencies above your desired subwoofer range. A common starting point is 80-100Hz.
- Iragazki subssonikoa: Fixed at 25Hz. This filters out extremely low frequencies that the subwoofer cannot reproduce efficiently, protecting it from damage.
- KICKER EQ Boost: Variable to +12dB, centered at 40Hz. Use this to fine-tune the bass response to your preference. Use sparingly to avoid distortion.
5. Mantentzea
Regular maintenance ensures the longevity and performance of your KICKER system.
- Garbiketa: Mantendu amplifier and subwoofer enclosure clean and free of dust and debris. Use a soft, dry cloth. Do not use liquid cleaners directly on components.
- Konexioak: Periodically check all power, ground, remote, and speaker connections to ensure they are secure and free from corrosion.
- Aireztapena: Ziurtatu amplifier's heatsink fins are not obstructed to allow for proper cooling.
6. Arazoak
If you experience issues with your system, refer to the following common problems and solutions:
6.1 No Power / AmpLifizer-a ez da pizten
- Egiaztatu fusiblea: Verify the fuse in the HA-AK8 kit's fuse holder is intact. Replace if blown.
- Potentzia-konexioa: Ensure the +12V power cable is securely connected to the battery and ampbiziagoa.
- Lur-konexioa: Confirm the ground cable has a solid connection to the chassis and ampbiziagoa.
- Urruneko piztea: Check that the remote wire is connected to both the head unit and amplifier, and that the head unit is powered on.
6.2 No Sound from Subwoofer
- Bozgorailu konexioak: Verify speaker wires are correctly connected to both the amplifier and subwoofer enclosure, with correct polarity.
- Seinale sarrera: Ensure RCA or high-level input cables are securely connected to both the head unit and ampbiziagoa.
- AmpGarraioa irabazia: Handitu amplifier's gain control slightly.
- Unitate Nagusiaren Ezarpenak: Check head unit's subwoofer output settings and volume.
6.3 Soinu distortsionatua
- Irabaziaren ezarpena: Murriztu amplifier's gain control. It may be set too high.
- Sarrera maila: Ensure the head unit's volume is not excessively high, causing the input signal to clip.
- Crossover Setting: Adjust the LPF setting on the ampbiziagoa.
6.4 AmpLifter gehiegi berotzea
- Aireztapena: Ziurtatu amplifier has adequate airflow and is not covered.
- Inpedantzia: Verify the subwoofer's impedance matches the amplifier's capabilities (the 48DCWR122-RS is 2 Ohm, which the 46CXA8001 supports).
- Irabaziaren ezarpena: Murriztu amplifier's gain.
7. Zehaztapenak
7.1 KICKER 48DCWR122-RS Dual 12" CompR Series Subwoofer Enclosure
- Potentzia manipulazioa: 1000 Watt RMS / 2000 Watt gailurra
- Recommended Power Range: 500 - 1000 Watts RMS
- Inpedantzia nominala: 2 Ohm
- Maiztasun-erantzuna: 25 - 500Hz
- Sentikortasuna: 98 dB
- Konoa Materiala: Polipropilenoa
- Inguruko materiala: Ribbed Santoprene
- Itxituraren eraikuntza: MDF (Medium Density Fiberboard) with extensive internal bracing
- Itxitura mota: Ported, Front-facing port
- Neurriak (gutxi gorabehera):
- Box Top Depth: 14"
- Box Bottom Depth: 17 1/4"
- Box Height: 16"
- Box Width: 32 3/8"
7.2 KICKER 46CXA8001 Car Audio Class D Mono Ampbiziagoa
- RMS potentzia irteera:
- 600 Watt x 1 @ 2 Ohm
- 800 Watt x 1 @ 1 Ohm
- Goi mailako potentzia irteera:
- 1200 Watt x 1 @ 2 Ohm
- 1600 Watt x 1 @ 1 Ohm
- Maiztasun-erantzuna: 25 Hz - 200 Hz
- Seinalea zarata erlazioa: 95 dB
- Sarrerako sentikortasuna:
- High level: 250mV-10V
- Low level: 125mV-5V
- Crossover aktiboa: 12dB/octave, variable 50-200Hz, low pass only
- Iragazki subssonikoa: 24dB/octave high-pass fixed @ 25Hz
- KICKER EQ Boost: Variable to +12dB, centered @ 40Hz
- Neurriak (gutxi gorabehera): 8-1/8" Length x 2-3/8" Height x 7-3/16" Width
8. Bermea eta laguntza
KICKER products are engineered for performance and reliability. For specific warranty information regarding your KICKER 48DCWR122-RS subwoofer enclosure and 46CXA8001 amplifier, please refer to the warranty card included with your product or visit the official KICKER website. For support with the Harmony Audio HA-AK8 installation kit, please refer to Harmony Audio's documentation.
If you require technical assistance or have questions not covered in this manual, please contact KICKER customer support or your authorized KICKER dealer.