1. Sarrera
This manual provides detailed instructions for the proper installation, operation, and maintenance of your Hooke Road Roof Rack with integrated LED lights. This product is designed for 2014-2021 Toyota Tundra Crewmax pickup trucks with four full-size doors. Please read all instructions carefully before beginning installation to ensure safe and correct assembly.

Image 1.1: Hooke Road Roof Rack with LED lights installed on a Toyota Tundra Crewmax.
2. Segurtasun informazioa
- Always ensure the roof rack is securely mounted before loading any cargo.
- Do not exceed the maximum load capacity of 330 pounds (evenly distributed).
- Distribute cargo evenly across the rack to maintain vehicle stability.
- Regularly inspect all mounting hardware for tightness and signs of wear or damage.
- When driving with a loaded roof rack, adjust driving speed and consider wind resistance.
- Professional installation is recommended for electrical wiring of LED lights.
3. Piezen zerrenda
Verify all components are present before beginning installation:
- 1 x Roof Rack Assembly (unassembled components)
- 4 x 18W LED Spotlights Cube Lights
- Mounting brackets & hardware accessories
- Instalazio argibideak (eskuliburu hau)

3.1. irudia: Lehertua view of roof rack components, including side rails, crossbars, front/rear beams, and mounting hardware.
4. Beharrezko tresnak
- Zulagailua
- Drill bits (specific sizes may vary, refer to detailed instructions for rivet nuts)
- Rivet nut tool (essential for secure installation)
- Giltzak/Entxufe multzoa
- Sealant (e.g., RTV silicone, JB Weld) for waterproofing drilled holes
- Neurtzeko zinta
- Markagailua
- Segurtasun betaurrekoak eta eskularruak
5. Setup and Installation Instructions
The installation process involves moderate bolt-on steps and requires some drilling. It is recommended to have assistance during installation.
5.1. Unboxing eta Hasierako Ikuskapena
Upon receiving the product, carefully unbox all components. Inspect each part for any damage that may have occurred during shipping. Verify that all items listed in the Parts List (Section 3) are present. If any parts are missing or damaged, contact customer support immediately.
Video 5.1: This video demonstrates the unboxing and initial assembly of a similar roof rack system. Note: Specific components and steps may vary slightly for your model.
5.2. Assembling the Roof Rack Frame
- Lay out all crossbars and side rails on a clean, flat surface.
- Attach the crossbars to the side rails using the provided hardware. Ensure all bolts are finger-tight only at this stage doikuntzak egiteko aukera emateko.
- Attach the front and rear beams to the assembled frame. Again, keep bolts finger-tight.

5.2 irudia: Azpialdea view of the roof rack frame assembly, showing crossbar and side rail connections.
5.3. Preparing the Vehicle for Mounting
This step involves drilling into the vehicle's roof. Exercise extreme caution.
- Carefully position the assembled roof rack onto the vehicle's roof to mark the drilling locations. Ensure proper alignment and spacing.
- Mark the precise locations for drilling. Double-check measurements to ensure accuracy.
- Drill pilot holes, then enlarge them to the appropriate size for the rivet nuts. Use quality drill bits.
- Apply a generous amount of sealant (e.g., RTV silicone) into each drilled hole before installing the rivet nuts to prevent water leaks.
- Use a rivet nut tool to securely install the rivet nuts into the drilled holes.
5.4. Mounting the Roof Rack to the Vehicle
- Carefully lift the assembled roof rack onto the vehicle's roof, aligning the mounting points with the installed rivet nuts.
- Attach the roof rack to the vehicle using the provided mounting brackets and bolts. Apply additional sealant around the bolts as they are tightened.
- Once all mounting bolts are in place, progressively tighten them evenly across the entire rack until secure. Do not overtighten.

5.3. irudia: Aurrealdea view of the roof rack securely mounted on the vehicle.
5.5. Installing LED Spotlights
- Mount the four 18W LED spotlights to the designated locations on the front beam of the roof rack using their individual mounting brackets.
- Route the wiring for the LED lights along the roof rack and into the vehicle's cabin. Ensure wiring is secured and protected from abrasion.
- Connect the LED lights to a suitable power source and switch. Professional electrical installation is highly recommended to ensure proper functionality and avoid electrical issues.

Image 5.4: Close-up of the LED spotlights on the front of the roof rack.
6. Funtzionamendu-argibideak
6.1. Karga-kargatzea
- Ensure cargo is evenly distributed and securely fastened to the crossbars using appropriate straps or nets. The crossbars feature holes for cargo securement.
- Avoid placing heavy items on one side of the rack to prevent imbalance.
- Ez gainditu 330 kiloko gehienezko karga-ahalmena.
6.2. LED argiaren funtzionamendua
The LED spotlights are designed to improve visibility in low-light conditions. Operate them via the switch installed during the electrical setup. Ensure local regulations regarding auxiliary lighting are followed.
7. Mantentzea
- Regularly clean the roof rack with mild soap and water to remove dirt and debris.
- Inspect the textured black powder coat finish for any chips or scratches. Touch up as needed to prevent rust and maintain durability.
- Check all bolts and fasteners periodically for tightness. Retighten if necessary.
- Inspect LED lights for any damage to the housing or wiring.
8. Arazoak
8.1. Rack Does Not Fit Correctly
Ensure the product is specifically for the 2014-2021 Toyota Tundra Crewmax model. Verify all components are correctly oriented according to the diagrams. If fitment issues persist, contact customer support.
8.2. Falta diren edo kaltetutako piezak
If any parts are missing or damaged upon arrival, document the issue with photos and contact Hooke Road customer service immediately for assistance.
8.3. Water Leaks After Installation
Ensure sufficient sealant was applied around all drilled holes and mounting bolts during installation. Re-check all sealed areas and apply additional sealant if any gaps are found.
9. Zehaztapenak
| Ezaugarri | Zehaztapena |
|---|---|
| Aplikazioa | 2014-2021 Toyota Tundra Crewmax (4 full-size doors) |
| Karga Ahalmena | Up to 330 pounds (evenly distributed) |
| Materiala | Heavy duty, high tensile 10 gauge (9/64 Inch) steel |
| Amaitu | Textured black powder coat & Premium E-coating |
| LED Argiak | 4x 18W high power LED spotlights included |
| Neurriak (L x W x H) | 56.4'' x 50.7'' x 5.3'' (gutxi gorabehera) |
| Elementuaren pisua | 66 lb inguru |
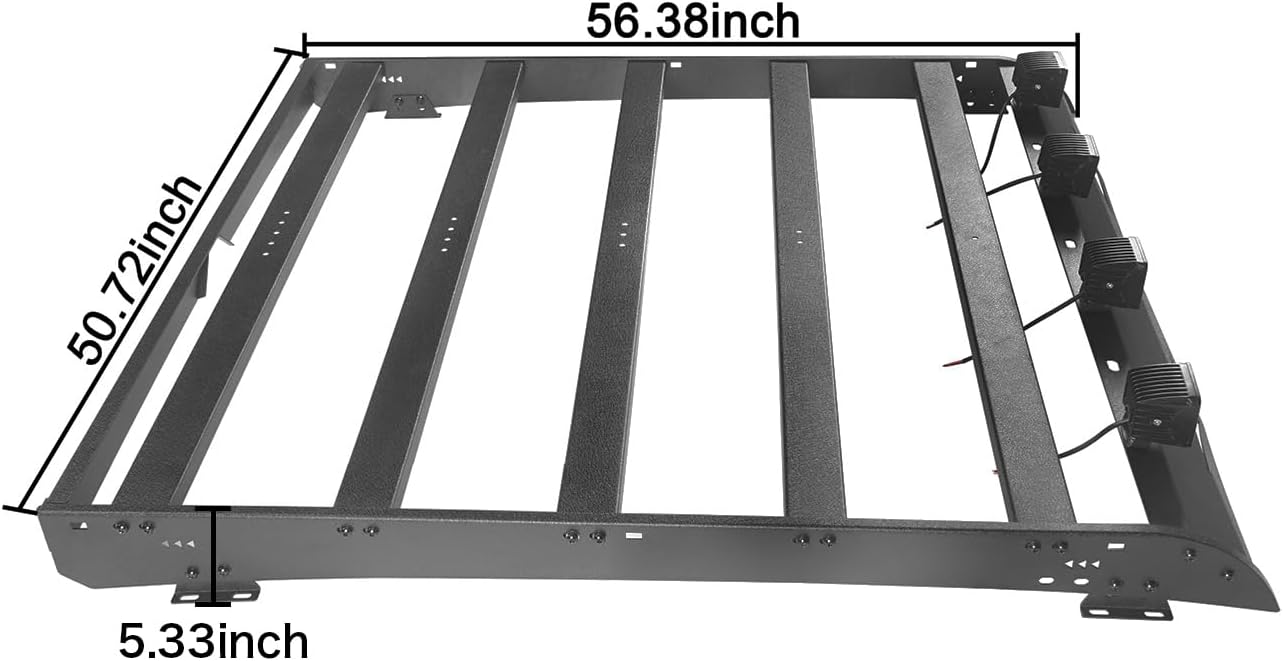
Image 9.1: Dimensional diagram of the roof rack.
10. Bermea eta laguntza
For warranty information, missing parts, or technical support, please contact Hooke Road customer service directly. Refer to your purchase documentation for specific contact details and warranty terms.
You can also visit the official Hooke Road store for additional product information and support: Hooke Road denda