1. Sarrera
This manual provides detailed instructions for the setup, operation, maintenance, and troubleshooting of your Sharkoon Light² 200 Gaming Mouse. Please read this manual thoroughly before using the device to ensure optimal performance and longevity.
2. Paketearen edukia
Egiaztatu elementu guztiak paketean daudela:
- Sharkoon Light² 200 Gaming Mouse
- Interchangeable Solid Top Cover (7g)
- Set of Replacement PTFE Glide Feet
- Argibide eskuliburua
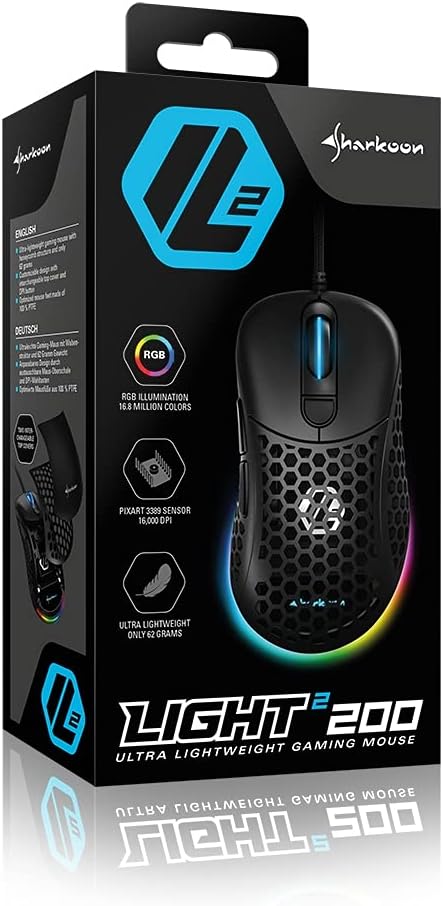
Image: The retail packaging for the Sharkoon Light² 200 Gaming Mouse, showing the mouse and its key features.
3. Konfigurazioa
3.1 Sagua konektatzea
- Unpack the Sharkoon Light² 200 Gaming Mouse from its packaging.
- Konektatu saguaren kablearen USB konektorea zure ordenagailuko USB ataka libre batean.
- Sistema eragileak automatikoki detektatu eta instalatuko ditu beharrezko kontrolatzaileak.

Image: The Sharkoon Light² 200 Gaming Mouse with its USB cable, ready for connection to a computer.
3.2 Software-instalazioa
For full customization and access to all features, download and install the Sharkoon gaming software from the official Sharkoon website. The software allows for DPI adjustments, button programming, and RGB lighting control.
- Visit the official Sharkoon webgunea.
- Navigate to the support or downloads section for the Light² 200 Gaming Mouse.
- Download the latest version of the gaming software.
- Jarraitu pantailako argibideei instalazioa amaitzeko.
4. Sagua erabiltzea
4.1 Oinarrizko funtzioak
The Light² 200 features standard mouse buttons and a scroll wheel:
- Ezkerreko klik: Ekintza nagusirako botoia.
- Egin klik eskuineko botoiarekin: Bigarren mailako ekintza-botoia, normalean testuinguru-menuetarako.
- Korritzeko gurpila: For vertical scrolling. Can also be pressed for a middle-click function.
- Alboko botoiak: Two buttons located on the left side, typically for 'forward' and 'back' navigation.
- DPI botoia: Located behind the scroll wheel, used to cycle through DPI settings.

Irudia: Albokoa view of the Sharkoon Light² 200 Gaming Mouse, highlighting the two programmable side buttons and the honeycomb structure.
4.2 DPI doikuntza
The optical PixArt sensor supports up to 16,000 DPI. You can adjust the DPI sensitivity using the dedicated DPI button behind the scroll wheel or through the Sharkoon gaming software. The RGB lighting on the scroll wheel and rear of the mouse indicates the current DPI profile.
4.3 botoi programagarri
The Light² 200 features six programmable buttons. Use the Sharkoon gaming software to assign custom functions, macros, or key bindings to these buttons for an optimized gaming experience.
4.4 RGB Argiztapen Pertsonalizazioa
The mouse features adjustable RGB illumination on the scroll wheel and the back end. The gaming software allows you to customize colors, effects, and brightness to match your preferences or gaming setup.
4.5 Modular Design: Changing the Top Cover
The Light² 200 has a modular design, allowing you to change the top surface. The default honeycomb top cover can be replaced with a closed 7-gram alternative for a different feel or aesthetic.
- Gently lift the rear edge of the honeycomb top cover to detach it. It is held by magnets.
- Align the replacement solid top cover with the mouse body and gently press it down until the magnets secure it in place.

Image: The Sharkoon Light² 200 Gaming Mouse with its honeycomb top cover removed, revealing the internal structure and magnetic attachment points.
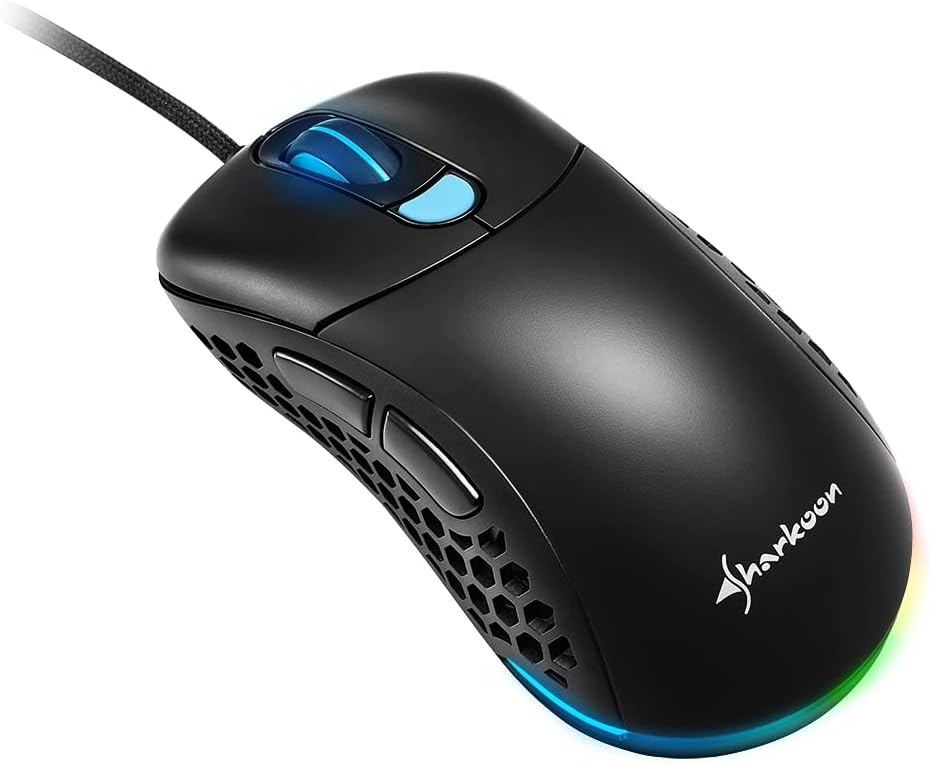
Image: The Sharkoon Light² 200 Gaming Mouse with the alternative solid top cover installed, providing a different aesthetic and feel.
5. Mantentzea
5.1 Sagua garbitzea
Errendimendu optimoa mantentzeko, garbitu sagua aldizka:
- Deskonektatu sagua ordenagailutik.
- Erabili zapi leun eta lehor bat saguaren gainazala garbitzeko.
- Zikinkeria egoskorrerako, apur bat lehortuampGarbitu zapi bat urarekin edo garbiketa-soluzio leun batekin. Saihestu produktu kimiko gogorrak.
- Use compressed air to clear dust from the honeycomb structure and around buttons.
- Clean the optical sensor area with a cotton swab lightly dampisopropil alkoholarekin egina.
5.2 Replacing PTFE Glide Feet
The PTFE glide feet ensure smooth movement. If they become worn, replace them using the included spare set:
- Carefully peel off the old PTFE feet using a thin, non-abrasive tool.
- Clean the surface where the feet were attached to ensure no residue remains.
- Peel the new PTFE feet from their backing and carefully apply them to the corresponding areas on the mouse's underside.
- Sakatu irmo atxikimendu egokia ziurtatzeko.

Image: The underside of the Sharkoon Light² 200 Gaming Mouse, showing the optical sensor, the DPI switch, and the four white PTFE glide feet.
6. Arazoak
- Saguak ez du erantzuten:
- Ensure the USB cable is securely connected to a working USB port.
- Try connecting the mouse to a different USB port or another computer to rule out port or system issues.
- Berrabiarazi ordenagailua. - DPI ezarpenak ez dira aldatzen:
- Ensure the Sharkoon gaming software is installed and running.
- Check if the DPI button is functioning correctly. - RGB argiztapena ez dabil edo ez dabil ondo:
- Verify that the Sharkoon gaming software is installed and that lighting settings are configured correctly.
- Ensure the mouse is properly connected. - Mouse movement is erratic or imprecise:
- Clean the optical sensor on the underside of the mouse.
- Ensure you are using the mouse on a suitable surface (e.g., a mouse pad).
- Check for any physical obstructions around the sensor. - Erantzuten ez duten botoiak:
- Check button assignments in the Sharkoon gaming software.
- Ensure no physical debris is obstructing the button mechanism.
7. Zehaztapenak
| Ezaugarri | Xehetasuna |
|---|---|
| Ereduaren izena | Argia² 200 |
| Elementuaren eredu-zenbakia | 4044951029013 |
| Produktuaren neurriak | 4.72 x 2.6 x 1.65 hazbete (120 x 66 x 42 mm) |
| Elementuaren pisua | 2.19 ontza (62 gramo) |
| Mugimenduak detektatzeko teknologia | Optical (PixArt Sensor) |
| Gehienezko DPI | 16,000 DPI |
| Botoi programagarriak | 6 |
| Konektibitate Teknologia | USBa |
| Ezaugarri Berezia | RGB LED Lights, Modular Design |
| Fabrikatzailea | Sharkoon Teknologiak |
8. Bermea eta Laguntza
8.1 Bermearen informazioa
Sharkoon products are covered by a manufacturer's warranty against defects in materials and workmanship. The specific warranty period and terms may vary by region. Please retain your proof of purchase for warranty claims.
8.2 Laguntza Teknikoa
For technical assistance, driver downloads, or further information, please visit the official Sharkoon webgunea:
- Webgunea: www.sharkoon.com
You may also find FAQs and troubleshooting guides on their support pages.


