1. Produktua amaitu daview
The MIDIPLUS STUDIO-M PRO is an advanced USB audio interface designed for high-quality audio recording and playback. It features a 24-bit/192KHz high-precision converter and pure amplifier inputs, ensuring pristine sound reproduction. Its robust aluminum alloy and metal construction make it durable for any personal studio environment. The intuitive panel design and new driver software provide easy control over your audio.

1. irudia: Aurrealdea view of the STUDIO-M PRO, showing input, gain controls, and level meters.
2. Ezaugarri nagusiak
- High-Precision Conversion: Supports 24-bit/192KHz audio resolution for superior clarity and detail in recordings.
- Upgraded Preamps: Equipped with high-quality preamplifier inputs and pure instrument/linear inputs, including 48V phantom power for condenser microphones.
- Intuitive Monitoring: Input gain knobs feature two-color level meter lights for real-time signal monitoring.
- Irteera malguak: Two 1/4'' TRS balanced outputs for connecting to monitor speakers and an independent headphone output with its own volume control.
- Studio Mix Driver: New driver software with 8 wire connect presets, sample rate selection, and ASIO settings for various audio processing, live broadcast, gaming, or video playback scenarios.
- Eraikuntza iraunkorra: Aluminum alloy panel and metal bottom shell for enhanced durability and stability.
3. Konfigurazio gida
3.1. Despaketatzea eta Hasierako Ikuskapena
Kontu handiz atera osagai guztiak paketetik. Egiaztatu behean zerrendatutako elementu guztiak daudela eta kalterik gabe daudela:
- MIDIPLUS STUDIO-M PRO Audio Interface
- USB kablea
- Azkar hasteko eskuliburua
- Software License (if applicable)
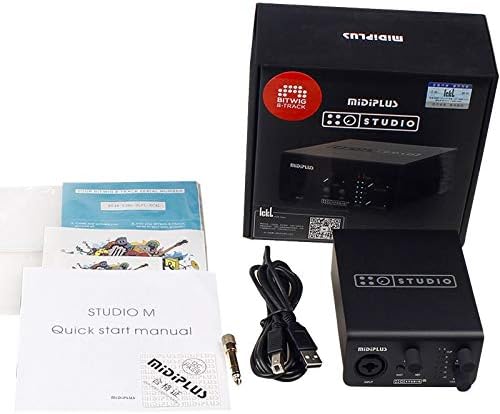
Figure 2: Contents of the STUDIO-M PRO retail package.
3.2. Hardware konexioak
Follow these steps to connect your STUDIO-M PRO to your computer and audio equipment:
- Konektatu ordenagailura: Use the provided USB cable to connect the STUDIO-M PRO's USB port to an available USB port on your computer.
- Mikrofonoak/Instrumentuak konektatu: Plug your microphone (XLR) or instrument (1/4" TS/TRS) into the INPUT jack on the front panel.
- Konektatu monitore-bozgorailuak: Connect your active monitor speakers to the LEFT and RIGHT 1/4" TRS balanced outputs on the rear panel.
- Konektatu entzungailuak: Plug your headphones into the HEADPHONE jack on the rear panel.

Figure 3: Rear panel connections of the STUDIO-M PRO, including USB, headphone, and balanced outputs.
3.3. Software Instalazioa
For optimal performance, it is crucial to install the latest Studio Mix driver software. Visit the official Midiplus website to download the appropriate driver for your operating system (Windows is supported). Follow the on-screen instructions during installation.
4. Funtzionamendu-argibideak
4.1. Input Gain Control
The front panel features controls for managing your input signals:
- GAIN botoia: Adjust this knob to control the input level of your microphone or instrument. The two-color LED meters (CLIP, 0, -3, -6, -12, -24) indicate the signal strength. Aim for the signal to peak around -3dB to avoid clipping (red CLIP LED).
- INST Button: Press this button when connecting a high-impedance instrument, such as an electric guitar or bass, directly into the input.
- 48V botoia: Activate this button to supply 48V phantom power to condenser microphones that require it. Ensure your microphone is connected before engaging 48V.
4.2. Monitoring and Output
Control your output and monitoring levels:
- MONITOR botoia: This knob controls the overall output volume to your main monitor speakers connected to the rear TRS outputs.
- HEADPHONE Knob: This knob independently controls the volume of the headphone output. Adjust to a comfortable listening level.
4.3. Using the Studio Mix Driver Software
The Studio Mix driver software provides advanced control over your audio interface. It allows you to:
- Hautatu sample rates (e.g., 44.1kHz, 48kHz, 96kHz, 192kHz).
- Configure ASIO settings for low-latency performance in digital audio workstations (DAWs).
- Utilize 8 wire connect presets for quick configuration for different applications like audio processing, live streaming, gaming, or video playback.
- Monitor input and output levels digitally.
Refer to the Studio Mix software's built-in help or online documentation for detailed instructions on its features.
5. Mantentzea
To ensure the longevity and optimal performance of your MIDIPLUS STUDIO-M PRO, follow these maintenance guidelines:
- Garbiketa: Use a soft, dry cloth to wipe the exterior of the unit. Avoid using abrasive cleaners, solvents, or waxes, as they may damage the finish.
- Biltegiratzea: Denbora luzez erabiltzen ez baduzu, gorde interfazea leku fresko eta lehor batean, eguzki-argitik eta muturreko tenperaturetatik babestuta.
- Manipulazioa: Kontu handiz maneiatu unitatea. Saihestu erortzea edo kolpe bortitzak jasatea.
- Aireztapena: Ziurtatu unitatearen inguruko aireztapen egokia dagoela gehiegi berotzea saihesteko. Ez blokeatu aireztapen-zuloak.
6. Arazoak
If you encounter issues with your STUDIO-M PRO, refer to the following common problems and solutions:
- Argirik gabe/Ez dago argirik:
- Ziurtatu USB kablea ondo konektatuta dagoela interfazera eta ordenagailura.
- Probatu beste USB ataka bat zure ordenagailuan.
- Verify your computer is powered on.
- Soinu-irteerarik ez:
- Check that the MONITOR and HEADPHONE volume knobs are turned up.
- Verify that your monitor speakers are powered on and connected correctly.
- Ensure the STUDIO-M PRO is selected as the default audio output device in your computer's sound settings or DAW.
- Check cable connections to speakers/headphones.
- Sarrerako seinalerik ez:
- Ensure your microphone or instrument is properly connected to the INPUT jack.
- Adjust the GAIN knob.
- Kondentsadore-mikrofono bat erabiltzen baduzu, ziurtatu 48V-ko phantom elikadura aktibatuta dagoela.
- If using an instrument, ensure the INST button is pressed.
- Verify the STUDIO-M PRO is selected as the default audio input device in your computer's sound settings or DAW.
- Soinu distortsionatua:
- Reduce the input GAIN to prevent clipping (red CLIP LED).
- Kable akastunak egiaztatu.
- Ziurtatu sample rate and buffer size settings in your DAW and Studio Mix driver are appropriate for your system.
- Gidariaren arazoak:
- Reinstall the latest Studio Mix driver from the official Midiplus webgunea.
- Desgaitu aldi baterako antibirusa kontrolatzailea instalatzen ari zaren bitartean.
If the problem persists, contact Midiplus customer support for further assistance.
7. Zehaztapen Teknikoak
| Ezaugarri | Zehaztapena |
|---|---|
| Elementuaren pisua | 1 kilogramo (2.2 libra) |
| Konektibitate Teknologia | USBa |
| Marka | Midiplus |
| Sistema eragileen bateragarritasuna | Leihoak |
| Hardware interfazea | USBa |
| Gailu bateragarriak | Aurikularra |
| Eskuragarri dagoen lehen data | 21ko uztailaren 2020a |
| Audio-ebazpena | 24 bit/192KHz |
| Sarrerak | 1x Combo XLR/TRS Input (with 48V phantom power, INST switch) |
| Irteerak | 2x 1/4'' TRS Balanced Outputs, 1x Headphone Output |
8. Bermea eta Laguntza
Information regarding the specific warranty terms and conditions for the MIDIPLUS STUDIO-M PRO is not available in the provided product data. Please refer to the official Midiplus website or contact their customer support directly for detailed warranty information and technical assistance.
Laguntza jasotzeko, bisitatu: Midiplus denda Amazonen


