1. Segurtasun informazioa
Please read and understand all safety information and operating instructions before using this multimeter. Failure to follow these instructions may result in electric shock, fire, or damage to the meter.
- Neurketa egin aurretik, ziurtatu beti proba-kableak behar bezala konektatuta daudela eta funtzio-etengailua tarte zuzenean ezarrita dagoela.
- Ez saiatu bolumena neurtzentages or currents exceeding the maximum rated values for this meter.
- Kontu handiz ibili zirkuitu biziekin lan egitean. Bolumen handikotagarriskutsuak izan daitezke.
- Never open the meter casing unless specifically instructed for battery or fuse replacement. Ensure test leads are disconnected before opening.
- Irakurketa zehatzak bermatzeko, ordezkatu bateria bateria baxuaren adierazlea agertzen denean.
- Ez erabili neurgailua hondatuta dagoela dirudienez edo proba-kableen isolamendua hondatuta badago.
1. irudia: Atzekoa view of the Rebel MIE-RB-830 Multimeter, showing the battery compartment cover and a warning label. The label advises removing test leads before opening the case to avoid electrical shock and to install fuses with correct amp/volt ratings. It also indicates the power supply is a 9V battery, type NEDA 1604 9V 6F22.
2. Produktua amaitu daview
The Rebel MIE-RB-830 is a compact, battery-operated digital multimeter designed for measuring DC/AC voltage, DC current, resistance, diode, and transistor (hFE) values. It is suitable for general electrical testing and troubleshooting.
2.1. Osagaiak
- Digital Multimeter Unit
- Proba-kableak (gorria eta beltza)
- 9V Battery (may be included or sold separately)
- Erabiltzailearen eskuliburua (dokumentu hau)

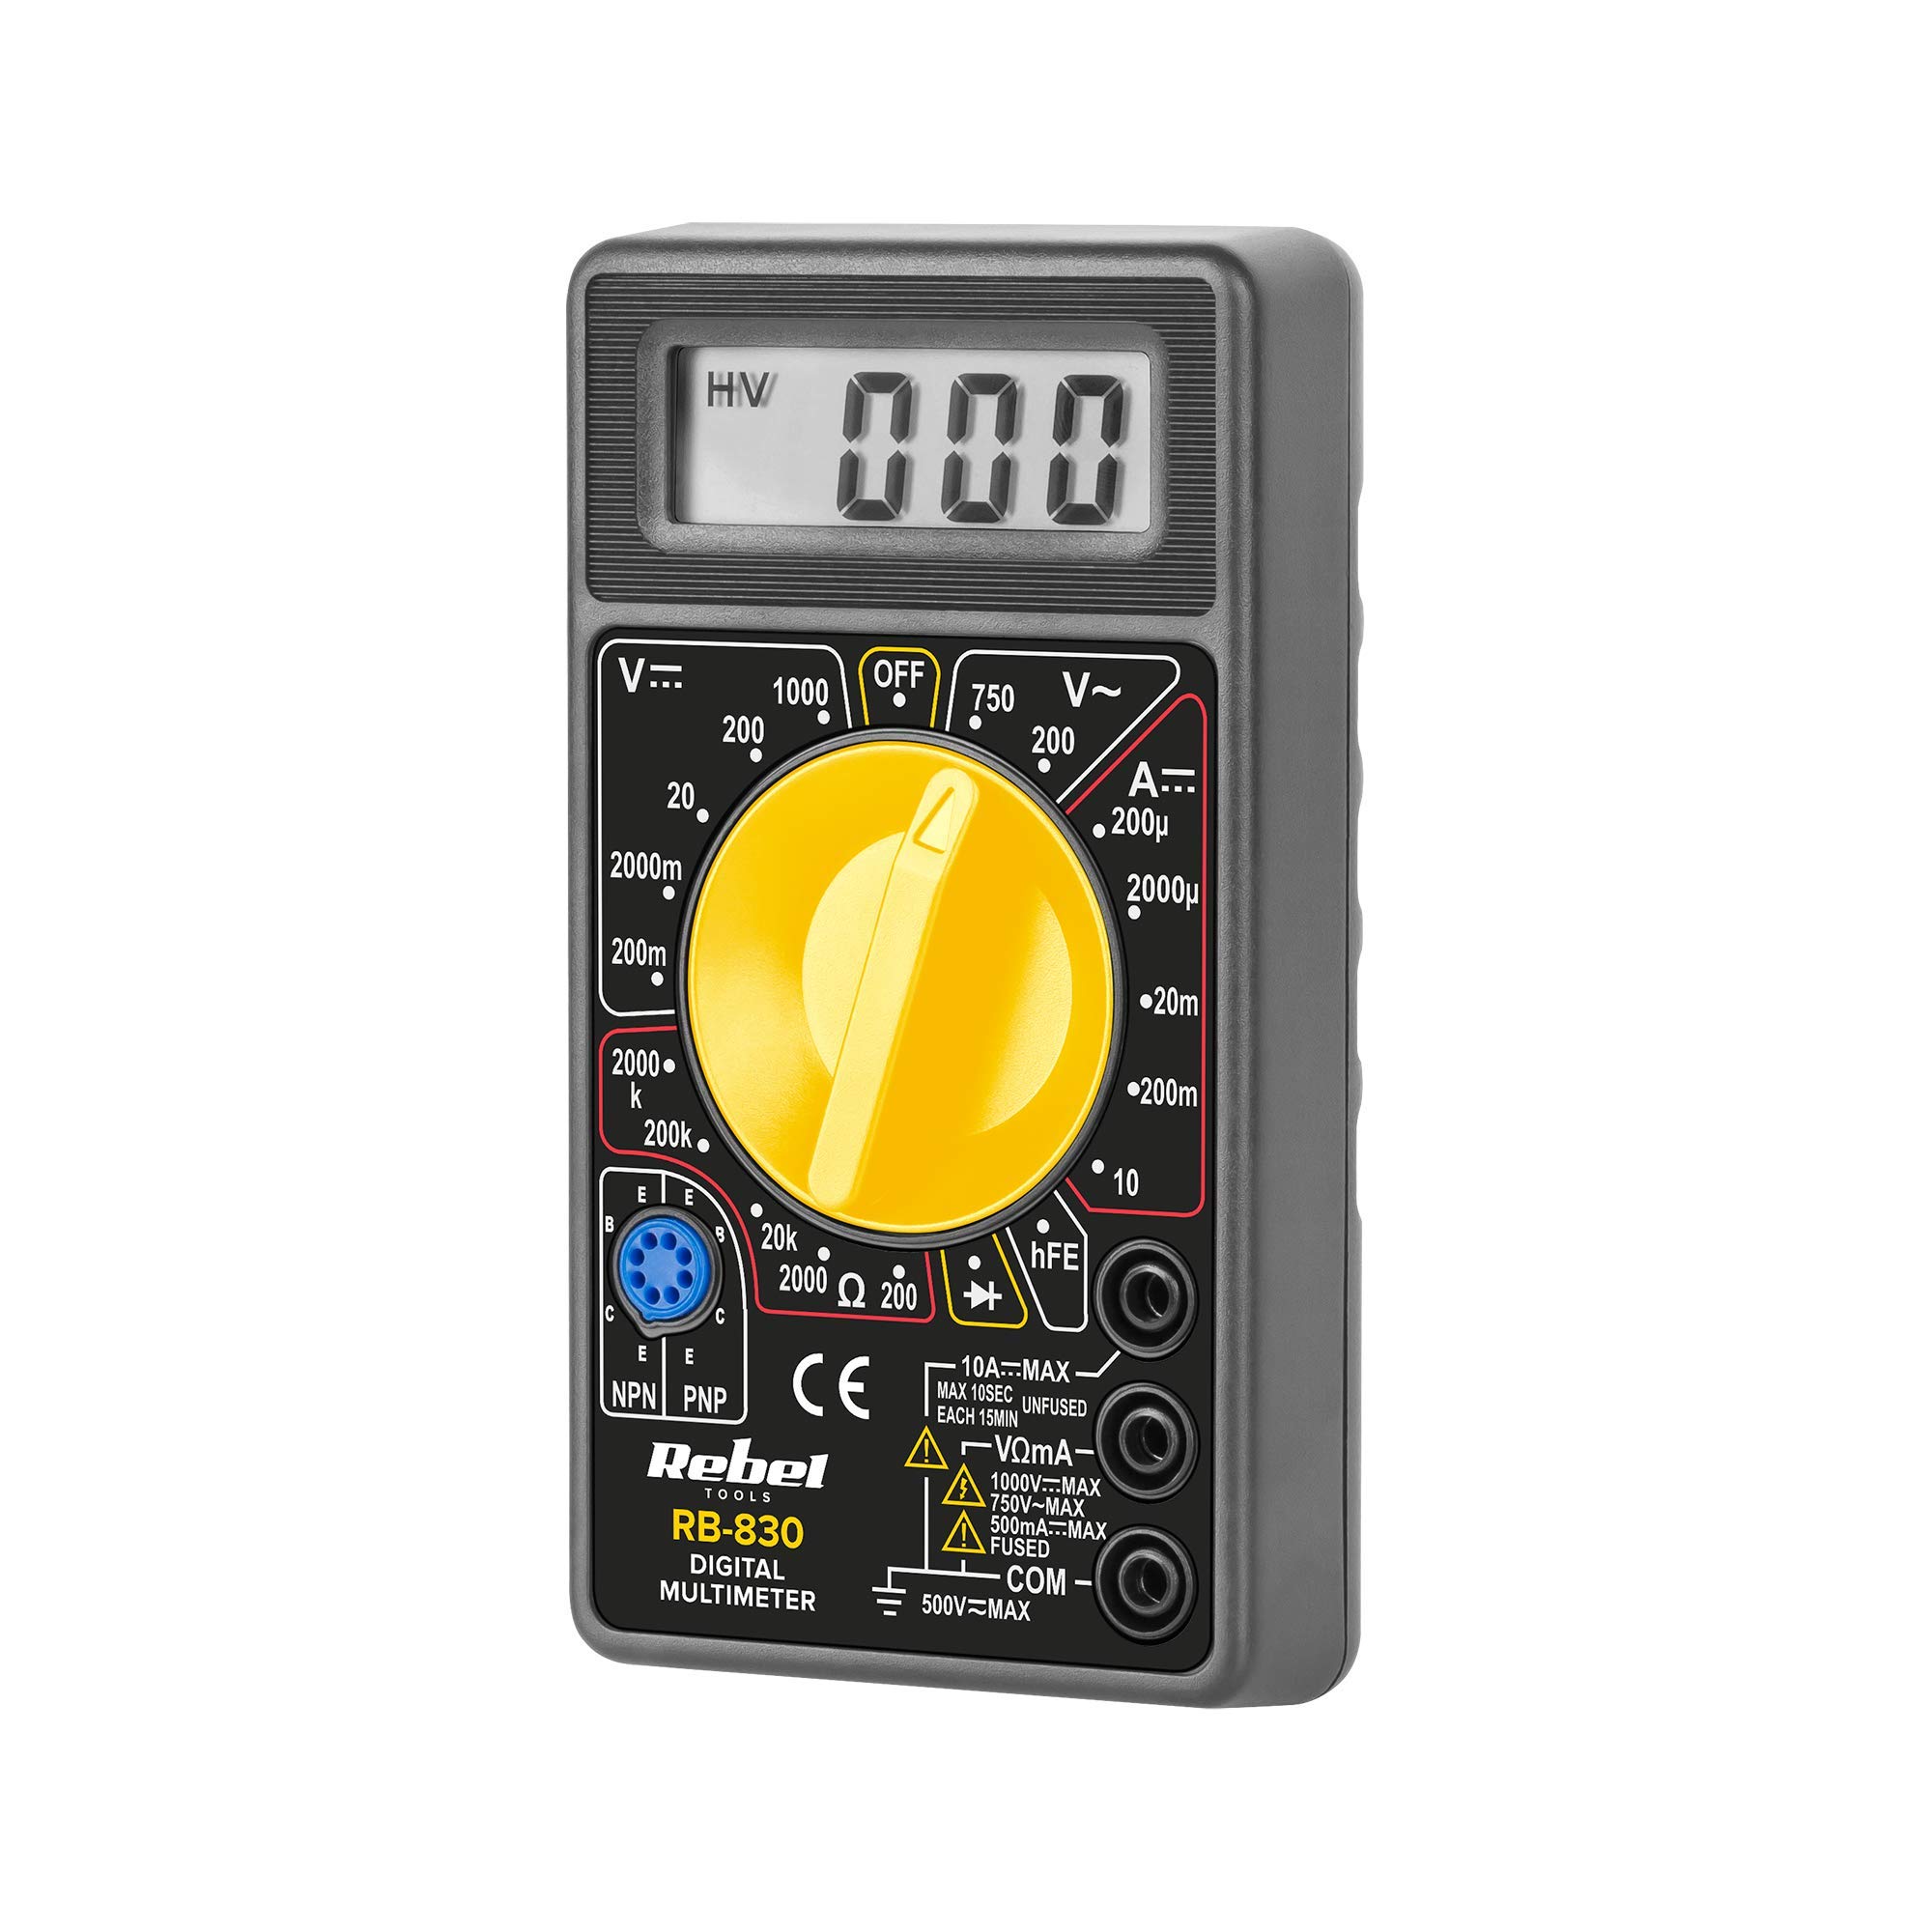
2. irudia: The Rebel MIE-RB-830 Digital Multimeter shown with its accompanying red and black test leads. The multimeter features a large LCD display and a rotary function switch.

3. irudia: Gertutik view of the red and black test leads. These leads are essential for connecting the multimeter to the circuit under test.
3. Konfigurazioa
3.1. Bateriaren instalazioa
- Ziurtatu multimetroa itzalita dagoela eta proba-kable guztiak deskonektatuta daudela.
- Locate the battery compartment cover on the back of the meter (refer to Figure 1).
- Unscrew the retaining screw(s) and carefully remove the cover.
- Insert a new 9V battery (NEDA 1604 or 6F22 type), observing the correct polarity (+ and -).
- Jarri berriro bateriaren konpartimentuaren estalkia eta finkatu torloju(ekin) erabiliz.
3.2. Proba-kableak konektatzea
- Konektatu gorria test lead to the "VΩmA" input jack.
- Konektatu beltza test lead to the "COM" (common) input jack.
- For current measurements exceeding 200mA (up to 10A), connect the red test lead to the "10A" input jack.
4. Funtzionamendu-argibideak
4.1. Funtzioa hautatzea
Turn the rotary switch to the desired measurement function and range. Always start with a higher range if the approximate value is unknown to prevent overloading the meter.
4.2. DC bolumena neurtzeatage (V–)
- Ezarri biraketa-etengailua nahi den DC bolumenera.tage (V–) range (e.g., 20V, 200V).
- Konektatu proba-kable gorria zirkuituaren alde positibora (+) eta proba-kable beltza alde negatibora (-).
- Irakurri liburukiatage balioa LCD pantailan.
4.3. AC Vol. neurtzeatage (V∼)
- Ezarri biraketa-etengailua nahi den korronte alternoko bolumenera.tage (V∼) range (e.g., 200V, 750V).
- Konektatu proba-kableak AC bolumenaren artean.tage iturria.
- Irakurri liburukiatage balioa LCD pantailan.
4.4. Measuring DC Current (A–)
Kontuz: To measure current, the meter must be connected in series with the circuit. Never connect the meter in parallel with a voltage source when in current mode, as this can damage the meter and the circuit.
- Set the rotary switch to the desired DC Current (A–) range (e.g., 20mA, 200mA, 10A).
- For currents up to 200mA, ensure the red lead is in the "VΩmA" jack. For currents up to 10A, move the red lead to the "10A" jack.
- Open the circuit where current is to be measured and connect the meter in series.
- Irakurri uneko balioa LCD pantailan.
4.5. Erresistentzia neurtzea (Ω)
Kontuz: Ziurtatu probatzen ari den zirkuitua edo osagaia deskonektatuta dagoela erresistentzia neurtu aurretik.
- Set the rotary switch to the desired Resistance (Ω) range (e.g., 200Ω, 2kΩ, 200kΩ).
- Konektatu proba-kableak neurtu beharreko osagai edo zirkuituan.
- Irakurri erresistentziaren balioa LCD pantailan.
4.6. Diode Test (→|–)
- Set the rotary switch to the Diode Test (→|–) position.
- Konektatu proba-kable gorria diodoaren anodora eta proba-kable beltza katodora.
- Pantailak aurrerako bolumena erakutsiko dutage-tentsio-jaitsiera (normalean 0.5V eta 0.8V artean siliziozko diodoentzat).
- Alderantzikatu kableak. Diodo ona dagoenean, pantailak "OL" (Ireki Begizta) erakutsi beharko luke.
4.7. Transistor (hFE) Test
- Jarri etengailu birakaria hFE posizioan.
- Zehaztu transistorea NPN edo PNP den.
- Insert the transistor's emitter, base, and collector leads into the corresponding sockets on the hFE test socket.
- Read the hFE (DC current gain) value on the display.
5. Mantentzea
5.1. Bateria ordezkatzea
Bateria baxuaren adierazlea pantailan agertzen denean, ordezkatu 9V-ko bateria 3.1 atalean azaltzen den bezala. Bateria baxua erabiltzeak irakurketa okerrak ekar ditzake.
5.2. Fusiblearen ordezkapena
If the current measurement function stops working, the fuse may need replacement. This operation should only be performed by qualified personnel.
- Ziurtatu multimetroa itzalita dagoela eta proba-kable guztiak deskonektatuta daudela.
- Ireki atzeko c-aasing of the meter (this may involve more screws than just the battery compartment).
- Locate the blown fuse and replace it with a fuse of the exact same type and rating (e.g., F200mA/250V for mA range, F10A/250V for 10A range). Refer to the internal markings or specifications for precise fuse ratings.
- Carefully reassemble the meter, ensuring all screws are tightened.
5.3. Garbiketa
Garbitu neurgailua iragarkiarekinamp oihal eta detergente leun batekin. Ez erabili urratzailerik edo disolbatzailerik. Mantendu neurgailua lehor.
6. Arazoak
| Arazoa | Kausa posiblea | Irtenbidea |
|---|---|---|
| Pantailarik ez edo pantaila ahula | Bateria baxua edo agortuta | Ordeztu 9Vko bateria. |
| Irakurketa okerrak | Low battery; Incorrect range selection; Poor test lead connection | Replace battery; Select appropriate range; Ensure leads are firmly connected. |
| Korrontearen neurketa ez dabil | Blown fuse; Incorrect lead connection for current | Replace fuse (see Section 5.2); Ensure red lead is in "VΩmA" or "10A" jack as appropriate. |
| "OL" (Gainkarga) bistaratzen da | Measured value exceeds selected range; Open circuit (for resistance/continuity) | Select a higher range; Check circuit for breaks. |
7. Zehaztapenak
| Neurketa-funtzioa | Barrutia | Zehaztasuna |
|---|---|---|
| DC bolumenatage (V–) | 200mV, 2V, 20V, 200V, 1000V | ±(% 0.5 + 2 zifra) |
| AC Boltage (V∼) | 200 V, 750 V | ±(% 1.2 + 10 zifra) |
| DC Current (A–) | 200µA, 2mA, 20mA, 200mA, 10A | ±(% 1.0 + 2 zifra) |
| Erresistentzia (Ω) | 200Ω, 2kΩ, 20kΩ, 200kΩ, 2MΩ | ±(% 0.8 + 2 zifra) |
| Diodo proba | Bai | Aurrera liburukiatage tanta |
| Transistorearen (hFE) proba | Bai | hFE value |
| Elikatze Hornidura | 9V Battery (NEDA 1604 or 6F22) | |
| Bistaratzea | 3½ Digit LCD, Max. 1999 | |
| Neurriak | Gutxi gorabehera. 13.5 x 10 x 4 cm | |
| Pisua | Approx. 107 grams (without battery) | |
| Funtzionamendu-tenperatura | 0°C eta 40°C (32°F eta 104°F) | |
| Biltegiratze Tenperatura | -10 °C eta 50 °C (14 °F eta 122 °F) | |
| Segurtasun Arauak | CE, RoHS |
8. Bermea eta Laguntza
This Rebel MIE-RB-830 Digital Multimeter is covered by a standard manufacturer's warranty against defects in materials and workmanship. Please refer to the warranty card included with your purchase or contact your retailer for specific warranty terms and conditions.
For technical support or service inquiries, please contact the point of purchase or visit the official Rebel webharremanetarako informazioa lortzeko gunea.


