1. Sarrera
This manual provides detailed instructions for the installation, operation, and maintenance of the SINOTIMER TM919A-2 LCD Digital Programmable Timer Switch. This device is designed for automatic control of electrical appliances based on programmed time schedules, offering daily and weekly programming options.
2. Produktuaren ezaugarriak
- Weekly 7-day programmable digital time switch.
- Bolumen anitzaktage options (5V, 12V, 24V, 110V, 220V, 85-265V). This specific model is 220V.
- Detachable battery design for backup power.
- 35mm DIN rail mounting for easy installation.
- LCD display for clear time and program viewing.
- 16 ON/OFF programs per day or week.
- Manual override function.
- High capacity 16A switching contact.
3. Segurtasun informazioa
WARNING: Risk of electric shock. Installation should only be performed by a qualified electrician or competent person.
- Ziurtatu energia deskonektatuta dagoela instalazioa edo mantentze-lanak egin aurretik.
- Do not exceed the maximum load capacity of 16A.
- Egiaztatu liburu zuzenatage supply for the specific model (220V for TM919A-2).
- Mantendu gailua hezetasunetik eta muturreko tenperaturetatik urrun.
4. Produktua amaitu daview eta Osagaiak
The SINOTIMER TM919A-2 features an LCD display, control buttons, and wiring terminals for power input and load control.

4.1. irudia: Aurrealdea view of the SINOTIMER TM919A-2 Digital Timer Switch, showing the LCD display, control buttons (P, D+, H+, M+, RESET, MANUAL), and wiring terminals.

4.2. irudia: The timer switch with its transparent protective cover opened, revealing the control buttons for programming and manual operation.
Kontrol-botoiak:
- P (Program): Programaren ezarpen moduan sartzen da.
- D+ (Day): Adjusts day of the week or program day.
- H+ (Hour): Adjusts hour or program hour.
- M+ (Minute): Adjusts minute or program minute.
- RESET Ezarpen guztiak fabrikako lehenetsietara berrezartzen ditu.
- ESKULIBURUA: Toggles output ON/AUTO/OFF.
5. Konfigurazioa eta instalazioa
5.1 Kableatu-diagrama
Refer to the wiring diagram on the side of the device and the illustration below for correct connection. Ensure all connections are secure.

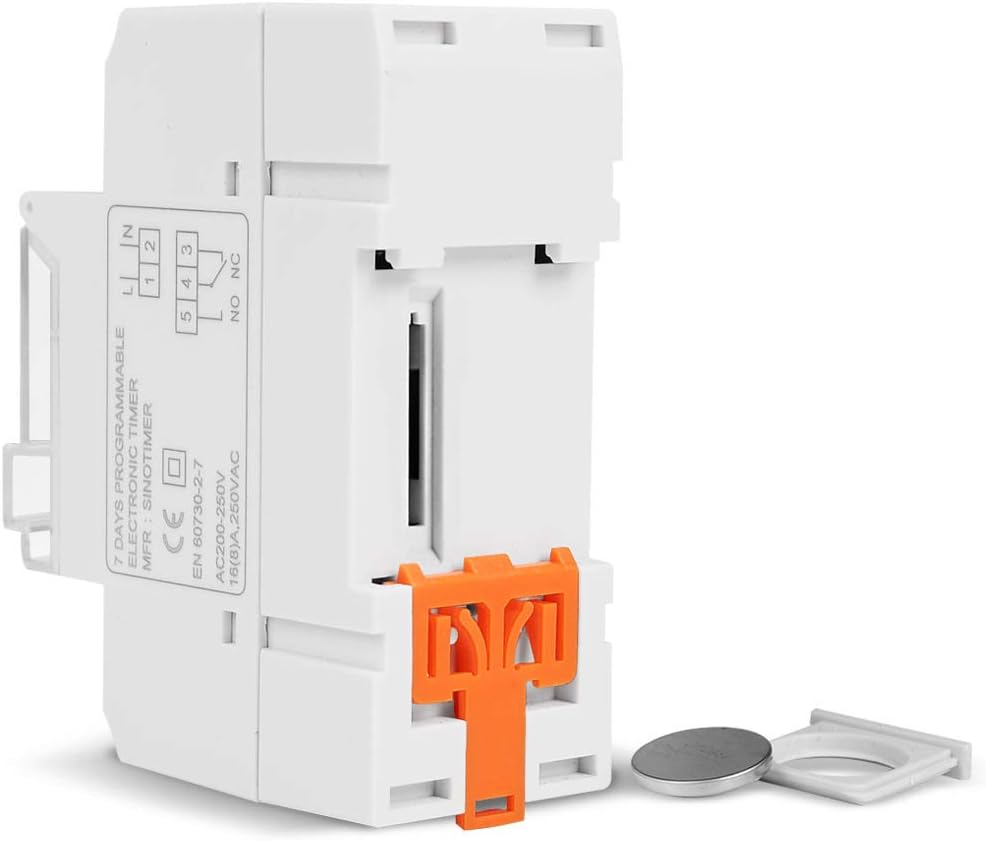
5.1. irudia: Aldea view of the timer switch displaying the wiring diagram. Terminals 1 and 2 are for power input (L and N). Terminals 3, 4, and 5 are for the relay output (Common, Normally Open, Normally Closed).
- Terminals 1 & 2 (L, N): Connect to the main power supply (220V AC for this model).
- Terminal 3 (NO - Normally Open): Connects to the load when the timer is ON.
- Terminal 4 (COM - Common): Connects to one side of the load and the power supply.
- Terminal 5 (NC - Normally Closed): Connects to the load when the timer is OFF (less common for typical applications).
5.2 Initial Power-up and Reset
Upon first power-up or after a long period without power, the LCD display may be blank. The internal battery provides backup for settings. If the display is unresponsive or shows garbled characters, press the Berrezarri button using a pointed object (e.g., a pen tip). This will clear all settings and restore the timer to its default state.
5.3 Uneko ordua eta eguna ezartzea
- Sakatu P botoia behin. Pantailak uneko ordu-ezarpena erakutsiko du.
- Sakatu D+ asteko uneko eguna ezartzeko.
- Sakatu H+ uneko ordua ezartzeko.
- Sakatu M+ uneko minutua ezartzeko.
- Sakatu P button again to exit time setting mode and return to normal operation.
6. Funtzionamendu-argibideak
6.1 ON/OFF zikloen programazioa
Tenporizadoreak 16 pizteko/itzaltzeko programa onartzen ditu gehienez. Programa bakoitzak pizteko ordu bat eta itzaltzeko ordu bat ditu.
- Sakatu P button repeatedly until "1 ON" appears on the display. This is the first ON program.
- Sakatu D+ programa honen eguna(k) hautatzeko. Aukeren artean daude egun bakarrak, lanegunak, asteburuak edo 7 egun guztiak.
- Sakatu H+ to set the desired hour for the "ON" event.
- Sakatu M+ to set the desired minute for the "ON" event.
- Sakatu P again. "1 OFF" will appear. This is the first OFF program.
- Repeat steps 2-4 to set the day(s), hour, and minute for the "OFF" event.
- Jarraitu sakatzen P to cycle through "2 ON", "2 OFF", up to "16 ON", "16 OFF". If you do not need all 16 programs, simply press P until the display returns to the current time.
- To save and exit programming mode, press the P button until the current time is displayed.
6.2 Eskuz gainidaztea
The ESKULIBURUA button allows you to override the programmed settings temporarily or permanently.
- Sakatu ESKULIBURUA once: Toggles between ON/AUTO/OFF modes.
- ON: The output is continuously ON, ignoring programs.
- DESaktibatuta: The output is continuously OFF, ignoring programs.
- AUTOA: Tenporizadorea programatutako ON/OFF zikloen arabera funtzionatzen du. Hau da funtzionamendu modu estandarra.
7. Mantentzea
7.1 Bateria ordezkatzea
The timer includes a detachable CR2032 lithium battery to maintain time and program settings during power outages. If the display becomes dim or resets frequently, the battery may need replacement.

7.1. irudia: The timer switch shown with its battery compartment open and a CR2032 lithium battery, indicating the detachable battery design.
- Disconnect power to the timer before attempting battery replacement.
- Locate the battery compartment, typically on the side or back of the unit.
- Kontu handiz kendu CR2032 bateria zaharra.
- Sartu CR2032 bateria berri bat, polaritate zuzena ziurtatuz (+ aldea gora begira).
- Itxi bateriaren konpartimendua.
- Reconnect power and reset the current time and day if necessary.
8. Arazoak
- Pantaila hutsik dago:
- Check power supply connections (Terminals 1 & 2).
- Ensure the internal battery is charged or replaced if old.
- Sakatu Berrezarri botoia.
- Programs are not running:
- Ziurtatu tenporizadorea martxan dagoela AUTO mode (check the display for "AUTO"). Press ESKULIBURUA zikloko moduetara.
- Verify that the current time and day are set correctly.
- Check that the ON/OFF programs are correctly entered and enabled for the desired days.
- Confirm wiring to the load (Terminals 3, 4, 5) is correct.
- Timer resets unexpectedly:
- The internal battery may be low or depleted. Replace the CR2032 battery.
- Ensure stable power supply to the unit.
9. Zehaztapenak
| Ezaugarri | Zehaztapena |
|---|---|
| Eredua | TM919A-2 |
| Elikatze Hornidura | 220V AC (as per model) |
| Energia-kontsumoa | 4.5 VA (MAX) |
| Tenperatura tartea | -20°C eta +50°C artean |
| Bistaratzea | LCDa |
| Switching Contact | 1 aldaketa-etengailu |
| Programak | 16 ON/OFF per day or week |
| Histeresia | 2 sec/day (at 25°C) |
| Edukiera | 16A |
| Tenporizadorearen barrutia | 1 minututik 168 ordura |
| Gutxieneko tartea | 1 minutu |
| Black-out Memory | 60 days (with internal battery) |
| Elementuaren pisua | 0.15 kg (5.3 ontza) |
| Muntaketa | 35 mm-ko DIN erraila |
| Pantailaren tamaina | 1.2 hazbete |
9.1. irudia: Dimensional drawing of the SINOTIMER TM919A-2, showing measurements in centimeters for height, width, and depth.
10. Bermea eta Laguntza
Specific warranty information for the SINOTIMER TM919A-2 is not provided in the product details. For warranty claims or technical support, please contact your retailer or the manufacturer directly. Keep your purchase receipt as proof of purchase.


