1. Sarrera
Thank you for choosing the Rebel RB-0005 Weather Station. This device provides accurate indoor and outdoor temperature readings, indoor humidity, and features a clock, calendar, and alarm function. This manual will guide you through the setup, operation, and maintenance of your new weather station to ensure optimal performance.
2. Segurtasun informazioa
- Ez jarri gailua tenperatura altuen, eguzki-argiaren eraginpean edo hezetasun handiaren eraginpean.
- Saihestu gailua kolpe gogorrak erortzea edo jasaten.
- Mantendu gailua uretatik eta beste likidoetatik urrun.
- Bota ezazu erabilitako bateriak arduraz tokiko araudiaren arabera.
- Ez saiatu gailua zeuk desmuntatzen edo konpontzen. Jarri harremanetan langile kualifikatuekin zerbitzua jasotzeko.
- The outdoor sensor cable should be handled with care to prevent damage.
3. Paketearen edukia
Mesedez, egiaztatu paketearen edukia deskonprimitzean:
- 1x Rebel RB-0005 Weather Station Main Unit
- 1x Wired Outdoor Temperature Sensor
- 1x Erabiltzailearen eskuliburua (dokumentu hau)
Note: 1x AAA battery is required for operation and is not included in the package.
4. Produktuaren ezaugarriak
- Indoor and Outdoor Temperature Measurement
- Indoor Humidity Measurement
- Egutegiaren funtzioa
- Alarma Funtzioa
- 12/24 orduko erlojuaren bistaratzea
- Memory Function for Highest and Lowest Temperature Readings
- Clear and Easy-to-Read LCD Display
- Eramangarritasunerako bateriarekin funtzionatzen du
5. Produktua amaitu daview
Familiarize yourself with the main components of your Rebel RB-0005 Weather Station.
5.1 Aurrealdeko pantaila
The large LCD screen displays various information simultaneously:
- IN Temperature: Current indoor temperature.
- OUT Temperature: Current outdoor temperature from the wired sensor.
- Ordua: Current time in 12-hour (AM/PM) or 24-hour format.
- RH%: Current indoor relative humidity.
- Egutegia: Date display (day, month).
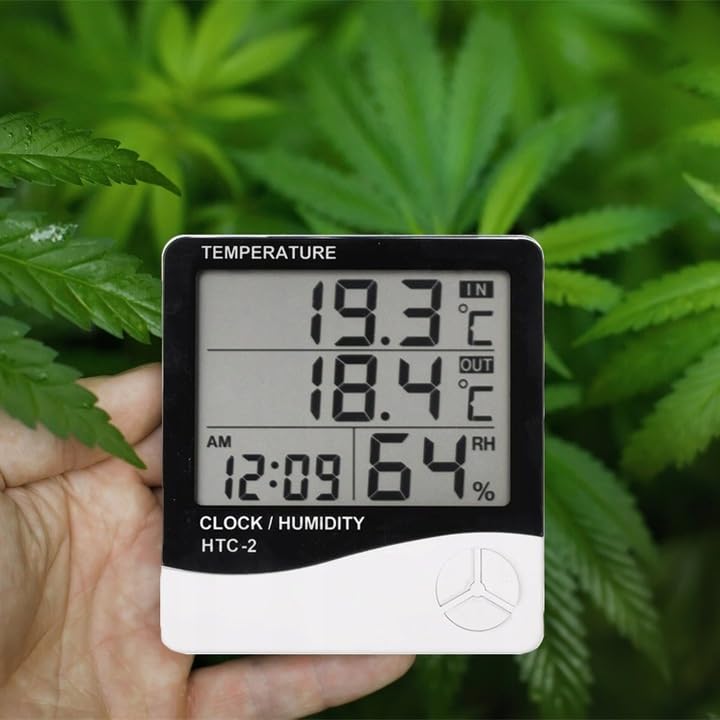
Figure 1: Front display of the weather station showing temperature, time, and humidity readings.

2. irudia: Xehetasuna view of the display and control buttons.
5.2 Kontrol botoiak
The device features three control buttons located on the front, below the display:
- JARRAIBIDEAK: Used to switch between display modes (e.g., time, alarm, calendar) and to enter/exit setting modes.
- ADJ (Adjust): Used to adjust values (e.g., hours, minutes, date) when in setting mode.
- OROIMENA: ohituta view the highest and lowest recorded temperature and humidity values.
5.3 Atzekoa View eta sentsorea
The back of the unit houses the battery compartment, a foldable stand, and the input for the wired outdoor temperature sensor.

3. Irudia: Atzealdea view of the weather station with battery compartment and wired sensor.
6. Konfigurazioa
6.1 Bateriaren instalazioa
- Ireki unitate nagusiaren atzealdean dagoen bateriaren konpartimentuaren estalkia.
- Insert one (1) AAA battery, ensuring the correct polarity (+/-).
- Close the battery compartment cover securely. The device should power on automatically.
6.2 Kanpoko sentsoreen kokapena
- Connect the wired outdoor temperature sensor to the designated port on the back of the main unit.
- Carefully route the sensor cable to the desired outdoor location. Ensure the cable is not pinched or damaged.
- Place the sensor in a shaded area, protected from direct sunlight and precipitation, to ensure accurate readings. Avoid placing it near heat sources or vents.

4. irudia: Adibample placement of the weather station for indoor temperature monitoring.
7. Funtzionamendu-argibideak
7.1 Ordua eta data ezartzea
- Eduki sakatuta MODUA button for approximately 3 seconds until the time display starts flashing.
- Erabili ADJ button to adjust the flashing value (e.g., hours, minutes).
- Sakatu MODUA button again to confirm the setting and move to the next value (e.g., minutes, 12/24 hour format, year, month, day).
- Repeat step 2 and 3 until all time and date settings are configured.
- Sakatu MODUA azken aldiz ezarpen modutik irteteko.
7.2 Alarma ezartzea
- Ordu-pantaila arruntetik, sakatu MODUA button once to enter alarm display mode (usually indicated by an alarm icon).
- Eduki sakatuta MODUA button for approximately 3 seconds until the alarm time starts flashing.
- Erabili ADJ botoia nahi duzun alarmaren ordua ezartzeko.
- Sakatu MODUA button to confirm the hour and move to set the minutes.
- Erabili ADJ botoia nahi duzun alarma minutua ezartzeko.
- Sakatu MODUA botoia sakatu alarma ezartzeko modutik irteteko eta berresteko.
- Alarma aktibatzeko/desaktibatzeko, sakatu ADJ button once while in alarm display mode. An alarm icon will appear/disappear on the display.
7.3 Viewing Min/Max Temperature and Humidity
- From the normal display, press the MEMORIA button once to show the maximum recorded indoor/outdoor temperature and indoor humidity.
- Sakatu MEMORIA button again to show the minimum recorded indoor/outdoor temperature and indoor humidity.
- Sakatu MEMORIA botoia hirugarren aldiz sakatu uneko irakurketetara itzultzeko.
- To clear the min/max memory, press and hold the MEMORIA botoia 3 segundoz gutxi gorabehera bitartean viewing the min/max values.
7.4 Tenperatura unitateak aldatzea (°C/°F)
While in normal display mode, press the ADJ button once to toggle between Celsius (°C) and Fahrenheit (°F) temperature units.
8. Mantentzea
- Garbiketa: Garbitu gailua zapi leun eta lehor batekin. Ez erabili garbitzaile edo disolbatzaile urratzailerik.
- Bateria ordezkatzea: Replace the AAA battery when the display becomes dim or the device stops functioning. Follow the battery installation steps in Section 6.1.
- Sentsoreen zainketa: Ensure the outdoor sensor cable is not damaged. Periodically check the sensor's placement to ensure it remains protected from elements for accurate readings.
9. Arazoak
| Arazoa | Kausa posiblea | Irtenbidea |
|---|---|---|
| Pantailarik ez edo pantaila iluna. | Low or depleted battery. Incorrect battery polarity. | Replace the AAA battery with a new one, ensuring correct polarity. |
| Outdoor temperature reading is incorrect or "---". | Outdoor sensor cable is disconnected or damaged. Sensor is exposed to direct sunlight or heat source. | Check if the sensor cable is securely connected. Ensure the sensor is placed in a shaded, protected area. Inspect the cable for damage. |
| Ordua/data okerra da. | Time/Date not set correctly after battery installation. | Refer to Section 7.1 "Setting Time and Date" to adjust. |
| Alarmak ez du jotzen. | Alarm is not activated. Alarm volume is too low (if adjustable, though this model likely isn't). | Ensure the alarm icon is displayed, indicating it is active (refer to Section 7.2). |
10. Zehaztapenak
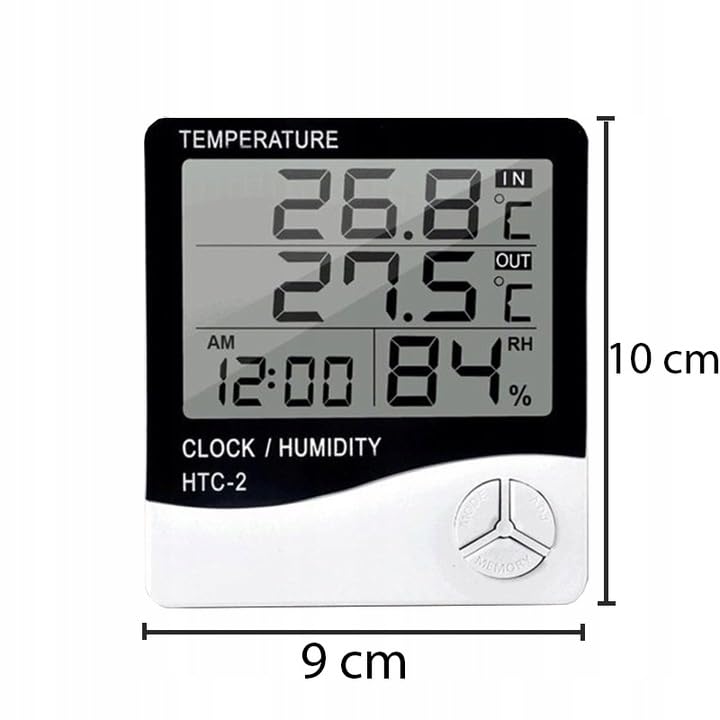
Figure 5: Approximate dimensions of the weather station.
- Eredua: RB-0005
- Marka: Matxinada
- Energia iturria: 1x AAA bateria (ez dago barne)
- Materiala: Plastikoa
- Ezaugarri bereziak: Alarm, Calendar, Min/Max Memory
- Paketearen neurriak: 18 x 12 x 10 cm
- Produktuaren neurriak (gutxi gorabehera): 9 cm (Zabalera) x 10 cm (Altuera)
- Lehenengo data eskuragarri: 23ko azaroaren 2020a
11. Bermea eta Laguntza
This product is covered by a standard manufacturer's warranty. For specific warranty terms and conditions, please refer to the documentation provided at the time of purchase or contact your retailer.
For technical support or inquiries, please contact the Rebel customer service department through their official webgunea edo zure dendariak emandako harremanetarako informazioa.