1. Sarrera
The Topping PRE90 is a high-performance preamplifier designed for audio enthusiasts. It features ultra-high NFCA modules, offering exceptional sound quality with balanced XLR and RCA outputs. This manual provides detailed instructions for setup, operation, and maintenance of your PRE90 preampbiziagoa.
2. Paketearen edukia
Despaketatzean, egiaztatu behean zerrendatutako elementu guztiak daudela eta egoera onean daudela:
- Topping PRE90 Preamplifier Unitatea
- Urruneko Kontrola
- AC energia kablea
- Erabiltzailearen eskuliburua (dokumentu hau)
- Berme Txartela

Image: The Topping PRE90 preamplifier unit, remote control, AC power cable, user manual, and warranty card are shown. The unit dimensions are approximately 22.2cm (width) x 16.0cm (depth) x 4.5cm (height).
3. Produktua amaitu daview
3.1 Aurreko panela

Irudia: Aurrealdea view of the Topping PRE90 preamplifier. It features a display showing input and output status, a multi-function knob on the right, and an input/select button on the left.
The front panel includes a display screen, a multi-function knob for volume control and menu navigation, and an input selection button.
3.2 Rear Panel - Inputs

Irudia: Atzealdea view of the Topping PRE90 preamplifier showing input connections. It includes an "EXT" port for expansion, and "INPUT" section with balanced XLR and single-ended RCA input jacks.
The PRE90 supports both balanced and single-ended signal processing. It features an EXT port for connecting an EXT90 input expansion module, and standard XLR and RCA input jacks.
3.3 Rear Panel - Outputs
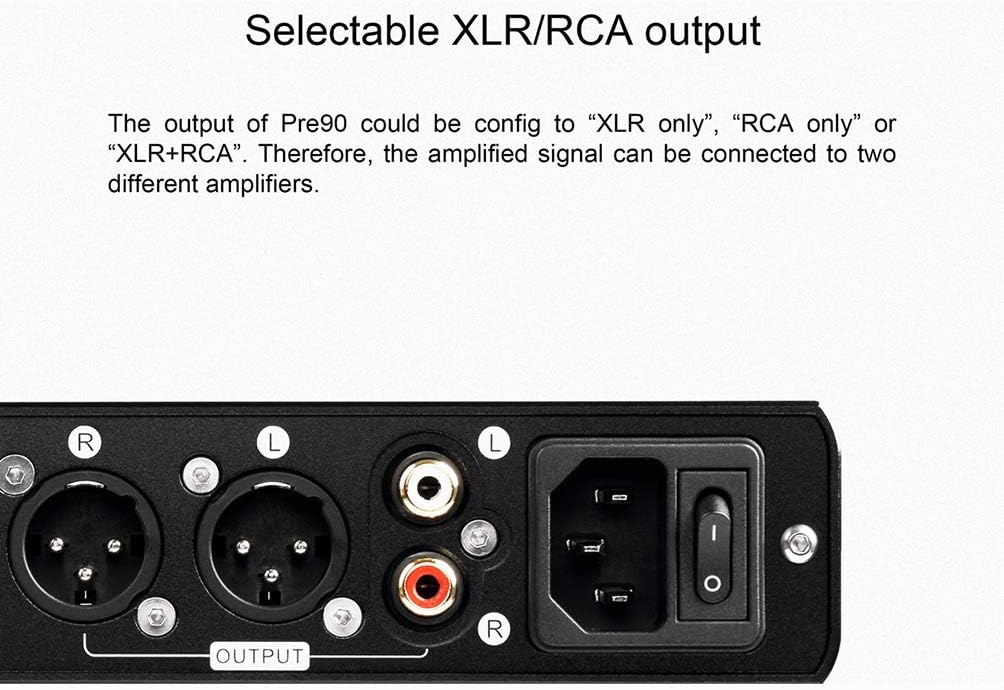
Irudia: Atzealdea view of the Topping PRE90 preamplifier showing output connections. It includes balanced XLR and single-ended RCA output jacks, along with the AC power inlet and power switch.
The PRE90 offers selectable XLR and RCA outputs. The amplified signal can be routed to one or two different amplifiers simultaneously (e.g., "XLR only", "RCA only", or "XLR+RCA").
4. Konfigurazioa
- Potentzia-konexioa: Connect the supplied AC power cable to the PRE90's power inlet and then to a suitable power outlet. Ensure the power switch on the rear panel is in the OFF position before connecting.
- Sarrerako konexioak:
- For balanced sources (e.g., Topping D90se, D90), use XLR cables to connect to the XLR input jacks.
- For single-ended sources, use RCA cables to connect to the RCA input jacks.
- If using the Topping EXT90 input expansion module, connect it to the "EXT" port.
- Irteerako konexioak:
- Connect the PRE90's XLR outputs to your power amplifier's XLR inputs for balanced signal transmission.
- Connect the PRE90's RCA outputs to your power amplifier's RCA inputs for single-ended signal transmission.
- The PRE90 can output simultaneously via XLR and RCA, allowing connection to two separate amplifiers or a subwoofer.
- Hasierako piztea: After all connections are secure, switch the power button on the rear panel to the ON position. The unit will power on and display its status.
5. Funtzionamendu-argibideak
5.1 Oinarrizko funtzionamendua
- Piztu/Itzali: Use the power switch on the rear panel.
- Sarrera hautatzea: Press the "O/SEL" button on the front panel or the corresponding button on the remote control to cycle through available inputs.
- Bolumen kontrola: Rotate the multi-function knob on the front panel or use the volume buttons on the remote control to adjust the output volume.
5.2 Safe Volume Feature

Image: The Topping PRE90 preamplifier display showing "Safe Mode On: -20dB" and "OK to restore: +0dB". This indicates the safe volume feature is active.
The Safe Volume feature protects your equipment and hearing by automatically reducing the output volume if the saved volume for a target input or output exceeds a preset safe level. This function can be enabled or disabled in the unit's settings.
5.3 Irteeraren konfigurazioa
The PRE90 allows configuration of its output mode:
- XLR Only: Audio signal is sent only through the balanced XLR outputs.
- RCA Only: Audio signal is sent only through the single-ended RCA outputs.
- XLR + RCA: Audio signal is sent simultaneously through both XLR and RCA outputs. This is useful for connecting to two separate amplifiers or an amplifier and a subwoofer.
Refer to the user manual for detailed instructions on how to access and change these settings.
5.4 Advanced Features (NFCA Modules)

Image: An internal circuit board of the Topping PRE90, highlighting the NFCA (Nested Feedback Composite Amplifier) modules. These modules contribute to the unit's high dynamic range and low noise floor.
The PRE90 incorporates advanced NFCA (Nested Feedback Composite Amplifier) modules, similar to those found in flagship Topping products. This technology, combined with Ultra High Gain Feedback (UHGF), ensures excellent DC and AC performance, ultra-low noise, and a high dynamic range for a clean audio signal.
6. Mantentzea
- Garbiketa: Erabili zapi leun eta lehor bat unitatea garbitzeko. Saihestu garbitzaile edo disolbatzaile urratzaileak.
- Aireztapena: Ziurtatu aireztapen egokia dagoela unitatearen inguruan gehiegi berotzea saihesteko. Ez blokeatu aireztapen-irekidurak.
- Itzali: Always power off the unit and disconnect it from the power outlet before performing any cleaning or maintenance.
7. Arazoak
| Arazoa | Kausa posiblea | Irtenbidea |
|---|---|---|
| Botererik ez | Power cable not connected; Power switch off; Power outlet malfunction. | Check power cable connection; Ensure power switch is ON; Test power outlet with another device. |
| Ez dago soinu irteerarik | Incorrect input selected; Output cables not connected; Volume too low; Amplifier off. | Select correct input; Check output cable connections; Increase volume; Ensure connected amplifier piztuta dago. |
| Urruneko kontrolak ez du erantzuten | Line of sight blocked; Batteries low/dead; Remote too far or misaligned. | Ensure clear line of sight to the unit's IR receiver; Replace remote batteries; Aim directly at the unit from a closer distance. |
| Soinu distortsionatua | Input signal too strong; Faulty cables; Connected equipment malfunction. | Reduce input signal level; Check and replace cables; Test with different source/ampbiziagoa. |
8. Zehaztapenak

Image: A detailed table outlining the technical parameters of the Topping PRE90 preamplifier, including THD+N, SNR, Dynamic Range, Frequency Response, Output Level, Noise Level, Channel Crosstalk, Channel Balance, IMD, Input Sensitivity, Volume Range, Output Impedance, and Output DC Configuration for various input/output modes (SE/SE, BAL IN/SE OUT, SE IN/BAL OUT, BAL IN/BAL OUT).
Key specifications for the Topping PRE90 Preamplifier are provided in the table above. For general information:
- Eredua: PRE90
- Fabrikatzailea: GAUZA
- Paketearen neurriak: 15.24 x 11.38 x 4.02 hazbete
- Elementuaren pisua: 0.634 ontza
- Lehenengo eskuragarri: 8ko abenduaren 2020a
9. Bermea eta Laguntza
The Topping PRE90 Preamplifier comes with a warranty period. Please refer to the included warranty card for specific terms and conditions. Generally, a one-year free repair period is provided, which may vary by brand and region.
For any questions, technical assistance, or support inquiries, please contact the AOSHIDA Audio after-sales team. They offer 24-hour online service and a 30-day return policy.
Harremanetarako informazioa: Refer to your purchase documentation or the AOSHIDA Audio webwebgunean laguntza-harremanetarako azken datuak lortzeko.


